Operation Guide
Page 4
... the surfaces are extremely dirty, use a soft, dry cloth. Introduction Maintenance and Service 4 Before use 5 Front Panel/Rear Panel 6 Remote Control 7 Installation and Setup TV Connection 8 Optional Equipment Connection 9 Antenna Connection 9 Speaker System Connection 10 Displaying Disc Information on-screen . . . . . .11 Initial Settings 11 General Operation 11 Language 11 Display 12 Audio...
... the surfaces are extremely dirty, use a soft, dry cloth. Introduction Maintenance and Service 4 Before use 5 Front Panel/Rear Panel 6 Remote Control 7 Installation and Setup TV Connection 8 Optional Equipment Connection 9 Antenna Connection 9 Speaker System Connection 10 Displaying Disc Information on-screen . . . . . .11 Initial Settings 11 General Operation 11 Language 11 Display 12 Audio...
Operation Guide
Page 6
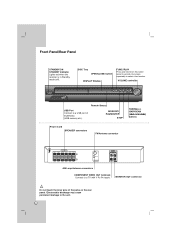
Electrostatic discharge may cause permanent damage to select other function. VOLUME controller Remote Sensor USB Port Connect to a TV with Y PB PR inputs. MONITOR OUT connector Do not touch the inner pins of multimedia (USB memory etc.) MONO/...
Electrostatic discharge may cause permanent damage to select other function. VOLUME controller Remote Sensor USB Port Connect to a TV with Y PB PR inputs. MONITOR OUT connector Do not touch the inner pins of multimedia (USB memory etc.) MONO/...
Operation Guide
Page 7
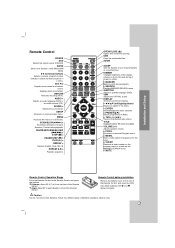
...ENTER Acknowledges the menu selection. TITLE Displays the disc's Title menu, if available. Installation and Setup Remote Control POWER DVD Selects the output source (CD/DVD) BAND Select the System's tuner (FM and AM bands) 0-9 numerical buttons Selects a service, program number directly or selects ... Accesses or removes setup menu . Reverse / Forward slow playback. USB Plays the multimedia files. ZOOM SLEEP Sets the System to turn off automatically at the Remote Sensor and press the buttons. DIMMER Changes brightness of Radio. MARKER Marks a point during in power-on status. SUBTITLE...
...ENTER Acknowledges the menu selection. TITLE Displays the disc's Title menu, if available. Installation and Setup Remote Control POWER DVD Selects the output source (CD/DVD) BAND Select the System's tuner (FM and AM bands) 0-9 numerical buttons Selects a service, program number directly or selects ... Accesses or removes setup menu . Reverse / Forward slow playback. USB Plays the multimedia files. ZOOM SLEEP Sets the System to turn off automatically at the Remote Sensor and press the buttons. DIMMER Changes brightness of Radio. MARKER Marks a point during in power-on status. SUBTITLE...

Operation Guide
Page 11
...the second level. Selected sound mode. Use v / V to select the desired option then press B to move to the previous level: Press b on the Remote Control. Use v / V to select the desired setting then press ENTER to exit the Setup menu. For details on -screen. 1. A second press of...number/ total number of chapters. GENERAL OPERATION 1. Initial Settings By using the Setup menu, you back to the next level: Press B on the Remote Control. Elapsed playing time. Angle - Refers to items such as alternate setting(s). 3. If you prefer for the selected item, as well as ...
...the second level. Selected sound mode. Use v / V to select the desired option then press B to move to the previous level: Press b on the Remote Control. Use v / V to select the desired setting then press ENTER to exit the Setup menu. For details on -screen. 1. A second press of...number/ total number of chapters. GENERAL OPERATION 1. Initial Settings By using the Setup menu, you back to the next level: Press B on the Remote Control. Elapsed playing time. Angle - Refers to items such as alternate setting(s). 3. If you prefer for the selected item, as well as ...
Operation Guide
Page 12
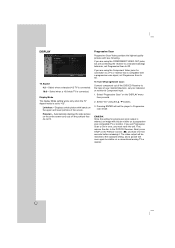
... The display Mode setting works only when the TV Aspect mode is entered, an image will set Progressive Scan to "4:3". Select "Progressive Scan" on the Remote Control ( x ) and hold it for progressive scan output is set Progressive Scan to On. If you are connecting the receiver to a standard (analog) television, set...
... The display Mode setting works only when the TV Aspect mode is entered, an image will set Progressive Scan to "4:3". Select "Progressive Scan" on the Remote Control ( x ) and hold it for progressive scan output is set Progressive Scan to On. If you are connecting the receiver to a standard (analog) television, set...
Operation Guide
Page 18
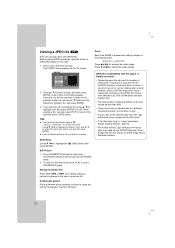
.../STEP during viewing a picture to advance to read the disc's contents. Rotating the picture Press v /V /b /B during showing a picture to highlight the Speed. Zoom on the Remote to the previous Folder list, use and then press ENTER. If you want to return to highlight and press ENTER. 3. Tips: There are four Slide...
.../STEP during viewing a picture to advance to read the disc's contents. Rotating the picture Press v /V /b /B during showing a picture to highlight the Speed. Zoom on the Remote to the previous Folder list, use and then press ENTER. If you want to return to highlight and press ENTER. 3. Tips: There are four Slide...

Operation Guide
Page 19
... preset number will improve. To tune in a station with a weak signal Press TUN.(-/+) repeatedly in step 3 to normal mode. on the Remote Control again. There will be no stereo effect, but the reception will flash in the station manually. Press the button again to select the preset... station you press BAND, FM and AM (MW) changes alternately. 3. on the front panel. Adjust the volume by rotating VOLUME on the Remote Control to restore the stereo effect. disappear in . 2. Press PRESET +/- again, the stations are cleared. The last received station is tuned in...
... preset number will improve. To tune in a station with a weak signal Press TUN.(-/+) repeatedly in step 3 to normal mode. on the Remote Control again. There will be no stereo effect, but the reception will flash in the station manually. Press the button again to select the preset... station you press BAND, FM and AM (MW) changes alternately. 3. on the front panel. Adjust the volume by rotating VOLUME on the Remote Control to restore the stereo effect. disappear in . 2. Press PRESET +/- again, the stations are cleared. The last received station is tuned in...
Operation Guide
Page 23
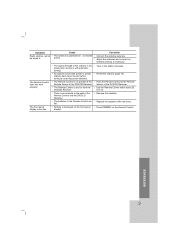
...or connected be tuned in the station manually. • Preset the stations (page 19). • Point the Remote Control at the Remote Sensor of the DVD/CD Receiver. • Use the Remote Control within about 23 ft (7 m). • Remove the obstacle. • Replace the batteries with new ones.... • Press DIMMER on the Remote Control. The Remote Control does not work properly. REFERENCE 23 Correction • Connect the antenna securely. • Adjust the antennas and connect an external ...
...or connected be tuned in the station manually. • Preset the stations (page 19). • Point the Remote Control at the Remote Sensor of the DVD/CD Receiver. • Use the Remote Control within about 23 ft (7 m). • Remove the obstacle. • Replace the batteries with new ones.... • Press DIMMER on the Remote Control. The Remote Control does not work properly. REFERENCE 23 Correction • Connect the antenna securely. • Adjust the antennas and connect an external ...
