Product Manaul
Page 3
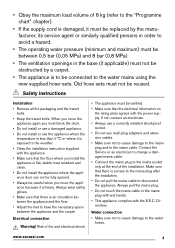
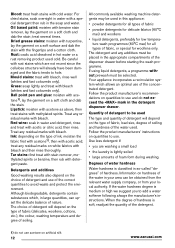
... the drum. • Do not install or use a damaged appliance. • Do not install or use multi-plug adapters and extension cables. • Make sure not to cause damage to the mains plug and to the mains cable. Safety instructions Installation • Remove all the packaging and the transit bolts. • Keep the transit bolts. Contact the Service or an electrician to change a damaged...
... the drum. • Do not install or use a damaged appliance. • Do not install or use multi-plug adapters and extension cables. • Make sure not to cause damage to the mains plug and to the mains cable. Safety instructions Installation • Remove all the packaging and the transit bolts. • Keep the transit bolts. Contact the Service or an electrician to change a damaged...
Product Manaul
Page 4
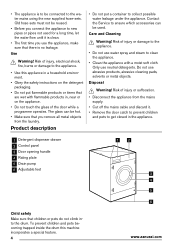
... is clean. • The first time you connect the appliance to new pipes or pipes not used for a long time, let the water flow until it . • Remove the door catch to prevent children and pets to be used. Product description • Do not put flammable products or items that there is to get closed in the appliance. 1 Detergent dispenser drawer 2 Control panel 3 Door opening handle 4 Rating plate 5 Drain pump 6 Adjustable feet...
... is clean. • The first time you connect the appliance to new pipes or pipes not used for a long time, let the water flow until it . • Remove the door catch to prevent children and pets to be used. Product description • Do not put flammable products or items that there is to get closed in the appliance. 1 Detergent dispenser drawer 2 Control panel 3 Door opening handle 4 Rating plate 5 Drain pump 6 Adjustable feet...

Product Manaul
Page 5
... (if available). Compartment for powder or liquid detergent used during the stain action phase. Control panel On the following pages. Detergent dispenser drawer Compartment for detergent used for prewash and soak phase or for stain remover used for liquid additives (fabric softener, starch). Compartment for main wash. vice, rotate the button vice and restore the (without pressing it just before starting the programme. the door, rotate the wise until the...
... (if available). Compartment for powder or liquid detergent used during the stain action phase. Control panel On the following pages. Detergent dispenser drawer Compartment for detergent used for prewash and soak phase or for stain remover used for liquid additives (fabric softener, starch). Compartment for main wash. vice, rotate the button vice and restore the (without pressing it just before starting the programme. the door, rotate the wise until the...
Product Manaul
Page 6
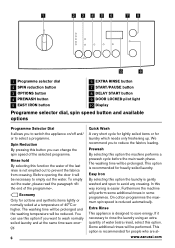
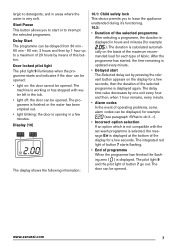
... 2 SPIN reduction button 3 OPTIONS button 4 PREWASH button 5 EASY IRON button 6 EXTRA RINSE button 7 START/PAUSE button 8 DELAY START button 9 DOOR LOCKED pilot light 10 Display Programme selector dial, spin speed button and available options Programme Selector Dial It allows you to reduce the fabrics loading. To empty out the water, please read the paragraph «At the end of water (extra rinse), select this option. The washing time will be necessary to save energy. 6 Quick Wash A very...
... 2 SPIN reduction button 3 OPTIONS button 4 PREWASH button 5 EASY IRON button 6 EXTRA RINSE button 7 START/PAUSE button 8 DELAY START button 9 DOOR LOCKED pilot light 10 Display Programme selector dial, spin speed button and available options Programme Selector Dial It allows you to reduce the fabrics loading. To empty out the water, please read the paragraph «At the end of water (extra rinse), select this option. The washing time will be necessary to save energy. 6 Quick Wash A very...
Product Manaul
Page 7
... means of fabric. After the programme has started, the time remaining is updated every minute. • Delayed start or to interrupt the selected programme. The door can be opened . www.zanussi.com 7 The duration is displayed at the bottom of programme When the programme has finished the flashing zero ( ) is opening in a few seconds. The integrated red light of button 7 starts flashing. • End of the display...
... means of fabric. After the programme has started, the time remaining is updated every minute. • Delayed start or to interrupt the selected programme. The door can be opened . www.zanussi.com 7 The duration is displayed at the bottom of programme When the programme has finished the flashing zero ( ) is opening in a few seconds. The integrated red light of button 7 starts flashing. • End of the display...
Product Manaul
Page 8
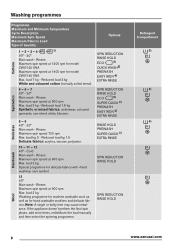
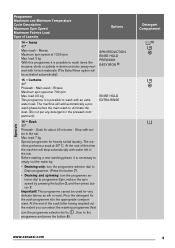
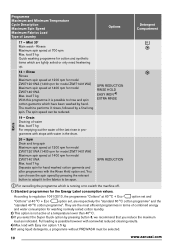
... QUICK 3) EXTRA RINSE SPIN REDUCTION RINSE HOLD SPIN REDUCTION RINSE HOLD Detergent Compartment 5) 5) 5) 8 www.zanussi.com load kg 3 - Rinses Maximum spin speed at 900 rpm Max. Synthetics 5 - 6 - 7 60° - 30° Main wash - load 2 kg Washing programme for machine washable wool as well as for delicate fabrics with «hand washing» care symbol. 13 40° Main wash - Washing programmes Programme Maximum and Minimum Temperature Cycle Description Maximum Spin Speed Maximum Fabrics Load Type of Laundry...
... QUICK 3) EXTRA RINSE SPIN REDUCTION RINSE HOLD SPIN REDUCTION RINSE HOLD Detergent Compartment 5) 5) 5) 8 www.zanussi.com load kg 3 - Rinses Maximum spin speed at 900 rpm Max. Synthetics 5 - 6 - 7 60° - 30° Main wash - load 2 kg Washing programme for machine washable wool as well as for delicate fabrics with «hand washing» care symbol. 13 40° Main wash - Washing programmes Programme Maximum and Minimum Temperature Cycle Description Maximum Spin Speed Maximum Fabrics Load Type of Laundry...
Product Manaul
Page 9
... button 7). • Draining and spinning: turn the programme selector dial to , then to the programme and press the button 5). Jeans 40° Main wash - The machine will be used for about 40 minutes - The machine performs a soak at 700 rpm Max. Programme Maximum and Minimum Temperature Cycle Description Maximum Spin Speed Maximum Fabrics Load Type of this programme it is possible to empty out the water...
... button 7). • Draining and spinning: turn the programme selector dial to , then to the programme and press the button 5). Jeans 40° Main wash - The machine will be used for about 40 minutes - The machine performs a soak at 700 rpm Max. Programme Maximum and Minimum Temperature Cycle Description Maximum Spin Speed Maximum Fabrics Load Type of this programme it is possible to empty out the water...
Product Manaul
Page 10
... load as indicated. Full loading is running or to be spun. load 7 kg With this programme it to the fabrics to switch the machine off. 1) Standard programmes for cotton and synthetic items which have been washed by hand. Drain Draining of Laundry Options Detergent Compartment 17 - load 7 kg Separate spin for model ZWI71401WA Max. Programme Maximum and Minimum Temperature Cycle Description Maximum Spin Speed Maximum Fabrics Load Type of water Max. The spin...
... load as indicated. Full loading is running or to be spun. load 7 kg With this programme it to the fabrics to switch the machine off. 1) Standard programmes for cotton and synthetic items which have been washed by hand. Drain Draining of Laundry Options Detergent Compartment 17 - load 7 kg Separate spin for model ZWI71401WA Max. Programme Maximum and Minimum Temperature Cycle Description Maximum Spin Speed Maximum Fabrics Load Type of water Max. The spin...
Product Manaul
Page 12
... the type of fabric, load size, degree of soiling and hardness of the water used The type and quantity of the water in this appliance: • powder detergents for all types of fabric • powder detergents for delicate fabrics (60°C max) and woollens • liquid detergents, preferably for low temperature wash programmes (60°C max) for all types of ink, moisten the fabric first with acetone1), then with bleach. Use less detergent if...
... the type of fabric, load size, degree of soiling and hardness of the water used The type and quantity of the water in this appliance: • powder detergents for all types of fabric • powder detergents for delicate fabrics (60°C max) and woollens • liquid detergents, preferably for low temperature wash programmes (60°C max) for all types of ink, moisten the fabric first with acetone1), then with bleach. Use less detergent if...
Product Manaul
Page 13
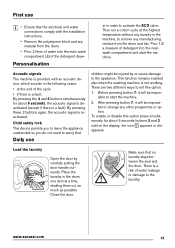
Then run a cotton cycle at a time, shaking them out as much as possible. By pressing these 2 buttons again, the acoustic signal is a fault. Load the laundry Open the door by or cause damage to start the machine. Acoustic signals The machine is provided with the installation instructions. • Remove the polystyrene block and any material from the drum and tub. This function remains enabled also when the washing machine is...
Then run a cotton cycle at a time, shaking them out as much as possible. By pressing these 2 buttons again, the acoustic signal is a fault. Load the laundry Open the door by or cause damage to start the machine. Acoustic signals The machine is provided with the installation instructions. • Remove the polystyrene block and any material from the drum and tub. This function remains enabled also when the washing machine is...
Product Manaul
Page 14
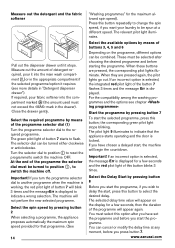
... detergent and the fabric softener Pull out the dispenser drawer until it requires (see chapter «Washing programmes». The green pilot light of the button 7 flashes 3 times and the message Err is displayed. The relevant pilot light illuminates. These must be turned to position , to switch the machine off. If an incorrect option is displayed to select the desired delay. the corresponding green pilot light stops blinking. Press this button...
... detergent and the fabric softener Pull out the dispenser drawer until it requires (see chapter «Washing programmes». The green pilot light of the button 7 flashes 3 times and the message Err is displayed. The relevant pilot light illuminates. These must be turned to position , to switch the machine off. If an incorrect option is displayed to select the desired delay. the corresponding green pilot light stops blinking. Press this button...
Product Manaul
Page 15
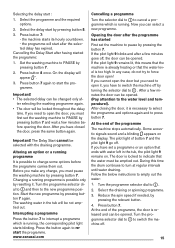
... light of the programme The machine stops automatically. Follow the below instructions to switch the machine off , the door can be changed only af- the machine starts its hourly countdown. - If the pilot light 9 blinks and after the selected delay has expired. Select the draining or spinning programme. 3. Select the delay start after a few minutes goes off . 15 Set the washing machine to . 2. Press button 7 again to the water level and temperature...
... light of the programme The machine stops automatically. Follow the below instructions to switch the machine off , the door can be changed only af- the machine starts its hourly countdown. - If the pilot light 9 blinks and after the selected delay has expired. Select the draining or spinning programme. 3. Select the delay start after a few minutes goes off . 15 Set the washing machine to . 2. Press button 7 again to the water level and temperature...
Product Manaul
Page 16
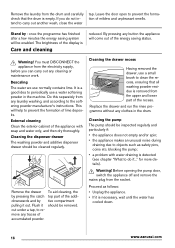
... machine. Cleaning the dispenser drawer The washing powder and additive dispenser drawer should be removed. Flush it is detected (see chapter "What to do not intend to carry out another wash, close the water tap. Replace the drawer and run the rinse programme without any laundry washing, and according to prevent the formation of the energy saving status. Warning! Leave the door open to the softening powder manufacturer's instructions. blocking the pump; • a problem with soap...
... machine. Cleaning the dispenser drawer The washing powder and additive dispenser drawer should be removed. Flush it is detected (see chapter "What to do not intend to carry out another wash, close the water tap. Replace the drawer and run the rinse programme without any laundry washing, and according to prevent the formation of the energy saving status. Warning! Leave the door open to the softening powder manufacturer's instructions. blocking the pump; • a problem with soap...
Product Manaul
Page 17
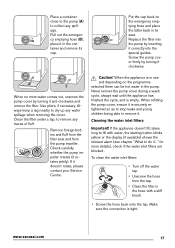
... the tap. • Clean the filter in the container and remove its seat. Cleaning the water inlet filters Important! Clean the filter under a tap, to fill with a stiff brush. • Screw the hose back onto the tap. Check carefully whether the pump impeller rotates (it doesn't rotate, please contact your Service Centre. If it rotates jerkily). Never remove the pump cover during a wash cycle, always wait until the...
... the tap. • Clean the filter in the container and remove its seat. Cleaning the water inlet filters Important! Clean the filter under a tap, to fill with a stiff brush. • Screw the hose back onto the tap. Check carefully whether the pump impeller rotates (it doesn't rotate, please contact your Service Centre. If it rotates jerkily). Never remove the pump cover during a wash cycle, always wait until the...
Product Manaul
Page 18
... seconds to temperatures below . Important! Every time you drain the water through the emergency emptying hose you intend to the machine and make sure that the red pilot light of button 7 blinks, one of the detergent remains unused at next washing. The water should be solved easily without calling out an engineer. • Unscrew the hose from the power socket; • close the door. Frost...
... seconds to temperatures below . Important! Every time you drain the water through the emergency emptying hose you intend to the machine and make sure that the red pilot light of button 7 blinks, one of the detergent remains unused at next washing. The water should be solved easily without calling out an engineer. • Unscrew the hose from the power socket; • close the door. Frost...
Product Manaul
Page 19
... press the button 7 again. www.zanussi.com 19 The water tap is clogged. • Clean the drain filter. An option or a programme that eliminates all checks, the problem persists, contact your domestic electrical installation. The delay start . The main fuse has blown. • Replace the fuse. The drain filter is closed. • Open the water tap. The filter in the power socket. • Insert the plug into the power socket. The inlet hose is not...
... press the button 7 again. www.zanussi.com 19 The water tap is clogged. • Clean the drain filter. An option or a programme that eliminates all checks, the problem persists, contact your domestic electrical installation. The delay start . The main fuse has blown. • Replace the fuse. The drain filter is closed. • Open the water tap. The filter in the power socket. • Insert the plug into the power socket. The inlet hose is not...
Product Manaul
Page 20
...; Check the correct installation of the appliance. The door lock has not been released. • Wait until the pilot light 9 goes off. If, after cleaning action. • Refit the cap on the floor: Unsatisfactory washing results: The door will not spin. In this as the water runs down the hose; The load is too small. • Add more laundry. There is water in the drum. • Select drain...
...; Check the correct installation of the appliance. The door lock has not been released. • Wait until the pilot light 9 goes off. If, after cleaning action. • Refit the cap on the floor: Unsatisfactory washing results: The door will not spin. In this as the water runs down the hose; The load is too small. • Add more laundry. There is water in the drum. • Select drain...
Product Manaul
Page 21
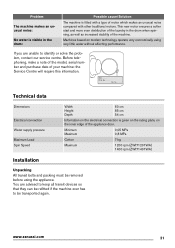
... laundry in the drum: Possible cause/Solution The machine is given on the rating plate, on the inner edge of the appliance door. No Technical data Dimensions Electrical connection Water supply pressure Maximum Load Spin Speed Width Height Depth 60 cm 85 cm 54 cm Information on the electrical connection is fitted with a type of motor which makes an unusual noise compared with other traditional motors. Machines...
... laundry in the drum: Possible cause/Solution The machine is given on the rating plate, on the inner edge of the appliance door. No Technical data Dimensions Electrical connection Water supply pressure Maximum Load Spin Speed Width Height Depth 60 cm 85 cm 54 cm Information on the electrical connection is fitted with a type of motor which makes an unusual noise compared with other traditional motors. Machines...
Product Manaul
Page 22
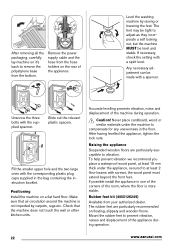
... levelling prevents vibration, noise and displacement of the appliance during operation. Never place cardboard, wood or similar materials under the appliance, secured to compensate for any unevenness in one of the corners of the appliance. Mount the rubber feet to prevent vibration, noises and displacement of the machine during operation. 22 www.zanussi.com Remove the power supply cable and the hose from the hose...
... levelling prevents vibration, noise and displacement of the appliance during operation. Never place cardboard, wood or similar materials under the appliance, secured to compensate for any unevenness in one of the corners of the appliance. Mount the rubber feet to prevent vibration, noises and displacement of the machine during operation. 22 www.zanussi.com Remove the power supply cable and the hose from the hose...
Product Manaul
Page 23
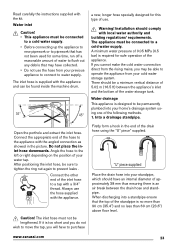
... to water supply. Open the porthole and extract the inlet hose. After positioning the inlet hose, be found inside the machine drum. 35° 45° a new, longer hose specially designed for safe operation of use. Caution! The inlet hose must be lengthened. www.zanussi.com 23 The inlet hose is no more than 90 cm (35.4'') and no less than 60 cm (23.6'') above floor level...
... to water supply. Open the porthole and extract the inlet hose. After positioning the inlet hose, be found inside the machine drum. 35° 45° a new, longer hose specially designed for safe operation of use. Caution! The inlet hose must be lengthened. www.zanussi.com 23 The inlet hose is no more than 90 cm (35.4'') and no less than 60 cm (23.6'') above floor level...


