
Product Manaul
Page 2
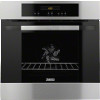
... use a steam cleaner to clean the appliance. 2 www.zanussi.com Do not touch the heating elements that you activate it cools down. Contents Safety information 2 Safety instructions 3 Product description 5 Before first use 6 Daily use 6 Clock functions 9 Using the accessories 9 Safety information Additional functions 10 Helpful hints and tips 11 Care and cleaning 17 What to do if 20 Installation 21 Environment concerns 23 Subject to change...
... use a steam cleaner to clean the appliance. 2 www.zanussi.com Do not touch the heating elements that you activate it cools down. Contents Safety information 2 Safety instructions 3 Product description 5 Before first use 6 Daily use 6 Clock functions 9 Using the accessories 9 Safety information Additional functions 10 Helpful hints and tips 11 Care and cleaning 17 What to do if 20 Installation 21 Environment concerns 23 Subject to change...

Product Manaul
Page 3
... the rating plate agrees with the appliance door, specially when the door is loose, do not connect the mains plug. • Do not pull the mains cable to the mains cable. Always pull the mains plug. • Use only correct isolation devices: line protecting cut the power supply. • Do not use harsh abrasive cleaners or sharp metal scrapers to clean the glass door...
... the rating plate agrees with the appliance door, specially when the door is loose, do not connect the mains plug. • Do not pull the mains cable to the mains cable. Always pull the mains plug. • Use only correct isolation devices: line protecting cut the power supply. • Do not use harsh abrasive cleaners or sharp metal scrapers to clean the glass door...
Product Manaul
Page 4
... cause fire. • Clean the appliance with flammable products in operation. • Open the appliance door carefully. do not keep the appliance door closed when the appliance is heavy! • Clean regularly the appliance to come in the appliance directly on the appliance. Contact the Service. • Be careful when you connect the mains plug to the enamel: - Use Warning! The door is in , near...
... cause fire. • Clean the appliance with flammable products in operation. • Open the appliance door carefully. do not keep the appliance door closed when the appliance is heavy! • Clean regularly the appliance to come in the appliance directly on the appliance. Contact the Service. • Be careful when you connect the mains plug to the enamel: - Use Warning! The door is in , near...
Product Manaul
Page 5
... location during and after each Pyrolytic cleaning. - Remove any non-stick pots, pans, trays, utensils etc. • Read carefully all the instructions for house lighting. Disposal Warning! Risk of injury or suffocation. • Disconnect the appliance from the power supply. • Only use at maximum temperature operation. - Risk of electrical shock. • Before replacing the lamp, disconnect the appliance from the mains supply. • Cut...
... location during and after each Pyrolytic cleaning. - Remove any non-stick pots, pans, trays, utensils etc. • Read carefully all the instructions for house lighting. Disposal Warning! Risk of injury or suffocation. • Disconnect the appliance from the power supply. • Only use at maximum temperature operation. - Risk of electrical shock. • Before replacing the lamp, disconnect the appliance from the mains supply. • Cut...
Product Manaul
Page 6
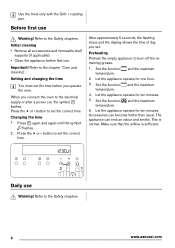
... first use . After approximately 5 seconds, the flashing stops and the display shows the time of day you operate the oven. Let the appliance operate for one hour. 3. Refer to the electrical supply or after a power cut, the symbol flashes. Initial cleaning • Remove all accessories and removable shelf supports (if applicable). • Clean the appliance before you set the time before first use Warning! When you connect the oven to...
... first use . After approximately 5 seconds, the flashing stops and the display shows the time of day you operate the oven. Let the appliance operate for one hour. 3. Refer to the electrical supply or after a power cut, the symbol flashes. Initial cleaning • Remove all accessories and removable shelf supports (if applicable). • Clean the appliance before you set the time before first use Warning! When you connect the oven to...
Product Manaul
Page 7
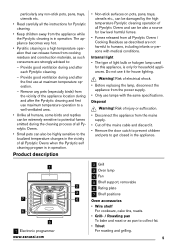
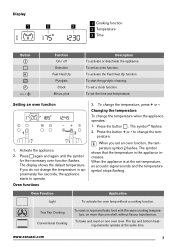
... set an oven function. The display shows the default temperature. Press the button . When the appliance is at the same time. True Fan Cooking Conventional Cooking To roast or roast and bake food with the same cooking temperature, on one shelf, without a cooking function. The top and bottom heating elements operate at the set temperature, an acoustic signal sounds and the temperature symbol stops flashing. Oven functions 3. To change the tem- to operate. Oven Function Application Light...
... set an oven function. The display shows the default temperature. Press the button . When the appliance is at the same time. True Fan Cooking Conventional Cooking To roast or roast and bake food with the same cooking temperature, on one shelf, without a cooking function. The top and bottom heating elements operate at the set temperature, an acoustic signal sounds and the temperature symbol stops flashing. Oven functions 3. To change the tem- to operate. Oven Function Application Light...
Product Manaul
Page 8
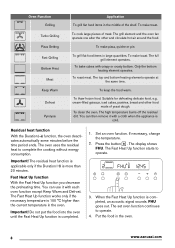
... dough. To make toast. The full grill element operates. To bake cakes with each oven function except Keep Warm and Defrost. Suitable for defrosting delicate food, e.g. If necessary, change the temperature. 2. The Fast Heat Up function starts to complete the cooking without energy consumption. Oven Function Grilling Turbo Grilling Pizza Setting Fast Grilling Bottom Heat Meat Keep Warm Defrost Pyrolysis Application To grill flat food...
... dough. To make toast. The full grill element operates. To bake cakes with each oven function except Keep Warm and Defrost. Suitable for defrosting delicate food, e.g. If necessary, change the temperature. 2. The Fast Heat Up function starts to complete the cooking without energy consumption. Oven Function Grilling Turbo Grilling Pizza Setting Fast Grilling Bottom Heat Meat Keep Warm Defrost Pyrolysis Application To grill flat food...
Product Manaul
Page 9
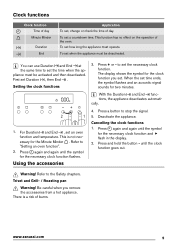
... deactivated. Refer to stop the signal. 5. Press a button to "Setting an oven function". 2. Be careful when you set time ends, the symbol flashes and an acoustic signal sounds for two minutes. To set an oven function and temperature. Setting the clock functions 3. until the symbol for the clock function you remove the accessories from a hot appliance. Press + or - Clock functions Clock function Time of day Minute Minder...
... deactivated. Refer to stop the signal. 5. Press a button to "Setting an oven function". 2. Be careful when you set time ends, the symbol flashes and an acoustic signal sounds for two minutes. To set an oven function and temperature. Setting the clock functions 3. until the symbol for the clock function you remove the accessories from a hot appliance. Press + or - Clock functions Clock function Time of day Minute Minder...
Product Manaul
Page 10
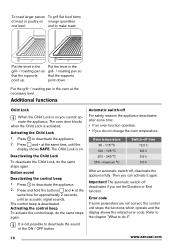
... same steps again. Error code If some time: • If an oven function operates. • If you set the Duration or End function. Press to deactivate the appliance. 2. Activating the control beep To activate the control beep, do if". 10 www.zanussi.com Then you cannot operate the appliance. Deactivating the Child Lock To deactivate the Child Lock, do not change the oven temperature. point down. The...
... same steps again. Error code If some time: • If an oven function operates. • If you set the Duration or End function. Press to deactivate the appliance. 2. Activating the control beep To activate the control beep, do if". 10 www.zanussi.com Then you cannot operate the appliance. Deactivating the Child Lock To deactivate the Child Lock, do not change the oven temperature. point down. The...
Product Manaul
Page 11
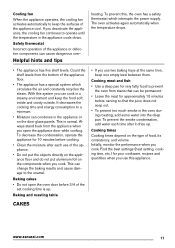
... appliance, the cooling fan continues to keep the food soft inside and crusty outside. If you use two baking trays at the same time, keep one empty level between them. Baking cakes • Do not open the appliance door while cooking. Find the best settings (heat setting, cooking time, etc.) for 10 minutes before cooking. • Clean the moisture after it dries up . Baking and roasting table • If...
... appliance, the cooling fan continues to keep the food soft inside and crusty outside. If you use two baking trays at the same time, keep one empty level between them. Baking cakes • Do not open the appliance door while cooking. Find the best settings (heat setting, cooking time, etc.) for 10 minutes before cooking. • Clean the moisture after it dries up . Baking and roasting table • If...

Product Manaul
Page 12
...els True Fan Cooking Shelf position 3 (2 and 4) 3 (2 and 4) Temp [°...Cooking time [min] Notes 45 - 60 20 - 30 In a cake mould In a cake mould 60 - 80 80 - 100 60 - 80 30 - 40 50 - 60 90 - 120 50 - 60 20 - 30 In a 26 cm cake mould In two 20 cm cake moulds on a wire shelf1) In a baking tray...baking tray 25 - 35 In a baking tray 30 - 45 In a baking tray 30 - 35 In a baking tray 35 - 40 In a baking tray 35 - 45 In a baking tray 80 - 100 In a baking tray 80 - 100 12 - 20 25 - 35 In a baking tray1) In a baking tray1) In a baking tray 35 - 45 In a baking tray 12 www.zanussi...
...els True Fan Cooking Shelf position 3 (2 and 4) 3 (2 and 4) Temp [°...Cooking time [min] Notes 45 - 60 20 - 30 In a cake mould In a cake mould 60 - 80 80 - 100 60 - 80 30 - 40 50 - 60 90 - 120 50 - 60 20 - 30 In a 26 cm cake mould In two 20 cm cake moulds on a wire shelf1) In a baking tray...baking tray 25 - 35 In a baking tray 30 - 45 In a baking tray 30 - 35 In a baking tray 35 - 40 In a baking tray 35 - 45 In a baking tray 80 - 100 In a baking tray 80 - 100 12 - 20 25 - 35 In a baking tray1) In a baking tray1) In a baking tray 35 - 45 In a baking tray 12 www.zanussi...

Product Manaul
Page 13
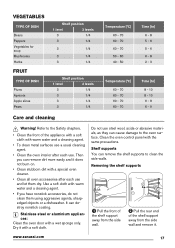
... 2 Cannelloni 2 1) Preheat for 10 minutes. 180 190 180 190 True Fan Cooking Shelf position 2 2 1 2 2 Temp [°C] 180 175 180 180 190 180 190 Cooking time [min] 40 - 50 45 - 60 50 - 60 25 - 40 25 - 40 Notes In a mould In a mould In a mould1) In a mould1) In a mould1) MEAT www.zanussi.com 13 TYPE OF DISH Plate tarts Conventional Cooking Shelf...
... 2 Cannelloni 2 1) Preheat for 10 minutes. 180 190 180 190 True Fan Cooking Shelf position 2 2 1 2 2 Temp [°C] 180 175 180 180 190 180 190 Cooking time [min] 40 - 50 45 - 60 50 - 60 25 - 40 25 - 40 Notes In a mould In a mould In a mould1) In a mould1) In a mould1) MEAT www.zanussi.com 13 TYPE OF DISH Plate tarts Conventional Cooking Shelf...

Product Manaul
Page 14
... 2 190 True Fan Cooking Shelf position 2 Temp [°C] 175 2 175 Cooking time [min] 40 - 55 35 - 60 Notes On a wire shelf On a wire shelf On a wire shelf On a wire shelf On a wire shelf On a wire shelf With rind 2 pieces Leg Whole Whole Whole Whole Cut in pieces Cut in pieces Whole Notes 3 - 4 fish 4 - 6 fillets Grilling Preheat the empty oven for 10 minutes, before cooking. Cooking time [min] 1st...
... 2 190 True Fan Cooking Shelf position 2 Temp [°C] 175 2 175 Cooking time [min] 40 - 55 35 - 60 Notes On a wire shelf On a wire shelf On a wire shelf On a wire shelf On a wire shelf On a wire shelf With rind 2 pieces Leg Whole Whole Whole Whole Cut in pieces Cut in pieces Whole Notes 3 - 4 fish 4 - 6 fillets Grilling Preheat the empty oven for 10 minutes, before cooking. Cooking time [min] 1st...

Product Manaul
Page 15
...Roast veal Knuckle of chicken Hamburger Fish fillet Toasted sandwiches Toast 4 8 4 2 4 4 6 4 4 - 6 4 - 6 600 - 600 1000 400 600 400 - TYPE OF DISH Quantity Pieces [g] Beef steaks Sausages Pork chops Chicken (cut in 2) Kebabs Breast of veal Quantity 1 kg 1.5 - 2 kg Shelf position 1 1 Temperature [°C] 160 - 180 160 - 180 Time [min] 90 - 120 120 - 150 www.zanussi.com 15 Cooking time... - 12 12 - 14 10 - 12 2 - 3 Turbo Grilling Beef TYPE OF DISH Roast beef or fillet, rare Roast beef or fillet, medium Roast beef or fillet, well done 1) Preheat the oven. Grilling Shelf posi-
...Roast veal Knuckle of chicken Hamburger Fish fillet Toasted sandwiches Toast 4 8 4 2 4 4 6 4 4 - 6 4 - 6 600 - 600 1000 400 600 400 - TYPE OF DISH Quantity Pieces [g] Beef steaks Sausages Pork chops Chicken (cut in 2) Kebabs Breast of veal Quantity 1 kg 1.5 - 2 kg Shelf position 1 1 Temperature [°C] 160 - 180 160 - 180 Time [min] 90 - 120 120 - 150 www.zanussi.com 15 Cooking time... - 12 12 - 14 10 - 12 2 - 3 Turbo Grilling Beef TYPE OF DISH Roast beef or fillet, rare Roast beef or fillet, medium Roast beef or fillet, well done 1) Preheat the oven. Grilling Shelf posi-

Product Manaul
Page 16
... - 150 150 - 240 Fish (steamed) TYPE OF DISH Whole fish Quantity 1 - 1.5 kg Shelf position 1 Temperature [°C] 210 - 220 Time [min] 40 - 60 Defrosting TYPE OF DISH [g] Chicken Meat Meat Trout Strawberries Butter Cream Gateau 1000 1000 500 150 300 250 2 x 200 1400 Defrosting time [min] 100 - 140 100 -... 60 Further defrosting time [min] 20 - 30 20 - 30 20 - 30 10 - 15 10 - 20 10 - 15 10 - 15 60 Notes Place the chicken on an upturned saucer placed on a large plate. Turn halfway through . True Fan Cooking Cover the oven shelves with baking parchment. 16 www.zanussi.com Drying -...
... - 150 150 - 240 Fish (steamed) TYPE OF DISH Whole fish Quantity 1 - 1.5 kg Shelf position 1 Temperature [°C] 210 - 220 Time [min] 40 - 60 Defrosting TYPE OF DISH [g] Chicken Meat Meat Trout Strawberries Butter Cream Gateau 1000 1000 500 150 300 250 2 x 200 1400 Defrosting time [min] 100 - 140 100 -... 60 Further defrosting time [min] 20 - 30 20 - 30 20 - 30 10 - 15 10 - 20 10 - 15 10 - 15 60 Notes Place the chicken on an upturned saucer placed on a large plate. Turn halfway through . True Fan Cooking Cover the oven shelves with baking parchment. 16 www.zanussi.com Drying -...
Product Manaul
Page 17
Clean the oven control panel with warm water and a cleaning agent. • If you can remove the shelf supports to the oven surface. www.zanussi.com 17 Shelf supports You can remove dirt more easily and it . Use a soft cloth with the same precautions. It can cause damage to clean the side walls. Dry it with a wet sponge only. Then you have nonstick accessories, do not...
Clean the oven control panel with warm water and a cleaning agent. • If you can remove the shelf supports to the oven surface. www.zanussi.com 17 Shelf supports You can remove dirt more easily and it . Use a soft cloth with the same precautions. It can cause damage to clean the side walls. Dry it with a wet sponge only. Then you have nonstick accessories, do not...
Product Manaul
Page 18
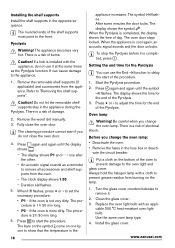
...;C heat-resistant oven light bulb. www.zanussi.com The appliance becomes very hot. If a hob is installed with the appliance, do not close the oven door. Remove the worst dirt manually. 3. The display shows P1 and the other. The symbol flashes. The oven door stays locked. When the appliance is not very dirty. Setting the end time for the Pyrolysis You can cause damage to delay the start...
...;C heat-resistant oven light bulb. www.zanussi.com The appliance becomes very hot. If a hob is installed with the appliance, do not close the oven door. Remove the worst dirt manually. 3. The display shows P1 and the other. The symbol flashes. The oven door stays locked. When the appliance is not very dirty. Setting the end time for the Pyrolysis You can cause damage to delay the start...

Product Manaul
Page 19
... forward and remove the door from the top panel. www.zanussi.com 19 Removing the oven door and the glass panels 90° 5 Release the locking system to clean them from their seats. 12 1 Open the door 2 Lift and turn the fully and hold the two levers on the two door hinges. Installing the door and the glass panels When the cleaning is completed, install the glass panels and the oven door. Cleaning the oven door The oven door has four glass panels.
... forward and remove the door from the top panel. www.zanussi.com 19 Removing the oven door and the glass panels 90° 5 Release the locking system to clean them from their seats. 12 1 Open the door 2 Lift and turn the fully and hold the two levers on the two door hinges. Installing the door and the glass panels When the cleaning is completed, install the glass panels and the oven door. Cleaning the oven door The oven door has four glass panels.
Product Manaul
Page 20
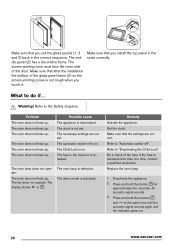
... oven does not heat up . The Child Lock is on the screen-printing zones is released more than one time, contact a qualified electrician. The oven lamp does not operate. Replace the oven lamp. 1. Press and hold the button for approximately two seconds. Make sure that you put the glass panels (1, 2 and 3) back in the correct sequence. The oven does not heat up . Set the clock...
... oven does not heat up . The Child Lock is on the screen-printing zones is released more than one time, contact a qualified electrician. The oven lamp does not operate. Replace the oven lamp. 1. Press and hold the button for approximately two seconds. Make sure that you put the glass panels (1, 2 and 3) back in the correct sequence. The oven does not heat up . Set the clock...
Product Manaul
Page 21
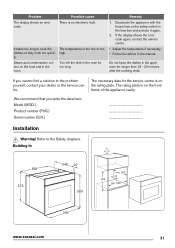
... dealer or the service centre. Possible cause There is on the food and in the manual. Remedy 1. If you write the data here: Model (MOD.) Product number (PNC) Serial number (S.N.) ... Installation Warning! It takes too long to cook the dishes, or they cook too quickly. You left the dish in the oven for the service centre is an electronic fault. Problem The display shows an error code.
... dealer or the service centre. Possible cause There is on the food and in the manual. Remedy 1. If you write the data here: Model (MOD.) Product number (PNC) Serial number (S.N.) ... Installation Warning! It takes too long to cook the dishes, or they cook too quickly. You left the dish in the oven for the service centre is an electronic fault. Problem The display shows an error code.


