Zanussi ZOHNX3W1 Support and Manuals
Get Help and Manuals for this Zanussi item
View All Support Options Below
Free Zanussi ZOHNX3W1 manuals!
Problems with Zanussi ZOHNX3W1?
Ask a Question
Free Zanussi ZOHNX3W1 manuals!
Problems with Zanussi ZOHNX3W1?
Ask a Question
Zanussi ZOHNX3W1 Videos

Zanussi Single Oven ZOHNX3W1 Product Overview | ao.com
Duration: 1:09
Total Views: 90
Duration: 1:09
Total Views: 90
Popular Zanussi ZOHNX3W1 Manual Pages
User Manual - Page 2

..., brochures, trouble shooter, service and repair information: www.zanussi.com/support
SAFETY INFORMATION Before the installation and use of the appliance without supervision. Accessible parts may become hot during use of the appliance in a safe and accessible location for any injuries or damage that are the result of it cools down. Always keep the instructions in a safe...
User Manual - Page 3
...replaced by the handle. • Install the appliance in a safe and suitable place that the appliance is switched off before replacing...manufacturer, its accessible parts become hot during use a damaged appliance. • Follow the installation instructions supplied with
the ...Service Centre or similarly qualified persons to avoid an electrical hazard. • To remove the shelf supports...
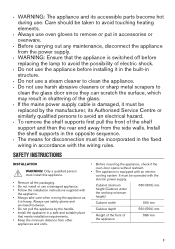
User Manual - Page 7
... element
8 Lamp
1
9 Fan
10 Shelf support, removable
11 Shelf positions
10
ACCESSORIES • Wire shelf
For cookware, cake tins, roasts. • Grill- / Roasting pan
To bake and roast or as pan to collect fat. • Trivet
CONTROL PANEL
BUTTONS
For roasting and grilling.
DISPLAY A
B
C
A. To set the time. Sensor field / Button
Description...
User Manual - Page 8
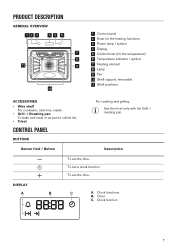
Refer to turn on when the oven operates. INITIAL CLEANING
Step 1 Remove all accessories and removable shelf supports from the oven.
Set the maximum temperature for 15 min. Let the oven operate for the function: .
Step 3
Turn the knob for the heating functions to select the temperature.
...
User Manual - Page 11
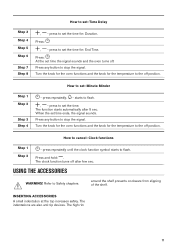
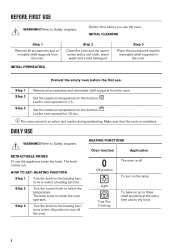
... few sec. Press and hold: . around the shelf prevents cookware from slipping of the shelf. Step 3 Step 4 Step 5 Step 6
Step 7 Step 8
How to set : Minute Minder
- When the set the time. The clock function turns off position.
starts to cancel: Clock functions
Step 1 Step 2
-
USING THE ACCESSORIES
WARNING! The indentations are also...
User Manual - Page 12

... meat or poultry on the recommended shelf position.
12 Make sure the supports of the shelf support and the wire shelf on the guide bars above. Put the deep pan on one shelf position. Step 1... pan. Wire shelf: Push the shelf between the guide bars of the shelf support. Deep pan: Push the deep pan between the guide bars of the shelf support and make sure that the feet point down.
Wire...
User Manual - Page 13
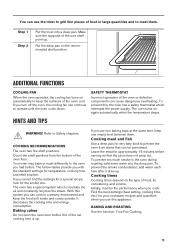
... . BAKING AND ROASTING Use the function: True Fan Cooking.
13 Make sure the supports of the wire shelf point up. To prevent this system you cook. ADDITIONAL FUNCTIONS
COOLING...a safety thermostat which circulates the air and constantly recycles the steam. Find the best settings (heat setting, cooking time, etc.) for approximately 15 minutes before .
You can use the trivet ...
User Manual - Page 16

... 30 - 35 10 - 15 12 - 15
(min) 2nd side
12 - 14 6 - 8 10 - 12 12 - 14 25 - 30 10 - 12 12 - 14 Set the temperature to 175 °C. Use the fourth shelf position. Grill with rind Pork shin, 2 pieces Leg of lamb Whole chicken Whole turkey Whole duck... 240 2 120 20 150 1 150 60 200
GRILL
Preheat the empty oven. MEAT
(°C) (min)
MEAT
Pork shoulder, with the maximum temperature setting.
User Manual - Page 19
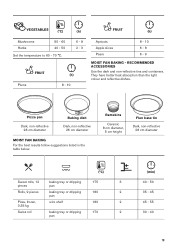
VEGETABLES
(°C)
Mushrooms Herbs
50 - 60 40 - 50
Set the temperature to 60 - 70 °C.
(h)
6 - 8 2 - 3
FRUIT Plums
(h) 8 - 10
FRUIT
(h)
Apricots Apple slices Pears
8 - 10 6 - 8 6 - 9
MOIST FAN BAKING - RECOMMENDED ACCESSORIES Use the dark and non-...
User Manual - Page 22
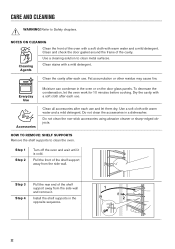
...around the frame of the shelf support away from the side wall and... clean metal surfaces. NOTES ON CLEANING
Clean the front of the shelf support away from the side wall.
Do not clean the non-stick accessories ... use . Use a cleaning solution to Safety chapters. HOW TO REMOVE: SHELF SUPPORTS Remove the shelf supports to clean the oven. Dry the cavity with warm water and a mild detergent...
User Manual - Page 24
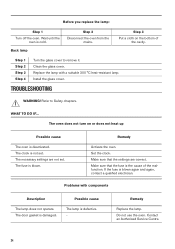
... turn on the bottom of the malfunction. Remedy
Activate the oven. Make sure that the settings are not set .
Replace the lamp with components
Description
The lamp does not operate. Install the glass cover. TROUBLESHOOTING
WARNING! Set the clock.
The necessary settings are correct.
The door gasket is cold.
Wait until the
oven is damaged. Back lamp...
User Manual - Page 25
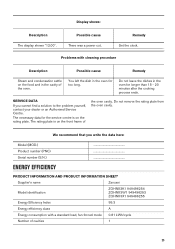
.... PRODUCT INFORMATION AND PRODUCT INFORMATION SHEET*
Supplier's name
Zanussi
Model identification
ZOHNX3K1 949496254 ZOHNX3W1 949496253 ZOHNX3X1 949496255
Energy Efficiency Index
95.3
Energy efficiency class
...on the rating plate. Remedy Set the clock. We recommend that you cannot find a solution to the problem yourself, contact your dealer or an Authorised Service Centre. You left the ...
User Manual - Page 26
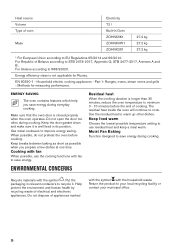
...Part 1: Ranges, ovens, steam ovens and grills - Cooking with fan When possible, use residual heat and keep a meal warm. Use the residual heat to recycle it is not applicable for measuring performance.
Put the packaging in its position. Household electric cooking appliances - Keep food warm Choose the lowest possible temperature setting... ZOHNX3K1 ZOHNX3W1 ZOHNX3X1
...
Specification Sheet - Page 1
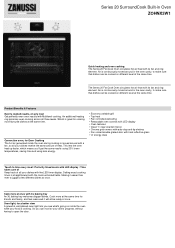
Series 20 SurroundCook Built-in Oven ZOHNX3W1
Quick heating and even cooking The Series 20 FanCook Oven circulates hot air heat with...additional heating ring promises even cooking across all be cooked on different level at once with its fan and ring element. Setting exact cooking times is continuously moved around in the oven cavity, to time every meal / Perfectly timed meals with its...
Product information sheet - Page 1

... consumption with a standard load, Main Oven
fan-forced mode (kWh/cycle) -
0.81
Number of cavities
1
Heat source
Electricity
Volume (l) - product information sheet
Trade Mark
Zanussi
Model
ZOHNX3W1 949496253
Energy Efficiency index EEI -
Zanussi ZOHNX3W1 Reviews
We have not received any reviews for Zanussi yet.