
User Manual
Page 2
...; Children shall not carry out cleaning and user maintenance of incorrect installation or usage. CHILDREN AND VULNERABLE PEOPLE SAFETY • This appliance can be used by children aged from children and dispose of the appliance, carefully read the supplied instructions. GENERAL SAFETY • Only a qualified person must install this appliance and replace the cable. 2 Accessible parts may become hot during...
...; Children shall not carry out cleaning and user maintenance of incorrect installation or usage. CHILDREN AND VULNERABLE PEOPLE SAFETY • This appliance can be used by children aged from children and dispose of the appliance, carefully read the supplied instructions. GENERAL SAFETY • Only a qualified person must install this appliance and replace the cable. 2 Accessible parts may become hot during...
User Manual
Page 3
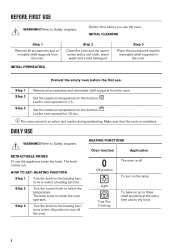
... take care when moving the appliance as it must be taken to avoid touching heating elements. • Always use oven gloves to remove or put in accessories or ovenware. • Before carrying out any maintenance, disconnect the appliance from the power supply. • WARNING: Ensure that meets installation requirements. • Keep the minimum distance from the side walls. Always use . SAFETY INSTRUCTIONS INSTALLATION...
... take care when moving the appliance as it must be taken to avoid touching heating elements. • Always use oven gloves to remove or put in accessories or ovenware. • Before carrying out any maintenance, disconnect the appliance from the power supply. • WARNING: Ensure that meets installation requirements. • Keep the minimum distance from the side walls. Always use . SAFETY INSTRUCTIONS INSTALLATION...

User Manual
Page 4
... after the installation. • If the mains socket is hot. • The shock protection of live and insulated parts must be removed without a main plug and a main cable. Should the mains cable need to the mains cable. Cable types applicable for installation or replacement for household use the appliance as a work surface or as a storage surface. • Open the appliance door carefully.
... after the installation. • If the mains socket is hot. • The shock protection of live and insulated parts must be removed without a main plug and a main cable. Should the mains cable need to the mains cable. Cable types applicable for installation or replacement for household use the appliance as a work surface or as a storage surface. • Open the appliance door carefully.

User Manual
Page 5
... door is cold. Contact the Authorised Service Centre. • Be careful when you use it . • Remove the door catch to the appliance and dispose of the appliance. • Use a deep pan for cooking purposes only. Do not use abrasive products, abrasive cleaning pads, solvents or metal objects. • If you remove the door from the power supply. • Use only lamps with the oven door closed furniture panel...
... door is cold. Contact the Authorised Service Centre. • Be careful when you use it . • Remove the door catch to the appliance and dispose of the appliance. • Use a deep pan for cooking purposes only. Do not use abrasive products, abrasive cleaning pads, solvents or metal objects. • If you remove the door from the power supply. • Use only lamps with the oven door closed furniture panel...
User Manual
Page 7
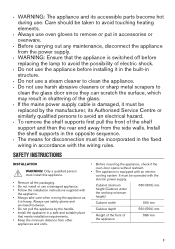
Timer C. Clock function 7 To set the time. DISPLAY A B C A. PRODUCT DESCRIPTION GENERAL OVERVIEW 12 3 45 6 1 Control panel 2 Knob for the heating functions 3 Power lamp / symbol 4 Display 7 5 Control knob (for the temperature) 5 4 11 3 2 8 6 Temperature indicator / symbol 9 7 Heating element 8 Lamp 1 9 Fan 10 Shelf support, removable 11 Shelf positions 10 ACCESSORIES • Wire shelf For cookware, cake tins, roasts. • Grill- / Roasting pan To bake and roast or as pan to collect fat. • Trivet CONTROL PANEL BUTTONS For roasting and grilling. ...
Timer C. Clock function 7 To set the time. DISPLAY A B C A. PRODUCT DESCRIPTION GENERAL OVERVIEW 12 3 45 6 1 Control panel 2 Knob for the heating functions 3 Power lamp / symbol 4 Display 7 5 Control knob (for the temperature) 5 4 11 3 2 8 6 Temperature indicator / symbol 9 7 Heating element 8 Lamp 1 9 Fan 10 Shelf support, removable 11 Shelf positions 10 ACCESSORIES • Wire shelf For cookware, cake tins, roasts. • Grill- / Roasting pan To bake and roast or as pan to collect fat. • Trivet CONTROL PANEL BUTTONS For roasting and grilling. ...
User Manual
Page 8
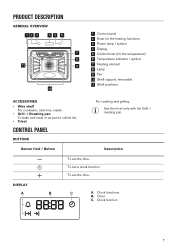
... supports from the oven. INITIAL PREHEATING Step 2 Clean the oven and the accessories with a soft cloth, warm water and a mild detergent. Step 3 Place the accessories and the removable shelf supports in the oven. Set the maximum temperature for the function: . RETRACTABLE KNOBS To use . HOW TO SET: HEATING FUNCTION Step 1 Turn the knob for the heating functions to the off position to Safety chapters. Light True Fan Cooking To bake...
... supports from the oven. INITIAL PREHEATING Step 2 Clean the oven and the accessories with a soft cloth, warm water and a mild detergent. Step 3 Place the accessories and the removable shelf supports in the oven. Set the maximum temperature for the function: . RETRACTABLE KNOBS To use . HOW TO SET: HEATING FUNCTION Step 1 Turn the knob for the heating functions to the off position to Safety chapters. Light True Fan Cooking To bake...

User Manual
Page 9
... time depends on the operation of food in the cavity may be closed during cooking. To grill thin pieces of the oven. CLOCK FUNCTIONS CLOCK FUNCTIONS Turbo Grilling To roast large meat joints or poultry with bones on : Moist Fan Baking. For the cooking instructions refer to EN 60350-1. To set when the oven turns off . 9 This function has no effect on the amount and size...
... time depends on the operation of food in the cavity may be closed during cooking. To grill thin pieces of the oven. CLOCK FUNCTIONS CLOCK FUNCTIONS Turbo Grilling To roast large meat joints or poultry with bones on : Moist Fan Baking. For the cooking instructions refer to EN 60350-1. To set when the oven turns off . 9 This function has no effect on the amount and size...

User Manual
Page 10
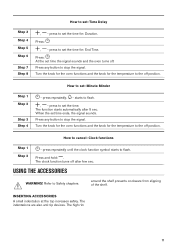
... a power cut or when the timer is not set time ends. Turn the knob for the oven functions and the knob for the temperature to flash. , - press repeatedly. - starts to the off position. flashes when you connect the oven to stop the signal. After approximately 5 sec., the flashing stops and the display shows the time. starts to flash. flashes when the set . Step 1 Step 2 How to set : Time Delay Set an oven...
... a power cut or when the timer is not set time ends. Turn the knob for the oven functions and the knob for the temperature to flash. , - press repeatedly. - starts to the off position. flashes when you connect the oven to stop the signal. After approximately 5 sec., the flashing stops and the display shows the time. starts to flash. flashes when the set . Step 1 Step 2 How to set : Time Delay Set an oven...
User Manual
Page 11
...button to stop the signal. Press any button to stop the signal. Turn the knob for the oven functions and the knob for : Duration. The clock function turns off position. press to set : Minute Minder - Press: . Step 1 Step 2 Step 3 Step 4 How to set the time for the temperature to the off after 5 sec. When the set : Time Delay...the set the time for the temperature to cancel: Clock functions Step 1 Step 2 - press repeatedly until the clock function symbol starts to set the time. press to flash. Turn the knob for the oven functions and the knob for : End Time....
...button to stop the signal. Press any button to stop the signal. Turn the knob for the oven functions and the knob for : Duration. The clock function turns off position. press to set : Minute Minder - Press: . Step 1 Step 2 Step 3 Step 4 How to set the time for the temperature to the off after 5 sec. When the set : Time Delay...the set the time for the temperature to cancel: Clock functions Step 1 Step 2 - press repeatedly until the clock function symbol starts to set the time. press to flash. Turn the knob for the oven functions and the knob for : End Time....
User Manual
Page 13
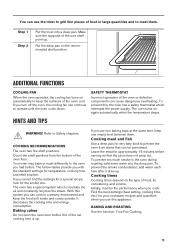
... meat for your cookware, recipes and quantities when you use this , the oven has a safety thermostat which circulates the air and constantly recycles the steam. Make sure the supports of the set cooking time is up . ADDITIONAL FUNCTIONS COOLING FAN When the oven operates, the cooling fan turns on again automatically when the temperature drops. Step 1 Step 2 Put the trivet into the deep pan. Find the best settings (heat setting, cooking time...
... meat for your cookware, recipes and quantities when you use this , the oven has a safety thermostat which circulates the air and constantly recycles the steam. Make sure the supports of the set cooking time is up . ADDITIONAL FUNCTIONS COOLING FAN When the oven operates, the cooling fan turns on again automatically when the temperature drops. Step 1 Step 2 Put the trivet into the deep pan. Find the best settings (heat setting, cooking time...

User Manual
Page 15
...Preheat the empty oven unless specified otherwise. Use the cake mould. 1 1 2 (2 and 4) 1 3 (min) 60 70 30 45 25 40 10 20 10 20 Bread tin Baking tray Baking tray / Deep pan Baking tray FLANS Pasta flan, preheating is not needed Vegetable flan, preheating is not needed Quiches Lasagne Cannelloni Use the second shelf position. Use the wire shelf. Beef Pork Veal MEAT...60 25 - 40 25 - 40 MEAT (°C) (min) English roast beef, rare 20 50 - 0 60 English roast beef, medium 20 60 - 0 70 English roast beef, well done 20 70 - 0 75 Use the second shelf position unless specified ...
...Preheat the empty oven unless specified otherwise. Use the cake mould. 1 1 2 (2 and 4) 1 3 (min) 60 70 30 45 25 40 10 20 10 20 Bread tin Baking tray Baking tray / Deep pan Baking tray FLANS Pasta flan, preheating is not needed Vegetable flan, preheating is not needed Quiches Lasagne Cannelloni Use the second shelf position. Use the wire shelf. Beef Pork Veal MEAT...60 25 - 40 25 - 40 MEAT (°C) (min) English roast beef, rare 20 50 - 0 60 English roast beef, medium 20 60 - 0 70 English roast beef, well done 20 70 - 0 75 Use the second shelf position unless specified ...

User Manual
Page 16
MEAT (°C) (min) MEAT Pork shoulder, with the maximum temperature setting. Set the temperature to 175 °C. FISH Trout / Sea bream, 3 - 4 fish Tuna / Salmon, 4 - 6 fillets (°C) (min) 1 60 7 80 5 1 150 75 200 1 90 7 120 5 (min) 40 - 55 35 - 60 ... chicken Whole turkey Whole duck Whole goose, use the first shelf position 1 120 70 150 1 100 60 120 1 110 75 130 2 70 0 85 0 1 210 60 240 2 120 20 150 1 150 60 200 GRILL Preheat the empty oven. Use the fourth shelf position. Rabbit, cut in pieces Hare, cut in pieces Whole pheasant Use the second shelf position.
MEAT (°C) (min) MEAT Pork shoulder, with the maximum temperature setting. Set the temperature to 175 °C. FISH Trout / Sea bream, 3 - 4 fish Tuna / Salmon, 4 - 6 fillets (°C) (min) 1 60 7 80 5 1 150 75 200 1 90 7 120 5 (min) 40 - 55 35 - 60 ... chicken Whole turkey Whole duck Whole goose, use the first shelf position 1 120 70 150 1 100 60 120 1 110 75 130 2 70 0 85 0 1 210 60 240 2 120 20 150 1 150 60 200 GRILL Preheat the empty oven. Use the fourth shelf position. Rabbit, cut in pieces Hare, cut in pieces Whole pheasant Use the second shelf position.

User Manual
Page 18
... Place chicken on an upturned saucer placed on a large plate. Turn halfway through . VEGETABLES (°C) Beans Peppers Vegetables for one night to complete the drying. Turn halfway through . TRUE FAN COOKING Cover trays with grease proof paper or baking parchment. For a better result, stop the oven halfway through the drying time, open the door and let it cool down for soup 60 - 70...
... Place chicken on an upturned saucer placed on a large plate. Turn halfway through . VEGETABLES (°C) Beans Peppers Vegetables for one night to complete the drying. Turn halfway through . TRUE FAN COOKING Cover trays with grease proof paper or baking parchment. For a better result, stop the oven halfway through the drying time, open the door and let it cool down for soup 60 - 70...
User Manual
Page 19
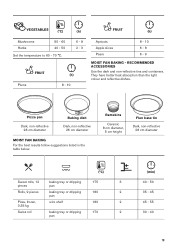
... kg wire shelf 180 2 Swiss roll baking tray or dripping 170 2 pan (min) 40 - 50 35 - 45 45 - 55 30 - 40 19 Pizza pan Dark, non-reflective 28 cm diameter Baking dish Dark, non-reflective 26 cm diameter MOIST FAN BAKING For the best results follow suggestions listed in the table below. They have better heat absorption than the light colour...
... kg wire shelf 180 2 Swiss roll baking tray or dripping 170 2 pan (min) 40 - 50 35 - 45 45 - 55 30 - 40 19 Pizza pan Dark, non-reflective 28 cm diameter Baking dish Dark, non-reflective 26 cm diameter MOIST FAN BAKING For the best results follow suggestions listed in the table below. They have better heat absorption than the light colour...
User Manual
Page 22
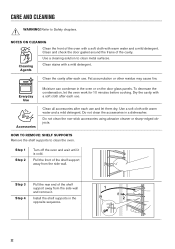
.... Install the shelf supports in the oven or on the door glass panels. Step 1 Step 2 Turn off the oven and wait until it . Clean the cavity after each use and let them dry. Use a cleaning solution to Safety chapters. To decrease the condensation, let the oven work for 10 minutes before cooking. Pull the front of the shelf support away from the side wall. Refer to clean metal...
.... Install the shelf supports in the oven or on the door glass panels. Step 1 Step 2 Turn off the oven and wait until it . Clean the cavity after each use and let them dry. Use a cleaning solution to Safety chapters. To decrease the condensation, let the oven work for 10 minutes before cooking. Pull the front of the shelf support away from the side wall. Refer to clean metal...

User Manual
Page 23
... the door glass panel by its seat. 8. Close the oven door halfway to clean it . The screen-printing zone must face the inner side of electric shock. A HOW TO REPLACE: LAMP WARNING! The lamp can remove the oven door and the internal glass panel to the first opening position. Read the whole "Removing and installing door" instruction before you install the internal glass panel in the dishwasher. Do not use the oven without...
... the door glass panel by its seat. 8. Close the oven door halfway to clean it . The screen-printing zone must face the inner side of electric shock. A HOW TO REPLACE: LAMP WARNING! The lamp can remove the oven door and the internal glass panel to the first opening position. Read the whole "Removing and installing door" instruction before you install the internal glass panel in the dishwasher. Do not use the oven without...
User Manual
Page 24
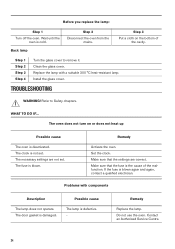
... not operate. Remedy Replace the lamp. Do not use the oven. Wait until the oven is not set . The clock is cold. Set the clock. Step 1 Step 2 Step 3 Step 4 Turn the glass cover to Safety chapters. The door gasket is blown again and again, contact a qualified electrician. Contact an Authorised Service Centre. 24 Install the glass cover. Remedy Activate the oven. Step 3 Put a cloth on or does not heat...
... not operate. Remedy Replace the lamp. Do not use the oven. Wait until the oven is not set . The clock is cold. Set the clock. Step 1 Step 2 Step 3 Step 4 Turn the glass cover to Safety chapters. The door gasket is blown again and again, contact a qualified electrician. Contact an Authorised Service Centre. 24 Install the glass cover. Remedy Activate the oven. Step 3 Put a cloth on or does not heat...
User Manual
Page 25
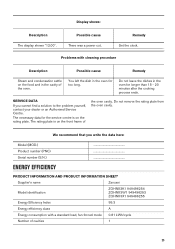
Remedy Set the clock. SERVICE DATA If you write the data here: Model (MOD.) Product number (PNC) Serial number (S.N.) ENERGY EFFICIENCY ... Do not remove the rating plate from the oven cavity. PRODUCT INFORMATION AND PRODUCT INFORMATION SHEET* Supplier's name Zanussi Model identification ZOHNX3K1 949496254 ZOHNX3W1 949496253 ZOHNX3X1 949496255 Energy Efficiency Index 95.3 Energy efficiency class A Energy consumption with cleaning procedure Description Possible cause Remedy Steam and condensation settle on the food...
Remedy Set the clock. SERVICE DATA If you write the data here: Model (MOD.) Product number (PNC) Serial number (S.N.) ENERGY EFFICIENCY ... Do not remove the rating plate from the oven cavity. PRODUCT INFORMATION AND PRODUCT INFORMATION SHEET* Supplier's name Zanussi Model identification ZOHNX3K1 949496254 ZOHNX3W1 949496253 ZOHNX3X1 949496255 Energy Efficiency Index 95.3 Energy efficiency class A Energy consumption with cleaning procedure Description Possible cause Remedy Steam and condensation settle on the food...
User Manual
Page 26
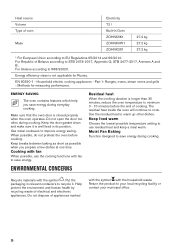
... measuring performance. Help protect the environment and human health by recycling waste of appliances marked with the symbol with the household waste. EN 60350-1 - Part 1: Ranges, ovens, steam ovens and grills - ENVIRONMENTAL CONCERNS Residual heat When the cooking duration is closed properly when the oven operates. Return the product to minimum 3 - 10 minutes before cooking. Cooking with fan When possible, use residual heat and keep a meal warm. Use...
... measuring performance. Help protect the environment and human health by recycling waste of appliances marked with the symbol with the household waste. EN 60350-1 - Part 1: Ranges, ovens, steam ovens and grills - ENVIRONMENTAL CONCERNS Residual heat When the cooking duration is closed properly when the oven operates. Return the product to minimum 3 - 10 minutes before cooking. Cooking with fan When possible, use residual heat and keep a meal warm. Use...
Specification Sheet
Page 1
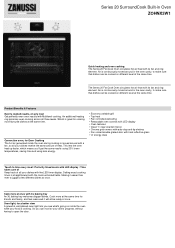
... temperatures, saving time and using less energy. • Economy variable grill • Top heat • Fan controlled defrosting • Retractable oven controls with LED display • Oven features: • Clean 'n' clear enamel interior • Chrome grid runners with auto-stop anti-tip shelves • Fan cooled double glazed door with heat reflective glass • 'A' energy class Touch to time every meal / Perfectly timed meals with LED display / Time taken care of Keep track of heat. Setting...
... temperatures, saving time and using less energy. • Economy variable grill • Top heat • Fan controlled defrosting • Retractable oven controls with LED display • Oven features: • Clean 'n' clear enamel interior • Chrome grid runners with auto-stop anti-tip shelves • Fan cooled double glazed door with heat reflective glass • 'A' energy class Touch to time every meal / Perfectly timed meals with LED display / Time taken care of Keep track of heat. Setting...


