
User Manual
Page 2
... age and persons with the appliance. • Keep all packaging away from children and dispose of incorrect installation or usage. The manufacturer is not responsible for future reference. GENERAL SAFETY • Only a qualified person must install this appliance and replace the cable. • WARNING: The appliance and its accessible parts become hot...
... age and persons with the appliance. • Keep all packaging away from children and dispose of incorrect installation or usage. The manufacturer is not responsible for future reference. GENERAL SAFETY • Only a qualified person must install this appliance and replace the cable. • WARNING: The appliance and its accessible parts become hot...
User Manual
Page 3
.... • The appliance must be replaced by the handle. • Keep the minimum distance from other appliances and units. • Install the appliance in shattering of the shelf support and then the rear end away from the side walls. Only a qualified person must be ...Centre or similarly qualified persons to avoid an electrical hazard. • Excessive spillage must be fastened in accordance with the electrical ratings of the installation. Always pull the mains plug. • Use only correct isolation devices: line protecting cut-outs, fuses (screw type fuses 3 •...
.... • The appliance must be replaced by the handle. • Keep the minimum distance from other appliances and units. • Install the appliance in shattering of the shelf support and then the rear end away from the side walls. Only a qualified person must be ...Centre or similarly qualified persons to avoid an electrical hazard. • Excessive spillage must be fastened in accordance with the electrical ratings of the installation. Always pull the mains plug. • Use only correct isolation devices: line protecting cut-outs, fuses (screw type fuses 3 •...

User Manual
Page 4
.... • Before maintenance, deactivate the appliance and disconnect the mains plug from the mains socket. • Make sure the appliance is installed behind a closed . • If the appliance is cold. Do not use any kind of detergent. PYROLYTIC CLEANING WARNING! Only use ... heating. • Always cook with the product) 4 removed from the holder), earth leakage trips and contactors. • The electrical installation must have an isolation device which lets you disconnect the appliance from the appliance. The isolation device must have a contact opening width of...
.... • Before maintenance, deactivate the appliance and disconnect the mains plug from the mains socket. • Make sure the appliance is installed behind a closed . • If the appliance is cold. Do not use any kind of detergent. PYROLYTIC CLEANING WARNING! Only use ... heating. • Always cook with the product) 4 removed from the holder), earth leakage trips and contactors. • The electrical installation must have an isolation device which lets you disconnect the appliance from the appliance. The isolation device must have a contact opening width of...
User Manual
Page 23
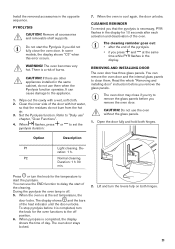
... error occurs. CAUTION! The cleaning reminder goes out: • after each activation and deactivation of the cleaning. CAUTION! ration: 1 h. Install the removed accessories in the display for the oven functions to delay the start the pyrolysis. PYROLYSIS CAUTION! Remove all accessories and removable shelf supports...start of the oven. You can cause damage to "Daily use the oven without the glass panels. 1. Read the whole "Removing and installing door" instruction before you that the residues do not use the END function to the off . 5. The oven door may close the...
... error occurs. CAUTION! The cleaning reminder goes out: • after each activation and deactivation of the cleaning. CAUTION! ration: 1 h. Install the removed accessories in the display for the oven functions to delay the start the pyrolysis. PYROLYSIS CAUTION! Remove all accessories and removable shelf supports...start of the oven. You can cause damage to "Daily use the oven without the glass panels. 1. Read the whole "Removing and installing door" instruction before you that the residues do not use the END function to the off . 5. The oven door may close the...
User Manual
Page 24
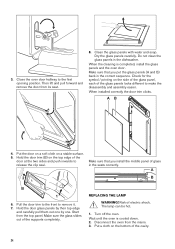
... panels looks different to release the clip seal. Then lift and pull forward and remove the door from the top panel. Make sure that you install the middle panel of the door at the two sides and push inwards to make the disassembly and assembly easier. Make sure the glass slides... out of the cavity. 24 Wait until the oven is completed, install the glass panels and the oven door. Put a cloth on the side of the glass panel, each of electric shock. Close the oven door halfway...
... panels looks different to release the clip seal. Then lift and pull forward and remove the door from the top panel. Make sure that you install the middle panel of the door at the two sides and push inwards to make the disassembly and assembly easier. Make sure the glass slides... out of the cavity. 24 Wait until the oven is completed, install the glass panels and the oven door. Put a cloth on the side of the glass panel, each of electric shock. Close the oven door halfway...
User Manual
Page 25
... lamp. 4. The display shows "C3". Problem Possible cause Remedy You cannot activate or operate the oven. The oven is too low or too high. CAUTION! Install the glass cover. You did not fully close the door. 25 Always hold the halogen lamp with a suitable 300 °C heat- It takes too long...
... lamp. 4. The display shows "C3". Problem Possible cause Remedy You cannot activate or operate the oven. The oven is too low or too high. CAUTION! Install the glass cover. You did not fully close the door. 25 Always hold the halogen lamp with a suitable 300 °C heat- It takes too long...
User Manual
Page 27
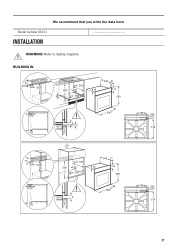
BUILDING IN 80 60 520 min. 550 600 20 6 min. 560 548 21 18 114 589 60 595±1 6 3 20 198 518 70 60 520 60 20 min. 550 580 20 min. 560 548 21 18 114 589 595±1 9 198 518 27 We recommend that you write the data here: Serial number (S.N.) INSTALLATION WARNING! Refer to Safety chapters.
BUILDING IN 80 60 520 min. 550 600 20 6 min. 560 548 21 18 114 589 60 595±1 6 3 20 198 518 70 60 520 60 20 min. 550 580 20 min. 560 548 21 18 114 589 595±1 9 198 518 27 We recommend that you write the data here: Serial number (S.N.) INSTALLATION WARNING! Refer to Safety chapters.
User Manual
Page 28
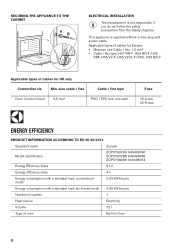
ENERGY EFFICIENCY PRODUCT INFORMATION ACCORDING TO EU 65-66/2014 Supplier's name Zanussi Model identification ZOP37902XU 949498090 ZOP37972BK 949498055 ZOP37982XK 949498054 Energy Efficiency Index 81.2 Energy efficiency class A+ Energy consumption with a standard load, conventional mode 0.93 kWh/cycle Energy consumption with a standard load, fan-... flex type Oven Control Circuit 2,5 mm² PVC / PVC twin and earth Fuse 15 A min. 20 A max. SECURING THE APPLIANCE TO THE CABINET AB ELECTRICAL INSTALLATION The manufacturer is supplied without a main plug and a main cable.
ENERGY EFFICIENCY PRODUCT INFORMATION ACCORDING TO EU 65-66/2014 Supplier's name Zanussi Model identification ZOP37902XU 949498090 ZOP37972BK 949498055 ZOP37982XK 949498054 Energy Efficiency Index 81.2 Energy efficiency class A+ Energy consumption with a standard load, conventional mode 0.93 kWh/cycle Energy consumption with a standard load, fan-... flex type Oven Control Circuit 2,5 mm² PVC / PVC twin and earth Fuse 15 A min. 20 A max. SECURING THE APPLIANCE TO THE CABINET AB ELECTRICAL INSTALLATION The manufacturer is supplied without a main plug and a main cable.
