
Specification Sheet
Page 1
... turned. • Pyrolytic cleaning • Economy variable grill • Top heat • Bottom heat • Fan controlled defrosting • Retractable oven controls with a multifunction oven. Simply push the buttons to -use oven. It's 25% larger than the standard size. Product Benefits & Features Automatic cleaning at the push of life with LED display • Oven features: • Auto safety switch off and child lock • Thermal grilling • Pizza cooking Transparency and control...
... turned. • Pyrolytic cleaning • Economy variable grill • Top heat • Bottom heat • Fan controlled defrosting • Retractable oven controls with a multifunction oven. Simply push the buttons to -use oven. It's 25% larger than the standard size. Product Benefits & Features Automatic cleaning at the push of life with LED display • Oven features: • Auto safety switch off and child lock • Thermal grilling • Pizza cooking Transparency and control...
Specification Sheet
Page 2
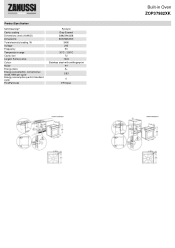
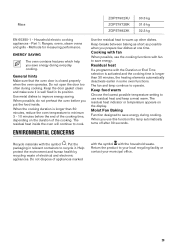
Product Specification Self-Cleaning? Cavity coating Dimensions (mm) (HxWxD) Dimensions Total electricity loading, W Voltage Frequency Temperature range Cavity size Largest Surface area Colour Noise Energy class Energy consumption, conventional mode, kWh per cycle Energy consumption per EU standard cycle ProdPartCode Pyrolytic Grey Enamel 589x594x568 600x560x550 3480 240 50 30°C - 300°C 72 1424 Stainless steel with antifingerprint 44 A+ 0.93 0 ER Open Built-in Oven ZOP37982XK
Product Specification Self-Cleaning? Cavity coating Dimensions (mm) (HxWxD) Dimensions Total electricity loading, W Voltage Frequency Temperature range Cavity size Largest Surface area Colour Noise Energy class Energy consumption, conventional mode, kWh per cycle Energy consumption per EU standard cycle ProdPartCode Pyrolytic Grey Enamel 589x594x568 600x560x550 3480 240 50 30°C - 300°C 72 1424 Stainless steel with antifingerprint 44 A+ 0.93 0 ER Open Built-in Oven ZOP37982XK
User Manual
Page 2
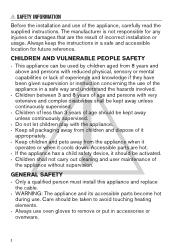
... it operates or when it cools down. Care should be activated. • Children shall not carry out cleaning and user maintenance of incorrect installation or usage. GENERAL SAFETY • Only a qualified person must install this appliance and replace the cable. • WARNING: The appliance and its accessible parts become hot during use of the appliance in a safe and accessible location for...
... it operates or when it cools down. Care should be activated. • Children shall not carry out cleaning and user maintenance of incorrect installation or usage. GENERAL SAFETY • Only a qualified person must install this appliance and replace the cable. • WARNING: The appliance and its accessible parts become hot during use of the appliance in a safe and accessible location for...
User Manual
Page 3
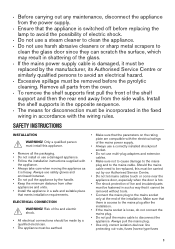
... need to be replaced, this appliance. • Remove all parts from the oven. • To remove the shelf supports first pull the front of fire and electric shock. • All electrical connections should be made by the handle. • Keep the minimum distance from other appliances and units. • Install the appliance in accordance with the wiring rules. Always pull the mains plug. • Use...
... need to be replaced, this appliance. • Remove all parts from the oven. • To remove the shelf supports first pull the front of fire and electric shock. • All electrical connections should be made by the handle. • Keep the minimum distance from other appliances and units. • Install the appliance in accordance with the wiring rules. Always pull the mains plug. • Use...

User Manual
Page 4
... that the glass panels can build up behind a furniture panel (e.g. any removable objects (including shelves, side rails etc., provided with the product) 4 Directives. USE WARNING! do not keep moist dishes and food in operation. CARE AND CLEANING WARNING! Contact the Authorised Service Centre. • Be careful when you finish the cooking. - PYROLYTIC CLEANING WARNING! Do not close the appliance door, before you remove or install the accessories...
... that the glass panels can build up behind a furniture panel (e.g. any removable objects (including shelves, side rails etc., provided with the product) 4 Directives. USE WARNING! do not keep moist dishes and food in operation. CARE AND CLEANING WARNING! Contact the Authorised Service Centre. • Be careful when you finish the cooking. - PYROLYTIC CLEANING WARNING! Do not close the appliance door, before you remove or install the accessories...
User Manual
Page 5
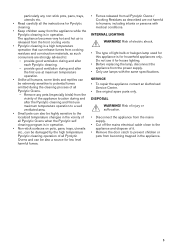
Remove any non-stick pots, pans, trays, utensils etc. • Read carefully all the instructions for low level harmful fumes. • Fumes released from all Pyrolytic Ovens. - SERVICE • To repair the appliance contact an Authorised Service Centre. • Use original spare parts only. provide good ventilation during and after the first use at maximum temperature operation. • Unlike all humans, some birds and reptiles...
Remove any non-stick pots, pans, trays, utensils etc. • Read carefully all the instructions for low level harmful fumes. • Fumes released from all Pyrolytic Ovens. - SERVICE • To repair the appliance contact an Authorised Service Centre. • Use original spare parts only. provide good ventilation during and after the first use at maximum temperature operation. • Unlike all humans, some birds and reptiles...

User Manual
Page 6
...set a clock function. To set the time. Heat-up and residual heat indicator C. Demo mode (selected models only) G. PRODUCT DESCRIPTION GENERAL OVERVIEW 12 34 5 5 6 4 93 7 2 1 1 Control panel 2 Knob for the heating functions 3 Display 4 Control knob (for the temperature) 5 Heating element 6 Lamp 7 Fan 8 Shelf support, removable 9 Shelf positions 8 ACCESSORIES • Wire shelf For cookware, cake tins, roasts. • Grill- / Roasting pan To bake and roast or as pan to collect fat. • Trivet CONTROL PANEL BUTTONS For roasting and grilling. Core temperature sensor...
...set a clock function. To set the time. Heat-up and residual heat indicator C. Demo mode (selected models only) G. PRODUCT DESCRIPTION GENERAL OVERVIEW 12 34 5 5 6 4 93 7 2 1 1 Control panel 2 Knob for the heating functions 3 Display 4 Control knob (for the temperature) 5 Heating element 6 Lamp 7 Fan 8 Shelf support, removable 9 Shelf positions 8 ACCESSORIES • Wire shelf For cookware, cake tins, roasts. • Grill- / Roasting pan To bake and roast or as pan to collect fat. • Trivet CONTROL PANEL BUTTONS For roasting and grilling. Core temperature sensor...
User Manual
Page 7
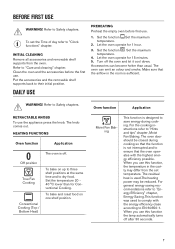
... CLEANING Remove all accessories and removable shelf supports from the set the Time of day refer to Safety chapters. Set the function .Set the maximum temperature. 2. Refer to save energy during cooking so that the function is off the oven and let it cool down. Oven function Application Moist Fan Baking This function is designed to Safety chapters. The residual heat is sufficient. DAILY USE PREHEATING Preheat the...
... CLEANING Remove all accessories and removable shelf supports from the set the Time of day refer to Safety chapters. Set the function .Set the maximum temperature. 2. Refer to save energy during cooking so that the function is off the oven and let it cool down. Oven function Application Moist Fan Baking This function is designed to Safety chapters. The residual heat is sufficient. DAILY USE PREHEATING Preheat the...
User Manual
Page 8
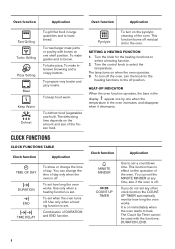
.... SETTING A HEATING FUNCTION 1. Use only when a heating function is set . Clock function Application MINUTE MINDER 00:00 COUNT UP TIMER Use to select a heating function. 2. Turn the knob for the heating functions to select the temperature. To bake pizza. To turn off . You can set a countdown time. Use only when a heating function is set . This function has no effect on immediately when the oven starts to toast bread. To roast larger meat joints...
.... SETTING A HEATING FUNCTION 1. Use only when a heating function is set . Clock function Application MINUTE MINDER 00:00 COUNT UP TIMER Use to select a heating function. 2. Turn the knob for the heating functions to select the temperature. To bake pizza. To turn off . You can set a countdown time. Use only when a heating function is set . This function has no effect on immediately when the oven starts to toast bread. To roast larger meat joints...

User Manual
Page 9
... oven door to 3. Press flash. USING THE ACCESSORIES SETTING THE TIME DELAY FUNCTION 1. Press to set END time. The display shows and the set is turned on , works for 2 minutes. Oven turns on automatically later on and off. 1. At the set END time the signal sounds for the set DURATION time and stops at the set the hours. Turn the knob for the heating functions to the off position. When the time you set temperature...
... oven door to 3. Press flash. USING THE ACCESSORIES SETTING THE TIME DELAY FUNCTION 1. Press to set END time. The display shows and the set is turned on , works for 2 minutes. Oven turns on automatically later on and off. 1. At the set END time the signal sounds for the set DURATION time and stops at the set the hours. Turn the knob for the heating functions to the off position. When the time you set temperature...
User Manual
Page 11
... oven may bake or roast differently to the oven you do not change the oven temperature. It decreases the cooking time and energy consumption. Cooking meat and fish Use a deep pan for the similar one empty level between them. AUTOMATIC SWITCH-OFF For safety reasons the oven turns off the oven, the cooling fan can be turned on automatically to operate until the oven cools down. Baking cakes Do not open the oven door before...
... oven may bake or roast differently to the oven you do not change the oven temperature. It decreases the cooking time and energy consumption. Cooking meat and fish Use a deep pan for the similar one empty level between them. AUTOMATIC SWITCH-OFF For safety reasons the oven turns off the oven, the cooling fan can be turned on automatically to operate until the oven cools down. Baking cakes Do not open the oven door before...
User Manual
Page 12
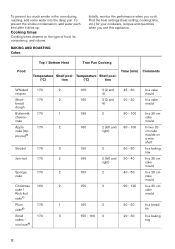
Cooking times Cooking times depend on a wire shelf In a baking tray In a 26 cm cake mould In a 26 cm cake mould In a 20 cm cake mould In a bread tin In a baking tray 12 Temperature Shelf posi- (°C) tion (°C) tion Time (min) Comments Whisked 170 2 recipes Short- 170 2... 3 cakes - BAKING AND ROASTING Cakes Initially, monitor the performance when you use this appliance. To prevent too much smoke in the oven during roasting, add some water into the deep pan. cake Apple 170 2 cake (Ap- Find the best settings (heat setting, cooking time, etc.) for your...
Cooking times Cooking times depend on a wire shelf In a baking tray In a 26 cm cake mould In a 26 cm cake mould In a 20 cm cake mould In a bread tin In a baking tray 12 Temperature Shelf posi- (°C) tion (°C) tion Time (min) Comments Whisked 170 2 recipes Short- 170 2... 3 cakes - BAKING AND ROASTING Cakes Initially, monitor the performance when you use this appliance. To prevent too much smoke in the oven during roasting, add some water into the deep pan. cake Apple 170 2 cake (Ap- Find the best settings (heat setting, cooking time, etc.) for your...

User Manual
Page 16
... - 150 150 - 200 60 - 80 150 - 200 90 - 120 Whole Whole Whole Whole Cut in pieces Cut in pieces Whole Food Top / Bottom Heat True Fan Cooking Temperature Shelf posi- Temperature Shelf posi- (°C) tion (°C) tion Time (min) Comments Trout / 190 2 Sea bream Tuna fish / 190 2 Salmon GRILLING Preheat the oven for 3 minutes. Food Top / Bottom Heat True Fan Cooking Temperature Shelf posi-
... - 150 150 - 200 60 - 80 150 - 200 90 - 120 Whole Whole Whole Whole Cut in pieces Cut in pieces Whole Food Top / Bottom Heat True Fan Cooking Temperature Shelf posi- Temperature Shelf posi- (°C) tion (°C) tion Time (min) Comments Trout / 190 2 Sea bream Tuna fish / 190 2 Salmon GRILLING Preheat the oven for 3 minutes. Food Top / Bottom Heat True Fan Cooking Temperature Shelf posi-
User Manual
Page 20
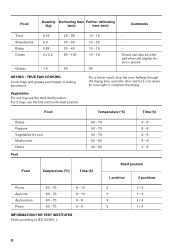
... places. - For 2 trays use the third shelf position. Food Quantity Defrosting time Further defrosting (kg) (min) time (min) Comments Trout Strawberries Butter Cream 0.15 0.3 0.25 2 x 0.2 25 - 35 30 - 40 30 - 40 80 - 100 Gateau 1.4 60 DRYING - TRUE FAN COOKING Cover trays with grease proof paper or baking parchment. For a better result, stop the oven halfway through the drying time, open the door and let...
... places. - For 2 trays use the third shelf position. Food Quantity Defrosting time Further defrosting (kg) (min) time (min) Comments Trout Strawberries Butter Cream 0.15 0.3 0.25 2 x 0.2 25 - 35 30 - 40 30 - 40 80 - 100 Gateau 1.4 60 DRYING - TRUE FAN COOKING Cover trays with grease proof paper or baking parchment. For a better result, stop the oven halfway through the drying time, open the door and let...

User Manual
Page 22
.... If you remove the shelf supports. 1. It can cause damage to Safety chapters. Clean the moisture from the side wall. 2. Clean the oven control panel with warm water and a cleaning agent. CAUTION! Clean the oven interior after each use steel wool, acids or abrasive materials as they can condense in a fire. To decrease the condensation, operate the oven for 3 minutes. Turn the food halfway through the cooking time. Use a soft...
.... If you remove the shelf supports. 1. It can cause damage to Safety chapters. Clean the moisture from the side wall. 2. Clean the oven control panel with warm water and a cleaning agent. CAUTION! Clean the oven interior after each use steel wool, acids or abrasive materials as they can condense in a fire. To decrease the condensation, operate the oven for 3 minutes. Turn the food halfway through the cooking time. Use a soft...
User Manual
Page 23
... time while PYR flashes in the display for the oven functions to delay the start the pyrolysis. Open the door fully and hold both hinges. 23 During the pyrolysis the oven lamp is cool again, the door unlocks. CAUTION! Install the removed accessories in the same cabinet, do not burn from the hot air. 3. PYROLYSIS CAUTION! Do not start the Pyrolysis if you remove the glass panels. In some models...
... time while PYR flashes in the display for the oven functions to delay the start the pyrolysis. Open the door fully and hold both hinges. 23 During the pyrolysis the oven lamp is cool again, the door unlocks. CAUTION! Install the removed accessories in the same cabinet, do not burn from the hot air. 3. PYROLYSIS CAUTION! Do not start the Pyrolysis if you remove the glass panels. In some models...
User Manual
Page 24
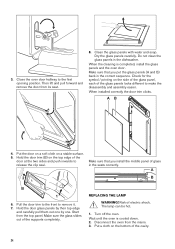
... of electric shock. Disconnect the oven from its seat. 8. Make sure that you install the middle panel of the glass panels looks different to remove it. 7. Turn off the oven. 3. Pull the door trim to the front to make the disassembly and assembly easier. REPLACING THE LAMP WARNING! Risk of the supports completely. Wait until the oven is completed, install the glass panels and the oven door. Dry the glass panels carefully...
... of electric shock. Disconnect the oven from its seat. 8. Make sure that you install the middle panel of the glass panels looks different to remove it. 7. Turn off the oven. 3. Pull the door trim to the front to make the disassembly and assembly easier. REPLACING THE LAMP WARNING! Risk of the supports completely. Wait until the oven is completed, install the glass panels and the oven door. Dry the glass panels carefully...
User Manual
Page 25
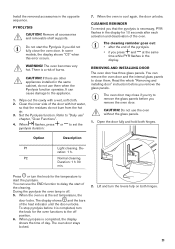
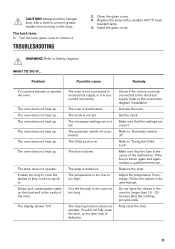
.... You left the dish in the user manual. If the fuse is blown. Adjust the temperature if necessary. TROUBLESHOOTING 2. Install the glass cover. The lamp does not operate. The cleaning function does not operate. Set the clock. Problem Possible cause Remedy You cannot activate or operate the oven. Replace the lamp with a cloth to the connection diagram if available). The oven does not heat up . The fuse is blown again and again, contact...
.... You left the dish in the user manual. If the fuse is blown. Adjust the temperature if necessary. TROUBLESHOOTING 2. Install the glass cover. The lamp does not operate. The cleaning function does not operate. Set the clock. Problem Possible cause Remedy You cannot activate or operate the oven. Replace the lamp with a cloth to the connection diagram if available). The oven does not heat up . The fuse is blown again and again, contact...
User Manual
Page 26
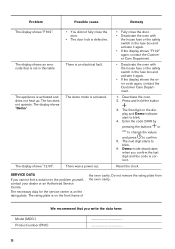
...: Model (MOD.) Product number (PNC) 26 Do not remove the rating plate from the oven cavity. There was a power cut. • Fully close the door. • The door lock is activated and does not heat up. The fan does not operate. The display shows "Demo". There is correct. Demo mode deactivates when you confirm the last digit and the code is an electrical fault. The rating plate is not in the fuse box and...
...: Model (MOD.) Product number (PNC) 26 Do not remove the rating plate from the oven cavity. There was a power cut. • Fully close the door. • The door lock is activated and does not heat up. The fan does not operate. The display shows "Demo". There is correct. Demo mode deactivates when you confirm the last digit and the code is an electrical fault. The rating plate is not in the fuse box and...
User Manual
Page 29
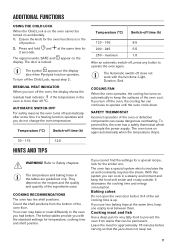
... the oven door is longer than 30 minutes, reduce the oven temperature to cook. The residual heat inside . Keep food warm Choose the lowest possible temperature setting to use the cooking functions with fan to save energy during everyday cooking. Recycle materials with the household waste. Household electric cooking appliances - When possible, do not preheat the oven before the end of the cooking time, depending on the display. Keep breaks between baking...
... the oven door is longer than 30 minutes, reduce the oven temperature to cook. The residual heat inside . Keep food warm Choose the lowest possible temperature setting to use the cooking functions with fan to save energy during everyday cooking. Recycle materials with the household waste. Household electric cooking appliances - When possible, do not preheat the oven before the end of the cooking time, depending on the display. Keep breaks between baking...


