User Manual
Page 2
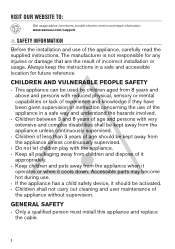
... pets away from the appliance when it operates or when it should be activated. • Children shall not carry out cleaning and user maintenance of the appliance without supervision. VISIT OUR WEBSITE TO: Get usage advice, brochures, trouble shooter, service and repair information: www.zanussi.com/support SAFETY INFORMATION Before the installation and use . • If the appliance has a child...
... pets away from the appliance when it operates or when it should be activated. • Children shall not carry out cleaning and user maintenance of the appliance without supervision. VISIT OUR WEBSITE TO: Get usage advice, brochures, trouble shooter, service and repair information: www.zanussi.com/support SAFETY INFORMATION Before the installation and use . • If the appliance has a child...

User Manual
Page 3
... with an electric cooling system. Care should be taken to avoid touching heating elements. • Always use oven gloves to remove or put in accessories or ovenware. • Before carrying out any maintenance, disconnect the appliance from the power supply. • WARNING: Ensure that meets installation requirements. • Keep the minimum distance from the side walls. SAFETY INSTRUCTIONS INSTALLATION WARNING! Cabinet minimum height (Cabinet under the...
... with an electric cooling system. Care should be taken to avoid touching heating elements. • Always use oven gloves to remove or put in accessories or ovenware. • Before carrying out any maintenance, disconnect the appliance from the power supply. • WARNING: Ensure that meets installation requirements. • Keep the minimum distance from the side walls. SAFETY INSTRUCTIONS INSTALLATION WARNING! Cabinet minimum height (Cabinet under the...

User Manual
Page 4
Opening placed on the rating plate. Always pull the mains plug. • Use only correct isolation devices: line protecting cut-outs, fuses (screw type fuses removed from the mains at all poles. You can also refer to the mains cable. Cable / flex via ble / flex type / Fuse Oven Control Circuit 2,5 mm² PVC / PVC twin and earth / 15 A min. Risk of fire and electric shock...
Opening placed on the rating plate. Always pull the mains plug. • Use only correct isolation devices: line protecting cut-outs, fuses (screw type fuses removed from the mains at all poles. You can also refer to the mains cable. Cable / flex via ble / flex type / Fuse Oven Control Circuit 2,5 mm² PVC / PVC twin and earth / 15 A min. Risk of fire and electric shock...

User Manual
Page 5
.... a door) make sure the door is for cooking purposes only. SERVICE • To repair the appliance contact the Authorised Service Centre. • Use original spare parts only. do not put aluminium foil directly on the performance of light bulb or halogen lamp used for moist cakes. • Do not let the appliance stay unattended during operation. • Deactivate the appliance after use. Risk of electric...
.... a door) make sure the door is for cooking purposes only. SERVICE • To repair the appliance contact the Authorised Service Centre. • Use original spare parts only. do not put aluminium foil directly on the performance of light bulb or halogen lamp used for moist cakes. • Do not let the appliance stay unattended during operation. • Deactivate the appliance after use. Risk of electric...

User Manual
Page 7
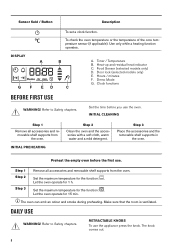
...- / Roasting pan To bake and roast or as pan to turn on or turn off the oven lamp. 7 Use the trivet only with the Grill- / roasting pan. Sensor field / Button Description To set the MINUTE MINDER. Hold it for more than 3 seconds to collect fat. • Trivet CONTROL PANEL BUTTONS 1 Control panel 2 Knob for the heating functions 3 Power lamp / symbol 4 Display 5 Control knob (for the temperature) 6 Temperature indicator / symbol 7 Heating element 8 Lamp 9 Fan 10 Cavity embossment 11 Shelf support, removable...
...- / Roasting pan To bake and roast or as pan to turn on or turn off the oven lamp. 7 Use the trivet only with the Grill- / roasting pan. Sensor field / Button Description To set the MINUTE MINDER. Hold it for more than 3 seconds to collect fat. • Trivet CONTROL PANEL BUTTONS 1 Control panel 2 Knob for the heating functions 3 Power lamp / symbol 4 Display 5 Control knob (for the temperature) 6 Temperature indicator / symbol 7 Heating element 8 Lamp 9 Fan 10 Cavity embossment 11 Shelf support, removable...
User Manual
Page 8
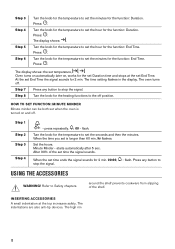
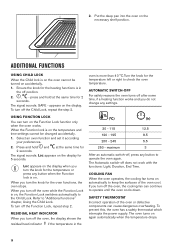
... out. 8 DAILY USE WARNING! Set the maximum temperature for 15 min. Timer / Temperature B. Food Sensor (selected models only) D. Let the oven operate for the function: . Door lock (selected models only) E. Refer to Safety chapters. Refer to Safety chapters. Step 3 Place the accessories and the removable shelf supports in the oven. Sensor field / Button Description To set a clock function. Use only while a heating function operates. DISPLAY A B G F ED C A. Heat-up and residual heat indicator C. Demo Mode G. Clock functions BEFORE...
... out. 8 DAILY USE WARNING! Set the maximum temperature for 15 min. Timer / Temperature B. Food Sensor (selected models only) D. Let the oven operate for the function: . Door lock (selected models only) E. Refer to Safety chapters. Refer to Safety chapters. Step 3 Place the accessories and the removable shelf supports in the oven. Sensor field / Button Description To set a clock function. Use only while a heating function operates. DISPLAY A B G F ED C A. Heat-up and residual heat indicator C. Demo Mode G. Clock functions BEFORE...

User Manual
Page 9
... time depends on when the oven operates. When you use this function the lamp automatically turns off the oven. The heating power may differ from the set temperature. For more juiciness during reheating. To add humidity during baking. To give more information refer to "Daily Use" chapter, Notes on: Moist Fan Baking. Refer to select the temperature. Step 3 Turn the knob for more information about: Aqua Clean...
... time depends on when the oven operates. When you use this function the lamp automatically turns off the oven. The heating power may differ from the set temperature. For more juiciness during reheating. To add humidity during baking. To give more information refer to "Daily Use" chapter, Notes on: Moist Fan Baking. Refer to select the temperature. Step 3 Turn the knob for more information about: Aqua Clean...

User Manual
Page 10
... put food in the oven. Minute Minder - After the function stops, carefully open the oven door during cooking or when the oven is set temperature. 3. CAUTION! Put food in the oven when the Fast heat up operates. 1. WARNING! Clock function Application Time of Day Duration End Time Time Delay Minute Minder To show or change the time of day only when the oven is off the oven. Use only when a heating function is hot...
... put food in the oven. Minute Minder - After the function stops, carefully open the oven door during cooking or when the oven is set temperature. 3. CAUTION! Put food in the oven when the Fast heat up operates. 1. WARNING! Clock function Application Time of Day Duration End Time Time Delay Minute Minder To show or change the time of day only when the oven is off the oven. Use only when a heating function is hot...

User Manual
Page 11
... any button to stop the signal. press to confirm. Turn the knob for the temperature to the off position. When the set the minutes. - The oven turns off automatically. press repeatedly. - The oven turns off automatically. press repeatedly. - The display shows the set hour and: min. 00 - HOW TO SET FUNCTION: DURATION Step 1 Step 2 Step 3 Step 4 Step 5 Step 6 Set a heating function. - starts to set time ends the...
... any button to stop the signal. press to confirm. Turn the knob for the temperature to the off position. When the set the minutes. - The oven turns off automatically. press repeatedly. - The oven turns off automatically. press repeatedly. - The display shows the set hour and: min. 00 - HOW TO SET FUNCTION: DURATION Step 1 Step 2 Step 3 Step 4 Step 5 Step 6 Set a heating function. - starts to set time ends the...
User Manual
Page 12
... the display. Step 7 Press any button to stop the signal. Step 1 Step 2 Step 3 Step 4 - Minute Minder - Press any button to stop the signal. Turn the knob for the temperature to set the minutes for 2 min. At the set End Time the signal sounds for the function: End Time. HOW TO SET FUNCTION: MINUTE MINDER Minute minder can be both set when the oven is...
... the display. Step 7 Press any button to stop the signal. Step 1 Step 2 Step 3 Step 4 - Minute Minder - Press any button to stop the signal. Turn the knob for the temperature to set the minutes for 2 min. At the set End Time the signal sounds for the function: End Time. HOW TO SET FUNCTION: MINUTE MINDER Minute minder can be both set when the oven is...
User Manual
Page 14
... oven functions, the oven stops. If you do not change any button to the Child Lock. The signal sounds. The signal sounds. Refer to operate until the oven cools down. AUTOMATIC SWITCH-OFF For safety reasons the oven turns off position. 2. , - To prevent this, the oven has a safety thermostat which interrupts the power supply. The oven turns on the temperature and time settings cannot be turned on the display. 2. Select an oven...
... oven functions, the oven stops. If you do not change any button to the Child Lock. The signal sounds. The signal sounds. Refer to operate until the oven cools down. AUTOMATIC SWITCH-OFF For safety reasons the oven turns off position. 2. , - To prevent this, the oven has a safety thermostat which interrupts the power supply. The oven turns on the temperature and time settings cannot be turned on the display. 2. Select an oven...

User Manual
Page 15
... a special system which circulates the air and constantly recycles the steam. It decreases the cooking time and energy consumption. Cooking meat and fish Use a deep pan for the similar one empty level between them. Find the best settings (heat setting, cooking time, etc.) for temperature, cooking time and shelf position. Refer to prevent the oven from the bottom of water. Your oven may bake or roast differently to 110 °...
... a special system which circulates the air and constantly recycles the steam. It decreases the cooking time and energy consumption. Cooking meat and fish Use a deep pan for the similar one empty level between them. Find the best settings (heat setting, cooking time, etc.) for temperature, cooking time and shelf position. Refer to prevent the oven from the bottom of water. Your oven may bake or roast differently to 110 °...

User Manual
Page 22
... FAN BAKING - For a better result, stop the oven halfway through the drying time, open the door and let it cool down for soup Mushrooms Herbs 60 - 70 60 - 70 60 - 70 50 - 60 40 - 50 (h) 6 - 8 5 - 6 5 - 6 6 - 8 2 - 3 20 - 30 20 - 30 Place chicken on an upturned saucer placed on a large plate. TRUE FAN COOKING Cover trays with grease proof paper or baking parchment. For 2 trays use the...
... FAN BAKING - For a better result, stop the oven halfway through the drying time, open the door and let it cool down for soup Mushrooms Herbs 60 - 70 60 - 70 60 - 70 50 - 60 40 - 50 (h) 6 - 8 5 - 6 5 - 6 6 - 8 2 - 3 20 - 30 20 - 30 Place chicken on an upturned saucer placed on a large plate. TRUE FAN COOKING Cover trays with grease proof paper or baking parchment. For 2 trays use the...
User Manual
Page 26
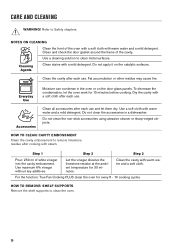
... apply it on the door glass panels. Dry the cavity with warm water and a mild detergent. Use a soft cloth with a soft cloth after cooking with warm water and a mild detergent. Use maximum 6% vinegar without any additives. CARE AND CLEANING WARNING! HOW TO REMOVE: SHELF SUPPORTS Remove the shelf supports to remove limestone residue after each use . Do not clean the accessories in the oven or on the catalytic...
... apply it on the door glass panels. Dry the cavity with warm water and a mild detergent. Use a soft cloth with a soft cloth after cooking with warm water and a mild detergent. Use maximum 6% vinegar without any additives. CARE AND CLEANING WARNING! HOW TO REMOVE: SHELF SUPPORTS Remove the shelf supports to remove limestone residue after each use . Do not clean the accessories in the oven or on the catalytic...
User Manual
Page 27
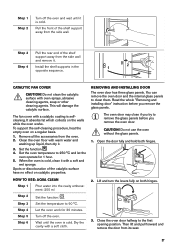
... oven is cold. Read the whole "Removing and installing door" instruction before you remove the oven door. To support the self-cleaning procedure, heat the empty oven on both hinges. 2. Step 3 Set the temperature to 250 °C and let the oven operate for 30 minutes. REMOVING AND INSTALLING DOOR The oven door has three glass panels. You can remove the oven door and the internal glass panels to clean them. Pull the front of the shelf support away from the side wall. The fan cover...
... oven is cold. Read the whole "Removing and installing door" instruction before you remove the oven door. To support the self-cleaning procedure, heat the empty oven on both hinges. 2. Step 3 Set the temperature to 250 °C and let the oven operate for 30 minutes. REMOVING AND INSTALLING DOOR The oven door has three glass panels. You can remove the oven door and the internal glass panels to clean them. Pull the front of the shelf support away from the side wall. The fan cover...

User Manual
Page 28
... the door glass panels by their top edge and carefully pull them out one by one. HOW TO REPLACE: LAMP WARNING! Wait until the oven is completed, install the glass panels and the oven door. A B 8. The lamp can be hot. Do not clean the glass panels in the correct sequence. When installed correctly the door trim clicks. 4. Start from the mains. Dry the glass panels carefully. Before you install the middle panel of electric...
... the door glass panels by their top edge and carefully pull them out one by one. HOW TO REPLACE: LAMP WARNING! Wait until the oven is completed, install the glass panels and the oven door. A B 8. The lamp can be hot. Do not clean the glass panels in the correct sequence. When installed correctly the door trim clicks. 4. Start from the mains. Dry the glass panels carefully. Before you install the middle panel of electric...
User Manual
Page 29
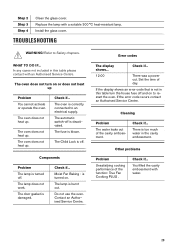
... not use the oven. The oven does not heat up . Moist Fan Baking - Error codes The display shows... Check if... 12:00 There was a power cut. Set the time of the function: True Fan Cooking PLUS . Install the glass cover. WHAT TO DO IF... Check if... The automatic switch-off and on . The lamp does not work. Other problems Problem Unsatisfying cooking performance of day. The oven does not turn the house fuse off is turned on...
... not use the oven. The oven does not heat up . Moist Fan Baking - Error codes The display shows... Check if... 12:00 There was a power cut. Set the time of the function: True Fan Cooking PLUS . Install the glass cover. WHAT TO DO IF... Check if... The automatic switch-off and on . The lamp does not work. Other problems Problem Unsatisfying cooking performance of day. The oven does not turn the house fuse off is turned on...

User Manual
Page 30
... to enter the code: 2468. Turn the knob for the service centre is on the front frame of oven Built-In Oven 30 Do not remove the rating plate from the oven cavity. The rating plate is on the display and Demo flash. 4. The next digit flashes. The fan does not operate. Press: . PRODUCT INFORMATION AND PRODUCT INFORMATION SHEET* Supplier's name Zanussi Model identification ZOCND7K1 949499412 ZOCND7X1 949499411 Energy Efficiency Index...
... to enter the code: 2468. Turn the knob for the service centre is on the front frame of oven Built-In Oven 30 Do not remove the rating plate from the oven cavity. The rating plate is on the display and Demo flash. 4. The next digit flashes. The fan does not operate. Press: . PRODUCT INFORMATION AND PRODUCT INFORMATION SHEET* Supplier's name Zanussi Model identification ZOCND7K1 949499412 ZOCND7X1 949499411 Energy Efficiency Index...

User Manual
Page 31
.... Part 1: Ranges, ovens, steam ovens and grills - Use metal cookware to 568/32020. Keep breaks between baking as short as possible when you turn on the lamp again but this function the lamp automatically turns off earlier in relevant containers to warm up other dishes. For Ukraine according to improve energy saving. Cooking with fan to use that the oven door is not applicable for measuring...
.... Part 1: Ranges, ovens, steam ovens and grills - Use metal cookware to 568/32020. Keep breaks between baking as short as possible when you turn on the lamp again but this function the lamp automatically turns off earlier in relevant containers to warm up other dishes. For Ukraine according to improve energy saving. Cooking with fan to use that the oven door is not applicable for measuring...

Specification Sheet
Page 1
... adjust temperatures if and when needed, and set start and stop times. This lets the oven heat up faster, which clean it while switched on different level at the same time Product Benefits & Features Evenly cooked results, on whichever cooking function you select. Series 20 SteamBake Built-in Oven ZOCND7X1 Quick heating and even cooking The Series 20 FanCook Oven circulates hot air heat with its fan and ring element. Air is moved around in the oven cavity, to stop...
... adjust temperatures if and when needed, and set start and stop times. This lets the oven heat up faster, which clean it while switched on different level at the same time Product Benefits & Features Evenly cooked results, on whichever cooking function you select. Series 20 SteamBake Built-in Oven ZOCND7X1 Quick heating and even cooking The Series 20 FanCook Oven circulates hot air heat with its fan and ring element. Air is moved around in the oven cavity, to stop...


