Zanussi ZOCND7X1 Support and Manuals
Get Help and Manuals for this Zanussi item
View All Support Options Below
Free Zanussi ZOCND7X1 manuals!
Problems with Zanussi ZOCND7X1?
Ask a Question
Free Zanussi ZOCND7X1 manuals!
Problems with Zanussi ZOCND7X1?
Ask a Question
Popular Zanussi ZOCND7X1 Manual Pages
User Manual - Page 2
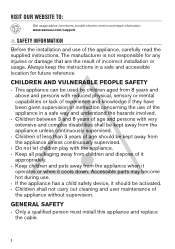
...for future reference. Accessible parts may become hot during use..., carefully read the supplied instructions. GENERAL SAFETY • Only a qualified person must install this appliance and replace the cable.
2 Always keep the instructions in a safe way and...trouble shooter, service and repair information: www.zanussi.com/support
SAFETY INFORMATION Before the installation and use of incorrect...
User Manual - Page 3

... not use a damaged appliance. • Follow the installation instructions supplied with
the appliance. • Always take care when moving the appliance as
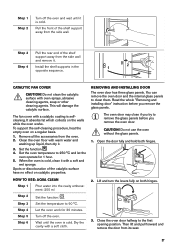
it must be replaced by the manufacturer, its Authorised Service Centre or similarly qualified persons to avoid an electrical hazard. • To remove the shelf supports first pull the front of the shelf...
User Manual - Page 7

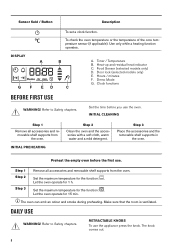
...bake and roast or as pan to turn on or turn off the oven lamp.
7
Sensor field / Button
Description
To set the MINUTE MINDER. Use the trivet only with the Grill- / roasting pan. Hold it for more than 3 seconds to ...the temperature) 6 Temperature indicator / symbol 7 Heating element 8 Lamp 9 Fan 10 Cavity embossment 11 Shelf support, removable 12 Shelf positions
For roasting and grilling.
User Manual - Page 8
... oven. Preheat the empty oven before you use . Set the maximum temperature for 15 min.
To check the oven temperature or the temperature of the core temperature sensor (if applicable). Door lock (selected models only) E.
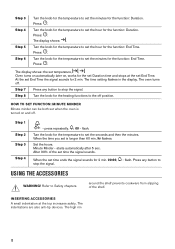
INITIAL CLEANING
Step 1 Remove all accessories and removable shelf supports from the oven. Step 3 Place the accessories and...
User Manual - Page 12
... in the display. The oven turns off . Step 8 Turn the knob for the heating functions to Safety chapters.
Step 1 Step 2 Step 3 Step 4
- Set the hours. starts automatically after 5 sec.
Press any button to stop the signal.
USING THE ACCESSORIES
WARNING! Refer to the off position. INSERTING ACCESSORIES A small ...
User Manual - Page 13
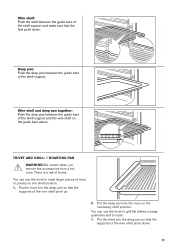
... of the wire shelf point down .
Wire shelf and deep pan together: Push the deep pan between the guide bars of the shelf support and the wire shelf on one shelf position. 1. You can use the trivet to toast. 1. You can use the trivet to grill flat dishes in ...
User Manual - Page 14
...for the heating functions is in the
oven is on accidentally. 1. Select an oven function and set it according
your preferences.
2. The signal sounds.
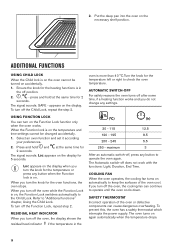
To prevent this, the oven has a safety.... Loc appears on the display when you turn the knob for 2 seconds. When you turn off , press any settings.
(°C)
(h)
30 - 115
12.5
120 - 195
8.5
200 - 245
5.5
250 - Refer to operate ...
User Manual - Page 15

... shelf position. Initially, monitor the performance when you with the standard settings for approximately 15 minutes before 3/4 of the set cooking time is up .
Refer to prevent the oven from the ... in a steamy environment and keep one .
CAKES / PAS- If you cannot find the settings for a special recipe, look for your cookware, recipes and quantities when you use two baking...
User Manual - Page 20
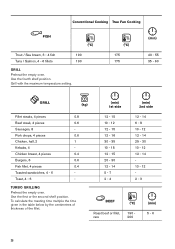
... first or the second shelf position. Chicken breast, 4 pieces
0.4
Burgers, 6
0.6
Fish fillet, 4 pieces
0.4
Toasted sandwiches, 4 - 6
-
Use the fourth shelf position. Grill with the maximum temperature setting.
(°C)
175 175
(min)
40 - 55 35 - 60
GRILL
(kg)
(min) 1st side
(min) 2nd side
Fillet steaks, 4 pieces
0.8
Beef steak, 4 pieces
0.6
Sausages, 8
- Conventional...
User Manual - Page 22

... whipped when still slightly frozen in places. - RECOMMENDED ACCESSORIES Use the dark and non-reflective tins and containers. For 2 trays use the third shelf position. Set the temperature to complete the drying. For 1 tray use the first and fourth shelf position. They have better heat absorption than the light colour and...
User Manual - Page 26
.... Refer to clean metal surfaces.
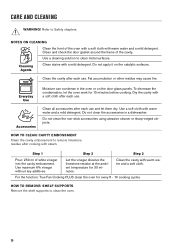
Do not clean the non-stick accessories using abrasive cleaner or sharp-edged objects. HOW TO REMOVE: SHELF SUPPORTS Remove the shelf supports to remove limestone residue after cooking with a soft cloth after each use and let them dry.
Accessories
Clean all accessories after each use. HOW...
User Manual - Page 27
... AQUA CLEAN
Step 1
Pour water into the cavity embossment: 200 ml
Step 2
Set the function: . Step 3 Set the temperature to clean them.
Do not clean the catalytic surface with a catalytic... and
wet sponge. Spots or discolouration of the shelf support away from the oven. 2.
Read the whole "Removing and installing door" instruction before you remove the glass panels. Step 3 Step ...
User Manual - Page 29
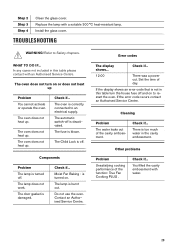
... is burnt out. Check if... Cleaning
Problem The water leaks out of the function: True Fan Cooking PLUS . Check if... You filled the cavity embossment with a suitable 300 °C heat-resistant lamp. Check if...
12:00
There was a power cut. TROUBLESHOOTING
WARNING! Error codes
The display shows... Set the time of day.
The automatic switch...
User Manual - Page 30

...problem yourself, contact your dealer or an Authorised Service Centre. The fan does not operate. Turn the knob for the service centre is activated and does not heat up.
Other problems... solution to
enter the code:
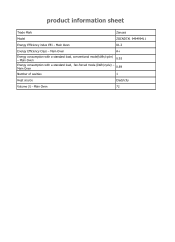
2468. PRODUCT INFORMATION AND PRODUCT INFORMATION SHEET*
Supplier's name
Zanussi
Model identification
ZOCND7K1 949499412 ZOCND7X1 949499411
Energy Efficiency Index...
Product information sheet - Page 1
...
Electricity
Volume (l) - Main Oven
81.2
Energy Efficiency Class - Main Oven
0.93
Energy consumption with a standard load, conventional mode(kWh/cycle) - product information sheet
Trade Mark
Zanussi
Model
ZOCND7X1 949499411
Energy Efficiency index EEI -
Zanussi ZOCND7X1 Reviews
We have not received any reviews for Zanussi yet.