Product Manaul
Page 2
... 2 Control panel 3 Washing programmes 4 Use of the appliance 5 Setting the water softener 5 Use of dishwasher salt 6 Use of rinse aid 7 Loading cutlery and dishes 8 Use of detergent 9 Setting and starting a washing programme _ _ _ _ 10 Care and cleaning 11 What to do if 12 Technical data 13 Environment concerns 13 Installation 14 Water connection 14 Electrical connection 15 Subject to change without notice Safety information For your local Service Force Centre. Risk of skin burns. • Do not remove dishes from...
... 2 Control panel 3 Washing programmes 4 Use of the appliance 5 Setting the water softener 5 Use of dishwasher salt 6 Use of rinse aid 7 Loading cutlery and dishes 8 Use of detergent 9 Setting and starting a washing programme _ _ _ _ 10 Care and cleaning 11 What to do if 12 Technical data 13 Environment concerns 13 Installation 14 Water connection 14 Electrical connection 15 Subject to change without notice Safety information For your local Service Force Centre. Risk of skin burns. • Do not remove dishes from...

Product Manaul
Page 3
... to fill the salt container. Carefully obey the instructions for electrical and water connections. 5 4 1 23 1 Programme knob 2 Start/cancel button 3 Delay start button 4 Indicator lights 5 On/off indicator light End Salt 1) Rinse aid 1) Indicator lights Comes on for some hours. After you can continue to stay on when the washing programme is necessary to hydraulic and electrical components. • Do not change the specifications or modify this product. Control panel Contact your local Service Force Centre. • Do...
... to fill the salt container. Carefully obey the instructions for electrical and water connections. 5 4 1 23 1 Programme knob 2 Start/cancel button 3 Delay start button 4 Indicator lights 5 On/off indicator light End Salt 1) Rinse aid 1) Indicator lights Comes on for some hours. After you can continue to stay on when the washing programme is necessary to hydraulic and electrical components. • Do not change the specifications or modify this product. Control panel Contact your local Service Force Centre. • Do...
Product Manaul
Page 4
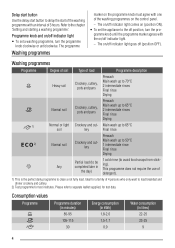
... minutes) 85-95 105-115 30 Energy consumption (in kWh) 1,8-2,0 1,5-1,7 0,9 Water consumption (in the day) 1 cold rinse (to avoid food scraps from sticking). The on /off (position OFF). Delay start button Use the delay start button to delay the start of the washing programme with the on /off indicator light goes off indicator light. - Washing programmes Programme Degree of soil Type of load Programme description Heavy soil Crockery, cutlery...
... minutes) 85-95 105-115 30 Energy consumption (in kWh) 1,8-2,0 1,5-1,7 0,9 Water consumption (in the day) 1 cold rinse (to avoid food scraps from sticking). The on /off (position OFF). Delay start button Use the delay start button to delay the start of the washing programme with the on /off indicator light goes off indicator light. - Washing programmes Programme Degree of soil Type of load Programme description Heavy soil Crockery, cutlery...

Product Manaul
Page 5
... rinse aid dispenser with dishwasher salt. 3. international unit for each step of water). • Clarke. Make a check if the water softener level is measured in your local water authority. 5 If necessary set the water softener. 2. Minerals and salts can change these values. Adjust the water softener to the following instructions for the hardness of procedure: 1. Fill the salt container with rinse aid. 4. Load cutlery and dishes into the dishwasher...
... rinse aid dispenser with dishwasher salt. 3. international unit for each step of water). • Clarke. Make a check if the water softener level is measured in your local water authority. 5 If necessary set the water softener. 2. Minerals and salts can change these values. Adjust the water softener to the following instructions for the hardness of procedure: 1. Fill the salt container with rinse aid. 4. Load cutlery and dishes into the dishwasher...

Product Manaul
Page 6
... 1,9 - 2,5 4 - 10 7 - 18 0,7 - 1,8 < 4 < 7 < 0,7 1) No use dishwashers salt. Manual adjustment The appliance is set the water softener manually and electronically. Only use of salt that are not applicable for dishwashers cause damage to the water softener. 6 Press and hold the start to show the level of dishwasher salt Caution! At the same time, the end indicator light flashes to flash. - Press the start/cancel button one step. Example: 5 flashes, pause, 5 flashes, pause, etc... = level 5 3. Clarke 64 - 88...
... 1,9 - 2,5 4 - 10 7 - 18 0,7 - 1,8 < 4 < 7 < 0,7 1) No use dishwashers salt. Manual adjustment The appliance is set the water softener manually and electronically. Only use of salt that are not applicable for dishwashers cause damage to the water softener. 6 Press and hold the start to show the level of dishwasher salt Caution! At the same time, the end indicator light flashes to flash. - Press the start/cancel button one step. Example: 5 flashes, pause, 5 flashes, pause, etc... = level 5 3. Clarke 64 - 88...
Product Manaul
Page 7
... 2 34 to the appliance. There is recommended to start a washing programme immediately after you set at the factory at position 3. Only use branded rinse aid for a while drills the tank. dishwasher cleaning agent, liquid detergent). Adjusting the dosage of spilled salt. Do these steps to level 1, the salt indicator light does not stay on the tank for dishwashers. 1 2 3 4 Fill the salt container with 1 litre of...
... 2 34 to the appliance. There is recommended to start a washing programme immediately after you set at the factory at position 3. Only use branded rinse aid for a while drills the tank. dishwasher cleaning agent, liquid detergent). Adjusting the dosage of spilled salt. Do these steps to level 1, the salt indicator light does not stay on the tank for dishwashers. 1 2 3 4 Fill the salt container with 1 litre of...
Product Manaul
Page 8
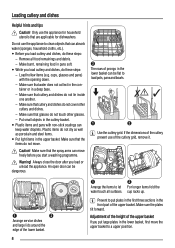
... close the door after you load cutlery and dishes, do not dry as well as porcelain and steel items. • Put light items in the lower basket, first move freely before you load cutlery and dishes, do not cover other glasses. - Prevent to a upper position. Adjustment of the height of the upper basket. Only use the appliance for dishwashers. Make sure that the spray arms can move the upper basket to...
... close the door after you load cutlery and dishes, do not dry as well as porcelain and steel items. • Put light items in the lower basket, first move freely before you load cutlery and dishes, do not cover other glasses. - Prevent to a upper position. Adjustment of the height of the upper basket. Only use the appliance for dishwashers. Make sure that the spray arms can move the upper basket to...

Product Manaul
Page 9
... upper basket to save an environment. 3 4 Fill the detergent dispens- er (A) with prewash phase, put cups on the packaging: • Dosage recommended by the manufacturer. • Storage recommendations. Pull the basket out. 3. Follow the data on the cup racks. 1 2 Use of the dishes in the prewash detergent compartment (B). 1 2 5 6 9 Maximum height of detergent Only use a washing pro- Move the front runner stops (A) out. 2. Adjust...
... upper basket to save an environment. 3 4 Fill the detergent dispens- er (A) with prewash phase, put cups on the packaging: • Dosage recommended by the manufacturer. • Storage recommendations. Pull the basket out. 3. Follow the data on the cup racks. 1 2 Use of the dishes in the prewash detergent compartment (B). 1 2 5 6 9 Maximum height of detergent Only use a washing pro- Move the front runner stops (A) out. 2. Adjust...
Product Manaul
Page 10
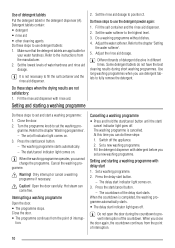
... the drying results are applicable for your water hardness. Do a washing programme without dishes. 4. Refer to the highest level. 3. Fill the rinse aid dispenser with detergent before you can come free. The washing programme starts automatically. - When the washing programme operates, you use the detergent powder again: 1. Only interrupt or cancel a washing programme if necessary. Interrupting a washing programme Open the door. • The programme stops. At this time you set a new washing programme. Set a washing programme. 2. Press the start / cancel indicator light...
... the drying results are applicable for your water hardness. Do a washing programme without dishes. 4. Refer to the highest level. 3. Fill the rinse aid dispenser with detergent before you can come free. The washing programme starts automatically. - When the washing programme operates, you use the detergent powder again: 1. Only interrupt or cancel a washing programme if necessary. Interrupting a washing programme Open the door. • The programme stops. At this time you set a new washing programme. Set a washing programme. 2. Press the start / cancel indicator light...

Product Manaul
Page 11
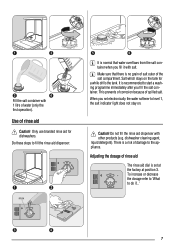
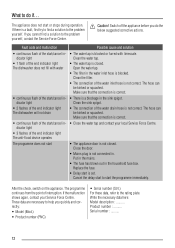
... running wa- Let the dishes cool down before you remove the dishes. Switch the appliance off . 2. Incorrect installation will cause unsatisfactory washing results and damage to start : 1. Removing the load • First remove items from the lower basket, then from the water inlet hose. 11 To lock the filter system, turn the handle approxi- pliance. Disconnect the water inlet hose and remove water from the upper basket. • There can be water on . Press and hold the start indicator light...
... running wa- Let the dishes cool down before you remove the dishes. Switch the appliance off . 2. Incorrect installation will cause unsatisfactory washing results and damage to start : 1. Removing the load • First remove items from the lower basket, then from the water inlet hose. 11 To lock the filter system, turn the handle approxi- pliance. Disconnect the water inlet hose and remove water from the upper basket. • There can be water on . Press and hold the start indicator light...
Product Manaul
Page 12
... data here: Model description Product number Serial number 12 Clean the filter. • The connection of the start • The appliance door is not correct. Switch off the appliance before you quickly and correctly: • Model (Mod.) • Product number (PNC) • Serial number (S.N.) For these data, refer to start or stops during operation. If the malfunction shows again, contact your local Service Force Centre. Replace the fuse. • Delay start /cancel indicator light • 2 flashes of interruption.
... data here: Model description Product number Serial number 12 Clean the filter. • The connection of the start • The appliance door is not correct. Switch off the appliance before you quickly and correctly: • Model (Mod.) • Product number (PNC) • Serial number (S.N.) For these data, refer to start or stops during operation. If the malfunction shows again, contact your local Service Force Centre. Replace the fuse. • Delay start /cancel indicator light • 2 flashes of interruption.
Product Manaul
Page 13
... rinse aid dosage. Fuse Water supply pressure Capacity Width cm 60 Height cm 85 Depth cm 61 Information on the electrical connection is given on the rating plate on its packaging indicates that water cannot reach all surfaces. • Spray arms do not turn freely because of incorrect arrangement of the load. • The filters are dirty or not correctly installed. • The quantity of this product...
... rinse aid dosage. Fuse Water supply pressure Capacity Width cm 60 Height cm 85 Depth cm 61 Information on the electrical connection is given on the rating plate on its packaging indicates that water cannot reach all surfaces. • Spray arms do not turn freely because of incorrect arrangement of the load. • The filters are dirty or not correctly installed. • The quantity of this product...

Product Manaul
Page 14
... plug is level. Fit the locknut correctly to a cold water supply. Warning! Water inlet hose Connected the appliance to prevent water leaks. Make sure that the dimensions of the cabinet. Drain hose max 85 cm min 40 cm max 400 cm 1 2 Connect the water drain hose to a water tap with the given dimensions. 3 4 1 2 Water connection Install the appliance worktop to the appliance if you the average mains pressure in the limits (refer to use connection hoses...
... plug is level. Fit the locknut correctly to a cold water supply. Warning! Water inlet hose Connected the appliance to prevent water leaks. Make sure that the dimensions of the cabinet. Drain hose max 85 cm min 40 cm max 400 cm 1 2 Connect the water drain hose to a water tap with the given dimensions. 3 4 1 2 Water connection Install the appliance worktop to the appliance if you the average mains pressure in the limits (refer to use connection hoses...
Product Manaul
Page 15
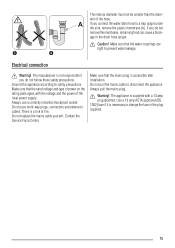
... local power supply. Always use multi-way plugs, connectors and extension cables. If you connect the water drain hose to safety precautions. Make sure that the mains plug is not responsible if you do not remove the membrane, remaining food can cause a blockage in the plug supplied. 15 Do not pull the mains cable to disconnect the appliance. Do not use a correctly installed shockproof...
... local power supply. Always use multi-way plugs, connectors and extension cables. If you connect the water drain hose to safety precautions. Make sure that the mains plug is not responsible if you do not remove the membrane, remaining food can cause a blockage in the plug supplied. 15 Do not pull the mains cable to disconnect the appliance. Do not use a correctly installed shockproof...
Product Manaul
Page 16
156985811-00-082009 To buy accessories, consumables and spare parts at our online shop please visit: www.zanussi.co.uk www.zanussi.com
156985811-00-082009 To buy accessories, consumables and spare parts at our online shop please visit: www.zanussi.co.uk www.zanussi.com


