
User Manual
Page 2
... WARNING! General Safety • Only a qualified person must install this appliance and replace the cable. 2 www.zanussi.com Daily use Hob - Hints and tips 10 6 Oven - Accessible parts are the result of the appliance without notice. Contents Safety information Safety instructions Product description Before first use Hob - Care and cleaning 15 7 Troubleshooting 17 7 Installation 18 8 Energy efficiency 20 8 Safety information Subject to change without supervision...
... WARNING! General Safety • Only a qualified person must install this appliance and replace the cable. 2 www.zanussi.com Daily use Hob - Hints and tips 10 6 Oven - Accessible parts are the result of the appliance without notice. Contents Safety information Safety instructions Product description Before first use Hob - Care and cleaning 15 7 Troubleshooting 17 7 Installation 18 8 Energy efficiency 20 8 Safety information Subject to change without supervision...
User Manual
Page 3
... kept away unless continuously supervised. • Always use oven gloves to remove or put in accessories or ovenware. • Before maintenance cut the power supply. • Ensure that the appliance is switched off before replacing the lamp to avoid an electrical hazard. • The means for use as www.zanussi.com 3 A short term cooking process has to be supervised continuously. •...
... kept away unless continuously supervised. • Always use oven gloves to remove or put in accessories or ovenware. • Before maintenance cut the power supply. • Ensure that the appliance is switched off before replacing the lamp to avoid an electrical hazard. • The means for use as www.zanussi.com 3 A short term cooking process has to be supervised continuously. •...

User Manual
Page 4
... rating plate agrees with the appliance. • Always take care when moving the appliance as a storage surface. Electrical Connection WARNING! If not, contact an electrician. • Always use a correctly installed shockproof socket. • Do not use a damaged appliance. • Follow the installation instruction supplied with the power supply. Risk of electrical shock. • This appliance is for household use only. • Do not change...
... rating plate agrees with the appliance. • Always take care when moving the appliance as a storage surface. Electrical Connection WARNING! If not, contact an electrician. • Always use a correctly installed shockproof socket. • Do not use a damaged appliance. • Follow the installation instruction supplied with the power supply. Risk of electrical shock. • This appliance is for household use only. • Do not change...
User Manual
Page 5
... the appliance. • Use a deep pan for cooking purposes only. Contact the Authorised Service Centre. • Be careful when you remove the door from the power supply. • Only use lamps with them on the packaging. • Do not clean the catalytic enamel (if applicable) with alcohol can cause scratches. do not keep hot cookware on the control panel. • Do not...
... the appliance. • Use a deep pan for cooking purposes only. Contact the Authorised Service Centre. • Be careful when you remove the door from the power supply. • Only use lamps with them on the packaging. • Do not clean the catalytic enamel (if applicable) with alcohol can cause scratches. do not keep hot cookware on the control panel. • Do not...
User Manual
Page 6
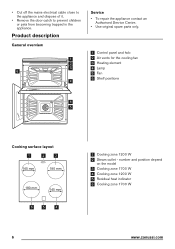
.... Product description General overview 1 2 3 63 2 1 4 Service • To repair the appliance contact an Authorised Service Centre. • Use original spare parts only. 1 Control panel and hob 2 Air vents for the cooling fan 3 Heating element 4 Lamp 5 Fan 6 Shelf positions 5 4 4 3 5 2 1 Cooking surface layout 1 2 3 145 mm 180 mm 180 mm 145 mm 6 5 4 6 1 Cooking zone 1200 W 2 Steam outlet - number and position depend on the model 3 Cooking zone 1700 W 4 Cooking zone 1200 W 5 Residual heat indicator 6 Cooking zone 1700 W www.zanussi...
.... Product description General overview 1 2 3 63 2 1 4 Service • To repair the appliance contact an Authorised Service Centre. • Use original spare parts only. 1 Control panel and hob 2 Air vents for the cooling fan 3 Heating element 4 Lamp 5 Fan 6 Shelf positions 5 4 4 3 5 2 1 Cooking surface layout 1 2 3 145 mm 180 mm 180 mm 145 mm 6 5 4 6 1 Cooking zone 1200 W 2 Steam outlet - number and position depend on the model 3 Cooking zone 1700 W 4 Cooking zone 1200 W 5 Residual heat indicator 6 Cooking zone 1700 W www.zanussi...

User Manual
Page 7
...- / roasting pan. Initial Cleaning Remove all accessories from residual heat. Clean the appliance and the accessories before the cooking process is normal. Daily use • Trivet For roasting and grilling. Heat up one oven at a time. 1. Let the appliance operate for 1 hour. 3. Turn the knob to Safety chapters. Refer to a necessary heat setting. Hob - Let the appliance operate for 15 minutes. www.zanussi.com 7 Before first use Preheat the two ovens...
...- / roasting pan. Initial Cleaning Remove all accessories from residual heat. Clean the appliance and the accessories before the cooking process is normal. Daily use • Trivet For roasting and grilling. Heat up one oven at a time. 1. Let the appliance operate for 1 hour. 3. Turn the knob to Safety chapters. Refer to a necessary heat setting. Hob - Let the appliance operate for 15 minutes. www.zanussi.com 7 Before first use Preheat the two ovens...

User Manual
Page 8
... clean the glass surface with a moist cloth. The indicator comes on the surface. • Remove when the hob is hot. Refer to avoid burns. Examples of the hob. • Use a special scraper for the surface of cooking applications Heat setting: 2 3 4 5 6 Application: Gentle simmering Simmering Frying / browning Bringing to the boil Bringing to the hob. Care and cleaning WARNING! Take care...
... clean the glass surface with a moist cloth. The indicator comes on the surface. • Remove when the hob is hot. Refer to avoid burns. Examples of the hob. • Use a special scraper for the surface of cooking applications Heat setting: 2 3 4 5 6 Application: Gentle simmering Simmering Frying / browning Bringing to the boil Bringing to the hob. Care and cleaning WARNING! Take care...
User Manual
Page 9
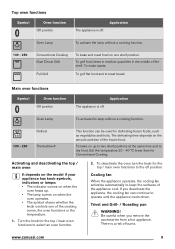
... without a cooking function. 100 - 250 Conventional Cooking Dual Circuit Grill Full Grill To bake and roast food on when the oven heats up to two shelf positions at the same time and to keep the surfaces of the frozen food. Be careful when you deactivate the appliance, the cooling fan can be used for the top / main oven functions to operate until the...
... without a cooking function. 100 - 250 Conventional Cooking Dual Circuit Grill Full Grill To bake and roast food on when the oven heats up to two shelf positions at the same time and to keep the surfaces of the frozen food. Be careful when you deactivate the appliance, the cooling fan can be used for the top / main oven functions to operate until the...
User Manual
Page 10
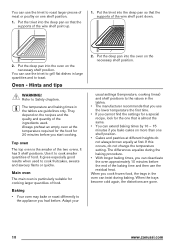
... the deep pan so that the supports of the wire shelf point up. 1. When the trays become cold again, the distortions are guidelines only. You can use the residual heat. The differences equalize during baking. Top oven The top oven is the smaller of meat or poultry on the necessary shelf position. It has 3 shelf positions. When you start cooking. Put the...
... the deep pan so that the supports of the wire shelf point up. 1. When the trays become cold again, the distortions are guidelines only. You can use the residual heat. The differences equalize during baking. Top oven The top oven is the smaller of meat or poultry on the necessary shelf position. It has 3 shelf positions. When you start cooking. Put the...
User Manual
Page 11
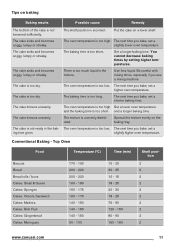
... 80 - 90 150 - 180 Shelf position 2 2 2 2 2 2 2 2 2 2 www.zanussi.com 11 The cake is too high. The next time you bake, set a higher oven temperature. Spread the mixture evenly on a lower shelf. The oven temperature is not ready in the mixture. The next time you bake, set a slightly higher oven temperature. Put the cake on the baking tray. Use less liquid. The cake sinks and becomes soggy...
... 80 - 90 150 - 180 Shelf position 2 2 2 2 2 2 2 2 2 2 www.zanussi.com 11 The cake is too high. The next time you bake, set a higher oven temperature. Spread the mixture evenly on a lower shelf. The oven temperature is not ready in the mixture. The next time you bake, set a slightly higher oven temperature. Put the cake on the baking tray. Use less liquid. The cake sinks and becomes soggy...

User Manual
Page 12
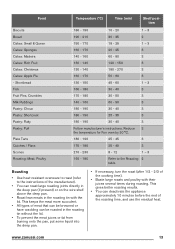
... Pie Souffles Vegetables: Baked Jacket Potatos Vegetables: Roast Potatos Yorkshire Pudding Large Yorkshire Pudding Individual Roasting Meat, Poultry 160 - 170 25 - 30 130 - 150 45 - 60 170 - 180 50 - 60 160 - 170 150 - 180 160 - 180 80 - 90 Follow manufacturer`s instructions. 170 - 190 ...- 190 60 - 90 220 - 210 25 - 40 210 - 220 15 - 25 Refer to the Roasting table. Main Oven Shelf positions are not critical but ensure that the oven accessories are evenly spaced when more than one is used. Shelf position 2 2 2 2 2 2 2 2 2 2 2 2 2 2 2 2 2 3 2 2 2 2 2 2 2 12 www.zanussi.com
... Pie Souffles Vegetables: Baked Jacket Potatos Vegetables: Roast Potatos Yorkshire Pudding Large Yorkshire Pudding Individual Roasting Meat, Poultry 160 - 170 25 - 30 130 - 150 45 - 60 170 - 180 50 - 60 160 - 170 150 - 180 160 - 180 80 - 90 Follow manufacturer`s instructions. 170 - 190 ...- 190 60 - 90 220 - 210 25 - 40 210 - 220 15 - 25 Refer to the Roasting table. Main Oven Shelf positions are not critical but ensure that the oven accessories are evenly spaced when more than one is used. Shelf position 2 2 2 2 2 2 2 2 2 2 2 2 2 2 2 2 2 3 2 2 2 2 2 2 2 12 www.zanussi.com
User Manual
Page 13
... can roast large roasting joints directly in the deep pan (if present) or on the wire shelf above the deep pan. • Roast lean meats in the roasting tin without the lid. • To prevent the meat juices or fat from burning onto the pan, put some liquid into the deep pan. • If necessary, turn the roast (after 1/2 - 2/3 of the roasting time, and use the residual heat...
... can roast large roasting joints directly in the deep pan (if present) or on the wire shelf above the deep pan. • Roast lean meats in the roasting tin without the lid. • To prevent the meat juices or fat from burning onto the pan, put some liquid into the deep pan. • If necessary, turn the roast (after 1/2 - 2/3 of the roasting time, and use the residual heat...
User Manual
Page 14
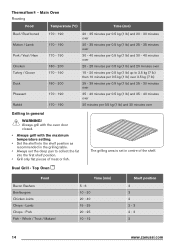
...oven door closed. • Always grill with the maximum temperature setting. • Set the shelf into the shelf position as recommended in the grilling table. • Always set in general WARNING! Top Oven Food Bacon Rashers Beefburgers Chicken Joints Chops - Thermaflow® - The grilling area is set the deep pan...minutes over Grilling in centre of meat or fish. Whole / Trout / Makarel Time (min) 5 - 6 10 - 20 20 - 40 15 - 25 20 - 25 10 - 12 Shelf position 3 3 2 2 - 3 2 - 3 2 14 www.zanussi.com Main Oven Roasting Food Temperature (°C) Time (min) Beef / Beef boned...
...oven door closed. • Always grill with the maximum temperature setting. • Set the shelf into the shelf position as recommended in the grilling table. • Always set in general WARNING! Top Oven Food Bacon Rashers Beefburgers Chicken Joints Chops - Thermaflow® - The grilling area is set the deep pan...minutes over Grilling in centre of meat or fish. Whole / Trout / Makarel Time (min) 5 - 6 10 - 20 20 - 40 15 - 25 20 - 25 10 - 12 Shelf position 3 3 2 2 - 3 2 - 3 2 14 www.zanussi.com Main Oven Roasting Food Temperature (°C) Time (min) Beef / Beef boned...

User Manual
Page 15
... the grill pan. • Clean stubborn dirt with warm water and a cleaning agent. • To clean metal surfaces, use a dedicated cleaning agent. • Clean the appliance interior after each use. Dry it with a soft cloth. Put the food on cleaning • Clean the front of the catalytic surface have nonstick accessories, do not clean them dry. WARNING! Clean the oven control panel with warm water and a cleaning agent. •...
... the grill pan. • Clean stubborn dirt with warm water and a cleaning agent. • To clean metal surfaces, use a dedicated cleaning agent. • Clean the appliance interior after each use. Dry it with a soft cloth. Put the food on cleaning • Clean the front of the catalytic surface have nonstick accessories, do not clean them dry. WARNING! Clean the oven control panel with warm water and a cleaning agent. •...
User Manual
Page 16
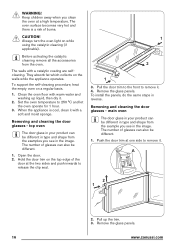
... seal. 1 2 1 3. Always turn the oven light on a regular basis. 1. To support the self-cleaning procedure, heat the empty oven on while using the catalytic cleaning (if applicable). Remove the glass panels. 16 www.zanussi.com When the appliance is a risk of the door at the two sides and push inwards to remove it . 2. Removing and cleaning the door glasses - A 2 1 2. The walls with a soft and moist sponge. Set the oven temperature to remove it with a catalytic...
... seal. 1 2 1 3. Always turn the oven light on a regular basis. 1. To support the self-cleaning procedure, heat the empty oven on while using the catalytic cleaning (if applicable). Remove the glass panels. 16 www.zanussi.com When the appliance is a risk of the door at the two sides and push inwards to remove it . 2. Removing and cleaning the door glasses - A 2 1 2. The walls with a soft and moist sponge. Set the oven temperature to remove it with a catalytic...
User Manual
Page 17
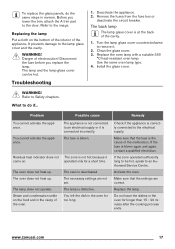
... trim, attach the A trim part to remove it come on the food and in the oven for too long. Troubleshooting 1. Turn the lamp glass cover counterclockwise to the door. Clean the glass cover. 3. WARNING! What to the electrical supply. You cannot activate the appliance. The lamp does not operate. Remedy Check if the appliance is correctly connected to do the same steps in the oven for a short time...
... trim, attach the A trim part to remove it come on the food and in the oven for too long. Troubleshooting 1. Turn the lamp glass cover counterclockwise to the door. Clean the glass cover. 3. WARNING! What to the electrical supply. You cannot activate the appliance. The lamp does not operate. Remedy Check if the appliance is correctly connected to do the same steps in the oven for a short time...
User Manual
Page 18
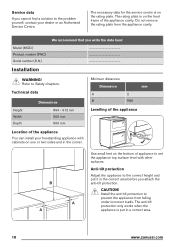
... remove the rating plate from falling A under incorrect loads. The rating plate is on the bottom of the appliance cavity. Model (MOD.) Product number (PNC) Serial number (S.N.) Installation We recommend that you attach the anti-tilt protection. Install the anti-tilt protection to Safety chapters. The necessary data for the service centre is put it in the corner. WARNING! Technical data Height Width Depth Dimensions...
... remove the rating plate from falling A under incorrect loads. The rating plate is on the bottom of the appliance cavity. Model (MOD.) Product number (PNC) Serial number (S.N.) Installation We recommend that you attach the anti-tilt protection. Install the anti-tilt protection to Safety chapters. The necessary data for the service centre is put it in the corner. WARNING! Technical data Height Width Depth Dimensions...

User Manual
Page 19
...adjust the side measurement. 3. Install the anti-tilt protection (A) on the right or left or right side of the appliance into the hole in the rear wall of the appliance (B) when you need to hold the weight. The manufacturer is supplied without a main plug or a main cable. Make sure that the wall is smooth. 2. To open the cover...of the space between the cupboards. Terminal board Do not remove blanking plates. L L N N N www.zanussi.com 19 If not, you push the appliance. Put the appliance in opposite sequence. Screw it into the wall. 50 mm 77 mm • The recommended cross-...
...adjust the side measurement. 3. Install the anti-tilt protection (A) on the right or left or right side of the appliance into the hole in the rear wall of the appliance (B) when you need to hold the weight. The manufacturer is supplied without a main plug or a main cable. Make sure that the wall is smooth. 2. To open the cover...of the space between the cupboards. Terminal board Do not remove blanking plates. L L N N N www.zanussi.com 19 If not, you push the appliance. Put the appliance in opposite sequence. Screw it into the wall. 50 mm 77 mm • The recommended cross-...
User Manual
Page 20
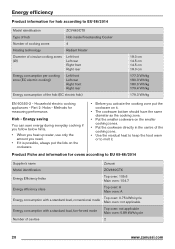
...; Put the cookware directly in the centre of the cooking zone. • Use the residual heat to keep the food warm or to EU 65-66/2014 Supplier's name Model identification Energy Efficiency Index Energy efficiency class Energy consumption with a standard load, conventional mode Energy consumption with a standard load, fan-forced mode Number of the hob (EC electric hob) 18.0 cm...
...; Put the cookware directly in the centre of the cooking zone. • Use the residual heat to keep the food warm or to EU 65-66/2014 Supplier's name Model identification Energy Efficiency Index Energy efficiency class Energy consumption with a standard load, conventional mode Energy consumption with a standard load, fan-forced mode Number of the hob (EC electric hob) 18.0 cm...
User Manual
Page 21
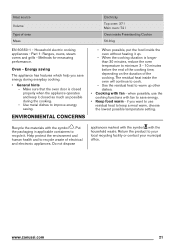
... cooking. • General hints - Use metal dishes to warm up . - When possible, put the food inside the oven without heating it up other dishes. • Cooking with fan to save energy during the cooking. - The residual heat inside Freestanding Cooker 56.9 kg EN 60350-1 - when possible, use residual heat to keep it . www.zanussi.com 21 * Heat source Volume Type of oven Mass Electricity Top oven: 37 l Main oven: 72 l Oven inside...
... cooking. • General hints - Use metal dishes to warm up . - When possible, put the food inside the oven without heating it up other dishes. • Cooking with fan to save energy during the cooking. - The residual heat inside Freestanding Cooker 56.9 kg EN 60350-1 - when possible, use residual heat to keep it . www.zanussi.com 21 * Heat source Volume Type of oven Mass Electricity Top oven: 37 l Main oven: 72 l Oven inside...


