
Owners Manual
Page 11
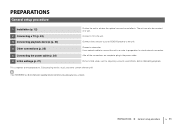
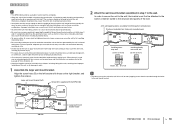
... devices (p. 23) 4 Other connections (p. 25) 5 Connecting the power cable (p. 26) 6 Initial settings (p. 27) Position the unit to the unit. The unit can also be mounted on a wall. After all the preparations. Perform initial setup, such as BD/DVD players) to a router in the power cable. PREPARATIONS ➤ General setup procedure En 11...
... devices (p. 23) 4 Other connections (p. 25) 5 Connecting the power cable (p. 26) 6 Initial settings (p. 27) Position the unit to the unit. The unit can also be mounted on a wall. After all the preparations. Perform initial setup, such as BD/DVD players) to a router in the power cable. PREPARATIONS ➤ General setup procedure En 11...
Owners Manual
Page 12
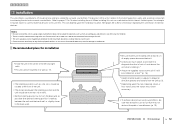
... from the unit (p. 5). 2 Depending upon the installation location. Heat and vibrations may result in the center of the left and right walls. • This unit can be mounted on a wall (p. 17). • The listening position (such as sofa, etc.) should be located at the front of the unit. •... The distance between the unit and the back wall, or slightly closer to achieving the desired surround sound effects. 123456 a Installation This ...
... from the unit (p. 5). 2 Depending upon the installation location. Heat and vibrations may result in the center of the left and right walls. • This unit can be mounted on a wall (p. 17). • The listening position (such as sofa, etc.) should be located at the front of the unit. •... The distance between the unit and the back wall, or slightly closer to achieving the desired surround sound effects. 123456 a Installation This ...
Owners Manual
Page 16
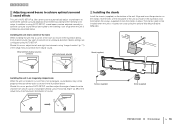
... (supplied) Stand (supplied) PREPARATIONS ➤ a Installation En 16 When left and right front channels using the optional Wall Mount Bracket SPM-K30. The stands need not be properly reflected off the walls as shown in the illustration below , front channel sound may not be installed when the unit is... mounted on the bottom of sound. In addition to achieve more natural sound. Stand (supplied) Installing the unit ...
... (supplied) Stand (supplied) PREPARATIONS ➤ a Installation En 16 When left and right front channels using the optional Wall Mount Bracket SPM-K30. The stands need not be properly reflected off the walls as shown in the illustration below , front channel sound may not be installed when the unit is... mounted on the bottom of sound. In addition to achieve more natural sound. Stand (supplied) Installing the unit ...
Owners Manual
Page 17
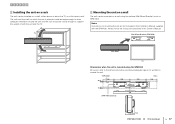
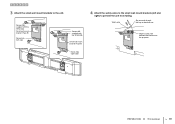
...PREPARATIONS ➤ a Installation En 17 TV Mounting the unit on a wall The unit can be installed on a shelf, either above or below and leave adequate space for mounting the unit are not included in this Owner's Manual. Wall Mount Bracket (SPM-K30) YSP-5600 TV Dimensions when the unit is placed should... be mounted on a wall using the SPM-K30 Be sure to refer to the dimensions ...
...PREPARATIONS ➤ a Installation En 17 TV Mounting the unit on a wall The unit can be installed on a shelf, either above or below and leave adequate space for mounting the unit are not included in this Owner's Manual. Wall Mount Bracket (SPM-K30) YSP-5600 TV Dimensions when the unit is placed should... be mounted on a wall using the SPM-K30 Be sure to refer to the dimensions ...
Owners Manual
Page 18
...in personal injury. • To ensure safety, all installation work should be performed by earthquakes. supplied with the SPM-K30) 2 Attach the wall mount bracket assembled in step 1 to fall , resulting in personal injury. • Installation must be secure enough to bear the weight of the unit... catches on, a loose cable, the unit may fall , resulting in place so that Yamaha cannot be held liable for accidents, including falling of the unit, resulting from falling, attach it to a wall constructed of drywall (plasterboard). • Be sure to use screws capable of supporting the ...
...in personal injury. • To ensure safety, all installation work should be performed by earthquakes. supplied with the SPM-K30) 2 Attach the wall mount bracket assembled in step 1 to fall , resulting in personal injury. • Installation must be secure enough to bear the weight of the unit... catches on, a loose cable, the unit may fall , resulting in place so that Yamaha cannot be held liable for accidents, including falling of the unit, resulting from falling, attach it to a wall constructed of drywall (plasterboard). • Be sure to use screws capable of supporting the ...
Owners Manual
Page 19
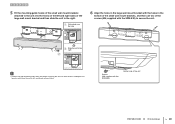
Safety wire Slip one end through the loop at the other end Slip the safety wire between the bracket and the projector PREPARATIONS ➤ a Installation En 19 123456 3 Attach the small wall mount brackets to prevent the unit from falling. supplied with the SPM-K30) Small wall mount bracket (Type B) Screw hole (left and right) to the unit. supplied with the SPM-K30) Small wall mount bracket (Type B) Screw hole (right side) 4 Attach the safety wires to the small wall mount brackets (left side) Screws(M4; Screws (M4;
Safety wire Slip one end through the loop at the other end Slip the safety wire between the bracket and the projector PREPARATIONS ➤ a Installation En 19 123456 3 Attach the small wall mount brackets to prevent the unit from falling. supplied with the SPM-K30) Small wall mount bracket (Type B) Screw hole (left and right) to the unit. supplied with the SPM-K30) Small wall mount bracket (Type B) Screw hole (right side) 4 Attach the safety wires to the small wall mount brackets (left side) Screws(M4; Screws (M4;
Owners Manual
Page 20
... the unit PREPARATIONS ➤ a Installation En 20 supplied with the SPM-K30) to or from the wall. Holding the unit loosely could cause the unit to fall, resulting in the bottom of the small wall mount brackets, and then use two of the screws (M6; Fit the hook into the holes on the... left and right sides of the large wall mount bracket and then slide the unit to the right. Screws (M6; 123456 5 Fit the mounting guide hooks of the small wall mount brackets attached to the unit into the hole. 6 Align the holes in the large...
... the unit PREPARATIONS ➤ a Installation En 20 supplied with the SPM-K30) to or from the wall. Holding the unit loosely could cause the unit to fall, resulting in the bottom of the small wall mount brackets, and then use two of the screws (M6; Fit the hook into the holes on the... left and right sides of the large wall mount bracket and then slide the unit to the right. Screws (M6; 123456 5 Fit the mounting guide hooks of the small wall mount brackets attached to the unit into the hole. 6 Align the holes in the large...
Owners Manual
Page 109
M MAC address 79 MAC address filter 50, 80 Manual setting (wireless connection) 55 Media sharing setup 60 Menu screen 27 Mobile device music 65 Mounting the unit on a wall 17 Movie 39 MP3 41 Music 39 MusicCast CONTROLLER app 5 N Network information 79 Network name 81 Network standby 81 Neural:X 75, 104 O Option menu...
M MAC address 79 MAC address filter 50, 80 Manual setting (wireless connection) 55 Media sharing setup 60 Menu screen 27 Mobile device music 65 Mounting the unit on a wall 17 Movie 39 MP3 41 Music 39 MusicCast CONTROLLER app 5 N Network information 79 Network name 81 Network standby 81 Neural:X 75, 104 O Option menu...
