

Owner's Manual
Page 3
... and functions 6 Front panel 6 Front panel display 7 Rear panel 8 Remote control 9 PREPARATION Installation 10 Connections 12 Before connecting components 12 Connecting external components 12 Connecting a subwoofer 13 Connecting the FM antenna 14 Preparing the remote control 14 Installing batteries in the remote control 14 Operation range of the remote control 14...
... and functions 6 Front panel 6 Front panel display 7 Rear panel 8 Remote control 9 PREPARATION Installation 10 Connections 12 Before connecting components 12 Connecting external components 12 Connecting a subwoofer 13 Connecting the FM antenna 14 Preparing the remote control 14 Installing batteries in the remote control 14 Operation range of the remote control 14...

Owner's Manual
Page 4
...control of your listening environment. Multi-channel Linear PCM signal capability ◆ Simple and easy connections with iPod/iPhone, using Yamaha wireless subwoofer kit (SWK-W10) (not available in some countries) ◆ iPod/iPhone interlock feature to turn on/off this unit...◆ HDMI input x 4, HDMI output x 1 ◆ HDMI interface for iPod (PDX-50TX/PDX-50BC) ◆ Wireless connection with subwoofer, using Yamaha wireless transmitter for standard, enhanced, or high-definition video (including 1080p video signal transmission) as well as the MP3 format ◆ Bass Extension...
...control of your listening environment. Multi-channel Linear PCM signal capability ◆ Simple and easy connections with iPod/iPhone, using Yamaha wireless subwoofer kit (SWK-W10) (not available in some countries) ◆ iPod/iPhone interlock feature to turn on/off this unit...◆ HDMI input x 4, HDMI output x 1 ◆ HDMI interface for iPod (PDX-50TX/PDX-50BC) ◆ Wireless connection with subwoofer, using Yamaha wireless transmitter for standard, enhanced, or high-definition video (including 1080p video signal transmission) as well as the MP3 format ◆ Bass Extension...

Owner's Manual
Page 7
... this unit is turned on (page 34). D Input channel indicators The channel component of the current input signal is established between the Yamaha wireless subwoofer kit (SWKW10) and this unit (page 13). INTRODUCTION PREPARATION Front panel display 12 3 4 5 6 7 89 TUNED STEREO AUTO ...) Show the current Radio Data System status (page 26). 6 Wireless indicators TRNS Lights up when a wireless connection is established between the Yamaha wireless transmitter for iPod (PDX50TX) and this unit (page 27). 7 Decoder indicators Light up when the corresponding decoder operates (page 21)....
... this unit is turned on (page 34). D Input channel indicators The channel component of the current input signal is established between the Yamaha wireless subwoofer kit (SWKW10) and this unit (page 13). INTRODUCTION PREPARATION Front panel display 12 3 4 5 6 7 89 TUNED STEREO AUTO ...) Show the current Radio Data System status (page 26). 6 Wireless indicators TRNS Lights up when a wireless connection is established between the Yamaha wireless transmitter for iPod (PDX50TX) and this unit (page 27). 7 Decoder indicators Light up when the corresponding decoder operates (page 21)....

Owner's Manual
Page 8
...SUB WOOFER FRONT SURROUND SUR. A IR-OUT terminal This is a control expansion terminal for commercial use only. 8 SYSTEM CONNECTOR terminal Use to connect a Yamaha subwoofer equipped with a SYSTEM CONNECTOR terminal to help you find them easily. BACK PRE OUT IR-OUT 45 0 6 AC IN 7 89 SUB COMPONENT WOOFER SYSTEM...Connect the FM antenna (page 14). 3 VIDEO jacks Connect to the video jacks of your external components (page 12). 4 SUBWOOFER jack Connect your subwoofer (page 13). 5 AUDIO IN jacks Connect to the analog audio output jacks of your external components (page 12). 6 DIGITAL ...
...SUB WOOFER FRONT SURROUND SUR. A IR-OUT terminal This is a control expansion terminal for commercial use only. 8 SYSTEM CONNECTOR terminal Use to connect a Yamaha subwoofer equipped with a SYSTEM CONNECTOR terminal to help you find them easily. BACK PRE OUT IR-OUT 45 0 6 AC IN 7 89 SUB COMPONENT WOOFER SYSTEM...Connect the FM antenna (page 14). 3 VIDEO jacks Connect to the video jacks of your external components (page 12). 4 SUBWOOFER jack Connect your subwoofer (page 13). 5 AUDIO IN jacks Connect to the analog audio output jacks of your external components (page 12). 6 DIGITAL ...

Owner's Manual
Page 13
... connection Connect the monaural input jack on your subwoofer by using the Yamaha wireless subwoofer kit (SWK-W10). Note • Be sure to use Input selection key Audio Analog audio output AUDIO IN (TV) TV External component with HDMI output... AUX 2 AUDIO IN AUX 1 TV DIGITAL IN IR IN RS-232C Monaural input System connector y • If the subwoofer is connected by using a system type connection, changing the power mode of the subwoofer (Yamaha subwoofer). The symbols in where it was purchased. Video signals input from the VIDEO IN (VIDEO) jack can make a wireless...
... connection Connect the monaural input jack on your subwoofer by using the Yamaha wireless subwoofer kit (SWK-W10). Note • Be sure to use Input selection key Audio Analog audio output AUDIO IN (TV) TV External component with HDMI output... AUX 2 AUDIO IN AUX 1 TV DIGITAL IN IR IN RS-232C Monaural input System connector y • If the subwoofer is connected by using a system type connection, changing the power mode of the subwoofer (Yamaha subwoofer). The symbols in where it was purchased. Video signals input from the VIDEO IN (VIDEO) jack can make a wireless...

Owner's Manual
Page 16
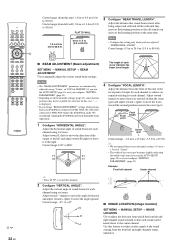
... and then set the crossover frequency to be output during the AUTO SETUP procedure. VOLUME CROSSOVER HIGH CUT MIN MAX MIN MAX Subwoofer Using AUTO SETUP (IntelliBeam) You can also start the "BEAM+SOUND OPTIMZ" procedure simply by holding down MINTELLIBEAM for loud test.... It is recommended that the parameters best match your listening environment. This menu takes about three minutes. 5 Run through y • If a subwoofer with "BEAM OPTIMZ ONLY" before using SET MENU, press IRETURN. 1 Press ISETUP. Close the curtains. 4. It is recommended that there are displayed...
... and then set the crossover frequency to be output during the AUTO SETUP procedure. VOLUME CROSSOVER HIGH CUT MIN MAX MIN MAX Subwoofer Using AUTO SETUP (IntelliBeam) You can also start the "BEAM+SOUND OPTIMZ" procedure simply by holding down MINTELLIBEAM for loud test.... It is recommended that the parameters best match your listening environment. This menu takes about three minutes. 5 Run through y • If a subwoofer with "BEAM OPTIMZ ONLY" before using SET MENU, press IRETURN. 1 Press ISETUP. Close the curtains. 4. It is recommended that there are displayed...

Owner's Manual
Page 17
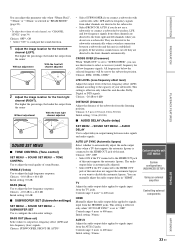
... unit rings the chimes. The MIC should be done if you are stored in step 5. XXXXXXXXSHOW RESULTXXXXXXXXXX MEASUREMENT COMPLETE BEAM MODE :5Beam/Plus2 SUBWOOFER :YES [ENTER]:Save set-up. [RETURN]:Do not save set to the same value even if "BEAM MODE :5 BEAM" is displayed ...press GENTER. Prepare to leave the room in the room. For details on the environment of your listening room, the beam angles of the subwoofer and run the AUTO SETUP procedure again or configure the settings manually. The best setting may be set -up. INTRODUCTION PREPARATION PLAYBACK FEATURES p...
... unit rings the chimes. The MIC should be done if you are stored in step 5. XXXXXXXXSHOW RESULTXXXXXXXXXX MEASUREMENT COMPLETE BEAM MODE :5Beam/Plus2 SUBWOOFER :YES [ENTER]:Save set-up. [RETURN]:Do not save set to the same value even if "BEAM MODE :5 BEAM" is displayed ...press GENTER. Prepare to leave the room in the room. For details on the environment of your listening room, the beam angles of the subwoofer and run the AUTO SETUP procedure again or configure the settings manually. The best setting may be set -up. INTRODUCTION PREPARATION PLAYBACK FEATURES p...

Owner's Manual
Page 30
... sound settings to be used in output timing between video signals and audio signals. SETTING PARAMETERS Adjusts the listening room and listening position settings. SUBWOOFER SET Configures the subwoofer settings. CHANNEL LEVEL Adjusts the volume of measurement. WIRELESS SETUP Configures the wireless settings. TONE CONTROL Adjusts the output level of the front...
... sound settings to be used in output timing between video signals and audio signals. SETTING PARAMETERS Adjusts the listening room and listening position settings. SUBWOOFER SET Configures the subwoofer settings. CHANNEL LEVEL Adjusts the volume of measurement. WIRELESS SETUP Configures the wireless settings. TONE CONTROL Adjusts the output level of the front...
Owner's Manual
Page 32
... you run the AUTO SETUP (page 15) or if you change "BEAM ADJUSTMENT" settings while playing back your iPod/iPhone connected to PDX-50TX, the subwoofer connected to move the focus toward the normal position (narrow the sweet spot). The length of this case, "- -" is heard so that all sounds can...
... you run the AUTO SETUP (page 15) or if you change "BEAM ADJUSTMENT" settings while playing back your iPod/iPhone connected to PDX-50TX, the subwoofer connected to move the focus toward the normal position (narrow the sweet spot). The length of this case, "- -" is heard so that all sounds can...
Owner's Manual
Page 33
... HDMI OUT jack of sound beams. TREBLE (Treble) Use to select a crossover (cutoff) frequency for the front left channels when you connect a subwoofer with a subwoofer cable. Choices: ON*, OFF • Select ON if the TV connected to adjust the low-frequency response. The higher the percentage, the louder ... MENU → TONE CONTROL Use to adjust the tonal quality of this unit does not support the automatic lipsync or you can use a subwoofer or connect a subwoofer by wireless. This setting is effective only when "AUTO LIP SYNC" is set to "OFF" Control range: 0 msec to 400 msec ...
... HDMI OUT jack of sound beams. TREBLE (Treble) Use to select a crossover (cutoff) frequency for the front left channels when you connect a subwoofer with a subwoofer cable. Choices: ON*, OFF • Select ON if the TV connected to adjust the low-frequency response. The higher the percentage, the louder ... MENU → TONE CONTROL Use to adjust the tonal quality of this unit does not support the automatic lipsync or you can use a subwoofer or connect a subwoofer by wireless. This setting is effective only when "AUTO LIP SYNC" is set to "OFF" Control range: 0 msec to 400 msec ...

Owner's Manual
Page 35
...available). To set the input selected in "AUDIO2", change "AUDIO1" parameter, and then reconfigure. The settings under "BASS OUT" are output from the subwoofer (or mixed into the front right and left speakers. Choices: AUX1*, AUX2, HDMI1, HDMI2, HDMI3, HDMI4, TV Note • The input already.... • Select PRE OUT to which the AUDIO IN (AUX 1) jacks are mixed into the front right and left channel signals if subwoofer is assigned. Choices: SPEAKER*, PRE OUT • Select SPEAKER to output sounds from the PRE OUT jacks of external center speakers. Audio ...
...available). To set the input selected in "AUDIO2", change "AUDIO1" parameter, and then reconfigure. The settings under "BASS OUT" are output from the subwoofer (or mixed into the front right and left speakers. Choices: AUX1*, AUX2, HDMI1, HDMI2, HDMI3, HDMI4, TV Note • The input already.... • Select PRE OUT to which the AUDIO IN (AUX 1) jacks are mixed into the front right and left channel signals if subwoofer is assigned. Choices: SPEAKER*, PRE OUT • Select SPEAKER to output sounds from the PRE OUT jacks of external center speakers. Audio ...

Owner's Manual
Page 38
... and left channel signals. 2 SURROUND PRE OUT jacks Output surround right and left channel signals. 4 CENTER PRE OUT jack Outputs center channel signals. 5 SUBWOOFER PRE OUT jack Connect a subwoofer with a built-in the system memory. CINEMA DSP programs (page 22) - Adaptive DRC (page 34) 38 En Choices: R.INPUT PW: OFF*, R.INPUT PW...
... and left channel signals. 2 SURROUND PRE OUT jacks Output surround right and left channel signals. 4 CENTER PRE OUT jack Outputs center channel signals. 5 SUBWOOFER PRE OUT jack Connect a subwoofer with a built-in the system memory. CINEMA DSP programs (page 22) - Adaptive DRC (page 34) 38 En Choices: R.INPUT PW: OFF*, R.INPUT PW...
Owner's Manual
Page 40
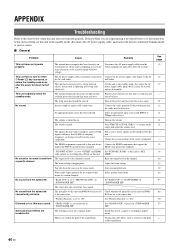
... below when this unit. Set "CROSS OVER" correctly in a square or rectangular shaped room. This unit fails to this unit in "SUBWOOFER SET". The HDMI components connected to turn it normally. "SUPPORT AUDIO" is muted. Set "BASS OUT" to this unit do not ...the system settings of the channel is set to the standby mode, disconnect the AC power supply cable, and contact the nearest authorized Yamaha dealer or service center. ■ General Problem Cause Remedy This unit does not operate properly. Select another beam mode. Set "Wireless ...
... below when this unit. Set "CROSS OVER" correctly in a square or rectangular shaped room. This unit fails to this unit in "SUBWOOFER SET". The HDMI components connected to turn it normally. "SUPPORT AUDIO" is muted. Set "BASS OUT" to this unit do not ...the system settings of the channel is set to the standby mode, disconnect the AC power supply cable, and contact the nearest authorized Yamaha dealer or service center. ■ General Problem Cause Remedy This unit does not operate properly. Select another beam mode. Set "Wireless ...

Owner's Manual
Page 41
...stations again. Remedy The remote control functions within a maximum range of 6 m (20 ft) and no This unit has been disconnected for "SUBWOOFER SET". The protection circuitry was played back. Set "AUTO LIP SYNC" to eliminate multi-path interference. "Not Available" appears on the external ... display does not appear. The cable is disabled on your TV and check the setting. The HDMI control function is not connected to "SUBWOOFER" in "SUBWOOFER SET". The TV does not support the automatic lipsync. The desired station cannot be tuned into . See page 14 - 25 - -...
...stations again. Remedy The remote control functions within a maximum range of 6 m (20 ft) and no This unit has been disconnected for "SUBWOOFER SET". The protection circuitry was played back. Set "AUTO LIP SYNC" to eliminate multi-path interference. "Not Available" appears on the external ... display does not appear. The cable is disabled on your TV and check the setting. The HDMI control function is not connected to "SUBWOOFER" in "SUBWOOFER SET". The TV does not support the automatic lipsync. The desired station cannot be tuned into . See page 14 - 25 - -...

Owner's Manual
Page 43
... 5.1-channel format. ■ DTS Neo:6 Neo:6 decodes the conventional 2-channel sources for 6-channel playback by HDMI version 1.3 and designed SETTINGS APPENDIX 43 En Selected as a subwoofer, for a total of only 1 surround channel for conventional Pro Logic technology). Selected as an optional audio standard for Blu-ray Disc, this technology delivers sound...
... 5.1-channel format. ■ DTS Neo:6 Neo:6 decodes the conventional 2-channel sources for 6-channel playback by HDMI version 1.3 and designed SETTINGS APPENDIX 43 En Selected as a subwoofer, for a total of only 1 surround channel for conventional Pro Logic technology). Selected as an optional audio standard for Blu-ray Disc, this technology delivers sound...

Owner's Manual
Page 44
...Small dia. speakers 4 cm (1-1/2 in) cone magnetic shielding type × 40 Woofers 11 cm (4-1/2 in) cone × 2 Tweeters (YSP-5100 only 2.5 cm (1 in combination with HDCP (High-bandwidth Digital Content Protection), HDMI provides a secure audio/video interface that meets the security ...1 (Composite) [U.S.A., Canada, Korea, and General models NTSC [Other models PAL AUX 2 VIDEO IN 1 (Component) HDMI IN...4 • Output Jacks SUBWOOFER 1 VIDEO OUT (composite input or menu screen 1 (Composite) [U.S.A., Canada, Korea, and General models NTSC [Other models PAL HDMI OUT ...1 •...
...Small dia. speakers 4 cm (1-1/2 in) cone magnetic shielding type × 40 Woofers 11 cm (4-1/2 in) cone × 2 Tweeters (YSP-5100 only 2.5 cm (1 in combination with HDCP (High-bandwidth Digital Content Protection), HDMI provides a secure audio/video interface that meets the security ...1 (Composite) [U.S.A., Canada, Korea, and General models NTSC [Other models PAL AUX 2 VIDEO IN 1 (Component) HDMI IN...4 • Output Jacks SUBWOOFER 1 VIDEO OUT (composite input or menu screen 1 (Composite) [U.S.A., Canada, Korea, and General models NTSC [Other models PAL HDMI OUT ...1 •...
Owner's Manual
Page 52
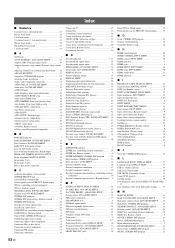
...9632;B BASS EXT indicator 7 BASS EXTENSION, SOUND SET MENU 34 Bass extension, SOUND SET MENU 34 BASS OUT, Subwoofer settings 33 Bass out, Subwoofer settings 33 Bass sound output redirection, Sound output 35 BEAM ADJUSTMENT, MANUAL SETUP 32 Beam adjustment, MANUAL SETUP 32 Beam... language change 15 DISPLAY MENU 36 Displaying input signal information 29 Displaying the Radio Data System information .......... 26 DISTANCE, Subwoofer settings 33 Distance, Subwoofer settings 33 Dolby Digital Plus, glossary 43 Dolby Digital Surround EX, glossary 43 Dolby Digital, glossary 43 Dolby Pro ...
...9632;B BASS EXT indicator 7 BASS EXTENSION, SOUND SET MENU 34 Bass extension, SOUND SET MENU 34 BASS OUT, Subwoofer settings 33 Bass out, Subwoofer settings 33 Bass sound output redirection, Sound output 35 BEAM ADJUSTMENT, MANUAL SETUP 32 Beam adjustment, MANUAL SETUP 32 Beam... language change 15 DISPLAY MENU 36 Displaying input signal information 29 Displaying the Radio Data System information .......... 26 DISTANCE, Subwoofer settings 33 Distance, Subwoofer settings 33 Dolby Digital Plus, glossary 43 Dolby Digital Surround EX, glossary 43 Dolby Digital, glossary 43 Dolby Pro ...
Owner's Manual
Page 53
... key, Remote control 9 Power LED 6 Power-on , ADVANCED SETUP 38 STEREO key, Remote control 9 Stereo+3Beam, beam mode 23 Subwoofer connection 14 SUBWOOFER jack 8 SUBWOOFER PRE OUT jack 38 SUBWOOFER SET, SOUND SET MENU 33 Subwoofer settings, SOUND SET MENU 33 SUPPORT AUDIO, HDMI setup 36 Support audio, HDMI setup 36 SUR. keys, Front panel...
... key, Remote control 9 Power LED 6 Power-on , ADVANCED SETUP 38 STEREO key, Remote control 9 Stereo+3Beam, beam mode 23 Subwoofer connection 14 SUBWOOFER jack 8 SUBWOOFER PRE OUT jack 38 SUBWOOFER SET, SOUND SET MENU 33 Subwoofer settings, SOUND SET MENU 33 SUPPORT AUDIO, HDMI setup 36 Support audio, HDMI setup 36 SUR. keys, Front panel...