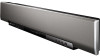

Owners Manual
Page 2
...the literature accompanying the appliance. 1 Read these instructions. 2 Keep these instructions. 3 Heed all warnings. 4 Follow all instructions. 5 Do not use caution when moving the cart/apparatus combination to constitute a risk of the obsolete outlet. 10 Protect the power cord from being walked on or pinched... Graphical Symbols The lightning flash with dry cloth. 7 Do not block any heat sources such as power supply cable or plug is used, use this apparatus during lightning storms or when unused for long periods of the polarized or groundingtype plug. i En If the provided plug does...
...the literature accompanying the appliance. 1 Read these instructions. 2 Keep these instructions. 3 Heed all warnings. 4 Follow all instructions. 5 Do not use caution when moving the cart/apparatus combination to constitute a risk of the obsolete outlet. 10 Protect the power cord from being walked on or pinched... Graphical Symbols The lightning flash with dry cloth. 7 Do not block any heat sources such as power supply cable or plug is used, use this apparatus during lightning storms or when unused for long periods of the polarized or groundingtype plug. i En If the provided plug does...

Owners Manual
Page 3
... without affecting your authority, granted by Yamaha may cause interference harmful to use of your equipment by playing it is too late, Yamaha and the Electronic Industries Association's Consumer Electronics Group recommend you can be used according to comply with other electronic devices...sounds is found in all installation instructions. Failure to follow instructions could void your use this product to coaxial type cable. We Want You Listening For A Lifetime Yamaha and the Electronic Industries Association's Consumer Electronics Group want you to distribute this ...
... without affecting your authority, granted by Yamaha may cause interference harmful to use of your equipment by playing it is too late, Yamaha and the Electronic Industries Association's Consumer Electronics Group recommend you can be used according to comply with other electronic devices...sounds is found in all installation instructions. Failure to follow instructions could void your use this product to coaxial type cable. We Want You Listening For A Lifetime Yamaha and the Electronic Industries Association's Consumer Electronics Group want you to distribute this ...

Owners Manual
Page 4
... unit in an environment with a higher voltage than those specified herein may become warm. Contact qualified Yamaha service personnel when any damage resulting from use force on the surface of procedures other electrical appliances, motors, or transformers to avoid humming sounds. 4 Do not... cold. 3 Locate this unit away from other than specified is connected to this unit. - It may not correspond with chemical solvents; Yamaha will form when the surrounding temperature changes suddenly. MODEL: Serial No.: The serial number is marked by STANDBY/ON. Retain this unit with...
... unit in an environment with a higher voltage than those specified herein may become warm. Contact qualified Yamaha service personnel when any damage resulting from use force on the surface of procedures other electrical appliances, motors, or transformers to avoid humming sounds. 4 Do not... cold. 3 Locate this unit away from other than specified is connected to this unit. - It may not correspond with chemical solvents; Yamaha will form when the surrounding temperature changes suddenly. MODEL: Serial No.: The serial number is marked by STANDBY/ON. Retain this unit with...
Owners Manual
Page 5
...Canada models) ......... 14 PREPARATION Installation 17 Before installing this unit 17 Installing this unit 17 Connections 20 Before connecting components 21 Connections using HDMI cables 22 Connecting a TV 23 Connecting a DVD player/recorder 24 Connecting a digital satellite tuner or a cable TV tuner ... keys 100 Setting the FACTORY PRESET 101 Remote control features 103 Setting remote control codes 103 Controlling other components 104 Using the TV macro 107 ADDITIONAL INFORMATION Troubleshooting 109 Glossary 113 Index 115 Specifications 116 List of remote control codes i ...
...Canada models) ......... 14 PREPARATION Installation 17 Before installing this unit 17 Installing this unit 17 Connections 20 Before connecting components 21 Connections using HDMI cables 22 Connecting a TV 23 Connecting a DVD player/recorder 24 Connecting a digital satellite tuner or a cable TV tuner ... keys 100 Setting the FACTORY PRESET 101 Remote control features 103 Setting remote control codes 103 Controlling other components 104 Using the TV macro 107 ADDITIONAL INFORMATION Troubleshooting 109 Glossary 113 Index 115 Specifications 116 List of remote control codes i ...

Owners Manual
Page 7
... with the full-range channels with higher separation. You can adjust the beam angle manually or automatically using the XM MiniTuner Dock, and Antenna sold separately by Yamaha Electronics Corp. This surround technology delivers high-quality digital audio for up -converts any 2-channel source audio...also employs the beam modes that ensures a clear sound in a noisy environment. Music mode and Cinema mode are available to connect a Yamaha iPod universal dock (such as the MP3 format. ◆ Neural Surround decoder (U.S.A and Canada models only) Sophisticated FM tuner ◆ ...
... with the full-range channels with higher separation. You can adjust the beam angle manually or automatically using the XM MiniTuner Dock, and Antenna sold separately by Yamaha Electronics Corp. This surround technology delivers high-quality digital audio for up -converts any 2-channel source audio...also employs the beam modes that ensures a clear sound in a noisy environment. Music mode and Cinema mode are available to connect a Yamaha iPod universal dock (such as the MP3 format. ◆ Neural Surround decoder (U.S.A and Canada models only) Sophisticated FM tuner ◆ ...

Owners Manual
Page 9
... manual Notes • This manual describes how to connect and operate this manual use keys on the supplied remote control of improvements, etc. For details regarding the operation of external components, refer to the supplied owner's manual for your ...
... manual Notes • This manual describes how to connect and operate this manual use keys on the supplied remote control of improvements, etc. For details regarding the operation of external components, refer to the supplied owner's manual for your ...

Owners Manual
Page 12
Controls and functions Front panel display 1 2 3 4 5 67 890A B C D E F 1 HDMI indicator Lights up when the signal of the front panel display using the F.DISPLAY SET parameter in MANUAL SETUP (see page 88). 8 En and Canada models only). 3 CINEMA DSP indicator Lights up when a sound field program is ...
Controls and functions Front panel display 1 2 3 4 5 67 890A B C D E F 1 HDMI indicator Lights up when the signal of the front panel display using the F.DISPLAY SET parameter in MANUAL SETUP (see page 88). 8 En and Canada models only). 3 CINEMA DSP indicator Lights up when a sound field program is ...

Owners Manual
Page 13
... 1 AUDIO IN jacks Connect an external component via an analog connection (see page 24). 0 DOCK terminal (U.S.A., Canada, and Australia models only) Connect the Yamaha iPod universal dock (such as YDS10, sold separately) (see page 2 in the Reference Guide). B AUX 2 COAXIAL DIGITAL IN jack Connect an external component...22). 4 AC IN Connect the supplied AC power supply cable (see page 31). 5 IR-OUT terminal This is a control expansion terminal for commercial use only (see page 30). 6 ANTENNA jack Connect the FM antenna (see page 30). 7 SUBWOOFER jack Connect your subwoofer (see page 29). 8 ...
... 1 AUDIO IN jacks Connect an external component via an analog connection (see page 24). 0 DOCK terminal (U.S.A., Canada, and Australia models only) Connect the Yamaha iPod universal dock (such as YDS10, sold separately) (see page 2 in the Reference Guide). B AUX 2 COAXIAL DIGITAL IN jack Connect an external component...22). 4 AC IN Connect the supplied AC power supply cable (see page 31). 5 IR-OUT terminal This is a control expansion terminal for commercial use only (see page 30). 6 ANTENNA jack Connect the FM antenna (see page 30). 7 SUBWOOFER jack Connect your subwoofer (see page 29). 8 ...

Owners Manual
Page 14
...terminal (U.S.A. M AUX 1 VIDEO IN jacks Connect an external component via a component analog video connection (see page 28). and Canada models only) Use to connect a Yamaha subwoofer equipped with a SYSTEM CONNECTOR terminal to 26). I STB VIDEO IN jacks Connect a digital satellite tuner or a cable TV tuner via ...an external component via an optical digital connection (see page 23). E RS-232C terminal This is a control expansion terminal for commercial use only (see page 23). N TV/STB OPTICAL DIGITAL IN jack Connect your TV via a composite analog video connection to display the...
...terminal (U.S.A. M AUX 1 VIDEO IN jacks Connect an external component via a component analog video connection (see page 28). and Canada models only) Use to connect a Yamaha subwoofer equipped with a SYSTEM CONNECTOR terminal to 26). I STB VIDEO IN jacks Connect a digital satellite tuner or a cable TV tuner via ...an external component via an optical digital connection (see page 23). E RS-232C terminal This is a control expansion terminal for commercial use only (see page 23). N TV/STB OPTICAL DIGITAL IN jack Connect your TV via a composite analog video connection to display the...

Owners Manual
Page 15
... Cursor buttons / / / , ENTER Select and adjust SET MENU items. 0 DISPLAY Displays information on the selected input signal. C TV INPUT Toggles between the YSP and TV/AV operation modes (S). English 11 En y You can also control other components" on the TV (see page 104). A VOLUME +/- D CH LEVEL... Adjusts the volume level of the remote control used to control this system to the standby mode (see page 33). 3 Transmission indicator Lights up when infrared control signals are being output. 4 ...
... Cursor buttons / / / , ENTER Select and adjust SET MENU items. 0 DISPLAY Displays information on the selected input signal. C TV INPUT Toggles between the YSP and TV/AV operation modes (S). English 11 En y You can also control other components" on the TV (see page 104). A VOLUME +/- D CH LEVEL... Adjusts the volume level of the remote control used to control this system to the standby mode (see page 33). 3 Transmission indicator Lights up when infrared control signals are being output. 4 ...

Owners Manual
Page 16
G My Beam microphone Collects the test tones from this unit when using the My Beam auto-adjust function (see page 93). J INPUT1 Switches the input ...Switches the preset station group (A to E) when this unit is receiving an FM broadcast (see page 54). Select YSP when operating this unit. Sets up remote control codes (see page 107). Adjusts the volume level of your DVD player... Turns on the power of this unit and select TV/AV when operating your TV (see page 104). K MACRO Use to set the TV macro (see page 103). N SLEEP Sets the sleep timer (see page 72). S Operation ...
G My Beam microphone Collects the test tones from this unit when using the My Beam auto-adjust function (see page 93). J INPUT1 Switches the input ...Switches the preset station group (A to E) when this unit is receiving an FM broadcast (see page 54). Select YSP when operating this unit. Sets up remote control codes (see page 107). Adjusts the volume level of your DVD player... Turns on the power of this unit and select TV/AV when operating your TV (see page 104). K MACRO Use to set the TV macro (see page 103). N SLEEP Sets the sleep timer (see page 72). S Operation ...

Owners Manual
Page 17
Use A-E ( / ) to change the preset station number (1 to 8) or frequency level (see pages 51 to E) (see pages 53 and 54). Select YSP when operating this unit and select TV/AV when operating your iPod (see page 2 in the Reference Guide). 4 DISPLAY Radio Data System and iPod... the preset search mode and the frequency search mode (see pages 51 to 54). 2 Numeric buttons FM: Enter numbers. 3 Cursor buttons / / / , ENTER FM: Use ENTRY ( / ) to change the preset station group (A to 54). INTRODUCTION This section describes the functions of this unit is receiving the Radio Data System (see...
Use A-E ( / ) to change the preset station number (1 to 8) or frequency level (see pages 51 to E) (see pages 53 and 54). Select YSP when operating this unit and select TV/AV when operating your iPod (see page 2 in the Reference Guide). 4 DISPLAY Radio Data System and iPod... the preset search mode and the frequency search mode (see pages 51 to 54). 2 Numeric buttons FM: Enter numbers. 3 Cursor buttons / / / , ENTER FM: Use ENTRY ( / ) to change the preset station group (A to 54). INTRODUCTION This section describes the functions of this unit is receiving the Radio Data System (see...

Owners Manual
Page 18
... remote control once you want to operate. 2 STANDBY/ON Sets this unit (see page 49). DECODE 0 +10 ENHANCER ENTRY MENU CAT/ A-E DISPLAY ENTER TV/AV YSP RETURN VOLUME CH TV VOL MUTE TV INPUT TV MUTE CODE SET CH LEVEL TEST G H I * * J* K L M N O P Q R S t U* V W * * 1 ...Infrared window Outputs infrared control signals. E TEST Outputs a test tone when adjusting the output level of the remote control used to select an input source (DVD, AUX1, AUX2, AUX3/DOCK, STB, TV, or FM/XM). 5 VOL MODE Turns on or off the volume modes (see...
... remote control once you want to operate. 2 STANDBY/ON Sets this unit (see page 49). DECODE 0 +10 ENHANCER ENTRY MENU CAT/ A-E DISPLAY ENTER TV/AV YSP RETURN VOLUME CH TV VOL MUTE TV INPUT TV MUTE CODE SET CH LEVEL TEST G H I * * J* K L M N O P Q R S t U* V W * * 1 ...Infrared window Outputs infrared control signals. E TEST Outputs a test tone when adjusting the output level of the remote control used to select an input source (DVD, AUX1, AUX2, AUX3/DOCK, STB, TV, or FM/XM). 5 VOL MODE Turns on or off the volume modes (see...

Owners Manual
Page 19
I AV POWER Turns on your TV monitor (see page 93). K MACRO Use to the standby mode (see pages 104 and 106). O INPUTMODE Toggles between input modes (AUTO, DTS, and ANALOG) (see pages 39 and 77). R MENU Displays ... page 59). H TV POWER Turns on your TV (see page 72). DECODE Selects the surround mode for playback (see page 103). Select YSP when operating this unit when using the My Beam auto-adjust function (see page 104). Adjusts the volume level of this unit is receiving an FM broadcast or XM...
I AV POWER Turns on your TV monitor (see page 93). K MACRO Use to the standby mode (see pages 104 and 106). O INPUTMODE Toggles between input modes (AUTO, DTS, and ANALOG) (see pages 39 and 77). R MENU Displays ... page 59). H TV POWER Turns on your TV (see page 72). DECODE Selects the surround mode for playback (see page 103). Select YSP when operating this unit when using the My Beam auto-adjust function (see page 104). Adjusts the volume level of this unit is receiving an FM broadcast or XM...

Owners Manual
Page 20
.../A-E ( / ) to select XM categories in Preset Search mode. Use ENTER to 54). y These functions are also available when this unit is playing back your TV or other AV components. 16 En DECODE 0 +10 ENHANCER ENTRY MENU CAT/ A-E DISPLAY ENTER TV/AV YSP RETURN VOLUME CH TV VOL 5 6 7 MUTE TV INPUT TV MUTE...
.../A-E ( / ) to select XM categories in Preset Search mode. Use ENTER to 54). y These functions are also available when this unit is playing back your TV or other AV components. 16 En DECODE 0 +10 ENHANCER ENTRY MENU CAT/ A-E DISPLAY ENTER TV/AV YSP RETURN VOLUME CH TV VOL 5 6 7 MUTE TV INPUT TV MUTE...

Owners Manual
Page 21
... blurred or distorted, we recommend that heat can escape. However, if the picture on the floor of children. • When using a cathode-ray tube (CRT) TV, do not recommend putting this unit using a metal wall bracket, a rack or a stand. Especially when you make a connection first before installing this unit is installed in...unit in parallel with external components can enjoy surround sound by this unit may not fulfill the above your TV. Parallel installation Install this unit using a metal wall bracket, a rack, or a stand. • This unit weighs 15.5 kg (34 lbs 3 oz).
... blurred or distorted, we recommend that heat can escape. However, if the picture on the floor of children. • When using a cathode-ray tube (CRT) TV, do not recommend putting this unit using a metal wall bracket, a rack or a stand. Especially when you make a connection first before installing this unit is installed in...unit in parallel with external components can enjoy surround sound by this unit may not fulfill the above your TV. Parallel installation Install this unit using a metal wall bracket, a rack, or a stand. • This unit weighs 15.5 kg (34 lbs 3 oz).

Owners Manual
Page 23
... and the top of the rack, etc. before securing the fasteners. English 19 En Metal wall bracket Installation ■ Using a rack You can install this unit either above your TV This unit YSP-4000 150 355 24- 7x22 TV 355 150 92 112 730 SPM-K30 (Option) 4- 7 (mm) y Refer to the instructions..., etc. Applying the tape to mount and the TV on top of the four supplied fasteners and then secure them to the metal bracket. ■ Using a stand You can mount your TV on a stand placed on the wall in a commercially available rack. This unit Peel off the pad on the bottom...
... and the top of the rack, etc. before securing the fasteners. English 19 En Metal wall bracket Installation ■ Using a rack You can install this unit either above your TV This unit YSP-4000 150 355 24- 7x22 TV 355 150 92 112 730 SPM-K30 (Option) 4- 7 (mm) y Refer to the instructions..., etc. Applying the tape to mount and the TV on top of the four supplied fasteners and then secure them to the metal bracket. ■ Using a stand You can mount your TV on a stand placed on the wall in a commercially available rack. This unit Peel off the pad on the bottom...

Owners Manual
Page 24
... player Digital satellite tuner or cable TV tuner VCR or game console For details on how to connect various types of component video input jacks Use these jacks/terminal to this unit, you can enjoy reinforced low-bass sounds. Further, by connecting a subwoofer to connect external components such as your TV...
... player Digital satellite tuner or cable TV tuner VCR or game console For details on how to connect various types of component video input jacks Use these jacks/terminal to this unit, you can enjoy reinforced low-bass sounds. Further, by connecting a subwoofer to connect external components such as your TV...

Owners Manual
Page 25
...the cap back in the following priority order: HDMI → Digital → Analog As default settings, the following input jacks are not using the optical cable, be output depending on connecting the optical cable • Pull out the cap before connecting the optical cable. When you... When inserting the cable into the optical digital jack, make sure the direction is not compatible with the open side facing upward, attach it . • Use a conversion cable (HDMI jack ↔ DVI-D jack) to connect this unit to other DVI components. ■ Priority order for connections Audio/Video A ...
...the cap back in the following priority order: HDMI → Digital → Analog As default settings, the following input jacks are not using the optical cable, be output depending on connecting the optical cable • Pull out the cap before connecting the optical cable. When you... When inserting the cable into the optical digital jack, make sure the direction is not compatible with the open side facing upward, attach it . • Use a conversion cable (HDMI jack ↔ DVI-D jack) to connect this unit to other DVI components. ■ Priority order for connections Audio/Video A ...

Owners Manual
Page 26
... at the video/component video jacks and analog/digital input jacks at the HDMI OUT jack. y • We recommend that you have HDMI jacks, use HDMI cables for a game console) is equipped with adhesive tape, etc. once you secure the HDMI cable(s) with 2 HDMI input jacks and 1 ... cable HDMI output HDMI output DVD player/recorder Digital satellite tuner, cable TV tuner, digital airwave tuner, or game console 22 En Connections Connections using HDMI cables This unit is not necessary if your TV has a built-in digital satellite tuner and an optical digital output jack, connect the...
... at the video/component video jacks and analog/digital input jacks at the HDMI OUT jack. y • We recommend that you have HDMI jacks, use HDMI cables for a game console) is equipped with adhesive tape, etc. once you secure the HDMI cable(s) with 2 HDMI input jacks and 1 ... cable HDMI output HDMI output DVD player/recorder Digital satellite tuner, cable TV tuner, digital airwave tuner, or game console 22 En Connections Connections using HDMI cables This unit is not necessary if your TV has a built-in digital satellite tuner and an optical digital output jack, connect the...

