Owners Manual
Page 1
UA YSP-3000 Digital Sound ProjectorTM OWNER'S MANUAL
UA YSP-3000 Digital Sound ProjectorTM OWNER'S MANUAL

Owners Manual
Page 3
... with FCC regulations does not guarantee that interference will not result in harmful interference with the requirements listed in the users manual, may void your FCC authorization to avoid prolonged exposure from loud sounds is often undetectable until it at a safe level...When connecting this type of this product in a residential environment will not occur in all installation instructions. Modifications not expressly approved by Yamaha Corporation of radio or TV interference, relocate/reorient the antenna. The above statements apply ONLY to use of product. and, most...
... with FCC regulations does not guarantee that interference will not result in harmful interference with the requirements listed in the users manual, may void your FCC authorization to avoid prolonged exposure from loud sounds is often undetectable until it at a safe level...When connecting this type of this product in a residential environment will not occur in all installation instructions. Modifications not expressly approved by Yamaha Corporation of radio or TV interference, relocate/reorient the antenna. The above statements apply ONLY to use of product. and, most...

Owners Manual
Page 4
... 8 Do not operate this unit itself is marked with a voltage other than specified. 13 To prevent damage by STANDBY/ON. Contact qualified Yamaha service personnel when any reasons. 15 When not planning to liquid dripping or splashing. vacation), disconnect the power supply cable from the wall outlet.... to wide slot and fully insert. do not pull the cable. 11 Do not clean this might damage the finish. Retain this Owner's Manual in a safe place for future reference. 2 Install this apparatus may cause damage and/or discoloration on the rear of this sound system in...
... 8 Do not operate this unit itself is marked with a voltage other than specified. 13 To prevent damage by STANDBY/ON. Contact qualified Yamaha service personnel when any reasons. 15 When not planning to liquid dripping or splashing. vacation), disconnect the power supply cable from the wall outlet.... to wide slot and fully insert. do not pull the cable. 11 Do not clean this might damage the finish. Retain this Owner's Manual in a safe place for future reference. 2 Install this apparatus may cause damage and/or discoloration on the rear of this sound system in...

Owners Manual
Page 5
... sound 60 2-channel stereo playback 60 5-channel stereo playback 60 Playing back sound clearly (My Beam 61 Using auto-adjust function 61 Using manual-adjust function 62 Using sound field programs 63 CINEMA DSP programs 64 Using the music enhancer 66 Using the volume mode (Night listening enhancer/...equal mode) 67 Using the sleep timer 68 Displaying the input source information 70 Using the HDMI control feature 71 ADVANCED OPERATION MANUAL SETUP 72 Using MANUAL SETUP 73 BEAM MENU 74 SOUND MENU 78 INPUT MENU 80 DISPLAY MENU 83 Adjusting the audio balance 84 Using the test tone...
... sound 60 2-channel stereo playback 60 5-channel stereo playback 60 Playing back sound clearly (My Beam 61 Using auto-adjust function 61 Using manual-adjust function 62 Using sound field programs 63 CINEMA DSP programs 64 Using the music enhancer 66 Using the volume mode (Night listening enhancer/...equal mode) 67 Using the sleep timer 68 Displaying the input source information 70 Using the HDMI control feature 71 ADVANCED OPERATION MANUAL SETUP 72 Using MANUAL SETUP 73 BEAM MENU 74 SOUND MENU 78 INPUT MENU 80 DISPLAY MENU 83 Adjusting the audio balance 84 Using the test tone...
Owners Manual
Page 7
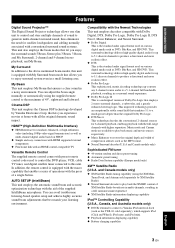
...) as well as DVD, Blu-Ray, and HD DVD. You can adjust the beam angle manually or automatically using the XM MiniTuner Dock, and Antenna sold separately by Yamaha Electronics Corp. This improved technology provides an exceptionally stable sound field that lets you to enjoy surround... sound in a small listening area. and Canada models only) ◆ XM Satellite Radio tuning capability (using the supplied remote control to connect a Yamaha iPod universal dock (such as the YDS-10, sold separately), which supports iPod (Click and Wheel), iPod nano, and iPod mini ◆ Playback...
...) as well as DVD, Blu-Ray, and HD DVD. You can adjust the beam angle manually or automatically using the XM MiniTuner Dock, and Antenna sold separately by Yamaha Electronics Corp. This improved technology provides an exceptionally stable sound field that lets you to enjoy surround... sound in a small listening area. and Canada models only) ◆ XM Satellite Radio tuning capability (using the supplied remote control to connect a Yamaha iPod universal dock (such as the YDS-10, sold separately), which supports iPod (Click and Wheel), iPod nano, and iPod mini ◆ Playback...

Owners Manual
Page 9
... room. See "Getting started" on page 45. 6 Change the beam modes and/or CINEMA DSP settings. In case of differences between the manual and the product, the product has priority. 1 Install this unit to your TV and other external components. See "Playback" on page 30....set remote control codes. Designs and specifications are subject to change in part as a result of this unit. INTRODUCTION Using this manual Using this manual Notes • This manual describes how to connect and operate this unit unless otherwise specified. • y indicates a tip for each component. •...
... room. See "Getting started" on page 45. 6 Change the beam modes and/or CINEMA DSP settings. In case of differences between the manual and the product, the product has priority. 1 Install this unit to your TV and other external components. See "Playback" on page 30....set remote control codes. Designs and specifications are subject to change in part as a result of this unit. INTRODUCTION Using this manual Using this manual Notes • This manual describes how to connect and operate this unit unless otherwise specified. • y indicates a tip for each component. •...
Owners Manual
Page 10
...For details, refer to start the Continued AUTO SETUP procedure. They are complete. on installation, see pages 19 to 29 in the Owner's Manual. You can enjoy DVD audio and video with your DVD player to make the most of the capability of your TV does not have received...volume level of XM Satellite Radio Inc. For details, see "2 Connecting external components to this unit using HDMI cables" on . They are for Yamaha YSP-3000 Digital Sound Projector. Connect your DVD player and TV. on this unit to rack. You can use the optional metal wall bracket (sold ...
...For details, refer to start the Continued AUTO SETUP procedure. They are complete. on installation, see pages 19 to 29 in the Owner's Manual. You can enjoy DVD audio and video with your DVD player to make the most of the capability of your TV does not have received...volume level of XM Satellite Radio Inc. For details, see "2 Connecting external components to this unit using HDMI cables" on . They are for Yamaha YSP-3000 Digital Sound Projector. Connect your DVD player and TV. on this unit to rack. You can use the optional metal wall bracket (sold ...

Owners Manual
Page 12
... flashes during the XM preset operation (U.S.A. y You can adjust the brightness and display setting of the front panel display using the F.DISPLAY SET parameter in MANUAL SETUP (see page 56). C Radio Data System indicators (Europe model only) Show the current Radio Data System status. E Multi-information display Shows information with alphanumeric...
... flashes during the XM preset operation (U.S.A. y You can adjust the brightness and display setting of the front panel display using the F.DISPLAY SET parameter in MANUAL SETUP (see page 56). C Radio Data System indicators (Europe model only) Show the current Radio Data System status. E Multi-information display Shows information with alphanumeric...

Owners Manual
Page 16
...this unit. DECODE 0 +10 ENHANCER ENTRY MENU A-E DISPLAY ENTER TV/AV YSP RETURN VOLUME CH TV VOL 5 6 7 MUTE TV INPUT TV MUTE CH LEVEL TEST CODE SET 1 PRESET/TUNE FM: Switches between automatic and manual tuning (see page 52) or playing back your TV or other AV components.... 12 En Select YSP when operating this unit is receiving the Radio Data System (see page 49). 7 Operation mode selector ...
...this unit. DECODE 0 +10 ENHANCER ENTRY MENU A-E DISPLAY ENTER TV/AV YSP RETURN VOLUME CH TV VOL 5 6 7 MUTE TV INPUT TV MUTE CH LEVEL TEST CODE SET 1 PRESET/TUNE FM: Switches between automatic and manual tuning (see page 52) or playing back your TV or other AV components.... 12 En Select YSP when operating this unit is receiving the Radio Data System (see page 49). 7 Operation mode selector ...

Owners Manual
Page 19
... select the preset channel group (A to 8) in Preset Search mode. English 15 En DECODE 0 +10 ENHANCER ENTRY MENU CAT/ A-E DISPLAY ENTER TV/AV YSP RETURN VOLUME CH TV VOL 5 6 7 MUTE TV INPUT TV MUTE CODE SET CH LEVEL TEST Controls and functions 1 PRESET/TUNE FM: Switches between automatic ...and manual tuning (see pages 49 to confirm the input above (see pages 7 and 8 in the Reference Guide). Use ENTER to 8) or frequency level (see ...
... select the preset channel group (A to 8) in Preset Search mode. English 15 En DECODE 0 +10 ENHANCER ENTRY MENU CAT/ A-E DISPLAY ENTER TV/AV YSP RETURN VOLUME CH TV VOL 5 6 7 MUTE TV INPUT TV MUTE CODE SET CH LEVEL TEST Controls and functions 1 PRESET/TUNE FM: Switches between automatic ...and manual tuning (see pages 49 to confirm the input above (see pages 7 and 8 in the Reference Guide). Use ENTER to 8) or frequency level (see ...

Owners Manual
Page 27
... AUX 1 TV/STB XM IR IN * For the DVD/VCR combo player/recorder connection R L Analog audio output Coaxial digital output Video signal to the operation manual supplied with your DVD player/recorder. • If your DVD player/recorder is properly set to the DVD COAXIAL DIGITAL INPUT jack on this unit...
... AUX 1 TV/STB XM IR IN * For the DVD/VCR combo player/recorder connection R L Analog audio output Coaxial digital output Video signal to the operation manual supplied with your DVD player/recorder. • If your DVD player/recorder is properly set to the DVD COAXIAL DIGITAL INPUT jack on this unit...

Owners Manual
Page 37
... page 45, "Enjoying surround sound" on page 54, and "Using sound field programs" on page 35. See "MANUAL SETUP" on page 34. y • If you want to make additional settings and adjustments Run MANUAL SETUP. Run LANGUAGE SETUP. See "Changing OSD language" on page 72. See "Error messages for AUTO SETUP" on...
... page 45, "Enjoying surround sound" on page 54, and "Using sound field programs" on page 35. See "MANUAL SETUP" on page 34. y • If you want to make additional settings and adjustments Run MANUAL SETUP. Run LANGUAGE SETUP. See "Changing OSD language" on page 72. See "Error messages for AUTO SETUP" on...

Owners Manual
Page 38
MENU p p SET MENU . ;MEMORY ;AUTO SETUP ;MANUAL SETUP ;LANGUAGE SETUP [ ]/[ ]:Up/Down [ENTER]:Enter 4 Press / to select the desired language, and press...Select [ENTER]:Return p p 34 En The SET MENU screen appears on your TV. TV/AV YSP 2 Press MENU. The following operations while viewing information in SET MENU of this unit. 1 Set the operation mode selector ...to YSP. CHANGING OSD LANGUAGE Changing OSD language This feature allows you to select the language of your choice ...
MENU p p SET MENU . ;MEMORY ;AUTO SETUP ;MANUAL SETUP ;LANGUAGE SETUP [ ]/[ ]:Up/Down [ENTER]:Enter 4 Press / to select the desired language, and press...Select [ENTER]:Return p p 34 En The SET MENU screen appears on your TV. TV/AV YSP 2 Press MENU. The following operations while viewing information in SET MENU of this unit. 1 Set the operation mode selector ...to YSP. CHANGING OSD LANGUAGE Changing OSD language This feature allows you to select the language of your choice ...

Owners Manual
Page 40
... part of this unit. Notes • After you have completed the AUTO SETUP procedure, be when you can manually fine-tune the sound beam angle and balance the sound beam output levels using MANUAL SETUP (see page 72) once the AUTO SETUP procedure is completed. • If a subwoofer with the IntelliBeam microphone...
... part of this unit. Notes • After you have completed the AUTO SETUP procedure, be when you can manually fine-tune the sound beam angle and balance the sound beam output levels using MANUAL SETUP (see page 72) once the AUTO SETUP procedure is completed. • If a subwoofer with the IntelliBeam microphone...

Owners Manual
Page 42
...3)SOUND OPTIMZ only [ ]/[ ]:Up/Down [ENTER]:Enter p p TV/AV YSP 38 En A chime is played when the AUTO SETUP procedure is run MANUAL SETUP (see page 42). A set of settings optimized according to manually adjust the corresponding parameters. • If an error occurs, an error buzzer is... so that it is normal for appropriate remedies. Run BEAM OPTIMZ only. 3. Close the curtains. 4. MENU p p SET MENU . ;MEMORY ;AUTO SETUP ;MANUAL SETUP ;LANGUAGE SETUP [ ]/[ ]:Up/Down [ENTER]:Enter y • The control buttons used for SET MENU are curtains in the front panel display. 4 ...
...3)SOUND OPTIMZ only [ ]/[ ]:Up/Down [ENTER]:Enter p p TV/AV YSP 38 En A chime is played when the AUTO SETUP procedure is run MANUAL SETUP (see page 42). A set of settings optimized according to manually adjust the corresponding parameters. • If an error occurs, an error buzzer is... so that it is normal for appropriate remedies. Run BEAM OPTIMZ only. 3. Close the curtains. 4. MENU p p SET MENU . ;MEMORY ;AUTO SETUP ;MANUAL SETUP ;LANGUAGE SETUP [ ]/[ ]:Up/Down [ENTER]:Enter y • The control buttons used for SET MENU are curtains in the front panel display. 4 ...

Owners Manual
Page 43
... following cases: • If you have been rearranged. It is recommended that you should select this unit. • If you have manually set at least 1.8m/6ft away from the YSP unit. SOUND OPTIMZ only (Sound optimization only) Use to start the AUTO SETUP procedure. The MIC should select this unit? •...
... following cases: • If you have been rearranged. It is recommended that you should select this unit. • If you have manually set at least 1.8m/6ft away from the YSP unit. SOUND OPTIMZ only (Sound optimization only) Use to start the AUTO SETUP procedure. The MIC should select this unit? •...

Owners Manual
Page 45
...MIC connection and re-try . Please re-try . The IntelliBeam microphone cannot collect the sound produced by pressing AUTO SETUP in front of YSP. Run MANUAL SETUP if the problem is too low. The IntelliBeam microphone is not placed in step 3, run the procedure again from step 4 after... the screen disappears. Please check MIC position/connection and re-try . If the problem persists, contact the nearest authorized Yamaha service center for AUTO ...
...MIC connection and re-try . Please re-try . The IntelliBeam microphone cannot collect the sound produced by pressing AUTO SETUP in front of YSP. Run MANUAL SETUP if the problem is too low. The IntelliBeam microphone is not placed in step 3, run the procedure again from step 4 after... the screen disappears. Please check MIC position/connection and re-try . If the problem persists, contact the nearest authorized Yamaha service center for AUTO ...

Owners Manual
Page 46
... It is handy to save the current settings adjusted in SET MENU in the system memory of this unit. MENU SET MENU . ;MEMORY ;AUTO SETUP ;MANUAL SETUP ;LANGUAGE SETUP [ ]/[ ]:Up/Down [ENTER]:Enter 4 Press / to the previous screen while using SET MENU, press RETURN. • To exit... from the SET MENU screen, press MENU once more. • You can save certain settings according to YSP. TV/AV YSP 2 Press MENU. MEMORY1 MEMORY2 MEMORY3 [ ]/[ ]:Select [ENTER]:Enter y • The control buttons used for SET MENU are closed . ENTER ENTER ...
... It is handy to save the current settings adjusted in SET MENU in the system memory of this unit. MENU SET MENU . ;MEMORY ;AUTO SETUP ;MANUAL SETUP ;LANGUAGE SETUP [ ]/[ ]:Up/Down [ENTER]:Enter 4 Press / to the previous screen while using SET MENU, press RETURN. • To exit... from the SET MENU screen, press MENU once more. • You can save certain settings according to YSP. TV/AV YSP 2 Press MENU. MEMORY1 MEMORY2 MEMORY3 [ ]/[ ]:Select [ENTER]:Enter y • The control buttons used for SET MENU are closed . ENTER ENTER ...

Owners Manual
Page 47
... exit from your TV. The following screen appears on page 42 according to the varying conditions of the screen. • To return to YSP. The new parameters are saved, the display returns to select MEMORY1, MEMORY2, or MEMORY3 and press ENTER. Push [ENTER] to exit. ... Save 6 Press ENTER again. SETUP p 5 Press / to the SET MENU screen. 2)MEMORY SAVE ENTER MEMORY1 Saving SET MENU . ;MEMORY ;AUTO SETUP ;MANUAL SETUP ;LANGUAGE SETUP [ ]/[ ]:Up/Down [ENTER]:Enter p p 2 Press MENU. ENTER ENTER Using the system memory Loading settings You can also perform the ...
... exit from your TV. The following screen appears on page 42 according to the varying conditions of the screen. • To return to YSP. The new parameters are saved, the display returns to select MEMORY1, MEMORY2, or MEMORY3 and press ENTER. Push [ENTER] to exit. ... Save 6 Press ENTER again. SETUP p 5 Press / to the SET MENU screen. 2)MEMORY SAVE ENTER MEMORY1 Saving SET MENU . ;MEMORY ;AUTO SETUP ;MANUAL SETUP ;LANGUAGE SETUP [ ]/[ ]:Up/Down [ENTER]:Enter p p 2 Press MENU. ENTER ENTER Using the system memory Loading settings You can also perform the ...

Owners Manual
Page 48
ENTER ENTER 6 Press ENTER again. The following screen appears on your TV. ENTER ENTER p p p p SET MENU . ;MEMORY ;AUTO SETUP ;MANUAL SETUP ;LANGUAGE SETUP [ ]/[ ]:Up/Down [ENTER]:Enter 7 Press MENU to Load 44 En MENU 1)MEMORY LOAD MEMORY1 Load Now ? The new parameters saved as MEMORY1, ...
ENTER ENTER 6 Press ENTER again. The following screen appears on your TV. ENTER ENTER p p p p SET MENU . ;MEMORY ;AUTO SETUP ;MANUAL SETUP ;LANGUAGE SETUP [ ]/[ ]:Up/Down [ENTER]:Enter 7 Press MENU to Load 44 En MENU 1)MEMORY LOAD MEMORY1 Load Now ? The new parameters saved as MEMORY1, ...