

Owners Manual
Page 2
... you can do with this unit 5 Mastering useful apps 6 Controls and functions 7 PREPARATIONS 11 General setup procedure 11 a Installation 12 Raising the antenna 13 Mounting the unit on a wall 14 b Connecting a TV 15 c Connecting playback devices 16 d Other connections 17 Connecting an external subwoofer 17 Wired network connections 17 e Connecting the power...
... you can do with this unit 5 Mastering useful apps 6 Controls and functions 7 PREPARATIONS 11 General setup procedure 11 a Installation 12 Raising the antenna 13 Mounting the unit on a wall 14 b Connecting a TV 15 c Connecting playback devices 16 d Other connections 17 Connecting an external subwoofer 17 Wired network connections 17 e Connecting the power...
Owners Manual
Page 4
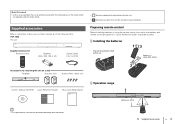
...-4; x2) Optical cable (1.5 m (4.9 ft)) Peel off the protection sheet before use of the following items. YSP-1600 The unit • indicates supplementary explanations for better use. • indicates precautions for mounting the unit on a wall Template Brackets (x2) MOUNTING TEMPLATE/GABARIT DE FIXATION ANTENNA / ANTENNE DRILL HERE / PERCER CIC 457mm (18" ) 457mm (18 po) DRILL...
...-4; x2) Optical cable (1.5 m (4.9 ft)) Peel off the protection sheet before use of the following items. YSP-1600 The unit • indicates supplementary explanations for better use. • indicates precautions for mounting the unit on a wall Template Brackets (x2) MOUNTING TEMPLATE/GABARIT DE FIXATION ANTENNA / ANTENNE DRILL HERE / PERCER CIC 457mm (18" ) 457mm (18 po) DRILL...
Owners Manual
Page 11
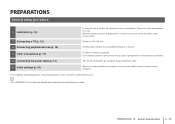
The unit can also be mounted on position and conditions. Connect a TV to the unit. Connect video devices (such as BD/DVD players) to the unit. Raise the wireless antenna in ...) 3 Connecting playback devices (p. 16) 4 Other connections (p. 17) 5 Connecting the power cable (p. 17) 6 Initial settings (p. 18) Position the unit to adjust surround sound effects based on a wall. Use a network cable to connect the unit to a router in preparation for information regarding network connection and audio playback via a network. PREPARATIONS ➤ General setup...
The unit can also be mounted on position and conditions. Connect a TV to the unit. Connect video devices (such as BD/DVD players) to the unit. Raise the wireless antenna in ...) 3 Connecting playback devices (p. 16) 4 Other connections (p. 17) 5 Connecting the power cable (p. 17) 6 Initial settings (p. 18) Position the unit to adjust surround sound effects based on a wall. Use a network cable to connect the unit to a router in preparation for information regarding network connection and audio playback via a network. PREPARATIONS ➤ General setup...
Owners Manual
Page 12
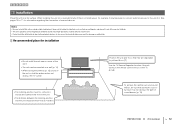
See pages 15 to install this unit on a wall (p. 14) • When raising the antenna (p. 13), position the unit so that the antenna does not obstruct the TV screen. • The listening position (such ... versa. PREPARATIONS ➤ a Installation En 12 Do not install hard disk drives or similar devices near a corner of the room. • The unit can be mounted on a large, stable stand where it does not fall subject to this unit on a flat surface.
See pages 15 to install this unit on a wall (p. 14) • When raising the antenna (p. 13), position the unit so that the antenna does not obstruct the TV screen. • The listening position (such ... versa. PREPARATIONS ➤ a Installation En 12 Do not install hard disk drives or similar devices near a corner of the room. • The unit can be mounted on a large, stable stand where it does not fall subject to this unit on a flat surface.

Owners Manual
Page 14
...unit. • When installing the unit on the unit or apply excessive force to the top of the unit. Yamaha will bear no responsibility for the screw holes. MOUNTING TEMPLATE/GABARIT DE FIXATION ANTENNA / ANTENNE DRILL HERE / PERCER CIC 457mm (18" ) 457mm (18 po) DRILL...9 mm (1/4" to 3/8") 4 mm (#8) 20 mm (3/4") or more 2 to 4 mm (1/16" to fall . 2 Remove the mounting template from falling, attach it before mounting the unit on a wall. 1 Attach the mounting template on a loose cable, the unit may cause the unit to 3/16") Brackets (supplied) Screws (supplied) 4 Hang the unit ...
...unit. • When installing the unit on the unit or apply excessive force to the top of the unit. Yamaha will bear no responsibility for the screw holes. MOUNTING TEMPLATE/GABARIT DE FIXATION ANTENNA / ANTENNE DRILL HERE / PERCER CIC 457mm (18" ) 457mm (18 po) DRILL...9 mm (1/4" to 3/8") 4 mm (#8) 20 mm (3/4") or more 2 to 4 mm (1/16" to fall . 2 Remove the mounting template from falling, attach it before mounting the unit on a wall. 1 Attach the mounting template on a loose cable, the unit may cause the unit to 3/16") Brackets (supplied) Screws (supplied) 4 Hang the unit ...
Owners Manual
Page 74
... HDMI 70 HDMI audio out 51 HDMI cable 15, 16 HDMI control 20, 51 I Indicators 7, 8 Information (audio/video/firmware) 53 Initialization 61 Installation (Mounting the unit on a wall) 14 Installation position of the unit 19 Internet radio 43 IP address 54, 55 iPod music (AirPlay) 45 iTunes music (AirPlay) 45 L Language (OSD...
... HDMI 70 HDMI audio out 51 HDMI cable 15, 16 HDMI control 20, 51 I Indicators 7, 8 Information (audio/video/firmware) 53 Initialization 61 Installation (Mounting the unit on a wall) 14 Installation position of the unit 19 Internet radio 43 IP address 54, 55 iPod music (AirPlay) 45 iTunes music (AirPlay) 45 L Language (OSD...
