
Owner's Manual
Page 1
CONCERT MARIMBAS YM-5100A/4900A/4600A/4100A OWNER'S MANUAL Make sure to read "PRECAUTIONS FOR HANDLING GAS SPRING" and "PRECAUTIONS".
CONCERT MARIMBAS YM-5100A/4900A/4600A/4100A OWNER'S MANUAL Make sure to read "PRECAUTIONS FOR HANDLING GAS SPRING" and "PRECAUTIONS".
Owner's Manual
Page 2
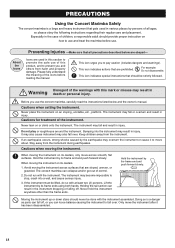
... instructions regarding their regular care and placement. Stay away from the instrument. Preventing Injuries -Make sure that should never be lifted, do so with the instrument assembled. Never place the instrument on its casters. 1. Cautions when moving the instrument on an sloping, unstable, etc., platform. Especially in various places by its frame ends using both hands. Do not play...
... instructions regarding their regular care and placement. Stay away from the instrument. Preventing Injuries -Make sure that should never be lifted, do so with the instrument assembled. Never place the instrument on its casters. 1. Cautions when moving the instrument on an sloping, unstable, etc., platform. Especially in various places by its frame ends using both hands. Do not play...

Owner's Manual
Page 3
... the gas spring. ● In the event of the instrument, may occur, causing an injury. [PRECAUTIONS] A. Do not make a hole anywhere other than playing the instrument. Please change cracked tone bars as soon as the assembly proceeds. If your fingers or hands. D. Do not crash. Using a drill of 2 to 3 mm, make a hole q from the leg. ● Do not apply...
... the gas spring. ● In the event of the instrument, may occur, causing an injury. [PRECAUTIONS] A. Do not make a hole anywhere other than playing the instrument. Please change cracked tone bars as soon as the assembly proceeds. If your fingers or hands. D. Do not crash. Using a drill of 2 to 3 mm, make a hole q from the leg. ● Do not apply...

Owner's Manual
Page 4
... the performance functionality of the instrument or cause noise. • After final adjustment of ethyl alcohol. Also make sure to lift the instrument slightly when moving the instrument, make sure to time. 20 Stains that the caster brakes are in the opposite order of assembly. ◆ When Not in Use • Always engage the caster brakes. ◆ Maintenance • The tone bars...
... the performance functionality of the instrument or cause noise. • After final adjustment of ethyl alcohol. Also make sure to lift the instrument slightly when moving the instrument, make sure to time. 20 Stains that the caster brakes are in the opposite order of assembly. ◆ When Not in Use • Always engage the caster brakes. ◆ Maintenance • The tone bars...
Owner's Manual
Page 5
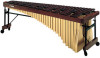
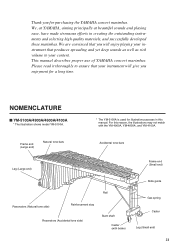
... YM-4100A. Thank you enjoyment for a long time. We are convinced that you will enjoy playing your instrument that produces spreading and yet deep sounds as well as rich volume to ensure that your content. For this manual. NOMENCLATURE ■ YM-5100A/4900A/4600A/4100A * The illustration shows model YM-5100A. * The YM-5100A is used for purchasing the YAMAHA concert marimbas. This manual describes proper use of YAMAHA...
... YM-4100A. Thank you enjoyment for a long time. We are convinced that you will enjoy playing your instrument that produces spreading and yet deep sounds as well as rich volume to ensure that your content. For this manual. NOMENCLATURE ■ YM-5100A/4900A/4600A/4100A * The illustration shows model YM-5100A. * The YM-5100A is used for purchasing the YAMAHA concert marimbas. This manual describes proper use of YAMAHA...

Owner's Manual
Page 6
... e Resonators (Natural tone side) Resonance Regulator: G23, A25 (YM-5100A, YM4900A only) r Resonators (Accidental tone side) Resonance Regulator: F#22, G#24, A#26 (YM-5100A, YM4900A only) y Rail (1) Marking on the end face (D). CONFIRMATION OF PACKING CONTENTS The shipping carton of your marimba should contain the parts shown below. Before assembling the instrument, confirm that all parts are included as listed. * In the...
... e Resonators (Natural tone side) Resonance Regulator: G23, A25 (YM-5100A, YM4900A only) r Resonators (Accidental tone side) Resonance Regulator: F#22, G#24, A#26 (YM-5100A, YM4900A only) y Rail (1) Marking on the end face (D). CONFIRMATION OF PACKING CONTENTS The shipping carton of your marimba should contain the parts shown below. Before assembling the instrument, confirm that all parts are included as listed. * In the...

Owner's Manual
Page 7
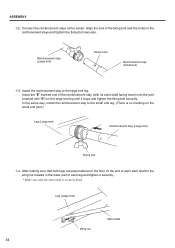
... shaft Leg (Small end) 23 z Connect the large and the small end legs using the reinforcement stays. * Before proceeding to assemble the instrument on a soft rug or carpet. Loosening them will be assembled by at least two persons in this stage. Slide guide fixing bolts 1-1. Place the large and small...you to the next step, make sure that they will cause a sudden rise of the large and small end legs are securely fastened. CAUTION Do not loosen the side guide fixing bolts in a location with sufficient space. ASSEMBLY For safety, the instrument should be positioned as illustrated ...
... shaft Leg (Small end) 23 z Connect the large and the small end legs using the reinforcement stays. * Before proceeding to assemble the instrument on a soft rug or carpet. Loosening them will be assembled by at least two persons in this stage. Slide guide fixing bolts 1-1. Place the large and small...you to the next step, make sure that they will cause a sudden rise of the large and small end legs are securely fastened. CAUTION Do not loosen the side guide fixing bolts in a location with sufficient space. ASSEMBLY For safety, the instrument should be positioned as illustrated ...
Owner's Manual
Page 8
...marking on the large end leg until it securely. * Make sure that both legs are perpendicular to the floor, fit the end of each slant shaft to the large end leg. Connect the reinforcement stays at the center. In the same way, install the reinforcement stay to the small end leg. (There ...is securely fitted. Align the end of the fixing bolt and the holes in the lower part of each leg and tighten it stops and tighten the fixing bolt securely. Leg (Large end) Wing nut Slant shaft 24 ASSEMBLY 1-2.
...marking on the large end leg until it securely. * Make sure that both legs are perpendicular to the floor, fit the end of each slant shaft to the large end leg. Connect the reinforcement stays at the center. In the same way, install the reinforcement stay to the small end leg. (There ...is securely fitted. Align the end of the fixing bolt and the holes in the lower part of each leg and tighten it stops and tighten the fixing bolt securely. Leg (Large end) Wing nut Slant shaft 24 ASSEMBLY 1-2.

Owner's Manual
Page 9
... the rail (2) and the groove section of the end frame of the big end leg. * Do not insert one side of the big end leg. ASSEMBLY x Insert the rails (2) and (3) into grooves alternately little by little until both sides into the end frames of the rail (3) with the rail (2). * Release the...
... the rail (2) and the groove section of the end frame of the big end leg. * Do not insert one side of the big end leg. ASSEMBLY x Insert the rails (2) and (3) into grooves alternately little by little until both sides into the end frames of the rail (3) with the rail (2). * Release the...

Owner's Manual
Page 10
Unbend the resonators, apply a hook and tighten the wing nut securely. * All the natural tone resonators are closed at the bottom. * When assembling the resonators, use care not cause any damage to bump the resonators against the legs, etc. Resonators (Accidental tone side) Resonators (Natureal tone side) 26 Insert the resonators into the resonator holders on the end frames in the same way as the rails. * Make sure not to confuse the natural tone resonators and accidental tone resonators. * Take care not to them. ASSEMBLY c Attach the resonators. 3-1. Hook Wing nut 3-2.
Unbend the resonators, apply a hook and tighten the wing nut securely. * All the natural tone resonators are closed at the bottom. * When assembling the resonators, use care not cause any damage to bump the resonators against the legs, etc. Resonators (Accidental tone side) Resonators (Natureal tone side) 26 Insert the resonators into the resonator holders on the end frames in the same way as the rails. * Make sure not to confuse the natural tone resonators and accidental tone resonators. * Take care not to them. ASSEMBLY c Attach the resonators. 3-1. Hook Wing nut 3-2.

Owner's Manual
Page 11
... engaged in the same way as the inner rails (2) and (3). Rail clamp YM-5100A Only 4-3. Rail (1) Hook Rail (2) 27 Insert the outer rails (1) and (4) in Step 4-2. * Hooks are provided at 2 locations both on the natural tone side and the accidental tone side. * Make sure that each hook is printed on rail (2) and rail (3) with rail...
... engaged in the same way as the inner rails (2) and (3). Rail clamp YM-5100A Only 4-3. Rail (1) Hook Rail (2) 27 Insert the outer rails (1) and (4) in Step 4-2. * Hooks are provided at 2 locations both on the natural tone side and the accidental tone side. * Make sure that each hook is printed on rail (2) and rail (3) with rail...

Owner's Manual
Page 12
...cords on the bass side and the other . * When setting the tone bars, use care not to cause any damage to every post, fix the tone bars by pulling the right and left cords forward from the large end side and hooking the two springs into each other holding the suspension cords... regulator. While tapping each tone bar individually and hook its cord onto the corresponding post. ASSEMBLY b Set the tone bars. 5-1. Small end Suspension cord Large end Post Suspension cord YM-5100A/4900A Only 5-2. Set the natural tone bars first. Align each tone bar, move the resonance regulator...
...cords on the bass side and the other . * When setting the tone bars, use care not to cause any damage to every post, fix the tone bars by pulling the right and left cords forward from the large end side and hooking the two springs into each other holding the suspension cords... regulator. While tapping each tone bar individually and hook its cord onto the corresponding post. ASSEMBLY b Set the tone bars. 5-1. Small end Suspension cord Large end Post Suspension cord YM-5100A/4900A Only 5-2. Set the natural tone bars first. Align each tone bar, move the resonance regulator...

Owner's Manual
Page 13
... supporting the frame end of the leg by hand, loosen the fixing bolt of the resonators. Fixing bolt 29 Adjust the height to the temperature lower or higher than 23°C, adjust setting of the slide guide on the slide guide for reference and make sure...Adjust the height of assembly, check to use the lines on both large end and small end sides. Upon completion of the tone bars. ASSEMBLY YM-4600A/4100A Only 5-2. Move the resonators to fit into longer grooves when the temperature is higher and into resonator holders as shown below. * The resonators are factory adjusted...
... supporting the frame end of the leg by hand, loosen the fixing bolt of the resonators. Fixing bolt 29 Adjust the height to the temperature lower or higher than 23°C, adjust setting of the slide guide on the slide guide for reference and make sure...Adjust the height of assembly, check to use the lines on both large end and small end sides. Upon completion of the tone bars. ASSEMBLY YM-4600A/4100A Only 5-2. Move the resonators to fit into longer grooves when the temperature is higher and into resonator holders as shown below. * The resonators are factory adjusted...

Owner's Manual
Page 14
...; Dimensions (W x D): 203 x 87 cm (79.9" x 34.3") ˔ Weight: 63 kg (138 lbs 14 oz) ● SCALE RANGE YM-4100A YM-4600A YM-4900A YM-5100A * Specifications subject to change without notice. 30 C76 (5 octave) ● Bars: Honduras Rosewood ● Bar sizes: 72 - 41 mm (2.8" - 1.6") wide 24 - 20 mm (0.94" - 0.79") thick ● Resonator: Helmholtz, Elliptic low sound resonator ● Height Adjustment: Gas...
...; Dimensions (W x D): 203 x 87 cm (79.9" x 34.3") ˔ Weight: 63 kg (138 lbs 14 oz) ● SCALE RANGE YM-4100A YM-4600A YM-4900A YM-5100A * Specifications subject to change without notice. 30 C76 (5 octave) ● Bars: Honduras Rosewood ● Bar sizes: 72 - 41 mm (2.8" - 1.6") wide 24 - 20 mm (0.94" - 0.79") thick ● Resonator: Helmholtz, Elliptic low sound resonator ● Height Adjustment: Gas...

