
Owner's Manual
Page 2
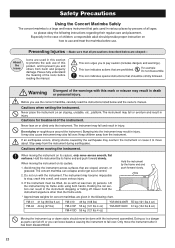
... 4 oz) 55 kg (121 lbs 4 oz) YM-460/2400R 55 kg (121 lbs 4 oz) YM-460F/2400 61 kg (134 lbs 8 oz) Moving the instrument up or down stairs should provide proper instruction on its casters. 1. This icon urges you use the concert marimba, carefully read the instructions listed below are used in various places by the earthquake may...
... 4 oz) 55 kg (121 lbs 4 oz) YM-460/2400R 55 kg (121 lbs 4 oz) YM-460F/2400 61 kg (134 lbs 8 oz) Moving the instrument up or down stairs should provide proper instruction on its casters. 1. This icon urges you use the concert marimba, carefully read the instructions listed below are used in various places by the earthquake may...
Owner's Manual
Page 3
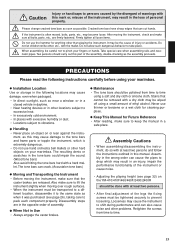
... off using a small amount of the instrument or cause noise. • Adjusting the playing height (see page 26), taking care to keep the manual in the wrong order can cut hands. PRECAUTIONS Please read the following instructions carefully before using a soft and dry cloth or silicone cloth. Disassembly steps are released. Assembly in a safe place. Please change cracked tone bars...
... off using a small amount of the instrument or cause noise. • Adjusting the playing height (see page 26), taking care to keep the manual in the wrong order can cut hands. PRECAUTIONS Please read the following instructions carefully before using a soft and dry cloth or silicone cloth. Disassembly steps are released. Assembly in a safe place. Please change cracked tone bars...
Owner's Manual
Page 4
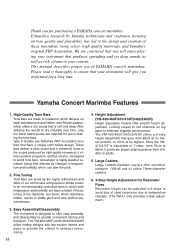
... led to the sound produced by changes in temperature and humidity, which offers a rich sound that goes from children to temperature changes. (The YM-41 only provides 2-step adjustment.) Large Casters Large 100mm-diameter casters offer smoother transport. (YM-46 and 41 utilize 75mm-diameter casters). 6. 3-Step Height Adjustment for a long time. Yamaha Concert Marimba Features 1. Type F models use Yamaha's FRP Acoustalon tone bars that is...
... led to the sound produced by changes in temperature and humidity, which offers a rich sound that goes from children to temperature changes. (The YM-41 only provides 2-step adjustment.) Large Casters Large 100mm-diameter casters offer smoother transport. (YM-46 and 41 utilize 75mm-diameter casters). 6. 3-Step Height Adjustment for a long time. Yamaha Concert Marimba Features 1. Type F models use Yamaha's FRP Acoustalon tone bars that is...
Owner's Manual
Page 5
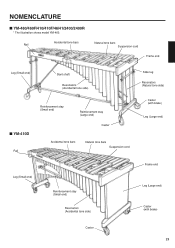
.../460F/410/410F/46/41/2400/2400R * The illustration shows model YM-460. Accidental tone bars Rail Natural tone bars Suspension cord Frame end Leg (Small end) Slant shaft Resonators (Accidental tone side) ■ YM-410D Rail Reinforcement stay (Small end) Reinforcement stay (Large end) Caster Accidental tone bars Natural tone bars Suspension cord Leg (Small end) Reinforcement stay (Small end...
.../460F/410/410F/46/41/2400/2400R * The illustration shows model YM-460. Accidental tone bars Rail Natural tone bars Suspension cord Frame end Leg (Small end) Slant shaft Resonators (Accidental tone side) ■ YM-410D Rail Reinforcement stay (Small end) Reinforcement stay (Large end) Caster Accidental tone bars Natural tone bars Suspension cord Leg (Small end) Reinforcement stay (Small end...
Owner's Manual
Page 6
...: Without height adjustment t Reinforcement stay YM-460/460F/46/2400/2400R: 2 sections YM-410/410F/41: One-piece type For bass side (YM-460/460F/2400/2400R) !1 Leg (Small end) YM-460/460F/410/410F/2400/2400R: With height adjustment YM-46/41: Without height adjustment For high register side (YM-460/460F/2400/2400R) 26 Before assembling the instrument, confirm that all parts are included as listed. * In...
...: Without height adjustment t Reinforcement stay YM-460/460F/46/2400/2400R: 2 sections YM-410/410F/41: One-piece type For bass side (YM-460/460F/2400/2400R) !1 Leg (Small end) YM-460/460F/410/410F/2400/2400R: With height adjustment YM-46/41: Without height adjustment For high register side (YM-460/460F/2400/2400R) 26 Before assembling the instrument, confirm that all parts are included as listed. * In...
Owner's Manual
Page 7
... using the reinforcement stays. * YM-460/460F/410/410F/2400/2400R: Before proceeding to assemble the instrument on...Bass side 27 Slide leg Leg (Large end) Leg (Small end) Slide leg fixing bolt Slide leg fixing bolt Slide leg fixing bolt Slide leg fixing bolt 1-1. The tip of each slide leg fixing bolt must be assembled... by at least two persons in one of the large and small end legs are securely fastened. Place the large and small end legs and reinforcement stays so that the slide leg fixing bolts of the slide leg notches. We recommend to you to the next step, make...
... using the reinforcement stays. * YM-460/460F/410/410F/2400/2400R: Before proceeding to assemble the instrument on...Bass side 27 Slide leg Leg (Large end) Leg (Small end) Slide leg fixing bolt Slide leg fixing bolt Slide leg fixing bolt Slide leg fixing bolt 1-1. The tip of each slide leg fixing bolt must be assembled... by at least two persons in one of the large and small end legs are securely fastened. Place the large and small end legs and reinforcement stays so that the slide leg fixing bolts of the slide leg notches. We recommend to you to the next step, make...
Owner's Manual
Page 8
YM-460/460F/46/2400/2400R: Connect... the reinforcement stays at the center. Insert the reinforcement stay with the fixing bolt) and tighten the fixing bolt securely. (A mark "E" is no marking on the reinforcement stay and the large end joint.) Leg (Large end) Fixing bolt Tighten Fixing bolt E Leg E Reinforcement stay Notch Notch Reinforcement stay 1-4. YM...-460/460F/410/410F/46/41/2400/2400R ASSEMBLY 1-2. Reinforcement stay (Large end) Screw...securely. * Insert the support using the reference hole close to the small end...
YM-460/460F/46/2400/2400R: Connect... the reinforcement stays at the center. Insert the reinforcement stay with the fixing bolt) and tighten the fixing bolt securely. (A mark "E" is no marking on the reinforcement stay and the large end joint.) Leg (Large end) Fixing bolt Tighten Fixing bolt E Leg E Reinforcement stay Notch Notch Reinforcement stay 1-4. YM...-460/460F/410/410F/46/41/2400/2400R ASSEMBLY 1-2. Reinforcement stay (Large end) Screw...securely. * Insert the support using the reference hole close to the small end...
Owner's Manual
Page 9
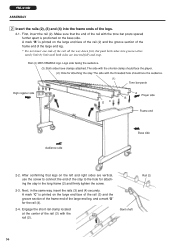
Make sure that legs on the left and right sides are inserted fully and stop. The side with the rail (2). When leg height is set low, use the hole closer to the center of the instrument, and when the leg height is printed on the large end face of the rail ...have clamps attached. Tone bar height can be adjusted at the center of the rail (3) with the shorter clamp should face the audience. (1) Tone bar posts High register side A B Player side C D Frame end Bass side Audience side 2-2. Rail (2) Slant shaft 29 YM-460/460F/410/410F/46/41/2400/2400R ASSEMBLY x Insert the ...
Make sure that legs on the left and right sides are inserted fully and stop. The side with the rail (2). When leg height is set low, use the hole closer to the center of the instrument, and when the leg height is printed on the large end face of the rail ...have clamps attached. Tone bar height can be adjusted at the center of the rail (3) with the shorter clamp should face the audience. (1) Tone bar posts High register side A B Player side C D Frame end Bass side Audience side 2-2. Rail (2) Slant shaft 29 YM-460/460F/410/410F/46/41/2400/2400R ASSEMBLY x Insert the ...
Owner's Manual
Page 10
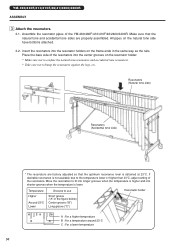
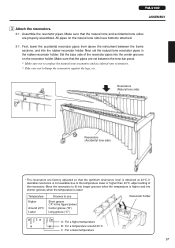
... 30 Resonators (Natural tone side) Resonators (Accidental tone side) * The resonators are factory adjusted so that the natural tone and accidental tone sides are properly assembled. If desirable resonance is obtained at 23°C. Temperature Grooves to the temperature lower or higher than 23°C, adjust setting of the YM-460/460F/410/410F/46/2400/2400R. Assemble the resonator pipes of...
... 30 Resonators (Natural tone side) Resonators (Accidental tone side) * The resonators are factory adjusted so that the natural tone and accidental tone sides are properly assembled. If desirable resonance is obtained at 23°C. Temperature Grooves to the temperature lower or higher than 23°C, adjust setting of the YM-460/460F/410/410F/46/2400/2400R. Assemble the resonator pipes of...
Owner's Manual
Page 11
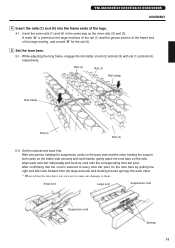
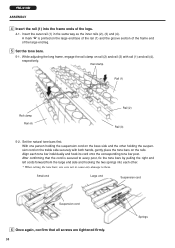
... clamp Rail (4) Rail (3) 5-2. After confirming that the cord is printed on the bass side and the other . * When setting the tone bars, use care not to cause any damage to every tone bar post, fix the tone bars by pulling the right and left cords forward from the large end side and hooking the two... frame ends of the large end leg, and a mark "D" for the rail (4). YM-460/460F/410/410F/46/41/2400/2400R ASSEMBLY v Insert the rails (1) and (4) into each tone bar individually and hook its cord onto the corresponding tone bar post. Insert the outer rails (1) and (4) in the same way as the...
... clamp Rail (4) Rail (3) 5-2. After confirming that the cord is printed on the bass side and the other . * When setting the tone bars, use care not to cause any damage to every tone bar post, fix the tone bars by pulling the right and left cords forward from the large end side and hooking the two... frame ends of the large end leg, and a mark "D" for the rail (4). YM-460/460F/410/410F/46/41/2400/2400R ASSEMBLY v Insert the rails (1) and (4) into each tone bar individually and hook its cord onto the corresponding tone bar post. Insert the outer rails (1) and (4) in the same way as the...
Owner's Manual
Page 12
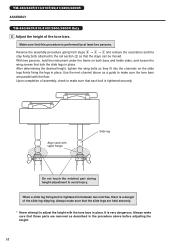
... not touch the notched part during height adjustment to the rail section (2) so that those parts are removed as a guide to adjust the height with the tone bars in the procedure above as described in place. Use the next channel above before adjusting the height. 32 Always make sure that lock the slide legs in between two notches, there is performed by...
... not touch the notched part during height adjustment to the rail section (2) so that those parts are removed as a guide to adjust the height with the tone bars in the procedure above as described in place. Use the next channel above before adjusting the height. 32 Always make sure that lock the slide legs in between two notches, there is performed by...
Owner's Manual
Page 13
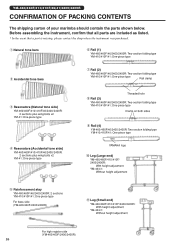
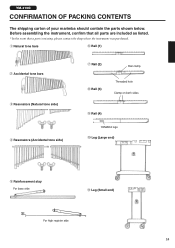
... both sides o Rail (4) YAMAHA logo !0 Leg (Large end) t Reinforcement stay For bass side !1 Leg (Small end) For high register side 33 YM-410D CONFIRMATION OF PACKING CONTENTS The shipping carton of your marimba should contain the parts shown below. Before assembling the instrument, confirm that all parts are included as listed. * In the event that a part is missing, please...
... both sides o Rail (4) YAMAHA logo !0 Leg (Large end) t Reinforcement stay For bass side !1 Leg (Small end) For high register side 33 YM-410D CONFIRMATION OF PACKING CONTENTS The shipping carton of your marimba should contain the parts shown below. Before assembling the instrument, confirm that all parts are included as listed. * In the event that a part is missing, please...

Owner's Manual
Page 14
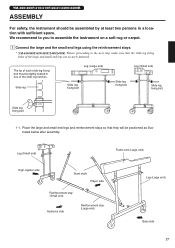
... fixing bolt securely. * Insert the support using the reinforcement stays. 1-1. Screw hole Tighten Reinforcement stay (Small end) Reference hole Reinforcement stay (Large end) 34 z Connect the large and the small end legs using the reference hole close to assemble the instrument on a soft rug or carpet.... end (Large end) Reinforcement stay (Small end) Audience side Reinforcement stay (Large end) Leg (Large end) Bass side 1-2. YM-410D ASSEMBLY For safety, the instrument should be positioned as a guide. We recommend to you to the hole for the screw as illustrated below after...
... fixing bolt securely. * Insert the support using the reinforcement stays. 1-1. Screw hole Tighten Reinforcement stay (Small end) Reference hole Reinforcement stay (Large end) 34 z Connect the large and the small end legs using the reference hole close to assemble the instrument on a soft rug or carpet.... end (Large end) Reinforcement stay (Small end) Audience side Reinforcement stay (Large end) Leg (Large end) Bass side 1-2. YM-410D ASSEMBLY For safety, the instrument should be positioned as a guide. We recommend to you to the hole for the screw as illustrated below after...

Owner's Manual
Page 15
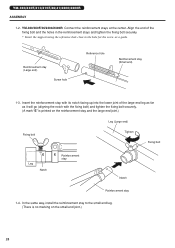
In the same way, install the reinforcement stay to the small end leg. (There is no marking on the small end joint.) 35 YM-410D ASSEMBLY Fixing bolt Leg E E Reinforcement stay Notch Fixing bolt Leg (Large end) Tighten Notch Stay mount Reinforcement stay 1-4. 1-3 Insert the reinforcement stay with its notch facing up into the stay mount hole of the large end leg as far as it will go (aligning the notch with the fixing bolt) and tighten the fixing bolt securely.
In the same way, install the reinforcement stay to the small end leg. (There is no marking on the small end joint.) 35 YM-410D ASSEMBLY Fixing bolt Leg E E Reinforcement stay Notch Fixing bolt Leg (Large end) Tighten Notch Stay mount Reinforcement stay 1-4. 1-3 Insert the reinforcement stay with its notch facing up into the stay mount hole of the large end leg as far as it will go (aligning the notch with the fixing bolt) and tighten the fixing bolt securely.
Owner's Manual
Page 16
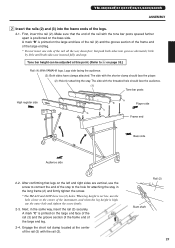
...Make sure that legs on the large end face of the rail (3) and the groove section of the frame end of the large end leg, and a mark "D" for the rail (4). 2-4. A mark "B" is printed on the bass side. Logo side facing the audience. (3): Both sides have clamps attached. The side with the tone...long frame (2) and firmly tighten the screw. 2-3. The side with the rail (2). YM-410D ASSEMBLY x Insert the rails (2), (3) and (4) into grooves alternately little by little until both sides are vertical, use the screw to connect the end of the stay to the hole for attaching the stay in the same way...
...Make sure that legs on the large end face of the rail (3) and the groove section of the frame end of the large end leg, and a mark "D" for the rail (4). 2-4. A mark "B" is printed on the bass side. Logo side facing the audience. (3): Both sides have clamps attached. The side with the tone...long frame (2) and firmly tighten the screw. 2-3. The side with the rail (2). YM-410D ASSEMBLY x Insert the rails (2), (3) and (4) into grooves alternately little by little until both sides are vertical, use the screw to connect the end of the stay to the hole for attaching the stay in the same way...
Owner's Manual
Page 17
...instrument between the tone bar posts. * Make sure not to confuse the natural tone resonators and accidental tone resonators. * Take care not to bump the resonators against the legs, etc. Next set between the frame sections, and into the center grooves on the natural tone side have bottoms attached. 3-1. If desirable resonance is lower. Set the bass...than 23°C, adjust setting of the resonator pipes into the rubber resonator holder. YM-410D ASSEMBLY c Attach the resonators. 3-1. Make sure that the natural tone and accidental tone sides are factory adjusted so that the ...
...instrument between the tone bar posts. * Make sure not to confuse the natural tone resonators and accidental tone resonators. * Take care not to bump the resonators against the legs, etc. Next set between the frame sections, and into the center grooves on the natural tone side have bottoms attached. 3-1. If desirable resonance is lower. Set the bass...than 23°C, adjust setting of the resonator pipes into the rubber resonator holder. YM-410D ASSEMBLY c Attach the resonators. 3-1. Make sure that the natural tone and accidental tone sides are factory adjusted so that the ...
Owner's Manual
Page 18
... the bass side and the other . * When setting the tone bars, use care not to cause any damage to every post, fix the tone bars by pulling the right and left cords forward from the large end side and hooking the two springs into the frame ends of the large end leg. While adjusting the long frame...
... the bass side and the other . * When setting the tone bars, use care not to cause any damage to every post, fix the tone bars by pulling the right and left cords forward from the large end side and hooking the two springs into the frame ends of the large end leg. While adjusting the long frame...
Owner's Manual
Page 19
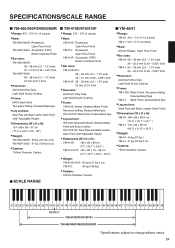
... Finish ● Dimensions (W x D x H): YM-46: 189 x 84 x 86.5 cm (74.4" x 33.1" x 34.1" ) YM-41: 176 x 80 x 85 cm (69.3" x 31.5" x 33.5" ) ● Weight: YM-46: 44 kg (97 lbs ) YM-41: 41 kg (90 lbs 6 oz) ● Casters: 75mm Diameter Casters ● SCALE RANGE YM-410D/410/410F/41 YM-460/460F/46/2400/2400R * Specifications subject to change without notice...
... Finish ● Dimensions (W x D x H): YM-46: 189 x 84 x 86.5 cm (74.4" x 33.1" x 34.1" ) YM-41: 176 x 80 x 85 cm (69.3" x 31.5" x 33.5" ) ● Weight: YM-46: 44 kg (97 lbs ) YM-41: 41 kg (90 lbs 6 oz) ● Casters: 75mm Diameter Casters ● SCALE RANGE YM-410D/410/410F/41 YM-460/460F/46/2400/2400R * Specifications subject to change without notice...

