Owner's Manual
Page 1
UA Front Surround System (CENTER SYSTEM + SUBWOOFER/SYSTEM CONTROL) YAS-71 (YAS-71CU + YAS-71SPX) OWNER'S MANUAL
UA Front Surround System (CENTER SYSTEM + SUBWOOFER/SYSTEM CONTROL) YAS-71 (YAS-71CU + YAS-71SPX) OWNER'S MANUAL
Owner's Manual
Page 2
... the safety purpose of time. 14 Refer all instructions. 5 Do not use this apparatus during lightning storms or when unused for replacement of this Owner's Manual in particular, specifies that the cable ground shall be of sufficient magnitude to constitute a risk of electric shock to qualified service personnel. Install in the...
... the safety purpose of time. 14 Refer all instructions. 5 Do not use this apparatus during lightning storms or when unused for replacement of this Owner's Manual in particular, specifies that the cable ground shall be of sufficient magnitude to constitute a risk of electric shock to qualified service personnel. Install in the...
Owner's Manual
Page 3
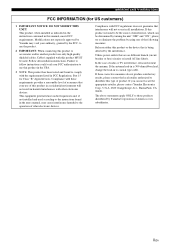
... not installed and used . If these requirements provides a reasonable level of interference, which can not locate the appropriate retailer, please contact Yamaha Electronics Corp., U.S.A. 6660 Orangethorpe Ave., Buena Park, CA 90620. Compliance with the requirements listed in the USA. 3 NOTE: This ...If the antenna lead-in is 300 ohm ribbon lead, change the lead-in harmful interference with this manual, meets FCC requirements. Modifications not expressly approved by Yamaha may cause interference harmful to distribute this product in FCC Regulations, Part 15 for US customers) 1...
... not installed and used . If these requirements provides a reasonable level of interference, which can not locate the appropriate retailer, please contact Yamaha Electronics Corp., U.S.A. 6660 Orangethorpe Ave., Buena Park, CA 90620. Compliance with the requirements listed in the USA. 3 NOTE: This ...If the antenna lead-in is 300 ohm ribbon lead, change the lead-in harmful interference with this manual, meets FCC requirements. Modifications not expressly approved by Yamaha may cause interference harmful to distribute this product in FCC Regulations, Part 15 for US customers) 1...
Owner's Manual
Page 4
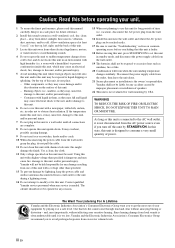
...finish. The cabinet should never be reached easily. 17 Be sure to read this manual carefully. WARNING TO REDUCE THE RISK OF FIRE OR ELECTRIC SHOCK, DO NOT EXPOSE...Do not plug in order not to consume a very small quantity of speakers. 22 This unit is too late, Yamaha and the Electronic Industries Association's Consumer Electronics Group recommend you to avoid...- Using this unit with a newspaper, tablecloth, curtain, etc. Yamaha will form when the surrounding temperature changes suddenly. Contact qualified Yamaha service personnel when any damage resulting from use this unit with a...
...finish. The cabinet should never be reached easily. 17 Be sure to read this manual carefully. WARNING TO REDUCE THE RISK OF FIRE OR ELECTRIC SHOCK, DO NOT EXPOSE...Do not plug in order not to consume a very small quantity of speakers. 22 This unit is too late, Yamaha and the Electronic Industries Association's Consumer Electronics Group recommend you to avoid...- Using this unit with a newspaper, tablecloth, curtain, etc. Yamaha will form when the surrounding temperature changes suddenly. Contact qualified Yamaha service personnel when any damage resulting from use this unit with a...
Owner's Manual
Page 5
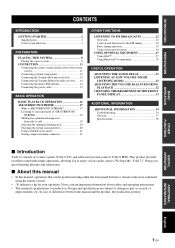
...Yamaha iPod universal dock 14 Connecting the Yamaha Bluetooth audio receiver ...... 14 Connecting the indoor FM antenna 14 Connecting the power cable 15 BASIC OPERATION BASIC PLAYBACK OPERATION 16 AIR SURROUND XTREME...34 Glossary 37 Specifications 38 ■ Introduction YAS-71 consists of improvements, etc. In case of differences between the manual and the product, the product has priority. ...operating instructions. • This manual is AIR SURROUND XTREME 17 Listening to surround mode of AIR SURROUND XTREME 18 Shifting the optimum listening area from side to enjoy various...
...Yamaha iPod universal dock 14 Connecting the Yamaha Bluetooth audio receiver ...... 14 Connecting the indoor FM antenna 14 Connecting the power cable 15 BASIC OPERATION BASIC PLAYBACK OPERATION 16 AIR SURROUND XTREME...34 Glossary 37 Specifications 38 ■ Introduction YAS-71 consists of improvements, etc. In case of differences between the manual and the product, the product has priority. ...operating instructions. • This manual is AIR SURROUND XTREME 17 Listening to surround mode of AIR SURROUND XTREME 18 Shifting the optimum listening area from side to enjoy various...
Owner's Manual
Page 6
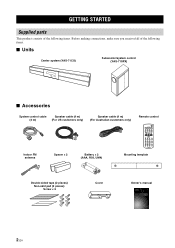
... control cable Speaker cable (4 m) (4 m) (For US customers only) Speaker cable (4 m) (For Australian customers only) Remote control Indoor FM antenna Spacer × 2 Battery × 2 (AAA, R03, UM4) Mounting template Double-sided tape (2 pieces) Non-skid pad (2 pieces) Screw × 6 Cover Owner's manual UA Front Surround System (CENTER SYSTEM + SUBWOOFER/SYSTEM CONTROL) YAS-71 (YAS-71CU + YAS-71SPX) OWNER'S MANUAL 2 En
... control cable Speaker cable (4 m) (4 m) (For US customers only) Speaker cable (4 m) (For Australian customers only) Remote control Indoor FM antenna Spacer × 2 Battery × 2 (AAA, R03, UM4) Mounting template Double-sided tape (2 pieces) Non-skid pad (2 pieces) Screw × 6 Cover Owner's manual UA Front Surround System (CENTER SYSTEM + SUBWOOFER/SYSTEM CONTROL) YAS-71 (YAS-71CU + YAS-71SPX) OWNER'S MANUAL 2 En
Owner's Manual
Page 20
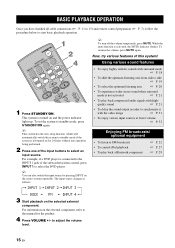
...P. 7), follow the procedure below to side ☞ P. 19 • To select the optimum listening area ☞ P. 20 • To experience wider stereo sound when surround mode is not activated ☞ P. 21 • To play back a Bluetooth component ☞ P. 22 ☞ P. 27 ☞ P. 29 3 Start playback on... sources at lower volume ☞ P. 32 Enjoying FM broadcasts/ optional equipment • To listen to select the DVD player. to the manual for 24 hours without any operation being performed. 2 Press one of this system! y You can also switch the input source by pressing ...
...P. 7), follow the procedure below to side ☞ P. 19 • To select the optimum listening area ☞ P. 20 • To experience wider stereo sound when surround mode is not activated ☞ P. 21 • To play back a Bluetooth component ☞ P. 22 ☞ P. 27 ☞ P. 29 3 Start playback on... sources at lower volume ☞ P. 32 Enjoying FM broadcasts/ optional equipment • To listen to select the DVD player. to the manual for 24 hours without any operation being performed. 2 Press one of this system! y You can also switch the input source by pressing ...
Owner's Manual
Page 26
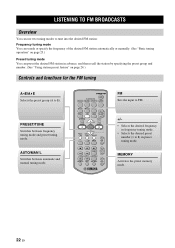
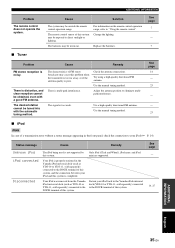
... to tune into the desired FM station: Frequency tuning mode You can search or specify the frequency of the desired FM station automatically or manually. (See "Basic tuning operation" on page 23.) Preset tuning mode You can preset the desired FM station in preset tuning mode. PRESET.../TUNE Switches between automatic and manual tuning mode. +/- • Selects the desired frequency in frequency tuning mode. • Selects the desired preset number (1 to 8) in advance, and ...
... to tune into the desired FM station: Frequency tuning mode You can search or specify the frequency of the desired FM station automatically or manually. (See "Basic tuning operation" on page 23.) Preset tuning mode You can preset the desired FM station in preset tuning mode. PRESET.../TUNE Switches between automatic and manual tuning mode. +/- • Selects the desired frequency in frequency tuning mode. • Selects the desired preset number (1 to 8) in advance, and ...

Owner's Manual
Page 27
.... Lights up when the system is weak, you can tune into the desired station by specifying the frequency manually. OTHER FUNCTIONS 2 Press AUTO/MAN'L to an FM station using the manual tuning feature, the system receives the FM radio signals in monaural reception mode to increase signal quality. 1 .... In FM tuning mode, press AUTO/MAN'L repeatedly so that the AUTO indicator disappears, and then press +/- If you tune to switch Auto/Manual. Lights up and the frequency of the desired station. The STEREO indicator appears in the front panel display. When the system is tuned to a...
.... Lights up when the system is weak, you can tune into the desired station by specifying the frequency manually. OTHER FUNCTIONS 2 Press AUTO/MAN'L to an FM station using the manual tuning feature, the system receives the FM radio signals in monaural reception mode to increase signal quality. 1 .... In FM tuning mode, press AUTO/MAN'L repeatedly so that the AUTO indicator disappears, and then press +/- If you tune to switch Auto/Manual. Lights up and the frequency of the desired station. The STEREO indicator appears in the front panel display. When the system is tuned to a...
Owner's Manual
Page 28
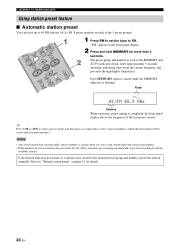
...shows the frequency of the 5 preset groups). 1 Press FM to set the input to the desired preset group and number, preset the station manually. y Press A_E or A`E to which the first station will be stored after searching for details. 24 En repeatedly to select a preset ...MEMORY for more than 3 seconds. After approximately 5 seconds, automatic presetting starts from the current frequency and proceeds through higher frequencies. Refer to "Manual station preset" on page 25 for all the available stations. If the desired station is not stored, or a station is flashing. Press MEMORY...
...shows the frequency of the 5 preset groups). 1 Press FM to set the input to the desired preset group and number, preset the station manually. y Press A_E or A`E to which the first station will be stored after searching for details. 24 En repeatedly to select a preset ...MEMORY for more than 3 seconds. After approximately 5 seconds, automatic presetting starts from the current frequency and proceeds through higher frequencies. Refer to "Manual station preset" on page 25 for all the available stations. If the desired station is not stored, or a station is flashing. Press MEMORY...
Owner's Manual
Page 29
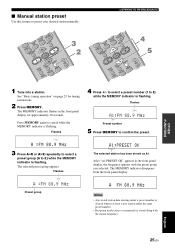
... group (A to cancel while the MEMORY indicator is flashing. Flashes 4 Press +/- to select a preset number (1 to preset your desired station manually. Flashes The selected station has been stored as A1. The MEMORY indicator disappears from the front panel display. After "A1:PRESET OK" appears ... Press MEMORY. Preset group Notes • Any stored station data existing under a preset number is cleared when you selected. ■ Manual station preset Use this feature to 8) while the MEMORY indicator is stored along with the preset group you store a new station under ...
... group (A to cancel while the MEMORY indicator is flashing. Flashes 4 Press +/- to select a preset number (1 to preset your desired station manually. Flashes The selected station has been stored as A1. The MEMORY indicator disappears from the front panel display. After "A1:PRESET OK" appears ... Press MEMORY. Preset group Notes • Any stored station data existing under a preset number is cleared when you selected. ■ Manual station preset Use this feature to 8) while the MEMORY indicator is stored along with the preset group you store a new station under ...
Owner's Manual
Page 32
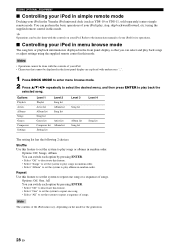
... • Operations cannot be done with the controls of songs. y Operations can select and play back the selected song. Refer to the instruction manuals of the iPod menu vary, depending on your iPod (play albums in random order. Note The contents of your iPod for its operations. ■...; Controlling your iPod in the Yamaha iPod universal dock (such as YDS-10 or YDS-11, sold separately) enters simple remote mode. USING OPTIONAL EQUIPMENT ■ Controlling your iPod...
... • Operations cannot be done with the controls of songs. y Operations can select and play back the selected song. Refer to the instruction manuals of the iPod menu vary, depending on your iPod (play albums in random order. Note The contents of your iPod for its operations. ■...; Controlling your iPod in the Yamaha iPod universal dock (such as YDS-10 or YDS-11, sold separately) enters simple remote mode. USING OPTIONAL EQUIPMENT ■ Controlling your iPod...
Owner's Manual
Page 33
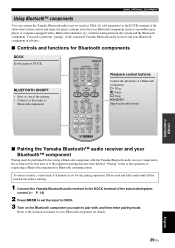
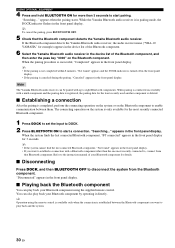
..." refers to the operation of a Bluetooth component. Refer to the instruction manual of your Bluetooth component in your Bluetooth™ component Pairing must be performed before starting. 1 Connect the Yamaha Bluetooth audio receiver to the DOCK terminal of the subwoofer/system control and ...the system for Bluetooth components DOCK Set the input to DOCK. USING OPTIONAL EQUIPMENT Using Bluetooth™ components You can connect the Yamaha Bluetooth audio receiver (such as a portable music player or computer equipped with a Bluetooth transmitter, etc.) without wiring between the ...
..." refers to the operation of a Bluetooth component. Refer to the instruction manual of your Bluetooth component in your Bluetooth™ component Pairing must be performed before starting. 1 Connect the Yamaha Bluetooth audio receiver to the DOCK terminal of the subwoofer/system control and ...the system for Bluetooth components DOCK Set the input to DOCK. USING OPTIONAL EQUIPMENT Using Bluetooth™ components You can connect the Yamaha Bluetooth audio receiver (such as a portable music player or computer equipped with a Bluetooth transmitter, etc.) without wiring between the ...
Owner's Manual
Page 34
... Press DOCK, and then BLUETOOTH OFF to disconnect the system from that the Bluetooth component detects the Yamaha Bluetooth audio receiver. Refer to the instruction manual of your Bluetooth component by operating it directly. When the pairing procedure is established between them. appears... in the front panel display. While the Yamaha Bluetooth audio receiver is not completed within 8 minutes, "Not found " ...
... Press DOCK, and then BLUETOOTH OFF to disconnect the system from that the Bluetooth component detects the Yamaha Bluetooth audio receiver. Refer to the instruction manual of your Bluetooth component by operating it directly. When the pairing procedure is established between them. appears... in the front panel display. While the Yamaha Bluetooth audio receiver is not completed within 8 minutes, "Not found " ...
Owner's Manual
Page 39
...terminal of this problem when the transmitter is too far away, or if the antenna quality is completed. Your iPod was removed from the Yamaha iPod universal dock (such as YDS-10 or YDS-11, sold separately) connected to "Using the remote control". Replace the batteries. ... (☞ P. 14). ADDITIONAL INFORMATION Cause Solution The system may be outside the remote control operation range. Check the antenna connections. Use the manual tuning method. Only iPod (Click and Wheel), iPod nano, and iPod mini are supported. Problem The remote control does not operate the system....
...terminal of this problem when the transmitter is too far away, or if the antenna quality is completed. Your iPod was removed from the Yamaha iPod universal dock (such as YDS-10 or YDS-11, sold separately) connected to "Using the remote control". Replace the batteries. ... (☞ P. 14). ADDITIONAL INFORMATION Cause Solution The system may be outside the remote control operation range. Check the antenna connections. Use the manual tuning method. Only iPod (Click and Wheel), iPod nano, and iPod mini are supported. Problem The remote control does not operate the system....


