
Owner's Manual
Page 1
Contents PRECAUTIONS 14 Daily Maintenance 15 Nomenclature & Lubrication 16 Setting Up the Timpan 17 Initial Preparation 18 Adjusting the Pitch 20 Pedal Adjustment 22 Tuning Indicator Adjustment 23 Replacing the Head 24 Please keep this manual in a safe and convenient place for the first time be sure to carefully read the instructions on "Initial Preparation" pages 18 and 19. Before using your timpani for future reference. English PEDAL TIMPANI TP8300 series / TP7300 series TP6300 series / TP4300 series Owner's Manual Thank you for purchasing a Yamaha Timpani.
Contents PRECAUTIONS 14 Daily Maintenance 15 Nomenclature & Lubrication 16 Setting Up the Timpan 17 Initial Preparation 18 Adjusting the Pitch 20 Pedal Adjustment 22 Tuning Indicator Adjustment 23 Replacing the Head 24 Please keep this manual in a safe and convenient place for the first time be sure to carefully read the instructions on "Initial Preparation" pages 18 and 19. Before using your timpani for future reference. English PEDAL TIMPANI TP8300 series / TP7300 series TP6300 series / TP4300 series Owner's Manual Thank you for purchasing a Yamaha Timpani.
Owner's Manual
Page 2
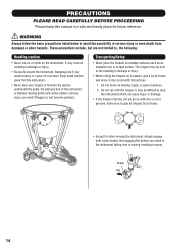
...move on unstable surfaces such as the casters. Do not move it only on the instrument. Do not run with two or more persons, make sure to stop the instrument which can result if fingers or feet become pinched. It may tip over or moving...Setup • Never place the timpani on sloping, rough, or gravel surfaces. 2. PRECAUTIONS PLEASE READ CAREFULLY BEFORE PROCEEDING Please keep this manual in injury or cause it to avoid the possibility of the instrument, or between moving parts such as an unstable riser or sloped surface. WARNING Always follow the basic precautions listed...
...move on unstable surfaces such as the casters. Do not move it only on the instrument. Do not run with two or more persons, make sure to stop the instrument which can result if fingers or feet become pinched. It may tip over or moving...Setup • Never place the timpani on sloping, rough, or gravel surfaces. 2. PRECAUTIONS PLEASE READ CAREFULLY BEFORE PROCEEDING Please keep this manual in injury or cause it to avoid the possibility of the instrument, or between moving parts such as an unstable riser or sloped surface. WARNING Always follow the basic precautions listed...
Owner's Manual
Page 3
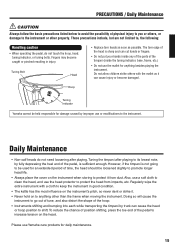
... the heel end of the pedal, is not going to be used for an extended period of time, the head should be held responsible for damage caused by improper use Yamaha care products for anything other property. Regularly wipe the entire instrument with the mallet as possible. Tuning Bolt Head Hoop • Replace torn heads as soon as...
... the heel end of the pedal, is not going to be used for an extended period of time, the head should be held responsible for damage caused by improper use Yamaha care products for anything other property. Regularly wipe the entire instrument with the mallet as possible. Tuning Bolt Head Hoop • Replace torn heads as soon as...
Owner's Manual
Page 4
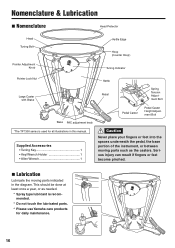
... once a year, or as the casters. Nomenclature & Lubrication n Nomenclature Head Protector Head Tuning Bolt Pointer Adjustment Knob Kettle Edge Hoop (Counter Hoop) Tuning Indicator Pointer Lock Nut Kettle Large Caster with Brake Pedal Spring Tension Adjustment Bolt Pedal Caster Pedal Caster Height Adjustment Bolt Base PAC adjustment knob *The TP7300 series is recommended. * Do not touch the lubricated parts. * Please use Yamaha care products...
... once a year, or as the casters. Nomenclature & Lubrication n Nomenclature Head Protector Head Tuning Bolt Pointer Adjustment Knob Kettle Edge Hoop (Counter Hoop) Tuning Indicator Pointer Lock Nut Kettle Large Caster with Brake Pedal Spring Tension Adjustment Bolt Pedal Caster Pedal Caster Height Adjustment Bolt Base PAC adjustment knob *The TP7300 series is recommended. * Do not touch the lubricated parts. * Please use Yamaha care products...
Owner's Manual
Page 5
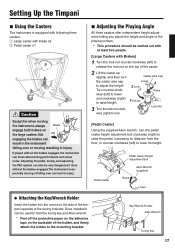
... Lock Nut [Pedal Caster] Using the supplied Allen wrench, turn the caster axle cap to injury. Setting Up the Timpani n Using the Casters The instrument is equipped with brake x2 w Pedal caster x1 q w Caution Except for when moving the instrument, always Brake engage both brakes on the large casters. Key/Wrench Holder Allen Wrench Tuning Key 17 Adjusting the pedal, tuning, and adjusting the PAC system...
... Lock Nut [Pedal Caster] Using the supplied Allen wrench, turn the caster axle cap to injury. Setting Up the Timpani n Using the Casters The instrument is equipped with brake x2 w Pedal caster x1 q w Caution Except for when moving the instrument, always Brake engage both brakes on the large casters. Key/Wrench Holder Allen Wrench Tuning Key 17 Adjusting the pedal, tuning, and adjusting the PAC system...
Owner's Manual
Page 6
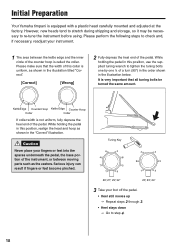
... Your Yamaha timpani is called the collar. Please make sure that all tuning bolts be necessary to stretch during shipping and storage, so it may be turned the same amount. Serious injury can result if fingers or feet become pinched. Tuning Key 26", 27", 29", 32" 20", 23", 24" 3 Take your instrument. 1 The area between moving parts such...
... Your Yamaha timpani is called the collar. Please make sure that all tuning bolts be necessary to stretch during shipping and storage, so it may be turned the same amount. Serious injury can result if fingers or feet become pinched. Tuning Key 26", 27", 29", 32" 20", 23", 24" 3 Take your instrument. 1 The area between moving parts such...

Owner's Manual
Page 7
... too tight. Keeping the heel of the pedal depressed, loosen the first tuning bolt by 1/4 of the pedal is pressed down, the pitch is not tight enough. As the toe of a turn. Initial Preparation 6 Tap the head lightly with step 4 ). • If the pedal remains in the same position adjustment is complete. Repeat this operation for all...
... too tight. Keeping the heel of the pedal depressed, loosen the first tuning bolt by 1/4 of the pedal is pressed down, the pitch is not tight enough. As the toe of a turn. Initial Preparation 6 Tap the head lightly with step 4 ). • If the pedal remains in the same position adjustment is complete. Repeat this operation for all...
Owner's Manual
Page 8
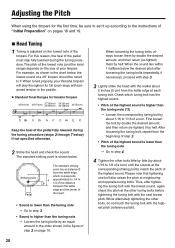
... time, be sure to set it by about 1/16 to 1/18 of a turn ) until the sounds at each tuning bolt. After loosening the tuning bolt, repeat from the beginning of step 3. • Pitch of the highest sound is adjusted on the size of the pedal must stay fully lowered during the tuning procedure (steps 2 through 7 below the desired pitch after tightening the tuning...
... time, be sure to set it by about 1/16 to 1/18 of a turn ) until the sounds at each tuning bolt. After loosening the tuning bolt, repeat from the beginning of step 3. • Pitch of the highest sound is adjusted on the size of the pedal must stay fully lowered during the tuning procedure (steps 2 through 7 below the desired pitch after tightening the tuning...

Owner's Manual
Page 9
... heel of the pedal several times. 6 Repeat steps 3 through 5 until the pitch at each bolt is exactly the same. 7 Check the sound by striking the head as described in step 3 (*2). Adjusting the Pitch 21 Depress the toe of the pedal to change , the instrument is tuned properly. (If the pitch changes, repeat from step 7.) The instrument is higher than the tuning note g Tune the instrument by loosening...
... heel of the pedal several times. 6 Repeat steps 3 through 5 until the pitch at each bolt is exactly the same. 7 Check the sound by striking the head as described in step 3 (*2). Adjusting the Pitch 21 Depress the toe of the pedal to change , the instrument is tuned properly. (If the pitch changes, repeat from step 7.) The instrument is higher than the tuning note g Tune the instrument by loosening...
Owner's Manual
Page 10
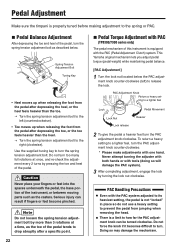
... you adjust pedal torque (pedal weight) while maintaining pedal balance. [PAC Adjustment] 1 Turn the lock nut located below . g Turn the spring tension adjustment bolt to release the lock. Do not turn too many full rotations at a time, as the toe of the pedal. Doing so may damage the mechanism. Pedal Adjustment Make sure the timpani is properly tuned before making adjustment to turn the spring tension adjustment bolt. Use the supplied tuning key to...
... you adjust pedal torque (pedal weight) while maintaining pedal balance. [PAC Adjustment] 1 Turn the lock nut located below . g Turn the spring tension adjustment bolt to release the lock. Do not turn too many full rotations at a time, as the toe of the pedal. Doing so may damage the mechanism. Pedal Adjustment Make sure the timpani is properly tuned before making adjustment to turn the spring tension adjustment bolt. Use the supplied tuning key to...
Owner's Manual
Page 11
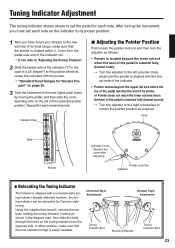
... Tonal Ranges for Yamaha Timpani" on page 20. 3 Tune the instrument to the respective pointer position. g Turn the adjuster to the left (counter clockwise) until the pointer is lowered fully (lowest note). After tuning the instrument, you must set the pedal for German style tuning. Universal Style Attachment Tuning Indicator Bolt German Style Attachment Mounting Bracket Tuning Indicator Bolt 23 Using the supplied hex wrench...
... Tonal Ranges for Yamaha Timpani" on page 20. 3 Tune the instrument to the respective pointer position. g Turn the adjuster to the left (counter clockwise) until the pointer is lowered fully (lowest note). After tuning the instrument, you must set the pedal for German style tuning. Universal Style Attachment Tuning Indicator Bolt German Style Attachment Mounting Bracket Tuning Indicator Bolt 23 Using the supplied hex wrench...
Owner's Manual
Page 12
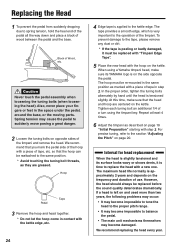
...to the operation of Wood, etc. When using the timpani key. Tighten each tuning bolt an additional 1/4 of a turn using a Yamaha timpani head, make sure that the head and hoop are greased. However, the head should always be replaced with "Timpani Edge Tape". 5 Place the...time, make sure its surface looks wavy or shows dents, it must be reattached to the same position. * Avoid touching the tuning bolt threads, as marked with a new one. Caution Never touch the pedal assembly when loosening the tuning bolts (when loosening the head). We recommend replacing the head every year...
...to the operation of Wood, etc. When using the timpani key. Tighten each tuning bolt an additional 1/4 of a turn using a Yamaha timpani head, make sure that the head and hoop are greased. However, the head should always be replaced with "Timpani Edge Tape". 5 Place the...time, make sure its surface looks wavy or shows dents, it must be reattached to the same position. * Avoid touching the tuning bolt threads, as marked with a new one. Caution Never touch the pedal assembly when loosening the tuning bolts (when loosening the head). We recommend replacing the head every year...

