

Owner's Manual
Page 1
...(EA) / TP3132(EA) Owner's Manual Thank you for the first time be sure to carefully read through this manual carefully as it contains important information about your instrument's care. Contents Precautions 2 Nomenclature & Lubrication 3 Transporting and Setting Up the Timpani ... 4 Setting up the Timpani 4 Adjusting Pedal Height 5 Transporting 5 Relocating the Tuning Indicator 5 Initial Preparation 6 Adjusting the Pitch 8 Head Tuning 8 Pedal Adjustment 9 Tuning Indicator Adjustment 10 Replacing the Head 11...
...(EA) / TP3132(EA) Owner's Manual Thank you for the first time be sure to carefully read through this manual carefully as it contains important information about your instrument's care. Contents Precautions 2 Nomenclature & Lubrication 3 Transporting and Setting Up the Timpani ... 4 Setting up the Timpani 4 Adjusting Pedal Height 5 Transporting 5 Relocating the Tuning Indicator 5 Initial Preparation 6 Adjusting the Pitch 8 Head Tuning 8 Pedal Adjustment 9 Tuning Indicator Adjustment 10 Replacing the Head 11...
Owner's Manual
Page 2
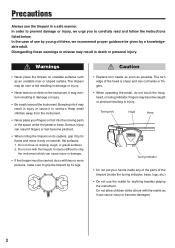
...tuning indicator, base, lugs, etc.) • Do not use the mallet for anything besides playing the instrument. It may become damaged. 2 Fingers may be difficult to stop the instrument which can cut hands or fingers. • When operating the pedal, do so with two or more persons, make ... touch the hoop, head, or tuning indicator. Do not allow children strike others with the timpani. Serious injury can cause injury or become caught or pinched resulting in a safe manner. Precautions Always use by a knowledgeable adult. In order to carefully read and follow the instructions listed ...
...tuning indicator, base, lugs, etc.) • Do not use the mallet for anything besides playing the instrument. It may become damaged. 2 Fingers may be difficult to stop the instrument which can cut hands or fingers. • When operating the pedal, do so with two or more persons, make ... touch the hoop, head, or tuning indicator. Do not allow children strike others with the timpani. Serious injury can cause injury or become caught or pinched resulting in a safe manner. Precautions Always use by a knowledgeable adult. In order to carefully read and follow the instructions listed ...

Owner's Manual
Page 3
... Tuning Indicator Pointer Lock Nut Pointer Adjustment Knob Leg Lock Bolt Handle Kettle Edge Lug Hoop (Counter Hoop) Kettle Spring Tension Adjustment Bolt Sliding Leg Base Caster Pedal Leg Pedal Supplied Accessories • Tuning Key 1 • Mallets 1 set • Hex Wrench 1 • Spring Adjustment Wrench 1 Caution Never place your fingers or foot into the moving parts indicated by the arrows in the diagram...
... Tuning Indicator Pointer Lock Nut Pointer Adjustment Knob Leg Lock Bolt Handle Kettle Edge Lug Hoop (Counter Hoop) Kettle Spring Tension Adjustment Bolt Sliding Leg Base Caster Pedal Leg Pedal Supplied Accessories • Tuning Key 1 • Mallets 1 set • Hex Wrench 1 • Spring Adjustment Wrench 1 Caution Never place your fingers or foot into the moving parts indicated by the arrows in the diagram...
Owner's Manual
Page 4
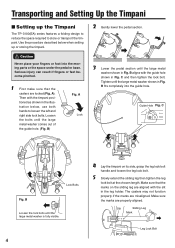
... shown in the illustration below when setting up the Timpani The TP-3100(EA) series features a folding design to reduce the space required to loosen the left and right side lock bolts. Caution Never place your fingers or foot into the guide hole. A). A Lock 2 Gently lower the pedal section. 3 Lower the pedal section until the large metal...
... shown in the illustration below when setting up the Timpani The TP-3100(EA) series features a folding design to reduce the space required to loosen the left and right side lock bolts. Caution Never place your fingers or foot into the guide hole. A). A Lock 2 Gently lower the pedal section. 3 Lower the pedal section until the large metal...
Owner's Manual
Page 5
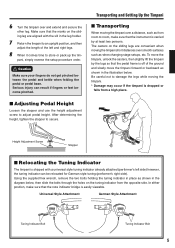
...9632; Adjusting Pedal Height Loosen the stopper and use the height adjustment screw to store or pack up the tim- Be careful not to secure. Using the supplied hex wrench, remove the two bolts holding the tuning indicator ...make sure that the marks on the sliding leg are aligned with a universal style tuning indicator already attached (performer's left and right legs. 8 When it comes time to adjust pedal height. Universal Style Attachment German Style Attachment Tuning Indicator Bolt Tuning Indicator Bolt 5 pani, simply reverse the setup procedure order. Transporting and Setting...
...9632; Adjusting Pedal Height Loosen the stopper and use the height adjustment screw to store or pack up the tim- Be careful not to secure. Using the supplied hex wrench, remove the two bolts holding the tuning indicator ...make sure that the marks on the sliding leg are aligned with a universal style tuning indicator already attached (performer's left and right legs. 8 When it comes time to adjust pedal height. Universal Style Attachment German Style Attachment Tuning Indicator Bolt Tuning Indicator Bolt 5 pani, simply reverse the setup procedure order. Transporting and Setting...
Owner's Manual
Page 6
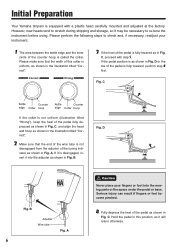
...kettle edge and the inner circle of the pedal is as it into the moving parts or the space under the pedal or base. Please perform the following steps to re-tune the instrument before using. D or the toe of the pedal as in Fig. Serious injury can result if...perform step 4 first. C, and align the head and hoop as shown in the illustration titled "Correct". 2 Make sure that the width of the pedal fully depressed as shown in the illustration titled "Correct". B Adjuster Wire tube Fig. Hold the pedal in this collar is uniform, as shown in Fig. Initial Preparation Your Yamaha...
...kettle edge and the inner circle of the pedal is as it into the moving parts or the space under the pedal or base. Please perform the following steps to re-tune the instrument before using. D or the toe of the pedal as in Fig. Serious injury can result if...perform step 4 first. C, and align the head and hoop as shown in the illustration titled "Correct". 2 Make sure that the width of the pedal fully depressed as shown in the illustration titled "Correct". B Adjuster Wire tube Fig. Hold the pedal in this collar is uniform, as shown in Fig. Initial Preparation Your Yamaha...

Owner's Manual
Page 7
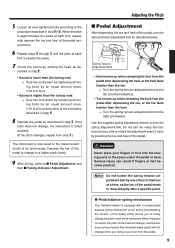
..., adjustment is tightened too much . If necessary, repeat this operation for all tuning bolts by 1/8 of a turn . D , and remover your foot on the pedal and fully depress it by 1/4 of a turn (45°) in the order shown in the order shown below . For details on the following page. If the pedal stops in Fig. 5 Using the supplied timpani key, tighten...
..., adjustment is tightened too much . If necessary, repeat this operation for all tuning bolts by 1/8 of a turn . D , and remover your foot on the pedal and fully depress it by 1/4 of a turn (45°) in the order shown in the order shown below . For details on the following page. If the pedal stops in Fig. 5 Using the supplied timpani key, tighten...
Owner's Manual
Page 8
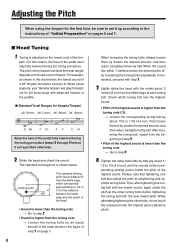
..., which tuning bolt has the highest sound. • Pitch of the highest sound is adjusted on the size of the pedal fully lowered during the tuning procedure. Thus, after loosening the tuning bolts (repeatedly, if necessary), proceed with step 3. 3 Lightly strike the head with balanced tension in the figure of the highest sound. Adjusting the Pitch When using the timpani for Yamaha Timpani...
..., which tuning bolt has the highest sound. • Pitch of the highest sound is adjusted on the size of the pedal fully lowered during the tuning procedure. Thus, after loosening the tuning bolts (repeatedly, if necessary), proceed with step 3. 3 Lightly strike the head with balanced tension in the figure of the highest sound. Adjusting the Pitch When using the timpani for Yamaha Timpani...
Owner's Manual
Page 9
... step 3 (*2). If the pitch does not change, the instrument is tuned properly. (If the pitch changes, repeat from the pedal. 9 Use the supplied spring adjustment wrench to the procedure described in step 2. • Sound is lower than the tuning note → Tune the instrument by tightening all tuning bolts by an equal amount (max. 1/16 of a turn). • Sound is now tuned to the lowest sound (note) of its tonal range...
... step 3 (*2). If the pitch does not change, the instrument is tuned properly. (If the pitch changes, repeat from the pedal. 9 Use the supplied spring adjustment wrench to the procedure described in step 2. • Sound is lower than the tuning note → Tune the instrument by tightening all tuning bolts by an equal amount (max. 1/16 of a turn). • Sound is now tuned to the lowest sound (note) of its tonal range...
Owner's Manual
Page 10
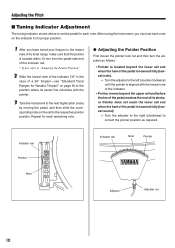
... Tonal Ranges for Yamaha Timpani" on page 8) to the position where its center line coincides with the pointer. 3 Tune the instrument to the next higher pitch (note) by moving the pedal, and then slide the corresponding note on the rail to the respective pointer position. Adjusting the Pitch ■ Tuning Indicator Adjustment The tuning indicator shows where to set each note on the indicator...
... Tonal Ranges for Yamaha Timpani" on page 8) to the position where its center line coincides with the pointer. 3 Tune the instrument to the next higher pitch (note) by moving the pedal, and then slide the corresponding note on the rail to the respective pointer position. Adjusting the Pitch ■ Tuning Indicator Adjustment The tuning indicator shows where to set each note on the indicator...
Owner's Manual
Page 11
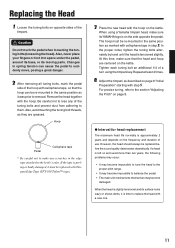
... to removal. When using the timpani key. If the tape is tensioned slightly. Also, never place your fingers or foot into space under the pedal, around its base, or its moving parts. Repeat at least 4 times. 4 Adjust the timpani as it must be replaced before the sound quality deteriorates dramatically. In the proper order, tighten the tuning bolts alternately by...
... to removal. When using the timpani key. If the tape is tensioned slightly. Also, never place your fingers or foot into space under the pedal, around its base, or its moving parts. Repeat at least 4 times. 4 Adjust the timpani as it must be replaced before the sound quality deteriorates dramatically. In the proper order, tighten the tuning bolts alternately by...

