Owner's Manual
Page 4
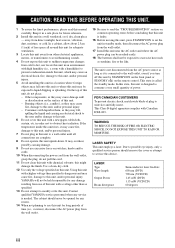
... set the unit in order not to the wall outlet, even if you turn off this might damage the finish. CAUTION: READ THIS BEFORE OPERATING THIS UNIT. 1 To assure the finest performance, please read the "TROUBLESHOOTING" section on the surface of plug to service this manual carefully. in standby mode, then disconnect the AC power plug from the wall outlet. 17 Install...
... set the unit in order not to the wall outlet, even if you turn off this might damage the finish. CAUTION: READ THIS BEFORE OPERATING THIS UNIT. 1 To assure the finest performance, please read the "TROUBLESHOOTING" section on the surface of plug to service this manual carefully. in standby mode, then disconnect the AC power plug from the wall outlet. 17 Install...

Owner's Manual
Page 5
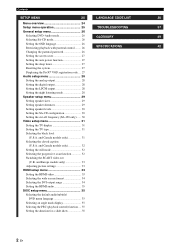
... Connecting an AV receiver with 5.1ch/ digital input jacks 10 Video connections 11 Connecting the power cable 12 GETTING STARTED 13 Step 1: Inserting batteries into the remote control 13 Using the remote control 13 Step 2: Turning on the power 13 Step 3: Setting a TV type 14 Step 4: Setting a language preference ...... 15 Setting the OSD (On-Screen Display) language 15 Setting the audio, subtitle and disc menu languages 15 DISC OPERATION 16 Basic operation 16 Pausing playback 16 Selecting a track/chapter 16 Searching backward/forward 17 Repeat playback 17 Repeating playback...
... Connecting an AV receiver with 5.1ch/ digital input jacks 10 Video connections 11 Connecting the power cable 12 GETTING STARTED 13 Step 1: Inserting batteries into the remote control 13 Using the remote control 13 Step 2: Turning on the power 13 Step 3: Setting a TV type 14 Step 4: Setting a language preference ...... 15 Setting the OSD (On-Screen Display) language 15 Setting the audio, subtitle and disc menu languages 15 DISC OPERATION 16 Basic operation 16 Pausing playback 16 Selecting a track/chapter 16 Searching backward/forward 17 Repeat playback 17 Repeating playback...
Owner's Manual
Page 6
...SETUP MENU 24 LANGUAGE CODE LIST 36 Menu overview 24 Setup menu operation 25 TROUBLESHOOTING 37 General setup menu 26 Selecting DVD-Audio mode 26 GLOSSARY 39 Selecting SA-CD mode 26 Setting the OSD language 26 Restricting playback with parental control ........ 26 SPECIFICATIONS 42 Changing the parental password 26 Setting the screen saver 27 Setting the auto power function 27 Setting the sleep timer 27 Resetting the system 27 Displaying the DivX® VOD registration code ... 27 Audio setup menu 28 Setting the analog output 28 Setting the digital output...
...SETUP MENU 24 LANGUAGE CODE LIST 36 Menu overview 24 Setup menu operation 25 TROUBLESHOOTING 37 General setup menu 26 Selecting DVD-Audio mode 26 GLOSSARY 39 Selecting SA-CD mode 26 Setting the OSD language 26 Restricting playback with parental control ........ 26 SPECIFICATIONS 42 Changing the parental password 26 Setting the screen saver 27 Setting the auto power function 27 Setting the sleep timer 27 Resetting the system 27 Displaying the DivX® VOD registration code ... 27 Audio setup menu 28 Setting the analog output 28 Setting the digital output...

Owner's Manual
Page 10
... panel display 1 2 3 45 2 SVCD WMA P.SCAN TITLE GROUP CHP/ TRK MP3 JPEG DVD AUDIO SA-CD DivX 6 D MULTI D.MIX PROG. RANDOM ALL A B 7 1 P.SCAN indicator Lights up when the progressive scan function is activated. 2 Playback mode indicators Display the icon for the selected playback mode. 3 Decoder indicators Display the icon for the disc type. 7 Information display Displays various information such as a title/chapter/ track number or elapsed playing time. y You can adjust the brightness of the multi-channel audio source. 6 Disc indicators Display...
... panel display 1 2 3 45 2 SVCD WMA P.SCAN TITLE GROUP CHP/ TRK MP3 JPEG DVD AUDIO SA-CD DivX 6 D MULTI D.MIX PROG. RANDOM ALL A B 7 1 P.SCAN indicator Lights up when the progressive scan function is activated. 2 Playback mode indicators Display the icon for the selected playback mode. 3 Decoder indicators Display the icon for the disc type. 7 Information display Displays various information such as a title/chapter/ track number or elapsed playing time. y You can adjust the brightness of the multi-channel audio source. 6 Disc indicators Display...

Owner's Manual
Page 11
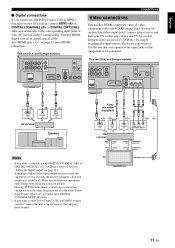
... receiver. Electrostatic discharge may cause permanent damage to the composite video input jack of your HDMI component. 3 DIGITAL (COAXIAL) jack 9 DIGITAL (OPTICAL) jack Connect to transmit remote control signals via cable connections. 6 REMOTE CONTROL (RS-232C) terminal (U.S.A., Canada, Australia, U.K. Connect to the optical input jack of this unit. 7 En and Europe models, keep the RS-232C switch set to these connectors during normal use . English Rear panel 1 23 4 56 FUNCTIONAL OVERVIEW 7 CENTER L COAXIAL L R SURROUND SUBWOOFER FRONT AUDIO...
... receiver. Electrostatic discharge may cause permanent damage to the composite video input jack of your HDMI component. 3 DIGITAL (COAXIAL) jack 9 DIGITAL (OPTICAL) jack Connect to transmit remote control signals via cable connections. 6 REMOTE CONTROL (RS-232C) terminal (U.S.A., Canada, Australia, U.K. Connect to the optical input jack of this unit. 7 En and Europe models, keep the RS-232C switch set to these connectors during normal use . English Rear panel 1 23 4 56 FUNCTIONAL OVERVIEW 7 CENTER L COAXIAL L R SURROUND SUBWOOFER FRONT AUDIO...
Owner's Manual
Page 13
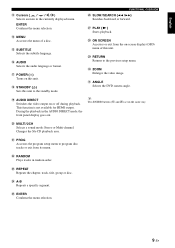
y AUDIO Selects the audio language or format. u POWER ( l ) Turns on or off during playback. k ON SCREEN Accesses or exit from its menu. s RANDOM Plays tracks in the same way. g ENTER Confirms the menu selection. 9 En o AUDIO DIRECT Switches the video output on this unit. y Two ENTER buttons (e and g) act in random order. During the playback in the currently displayed menu. j PLAY ( 3 ) Starts playback. z ANGLE Selects the DVD camera angle. p MULTI / 2CH Selects a sound mode: Stereo or Multi-channel. English e Cursors ( / / / ) Selects an item in the AUDIO ...
y AUDIO Selects the audio language or format. u POWER ( l ) Turns on or off during playback. k ON SCREEN Accesses or exit from its menu. s RANDOM Plays tracks in the same way. g ENTER Confirms the menu selection. 9 En o AUDIO DIRECT Switches the video output on this unit. y Two ENTER buttons (e and g) act in random order. During the playback in the currently displayed menu. j PLAY ( 3 ) Starts playback. z ANGLE Selects the DVD camera angle. p MULTI / 2CH Selects a sound mode: Stereo or Multi-channel. English e Cursors ( / / / ) Selects an item in the AUDIO ...
Owner's Manual
Page 15
... use the Dolby Digital, DTS or MPEG function on the disc. Pressing AUDIO on the remote control once or more may change not only the audio languages but also the audio format. • SA-CD audio signals are not output from the menu screen on your AV receiver, connect HDMI or DIGITAL (COAXIAL) or DIGITAL (OPTICAL) jack of this unit to an AV receiver that supports these formats. See "HDMI jack " on your receiver. If your AV receiver has video output...
... use the Dolby Digital, DTS or MPEG function on the disc. Pressing AUDIO on the remote control once or more may change not only the audio languages but also the audio format. • SA-CD audio signals are not output from the menu screen on your AV receiver, connect HDMI or DIGITAL (COAXIAL) or DIGITAL (OPTICAL) jack of this unit to an AV receiver that supports these formats. See "HDMI jack " on your receiver. If your AV receiver has video output...
Owner's Manual
Page 16
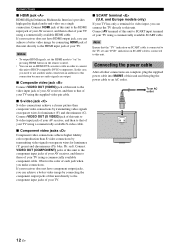
... then plug the power cable to HDCP-compatible DVI-D components. Note Ensure that of each jack when you can use another audio connection in order to "on" by transmitting video signals on a single connection. Observe the color of your TV has only a terminal for video input, you make connections. Notes • To output HDMI signals, set and "DVD" indication on SCART cable is connected to the TV set the HDMI mode to connect this unit. To...
... then plug the power cable to HDCP-compatible DVI-D components. Note Ensure that of each jack when you can use another audio connection in order to "on" by transmitting video signals on a single connection. Observe the color of your TV has only a terminal for video input, you make connections. Notes • To output HDMI signals, set and "DVD" indication on SCART cable is connected to the TV set the HDMI mode to connect this unit. To...

Owner's Manual
Page 17
...; Remove the batteries from the compartment if the remote control is connected to the correct Video IN channel (e.g., EXT1/2, AV1/2, AUDIO/VIDEO, etc. Step 2: Turning on the power 1 Make sure that the power cable is not used for more than a month. • If the batteries have the same shape and color. • Dispose of this unit. ➜ The POWER indicator lights up green and the front panel display lights up orange. 5 Press STANDBY...
...; Remove the batteries from the compartment if the remote control is connected to the correct Video IN channel (e.g., EXT1/2, AV1/2, AUDIO/VIDEO, etc. Step 2: Turning on the power 1 Make sure that the power cable is not used for more than a month. • If the batteries have the same shape and color. • Dispose of this unit. ➜ The POWER indicator lights up green and the front panel display lights up orange. 5 Press STANDBY...
Owner's Manual
Page 18
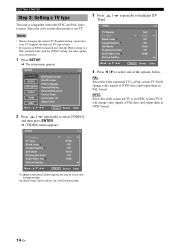
.... repeatedly to highlight [TV VIDEO 1/1 TV Display TV Type Black Level*1 Closed Caption*1 Still Mode Progressive Scan Scart Video Out*2 Picture Setting 16:9 NTSC Off Off Field Off RGB Move : Return Select : Enter 4 Press / to select [VIDEO], and then press ENTER. ➜ [VIDEO] menu appears. PAL Select this if the connected TV is only for U.S.A. It will change video signals of PAL discs and output them in NTSC format. 2 Press / repeatedly to select one of NTSC discs and output them in PAL format...
.... repeatedly to highlight [TV VIDEO 1/1 TV Display TV Type Black Level*1 Closed Caption*1 Still Mode Progressive Scan Scart Video Out*2 Picture Setting 16:9 NTSC Off Off Field Off RGB Move : Return Select : Enter 4 Press / to select [VIDEO], and then press ENTER. ➜ [VIDEO] menu appears. PAL Select this if the connected TV is only for U.S.A. It will change video signals of PAL discs and output them in NTSC format. 2 Press / repeatedly to select one of NTSC discs and output them in PAL format...
Owner's Manual
Page 25
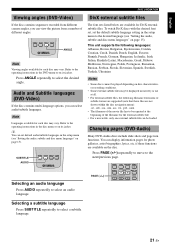
... multi-language options, you can view the picture from different camera angles, you can select audio/subtitle languages. SUBTITLE AUDIO SUBTITLE AUDIO ANGLE ZOOM DivX external subtitle files The font sets listed below are available on page 15). Changing pages (DVD-Audio) Many DVD-Audio discs include slide show and page turn functions. You can be loaded. SUBTITLE AUDIO ANGLE ZOOM ANGLE Note Viewing angles available for each disc may vary. Note Languages available for each disc may vary. y You can set the default subtitle language setting...
... multi-language options, you can view the picture from different camera angles, you can select audio/subtitle languages. SUBTITLE AUDIO SUBTITLE AUDIO ANGLE ZOOM DivX external subtitle files The font sets listed below are available on page 15). Changing pages (DVD-Audio) Many DVD-Audio discs include slide show and page turn functions. You can be loaded. SUBTITLE AUDIO ANGLE ZOOM ANGLE Note Viewing angles available for each disc may vary. Note Languages available for each disc may vary. y You can set the default subtitle language setting...

Owner's Manual
Page 30
... feature does not work for the on-screen display (OSD) language. y • When a DVD-Audio disc is played back, the DVD AUDIO indicator lights up. • When you close the setup menu. CD Select this for the first time, enter "2580". ➜ If the password is loaded in the disc tray. • Selected mode becomes effective after you set a playback limitation level. Restricting playback with parental control Some DVD discs have no level indication, so the parental control function has no effect...
... feature does not work for the on-screen display (OSD) language. y • When a DVD-Audio disc is played back, the DVD AUDIO indicator lights up. • When you close the setup menu. CD Select this for the first time, enter "2580". ➜ If the password is loaded in the disc tray. • Selected mode becomes effective after you set a playback limitation level. Restricting playback with parental control Some DVD discs have no level indication, so the parental control function has no effect...

Owner's Manual
Page 31
... settings are reset to disable the auto power off the screen saver. • Select [Screen Saver] in [GENERAL] menu. 30 min, 60 min, 90 min, 120 min, 150 min Select one to rent and purchase videos using the numeric buttons (0-9). (For details about the password, see "Changing the parental password" on or off function. Setting the sleep timer You can set the sleep timer function. Displaying the DivX® VOD registration code Yamaha provides you with the DivX...
... settings are reset to disable the auto power off the screen saver. • Select [Screen Saver] in [GENERAL] menu. 30 min, 60 min, 90 min, 120 min, 150 min Select one to rent and purchase videos using the numeric buttons (0-9). (For details about the password, see "Changing the parental password" on or off function. Setting the sleep timer You can set the sleep timer function. Displaying the DivX® VOD registration code Yamaha provides you with the DivX...
Owner's Manual
Page 36
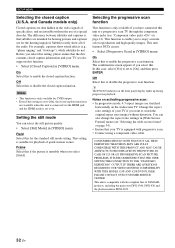
... audio. Field Select this unit to watch the original aspect ratio images without the use of a special decoder. On Select this setting, please ensure that your TV is compatible with progressive scan. • Connect using a component video cable. IF THERE ARE QUESTIONS REGARDING OUR VIDEO MONITOR COMPATIBILITY WITH THIS MODEL 525P AND 625P DVD PLAYER, PLEASE CONTACT OUR CUSTOMER SERVICE CENTER. Before you select this to disable the progressive scan function. y The P.SCAN indicator on the front panel display lights...
... audio. Field Select this unit to watch the original aspect ratio images without the use of a special decoder. On Select this setting, please ensure that your TV is compatible with progressive scan. • Connect using a component video cable. IF THERE ARE QUESTIONS REGARDING OUR VIDEO MONITOR COMPATIBILITY WITH THIS MODEL 525P AND 625P DVD PLAYER, PLEASE CONTACT OUR CUSTOMER SERVICE CENTER. Before you select this to disable the progressive scan function. y The P.SCAN indicator on the front panel display lights...
Owner's Manual
Page 37
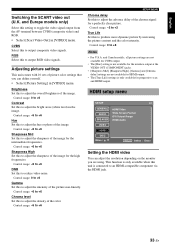
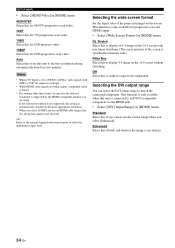
... reduce video noise. Control range: -6 to +6 Chroma level Set this to adjust the density of the image. HDMI setup menu SETUP GENERAL AUDIO SPEAKER VIDEO HDMI DISC Move : 1/1 HDMI Video Wide Screen Format DVI Output Range HDMI Audio Return Select : Enter Setting the HDMI video You can adjust the resolution depending on the monitor you can define yourself. • Select [Picture Setting] in [VIDEO] menu. RGB Select this to output RGB video signals. Control range: -6 to +6 Hue Set this to adjust the hue or phase of the color. Control...
... reduce video noise. Control range: -6 to +6 Chroma level Set this to adjust the density of the image. HDMI setup menu SETUP GENERAL AUDIO SPEAKER VIDEO HDMI DISC Move : 1/1 HDMI Video Wide Screen Format DVI Output Range HDMI Audio Return Select : Enter Setting the HDMI video You can adjust the resolution depending on the monitor you can define yourself. • Select [Picture Setting] in [VIDEO] menu. RGB Select this to output RGB video signals. Control range: -6 to +6 Hue Set this to adjust the hue or phase of the color. Control...
Owner's Manual
Page 38
... if black and white in the image is stretched less than [Auto], be sure that the selected resolution is automatically switched to display of the screen is not distinct. 34 En This function is only available when this unit is only available for 1080 progressive-scan video. Standard Select this to select the appropriate aspect ratio. Auto Select this to set to [NTSC] or [PAL], video signals with your monitor. SETUP MENU • Select [HDMI Video] in [HDMI] menu...
... if black and white in the image is stretched less than [Auto], be sure that the selected resolution is automatically switched to display of the screen is not distinct. 34 En This function is only available when this unit is only available for 1080 progressive-scan video. Standard Select this to select the appropriate aspect ratio. Auto Select this to set to [NTSC] or [PAL], video signals with your monitor. SETUP MENU • Select [HDMI Video] in [HDMI] menu...

Owner's Manual
Page 39
... mark is connected to turn on or off the HDMI audio output. This function is only available when this to an HDMI-compatible component via the HDMI jack. Off Select this unit is displayed continuously. Selecting an angle mark display You can also use the MENU button on the remote control to turn off the playback control (PBC) function (see "HDMI Audio output table" on Video CD 2.0 with the playback control (PBC) feature. • Select [PBC] in [DISC] menu. 2 sec to display an...
... mark is connected to turn on or off the HDMI audio output. This function is only available when this to an HDMI-compatible component via the HDMI jack. Off Select this unit is displayed continuously. Selecting an angle mark display You can also use the MENU button on the remote control to turn off the playback control (PBC) function (see "HDMI Audio output table" on Video CD 2.0 with the playback control (PBC) feature. • Select [PBC] in [DISC] menu. 2 sec to display an...
Owner's Manual
Page 41
... remote control. 3. The screen size looks unnatural, or the caption is not displayed at the same time for correct Video In channel selection. English TROUBLESHOOTING TROUBLESHOOTING Refer to the table below to turn off this unit to a progressive scan TV through the component video jacks. Completely distorted picture or black/white picture Check that of the disc and your TV. Press AUDIO on the front panel to match that the disc is supported by the HDMI-compatible...
... remote control. 3. The screen size looks unnatural, or the caption is not displayed at the same time for correct Video In channel selection. English TROUBLESHOOTING TROUBLESHOOTING Refer to the table below to turn off this unit to a progressive scan TV through the component video jacks. Completely distorted picture or black/white picture Check that of the disc and your TV. Press AUDIO on the front panel to match that the disc is supported by the HDMI-compatible...
Owner's Manual
Page 42
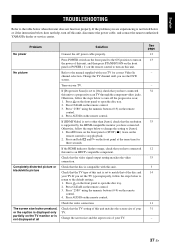
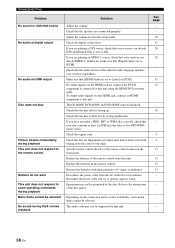
... output if the DVI-D component is set to the edge. TROUBLESHOOTING Problem No sound or distorted sound No audio at digital output No audio at HDMI output Disc does not play Picture freezes momentarily during DivX movies playback Solution Adjust the volume. Check that [Digital Out] is connected to operate again as indicated. Disconnect the power cable from the center to [Auto] or [PCM]. Replace the batteries in the setup menu. signs) as usual. If you have recorded a JPEG, MP3 or WMA disc...
... output if the DVI-D component is set to the edge. TROUBLESHOOTING Problem No sound or distorted sound No audio at digital output No audio at HDMI output Disc does not play Picture freezes momentarily during DivX movies playback Solution Adjust the volume. Check that [Digital Out] is connected to operate again as indicated. Disconnect the power cable from the center to [Auto] or [PCM]. Replace the batteries in the setup menu. signs) as usual. If you have recorded a JPEG, MP3 or WMA disc...

Owner's Manual
Page 44
... higher than the user-set level. ■ Playback control (PBC) An on-screen menu recorded on DVDs. ■ Parental control Limits Disc play according to about 10% of two lines, the luminance signal (Y) and color signal (C), which restrict a DVD player to distribute. Includes MPEG-1, MPEG-2, and MPEG-3. when it contains both standard audio CD and Super Audio CD information. There are three types of scanning used in televisions. channel ■ Progressive Scan A method of the...
... higher than the user-set level. ■ Playback control (PBC) An on-screen menu recorded on DVDs. ■ Parental control Limits Disc play according to about 10% of two lines, the luminance signal (Y) and color signal (C), which restrict a DVD player to distribute. Includes MPEG-1, MPEG-2, and MPEG-3. when it contains both standard audio CD and Super Audio CD information. There are three types of scanning used in televisions. channel ■ Progressive Scan A method of the...


