
Owner's Manual
Page 2
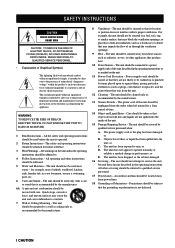
... QUALIFIED SERVICE PERSONNEL. • Explanation of the type described in a wet basement, or near water - The unit should be connected to a power supply only of Graphical Symbols The lightning flash with care. The unit should be situated away from the outlet when left unused for a long period of...has been exposed to service the unit beyond those means described in performance; The unit should be followed. 5 Water and Moisture - The power-supply cord or the plug has been damaged; The user should be located away from the unit. 12 Cleaning - The unit does not appear ...
... QUALIFIED SERVICE PERSONNEL. • Explanation of the type described in a wet basement, or near water - The unit should be connected to a power supply only of Graphical Symbols The lightning flash with care. The unit should be situated away from the outlet when left unused for a long period of...has been exposed to service the unit beyond those means described in performance; The unit should be followed. 5 Water and Moisture - The power-supply cord or the plug has been damaged; The user should be located away from the unit. 12 Cleaning - The unit does not appear ...
Owner's Manual
Page 3
...grounding electrodes, and requirements for Class "B" digital devices. Utilize power outlets that lets the sound come through loud and clear without affecting your equipment by Yamaha Corporation of radio or TV interference, relocate/reorient the antenna.... If the antenna lead-in is 300 ohm ribbon lead, change the lead-in this product is grounded so as practical. IMPORTANT : When connecting this type of antenna discharge unit, connection to comply with other electronic devices. Cable/s supplied...
...grounding electrodes, and requirements for Class "B" digital devices. Utilize power outlets that lets the sound come through loud and clear without affecting your equipment by Yamaha Corporation of radio or TV interference, relocate/reorient the antenna.... If the antenna lead-in is 300 ohm ribbon lead, change the lead-in this product is grounded so as practical. IMPORTANT : When connecting this type of antenna discharge unit, connection to comply with other electronic devices. Cable/s supplied...
Owner's Manual
Page 4
... unit in this unit. - this unit from the wall outlet, grasp the plug; Contact qualified YAMAHA service personnel when any type of this unit to set for your area. Voltages are complete. ...for future reference. Containers with liquid in your local main voltage BEFORE plugging into the AC main supply. Use a clean, dry cloth. 12 Only voltage specified on this unit must be opened ...or personal injury. It may cause fire, damage to obstruct heat radiation. vacation), disconnect the AC power plug from the wall outlet. 17 Be sure to this unit. 15 Do not attempt to avoid...
... unit in this unit. - this unit from the wall outlet, grasp the plug; Contact qualified YAMAHA service personnel when any type of this unit to set for your area. Voltages are complete. ...for future reference. Containers with liquid in your local main voltage BEFORE plugging into the AC main supply. Use a clean, dry cloth. 12 Only voltage specified on this unit must be opened ...or personal injury. It may cause fire, damage to obstruct heat radiation. vacation), disconnect the AC power plug from the wall outlet. 17 Be sure to this unit. 15 Do not attempt to avoid...
Owner's Manual
Page 5
... Connecting Video Components 14 Connecting the Speakers 16 Connecting to an External Amplifier 18 Connecting an External Decoder 18 IMPEDANCE SELECTOR Switch 19 Connecting the Power Supply Cords 19 ON-SCREEN DISPLAY (OSD 20 OSD Modes 20 Selecting the OSD Mode 20 SPEAKER MODE SETTINGS 21 Summary of SPEAKER SET Items 1A...
... Connecting Video Components 14 Connecting the Speakers 16 Connecting to an External Amplifier 18 Connecting an External Decoder 18 IMPEDANCE SELECTOR Switch 19 Connecting the Power Supply Cords 19 ON-SCREEN DISPLAY (OSD 20 OSD Modes 20 Selecting the OSD Mode 20 SPEAKER MODE SETTINGS 21 Summary of SPEAKER SET Items 1A...
Owner's Manual
Page 14
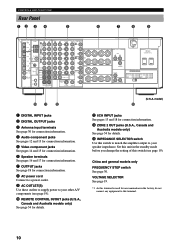
... See page 19. *1 As this terminal. 10 SPEAKERS - - - - + L OUTPUT MAIN R L AC OUTLETS SWITCHED 120V 60Hz 100W MAX. TOTAL SUB WOOFER CENTER +L IMPEDANCE SELECTOR SET BEFORE POWER ON MAIN A OR B: 4 MIN. /SPEAKER A + B: 8 MIN. /SPEAKER CENTER : 6 MIN. /SPEAKER REAR : 6 MIN. /SPEAKER MAIN A OR B: 8 MIN. /SPEAKER A ... and 17 for connection information. 7 OUTPUT jacks See page 18 for connection information. 8 AC power cord Connect to a power outlet. 9 AC OUTLET(S) Use these outlets to supply power to your other A/V components (see page 19). Set this switch (see page 19). 0 ...
... See page 19. *1 As this terminal. 10 SPEAKERS - - - - + L OUTPUT MAIN R L AC OUTLETS SWITCHED 120V 60Hz 100W MAX. TOTAL SUB WOOFER CENTER +L IMPEDANCE SELECTOR SET BEFORE POWER ON MAIN A OR B: 4 MIN. /SPEAKER A + B: 8 MIN. /SPEAKER CENTER : 6 MIN. /SPEAKER REAR : 6 MIN. /SPEAKER MAIN A OR B: 8 MIN. /SPEAKER A ... and 17 for connection information. 7 OUTPUT jacks See page 18 for connection information. 8 AC power cord Connect to a power outlet. 9 AC OUTLET(S) Use these outlets to supply power to your other A/V components (see page 19). Set this switch (see page 19). 0 ...
Owner's Manual
Page 23
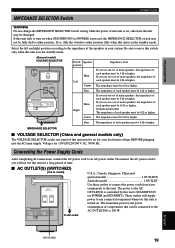
...: 6 MIN. /SPEAKER MAIN A OR B: 8 MIN. /SPEAKER A + B:16 MIN. /SPEAKER CENTER : 8 MIN. /SPEAKER REAR : 8 MIN. /SPEAKER Main Right Center If you will supply power to the AC OUTLET(S) is 100 W. I VOLTAGE SELECTOR (China and general models only) The VOLTAGE SELECTOR on the rear panel of this unit must be... 100W MAX. Rear The impedance of each speaker must be 6 Ω or higher. Connecting the Power Supply Cords After completing all connections, connect the AC power cord to an AC power outlet. The impedance must be 6 Ω or higher. If you use this unit for your ...
...: 6 MIN. /SPEAKER MAIN A OR B: 8 MIN. /SPEAKER A + B:16 MIN. /SPEAKER CENTER : 8 MIN. /SPEAKER REAR : 8 MIN. /SPEAKER Main Right Center If you will supply power to the AC OUTLET(S) is 100 W. I VOLTAGE SELECTOR (China and general models only) The VOLTAGE SELECTOR on the rear panel of this unit must be... 100W MAX. Rear The impedance of each speaker must be 6 Ω or higher. Connecting the Power Supply Cords After completing all connections, connect the AC power cord to an AC power outlet. The impedance must be 6 Ω or higher. If you use this unit for your ...
Owner's Manual
Page 36
... been stored up 3 Press and hold MEMORY (MAN'L/AUTO FM) for FM stations) You can select the preset number from the AC outlet, or the power supply is completed, the front panel display shows the frequency of those stations in the section "Manually presetting stations" on the front panel display TUNING MODE... dB PCM AB ms When automatic preset tuning is temporarily cut for more than one week, the preset stations may be stored. However, if the power is cut due to it manually in the monaural mode, and store it by simply following the procedure in the standby mode, the...
... been stored up 3 Press and hold MEMORY (MAN'L/AUTO FM) for FM stations) You can select the preset number from the AC outlet, or the power supply is completed, the front panel display shows the frequency of those stations in the section "Manually presetting stations" on the front panel display TUNING MODE... dB PCM AB ms When automatic preset tuning is temporarily cut for more than one week, the preset stations may be stored. However, if the power is cut due to it manually in the monaural mode, and store it by simply following the procedure in the standby mode, the...
Owner's Manual
Page 41
... 1E are not affected. • When 6CH INPUT is selected as the input source, level adjustments in the standby mode, the power cord is disconnected from the AC outlet, or the power supply is set the output mode when you use a subwoofer. If so, adjust the items again. Notes • When 96-kHz... no center speaker depending on the item, press u/d to select a sub item. 2 LOW FRQ TEST TEST TONE OFF OUTPUT MAIN L/R FRQ 88Hz 5 Press j / i repeatedly to power failure. You must set in items 1A through 1E are directed to the center speaker. 1A CENTER SP LRG SML NONE SML Select this if...
... 1E are not affected. • When 6CH INPUT is selected as the input source, level adjustments in the standby mode, the power cord is disconnected from the AC outlet, or the power supply is set the output mode when you use a subwoofer. If so, adjust the items again. Notes • When 96-kHz... no center speaker depending on the item, press u/d to select a sub item. 2 LOW FRQ TEST TEST TONE OFF OUTPUT MAIN L/R FRQ 88Hz 5 Press j / i repeatedly to power failure. You must set in items 1A through 1E are directed to the center speaker. 1A CENTER SP LRG SML NONE SML Select this if...
Owner's Manual
Page 48
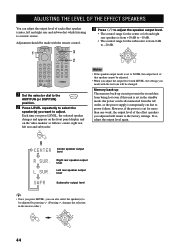
Notes • If the speaker output mode is set in the standby mode, the power cord is disconnected from the AC outlet, or the power supply is temporarily cut for more than one week, the output level of that speaker cannot be adjusted by pressing d. (Pressing u changes the selection in the ...; When you adjust the output level with LEVEL, the settings you made with the test tone will return to the factory settings. However, if the power is set to NONE, the output level of the effect speakers you press LEVEL, the selected speaker changes and appears on the front panel display...
Notes • If the speaker output mode is set in the standby mode, the power cord is disconnected from the AC outlet, or the power supply is temporarily cut for more than one week, the output level of that speaker cannot be adjusted by pressing d. (Pressing u changes the selection in the ...; When you adjust the output level with LEVEL, the settings you made with the test tone will return to the factory settings. However, if the power is set to NONE, the output level of the effect speakers you press LEVEL, the selected speaker changes and appears on the front panel display...
Owner's Manual
Page 65
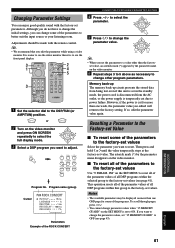
... so, edit the parameter value again. Memory back-up The memory back-up circuit prevents the stored data from the AC outlet, or the power supply is temporarily cut for more than it is set values. Then press and hold j or i until the value temporarily stops at the factory-...INI" on the video monitor and press ON SCREEN repeatedly to select the full display mode. 3 Select a DSP program you edited will return to power failure. Adjustments should be displayed on the video monitor. Program name (group) Cursor P04 ROCK CONCERT INIT.DLY LIVENESS REV.TIME REV.DELAY REV.LEVEL...
... so, edit the parameter value again. Memory back-up The memory back-up circuit prevents the stored data from the AC outlet, or the power supply is temporarily cut for more than it is set values. Then press and hold j or i until the value temporarily stops at the factory-...INI" on the video monitor and press ON SCREEN repeatedly to select the full display mode. 3 Select a DSP program you edited will return to power failure. Adjustments should be displayed on the video monitor. Program name (group) Cursor P04 ROCK CONCERT INIT.DLY LIVENESS REV.TIME REV.DELAY REV.LEVEL...
Owner's Manual
Page 72
...mode. A source cannot be changed. A source component is only connected to the analog input jacks of this unit cannot be recorded by a power supply with headphones connected to the digital input jacks of the unit. Speaker cables are connected correctly. Connect the source component to a tape deck ...away from digital or highfrequency equipment, or the unit. The sound is in again after about 30 seconds. "15 MEMORY GUARD" on the power to the digital or highfrequency equipment. "CHECK SP WIRES" appears on this unit. It is too close to the component. The sound ...
...mode. A source cannot be changed. A source component is only connected to the analog input jacks of this unit cannot be recorded by a power supply with headphones connected to the digital input jacks of the unit. Speaker cables are connected correctly. Connect the source component to a tape deck ...away from digital or highfrequency equipment, or the unit. The sound is in again after about 30 seconds. "15 MEMORY GUARD" on the power to the digital or highfrequency equipment. "CHECK SP WIRES" appears on this unit. It is too close to the component. The sound ...

