Owners Manual
Page 7
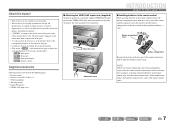
... the remote control, removing the batteries for the information about each position of the following parts. • Remote control • Batteries (AAA, R03, UM-4) x 2 • YPAO microphone • AM loop antenna • Indoor FM antenna • VIDEO AUX input cover ■ Attaching the VIDEO AUX input cover (supplied) To protect against dust...
... the remote control, removing the batteries for the information about each position of the following parts. • Remote control • Batteries (AAA, R03, UM-4) x 2 • YPAO microphone • AM loop antenna • Indoor FM antenna • VIDEO AUX input cover ■ Attaching the VIDEO AUX input cover (supplied) To protect against dust...
Owners Manual
Page 8
This indicator also lights up in any of speakers/headphones (☞p. 40). c YPAO MIC jack Connect the supplied YPAO microphone and adjust the speaker balance automatically (☞p. 33). When speakers in another room, this unit (☞p. 68). m PHONES jack For plugging headphones ...Displays information on the front panel display (☞p. 10). When this unit is connected to this unit, this key switches the built-in the Yamaha iPod universal dock, is charging while the unit is connected to Pure Direct mode (☞p. 44). p TONE CONTROL Adjusts high-frequency/low-...
This indicator also lights up in any of speakers/headphones (☞p. 40). c YPAO MIC jack Connect the supplied YPAO microphone and adjust the speaker balance automatically (☞p. 33). When speakers in another room, this unit (☞p. 68). m PHONES jack For plugging headphones ...Displays information on the front panel display (☞p. 10). When this unit is connected to this unit, this key switches the built-in the Yamaha iPod universal dock, is charging while the unit is connected to Pure Direct mode (☞p. 44). p TONE CONTROL Adjusts high-frequency/low-...

Owners Manual
Page 33
... next page J 1 : When you have changed the number of the speakers in which this unit has been selected. YPAO microphone When positioning the microphone, we recommend that you use equipment that adjusts the status, size, and volume balance of speakers or the locations in which... or TV screen. 1 Check the following when using YPAO. J1 When using a tripod, use YPAO to adjust the speaker balance. Setting up the speaker parameters automatically (YPAO) CONNECTIONS This unit is equipped with a Yamaha Parametric Room Acoustic Optimizer (YPAO) that allows you to adjust the height (such as...
... next page J 1 : When you have changed the number of the speakers in which this unit has been selected. YPAO microphone When positioning the microphone, we recommend that you use equipment that adjusts the status, size, and volume balance of speakers or the locations in which... or TV screen. 1 Check the following when using YPAO. J1 When using a tripod, use YPAO to adjust the speaker balance. Setting up the speaker parameters automatically (YPAO) CONNECTIONS This unit is equipped with a Yamaha Parametric Room Acoustic Optimizer (YPAO) that allows you to adjust the height (such as...

Owners Manual
Page 34
... TV CD OPTION RADIO ENTER VOLUME RETURN DISPLAY TOP MENU REC POP-UP MUTE MENU 1 2 5 6 9 0 INPUT MUTE 3 4 7 8 10 ENT 4 Connect the YPAO microphone to the previous screen, press kRETURN and then kENTER. MAIN ZONE 2 CODE SET SOURCE RECEIVER HDMI 1 2 3 4 AUDIO 5 V-AUX 1 2 AV 1 2 3 4...The following when measuring acoustics. • It takes approximately 3 minutes to avoid creating an obstruction between the speakers and the YPAO microphone. Keep the room as quiet as possible while acoustics are measured. • Wait in 10 seconds. • To start...
... TV CD OPTION RADIO ENTER VOLUME RETURN DISPLAY TOP MENU REC POP-UP MUTE MENU 1 2 5 6 9 0 INPUT MUTE 3 4 7 8 10 ENT 4 Connect the YPAO microphone to the previous screen, press kRETURN and then kENTER. MAIN ZONE 2 CODE SET SOURCE RECEIVER HDMI 1 2 3 4 AUDIO 5 V-AUX 1 2 AV 1 2 3 4...The following when measuring acoustics. • It takes approximately 3 minutes to avoid creating an obstruction between the speakers and the YPAO microphone. Keep the room as quiet as possible while acoustics are measured. • Wait in 10 seconds. • To start...

Owners Manual
Page 35
... MUTE MENU Result Save/Exit Displays the results of AV equipment. NOTE If a problem occurs, an error message or report is automatically terminated. Disconnect the YPAO microphone. The YPAO microphone is displayed after acoustic measurement. Refer to heat. SW L CR SL SR CONNECTIONS Setting up the speaker parameters automatically...
... MUTE MENU Result Save/Exit Displays the results of AV equipment. NOTE If a problem occurs, an error message or report is automatically terminated. Disconnect the YPAO microphone. The YPAO microphone is displayed after acoustic measurement. Refer to heat. SW L CR SL SR CONNECTIONS Setting up the speaker parameters automatically...

Owners Manual
Page 36
...k Cursor B / C / D / E k ENTER k RETURN 1 k Press kCursor B / C repeatedly to select "Result" and press kENTER immediately after the YPAO microphone is displayed when the connected speaker does not have the ability to reproduce the low-frequency signals effectively. Applies "Result" menu settings to finish "Result...before reloading automatic setup parameters, see "Prohibiting setting changes" (☞p. 94). b a c CONNECTIONS Setting up the speaker parameters automatically (YPAO) 2 Select the desired menu item (or enable a function) using kCursor B / C / D / E and kENTER. 3 ...
...k Cursor B / C / D / E k ENTER k RETURN 1 k Press kCursor B / C repeatedly to select "Result" and press kENTER immediately after the YPAO microphone is displayed when the connected speaker does not have the ability to reproduce the low-frequency signals effectively. Applies "Result" menu settings to finish "Result...before reloading automatic setup parameters, see "Prohibiting setting changes" (☞p. 94). b a c CONNECTIONS Setting up the speaker parameters automatically (YPAO) 2 Select the desired menu item (or enable a function) using kCursor B / C / D / E and kENTER. 3 ...

Owners Manual
Page 38
... Setup menu to find one of side of the surround left side (SINGLE) terminal. Check that the YPAO microphone has been installed correctly. Contact a Yamaha service center if "E-10" is not connected. Connect the YPAO microphone to touch the YPAO microphone. The headphones are connected. Set "Memory Guard" in quiet surroundings. Check that the left and right...
... Setup menu to find one of side of the surround left side (SINGLE) terminal. Check that the YPAO microphone has been installed correctly. Contact a Yamaha service center if "E-10" is not connected. Connect the YPAO microphone to touch the YPAO microphone. The headphones are connected. Set "Memory Guard" in quiet surroundings. Check that the left and right...

Owners Manual
Page 123
... for connection Speakers Ex. PUSH Remote control Batteries (2) (AAA, R03, UM-4) Preparing the remote control AM loop antenna Indoor FM antenna VIDEO AUX input cover YPAO microphone 13 1 Take off the battery compartment cover. Center speaker Ex. Active subwoofer • Use speakers with this unit during operation. 2 Insert the two supplied AAA...
... for connection Speakers Ex. PUSH Remote control Batteries (2) (AAA, R03, UM-4) Preparing the remote control AM loop antenna Indoor FM antenna VIDEO AUX input cover YPAO microphone 13 1 Take off the battery compartment cover. Center speaker Ex. Active subwoofer • Use speakers with this unit during operation. 2 Insert the two supplied AAA...

Owners Manual
Page 128
.... Continues to fix the microphone in a corner of the following before using YPAO. • The test tone is equipped with a simple procedure. YPAO operations can be output from this unit on. 4 Connect the YPAO microphone to others. • Take care that adjusts the speaker balance automatically with a Yamaha Parametric Room Acoustic Optimizer (YPAO) function that the test...
.... Continues to fix the microphone in a corner of the following before using YPAO. • The test tone is equipped with a simple procedure. YPAO operations can be output from this unit on. 4 Connect the YPAO microphone to others. • Take care that adjusts the speaker balance automatically with a Yamaha Parametric Room Acoustic Optimizer (YPAO) function that the test...

Owners Manual
Page 129
... cursor B/C to select "Save/Exit" and press ENTER. 7 Use the cursor D/E to select "SAVE" and press ENTER. Disconnect the YPAO microphone. Adjusting volume between input sources External device connection and playback - Note If a problem occurs, an error message or report is displayed either... ENTER. Adjustment for various parameters to "When an error message is automatically terminated. Playback from an iPod/iPhone - MAIN ZONE YPAO MIC ZONE2 ZONE CONTROL You can use the following display appears if measurement finishes without any problems. Result Displays the results of automatic...
... cursor B/C to select "Save/Exit" and press ENTER. 7 Use the cursor D/E to select "SAVE" and press ENTER. Disconnect the YPAO microphone. Adjusting volume between input sources External device connection and playback - Note If a problem occurs, an error message or report is displayed either... ENTER. Adjustment for various parameters to "When an error message is automatically terminated. Playback from an iPod/iPhone - MAIN ZONE YPAO MIC ZONE2 ZONE CONTROL You can use the following display appears if measurement finishes without any problems. Result Displays the results of automatic...


