

Owner's Manual
Page 5
... 56 y indicates a tip for Other Future Formats x S Video Signal Input/Output Capability x 3 Optical/2 Coaxial Digital Signal Input Terminals x SLEEP Timer x Remote Control with Preset Manufacturer Codes Manufactured under license from Dolby Laboratories. and Canada models] Main: 100 W + 100 W (8 Ω) Center: 100 W (8 Ω...Digital Sound Field Processor (DSP) x Dolby Pro Logic Decoder x Dolby Digital Decoder x DTS Decoder x CINEMA DSP: Combination of YAMAHA DSP Technology and Dolby Pro Logic, Dolby Digital or DTS Sophisticated FM/AM Tuner x 40-Station Random Access Preset Tuning x ...
... 56 y indicates a tip for Other Future Formats x S Video Signal Input/Output Capability x 3 Optical/2 Coaxial Digital Signal Input Terminals x SLEEP Timer x Remote Control with Preset Manufacturer Codes Manufactured under license from Dolby Laboratories. and Canada models] Main: 100 W + 100 W (8 Ω) Center: 100 W (8 Ω...Digital Sound Field Processor (DSP) x Dolby Pro Logic Decoder x Dolby Digital Decoder x DTS Decoder x CINEMA DSP: Combination of YAMAHA DSP Technology and Dolby Pro Logic, Dolby Digital or DTS Sophisticated FM/AM Tuner x 40-Station Random Access Preset Tuning x ...

Owner's Manual
Page 6
...Avoid touching the leaked material or letting it come into contact with new ones. If it is close to replace the batteries within about the remote control.) Notes • Use only AAA, R03 or UM-4 batteries for an extended period of time. • If the batteries have leaked...and Canada models only) Indoor FM antenna Quick reference card Quick Reference Card AM loop antenna Connection guide Battery Installation in the Remote Control 2 1 3 1 Turn the remote control over and slide the battery compartment cover in your package. Be sure to the unit, the batteries are included in the ...
...Avoid touching the leaked material or letting it come into contact with new ones. If it is close to replace the batteries within about the remote control.) Notes • Use only AAA, R03 or UM-4 batteries for an extended period of time. • If the batteries have leaked...and Canada models only) Indoor FM antenna Quick reference card Quick Reference Card AM loop antenna Connection guide Battery Installation in the Remote Control 2 1 3 1 Turn the remote control over and slide the battery compartment cover in your package. Be sure to the unit, the batteries are included in the ...

Owner's Manual
Page 7
.... • Do not spill water, tea or other liquids on the remote control. • Do not drop the remote control. • Do not leave or store the remote control in the following conditions: - or - INTRODUCTION Using the Remote Control Remote control sensor Within approximately 6 m (20 feet) GETTING STARTED The remote control transmits a directional infrared beam. high humidity or temperature such as a fluorescent...
.... • Do not spill water, tea or other liquids on the remote control. • Do not drop the remote control. • Do not leave or store the remote control in the following conditions: - or - INTRODUCTION Using the Remote Control Remote control sensor Within approximately 6 m (20 feet) GETTING STARTED The remote control transmits a directional infrared beam. high humidity or temperature such as a fluorescent...

Owner's Manual
Page 8
... switch to turn on the power of power to receive infrared-signals from the remote control. 2 Remote control sensor This receives signals from the main speakers through the headphones. You can listen to the sound to be output from the remote control. 3 Display This shows various information. (Refer to page 6 for details.) ... selected program appears on or off , the signals of the center and rear channels are turned on the display. 4 6 VOLUME Turn this control to turn off the effect speakers (center and rear) and set this unit or to select a DSP program when the effect speakers (center ...
... switch to turn on the power of power to receive infrared-signals from the remote control. 2 Remote control sensor This receives signals from the main speakers through the headphones. You can listen to the sound to be output from the remote control. 3 Display This shows various information. (Refer to page 6 for details.) ... selected program appears on or off , the signals of the center and rear channels are turned on the display. 4 6 VOLUME Turn this control to turn off the effect speakers (center and rear) and set this unit or to select a DSP program when the effect speakers (center ...
Owner's Manual
Page 11
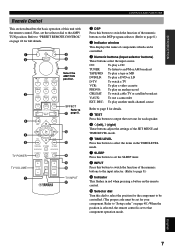
...items in red when pressing a button on the remote control. 0 Selector dial Turn this unit with the remote control. APPENDIX English 7 Refer to "Setup codes" on page 42 for the component to be controlled. (The proper code must be controlled. 3 Numeric buttons (Input selector buttons) These ... the AMP/TUN position. 3 4 5 6 TV POWER TV VOLUME 7 EFFECT Refer to q page 8. Refer to "PRESET REMOTE CONTROL" on page 48.) When the position is selected, the remote control is set the selector dial to the AMP/ TUN position. CD: To play a CD TUNER: To listen to that component operation...
...items in red when pressing a button on the remote control. 0 Selector dial Turn this unit with the remote control. APPENDIX English 7 Refer to "Setup codes" on page 42 for the component to be controlled. (The proper code must be controlled. 3 Numeric buttons (Input selector buttons) These ... the AMP/TUN position. 3 4 5 6 TV POWER TV VOLUME 7 EFFECT Refer to q page 8. Refer to "PRESET REMOTE CONTROL" on page 48.) When the position is selected, the remote control is set the selector dial to the AMP/ TUN position. CD: To play a CD TUNER: To listen to that component operation...

Owner's Manual
Page 23
..." on the display. 3 Turn up the volume. INTRODUCTION PREPARATION ADJUSTING THE SPEAKER BALANCE This procedure lets you use VOLUME (+/-) at your listening position with the remote control.
..." on the display. 3 Turn up the volume. INTRODUCTION PREPARATION ADJUSTING THE SPEAKER BALANCE This procedure lets you use VOLUME (+/-) at your listening position with the remote control.
Owner's Manual
Page 25
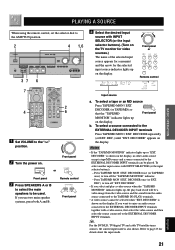
... with a video source, first select the video source and then select the source connected to the EXTERNAL DECODER INPUT terminals. Remote control Front panel Input source a. DECODER" is shown on the display. Refer to page 23 for the selected input source indicator... connected to the EXTERNAL DECODER INPUT terminals Press TAPE/MD MON / EXT. BASIC OPERATION INTRODUCTION PREPARATION BASIC OPERATION ADVANCED OPERATION PLAYING A SOURCE When using the remote control, set the selector dial to the AMP/TUN position. 2 4 1,6 - + - + L R 37 6 4 Select the desired input source with ...
... with a video source, first select the video source and then select the source connected to the EXTERNAL DECODER INPUT terminals. Remote control Front panel Input source a. DECODER" is shown on the display. Refer to page 23 for the selected input source indicator... connected to the EXTERNAL DECODER INPUT terminals Press TAPE/MD MON / EXT. BASIC OPERATION INTRODUCTION PREPARATION BASIC OPERATION ADVANCED OPERATION PLAYING A SOURCE When using the remote control, set the selector dial to the AMP/TUN position. 2 4 1,6 - + - + L R 37 6 4 Select the desired input source with ...
Owner's Manual
Page 26
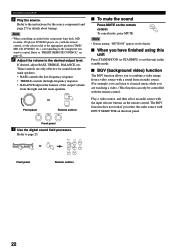
.../ MD, CD, DVD/LD, etc.), corresponding to the component you are only effective for details about tuning). Refer to "PRESET REMOTE CONTROL" on page 42. 6 Adjust the volume to page 25. Play a video source, and then select an audio source with INPUT SELECTOR on...A SOURCE 5 Play the source. Note • During muting, "MUTE ON" appears on the remote control. or Front panel Remote control 22 These controls are watching a video.) This function can only be controlled with the remote control, set this unit in the standby mode. Refer to the instructions for the source component (and ...
.../ MD, CD, DVD/LD, etc.), corresponding to the component you are only effective for details about tuning). Refer to "PRESET REMOTE CONTROL" on page 42. 6 Adjust the volume to page 25. Play a video source, and then select an audio source with INPUT SELECTOR on...A SOURCE 5 Play the source. Note • During muting, "MUTE ON" appears on the remote control. or Front panel Remote control 22 These controls are watching a video.) This function can only be controlled with the remote control, set this unit in the standby mode. Refer to the instructions for the source component (and ...

Owner's Manual
Page 27
...digital signal was selected again. • The input mode cannot be interrupted for sources that you have pressed to select the input source on the remote control) repeatedly until the desired input mode is shown on the display. When you turn on the power of this mode, only a digital signal ...or the input selector button that send both the OPTICAL and COAXIAL terminals, the digital signal from the COAXIAL terminal is selected. or Front panel Remote control Notes • Set the input mode to AUTO to play a DVD/LD source encoded with DTS is selected, even if other signals are used...
...digital signal was selected again. • The input mode cannot be interrupted for sources that you have pressed to select the input source on the remote control) repeatedly until the desired input mode is shown on the display. When you turn on the power of this mode, only a digital signal ...or the input selector button that send both the OPTICAL and COAXIAL terminals, the digital signal from the COAXIAL terminal is selected. or Front panel Remote control Notes • Set the input mode to AUTO to play a DVD/LD source encoded with DTS is selected, even if other signals are used...

Owner's Manual
Page 29
... three seconds. 3 Use the numeric buttons (1 to 8) to select the desired program. Refer to pages 32 to 34 for each of each program. - + - + L R 2 2 s On the remote control 1 Make sure that time. INTRODUCTION PREPARATION DIGITAL SOUND FIELD PROCESSOR (DSP) EFFECT Selecting a DSP Program You can only be heard from the center speaker. y If...
... three seconds. 3 Use the numeric buttons (1 to 8) to select the desired program. Refer to pages 32 to 34 for each of each program. - + - + L R 2 2 s On the remote control 1 Make sure that time. INTRODUCTION PREPARATION DIGITAL SOUND FIELD PROCESSOR (DSP) EFFECT Selecting a DSP Program You can only be heard from the center speaker. y If...

Owner's Manual
Page 30
... speakers. • If you turn off the effect speakers) Press EFFECT to cancel the sound effect and monitor only the main sound. Front panel or Remote control y If the selector dial is set to turn sound effect back on the source. In this case, turn the sound effect back on the... remote control. DIGITAL SOUND FIELD PROCESSOR (DSP) EFFECT Canceling the Sound Effect (turning off the sound effect when Dolby Digital or DTS is decoding, it may happen ...
... speakers. • If you turn off the effect speakers) Press EFFECT to cancel the sound effect and monitor only the main sound. Front panel or Remote control y If the selector dial is set to turn sound effect back on the source. In this case, turn the sound effect back on the... remote control. DIGITAL SOUND FIELD PROCESSOR (DSP) EFFECT Canceling the Sound Effect (turning off the sound effect when Dolby Digital or DTS is decoding, it may happen ...
Owner's Manual
Page 33
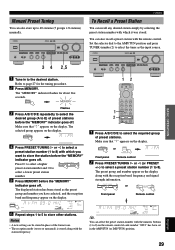
...with the reception band, frequency and signal strength information. You can be stored in the AMP/TUN (or DSP/TUN) position. 29 or Front panel Remote control 2 Press PRESET/TUNING h or l (or PRESET +/-) to select a preset station number (1 to store other stations. Make sure that " z ... Preset Tuning You can recall any desired station simply by selecting the preset station number with which it was stored. or Front panel Remote control BASIC OPERATION ADVANCED OPERATION APPENDIX English 6 Repeat steps 1 to 5 to 8). Press h to select a higher preset station number and...
...with the reception band, frequency and signal strength information. You can be stored in the AMP/TUN (or DSP/TUN) position. 29 or Front panel Remote control 2 Press PRESET/TUNING h or l (or PRESET +/-) to select a preset station number (1 to store other stations. Make sure that " z ... Preset Tuning You can recall any desired station simply by selecting the preset station number with which it was stored. or Front panel Remote control BASIC OPERATION ADVANCED OPERATION APPENDIX English 6 Repeat steps 1 to 5 to 8). Press h to select a higher preset station number and...

Owner's Manual
Page 35
...program and the setting of this unit. 4 Play the source and then turn up the volume to the "m" position. or Front panel Remote control APPENDIX English 31 Refer to the instructions for recording, you can monitor the sounds being recorded by the tape deck, MD recorder or VCR... connected to this unit cannot be disturbed due to those signals. 1 Set VOLUME to confirm the input source. or Front panel Remote control 3 Begin recording by pressing TAPE/MD MON / EXT. Therefore, when recording or dubbing video signals, if your video source component is being...
...program and the setting of this unit. 4 Play the source and then turn up the volume to the "m" position. or Front panel Remote control APPENDIX English 31 Refer to the instructions for recording, you can monitor the sounds being recorded by the tape deck, MD recorder or VCR... connected to this unit cannot be disturbed due to those signals. 1 Set VOLUME to confirm the input source. or Front panel Remote control 3 Begin recording by pressing TAPE/MD MON / EXT. Therefore, when recording or dubbing video signals, if your video source component is being...
Owner's Manual
Page 39
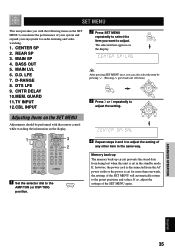
... 12.CBL INPUT 2 Press SET MENU repeatedly to select the item you want to adjust. INTRODUCTION PREPARATION SET MENU This unit provides you with the remote control while watching the information on the display. 1 3 2 1 Set the selector dial to the AMP/TUN (or DSP/TUN) position. 4 Repeat steps 2 and 3 to adjust the...
... 12.CBL INPUT 2 Press SET MENU repeatedly to select the item you want to adjust. INTRODUCTION PREPARATION SET MENU This unit provides you with the remote control while watching the information on the display. 1 3 2 1 Set the selector dial to the AMP/TUN (or DSP/TUN) position. 4 Repeat steps 2 and 3 to adjust the...

Owner's Manual
Page 44
... the delay time or speaker output levels. 4 Repeat steps 2 and 3 to adjust the settings of the SET MENU, you may not be performed with the remote control while watching the information on the setting of any other item. DELAY CENTER R SUR. If, however, the power cord is disconnected from being lost when...
... the delay time or speaker output levels. 4 Repeat steps 2 and 3 to adjust the settings of the SET MENU, you may not be performed with the remote control while watching the information on the setting of any other item. DELAY CENTER R SUR. If, however, the power cord is disconnected from being lost when...
Owner's Manual
Page 45
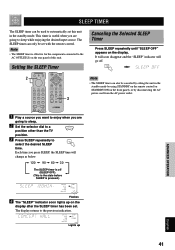
... to select the desired SLEEP time. INTRODUCTION PREPARATION SLEEP TIMER The SLEEP timer can only be set with the remote control. Lights up on the front panel), or by using STANDBY on the remote control (or STANDBY/ON on the display after the SLEEP timer has been set. Note • The SLEEP timer is...
... to select the desired SLEEP time. INTRODUCTION PREPARATION SLEEP TIMER The SLEEP timer can only be set with the remote control. Lights up on the front panel), or by using STANDBY on the remote control (or STANDBY/ON on the display after the SLEEP timer has been set. Note • The SLEEP timer is...

Owner's Manual
Page 46
... the basic operations of the selector dial. The code for a YAMAHA tape deck is used to mute the TV sound. If the remote control does not operate your YAMAHA DVD player, you can be controlled. Note • The button functions on the remote control differ depending on the remote control. TV POWER @ TV INPUT # TV VOLUME 42 CBL/SAT...
... the basic operations of the selector dial. The code for a YAMAHA tape deck is used to mute the TV sound. If the remote control does not operate your YAMAHA DVD player, you can be controlled. Note • The button functions on the remote control differ depending on the remote control. TV POWER @ TV INPUT # TV VOLUME 42 CBL/SAT...

Owner's Manual
Page 47
... Press CD (number 1) while the indicator is set the remote control with the manufacturers' codes listed from page i at the end of components. PRESET REMOTE CONTROL 43 English APPENDIX BASIC OPERATION ADVANCED OPERATION PREPARATION INTRODUCTION If you can control other brands of this manual, you set to the "m" ... the power. 4 Press INPUT. The indicator lights up for the CD player operation buttons. 7 Adjust the volume. Controlling the Components Connected to This Unit s Example: To control a YAMAHA CD player 2 6 4 5 3 7 1 Make sure that VOLUME is lit. 6 Press p.
... Press CD (number 1) while the indicator is set the remote control with the manufacturers' codes listed from page i at the end of components. PRESET REMOTE CONTROL 43 English APPENDIX BASIC OPERATION ADVANCED OPERATION PREPARATION INTRODUCTION If you can control other brands of this manual, you set to the "m" ... the power. 4 Press INPUT. The indicator lights up for the CD player operation buttons. 7 Adjust the volume. Controlling the Components Connected to This Unit s Example: To control a YAMAHA CD player 2 6 4 5 3 7 1 Make sure that VOLUME is lit. 6 Press p.

Owner's Manual
Page 48
... the playing direction of the previous track. Numeric buttons (MD) +10 (MD) While the indicator lights up for the manufacturer, use the original remote control supplied with a power button if you want to listen. SKIP+ (MD) This button skips to any of deck B. w REWIND (TAPE) This... deck or MD recorder. p PLAY This button plays a tape or an MD. r REC/PAUSE This button gives a pause in operation. PRESET REMOTE CONTROL Description of the next track. a DIR B (TAPE) This button selects the playing direction of the codes listed for about three seconds after pressing ...
... the playing direction of the previous track. Numeric buttons (MD) +10 (MD) While the indicator lights up for the manufacturer, use the original remote control supplied with a power button if you want to listen. SKIP+ (MD) This button skips to any of deck B. w REWIND (TAPE) This... deck or MD recorder. p PLAY This button plays a tape or an MD. r REC/PAUSE This button gives a pause in operation. PRESET REMOTE CONTROL Description of the next track. a DIR B (TAPE) This button selects the playing direction of the codes listed for about three seconds after pressing ...

Owner's Manual
Page 49
...on the CD player that is playing to find the point from which you have set the code for the manufacturer, use the original remote control supplied with CD changer) These buttons skip to listen. Numeric buttons INDEX +10 While the indicator lights up for a CD player with... does not respond to listen. The button functions as PAUSE/STOP* for operating a YAMAHA CD player under factory setting. s STOP This button stops operation. The button functions as PAUSE/STOP* for operating YAMAHA CD player under factory setting. y PAUSE/STOP function Press the button once to the...
...on the CD player that is playing to find the point from which you have set the code for the manufacturer, use the original remote control supplied with CD changer) These buttons skip to listen. Numeric buttons INDEX +10 While the indicator lights up for a CD player with... does not respond to listen. The button functions as PAUSE/STOP* for operating a YAMAHA CD player under factory setting. s STOP This button stops operation. The button functions as PAUSE/STOP* for operating YAMAHA CD player under factory setting. y PAUSE/STOP function Press the button once to the...


