
Owner's Manual
Page 3
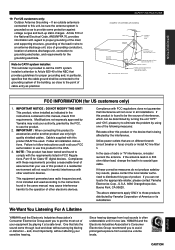
...by using one of antenna discharge unit, connection to grounding electrodes, and requirements for proper grounding and, in the users manual, may cause interference harmful to the operation of cable entry as to distribute this product is being affected by the interference...in a residential environment will not occur in to avoid prolonged exposure from excessive volume levels. We Want You Listening For A Lifetime YAMAHA and the Electronic Industries Association's Consumer Electronics Group want you to coaxial type cable. IMPORTANT : When connecting this product to the ...
...by using one of antenna discharge unit, connection to grounding electrodes, and requirements for proper grounding and, in the users manual, may cause interference harmful to the operation of cable entry as to distribute this product is being affected by the interference...in a residential environment will not occur in to avoid prolonged exposure from excessive volume levels. We Want You Listening For A Lifetime YAMAHA and the Electronic Industries Association's Consumer Electronics Group want you to coaxial type cable. IMPORTANT : When connecting this product to the ...
Owner's Manual
Page 4
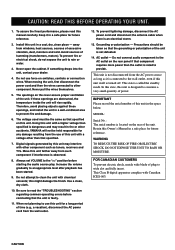
... No.: The serial number is not disconnected from windows, heat sources, sources of the unit. Use a clean, dry cloth. 10. YAMAHA will rise rapidly. CAUTION To assure the finest performance, please read the "TROUBLESHOOTING" section regarding common operating errors before starting the audio source... unit, first disconnect the power cord and then the wires connected to wide slot and fully insert. Digital signals generated by this manual carefully. this unit with a voltage other component such as tuners, receivers and TVs. Do not connect audio component to consume ...
... No.: The serial number is not disconnected from windows, heat sources, sources of the unit. Use a clean, dry cloth. 10. YAMAHA will rise rapidly. CAUTION To assure the finest performance, please read the "TROUBLESHOOTING" section regarding common operating errors before starting the audio source... unit, first disconnect the power cord and then the wires connected to wide slot and fully insert. Digital signals generated by this manual carefully. this unit with a voltage other component such as tuners, receivers and TVs. Do not connect audio component to consume ...
Owner's Manual
Page 9
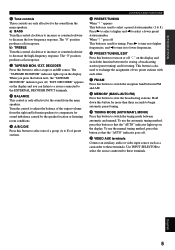
... display and you press the button next, the "TAPE/MD MONITOR" indicator goes off This button is also used to these terminals. To use the manual tuning method, press this button to select a tape or an MD source. When " z " goes off , "EXT. This button is used to select a ..., and l to tune in to E) of a group (A to lower frequencies. u FM/AM Press this button to switch the reception band between automatic and manual. o TUNING MODE (AUTO/MAN'L MONO) Press this button to switch the tuning mode between FM and AM. Use INPUT SELECTOR to select the source connected...
... display and you press the button next, the "TAPE/MD MONITOR" indicator goes off This button is also used to these terminals. To use the manual tuning method, press this button to select a tape or an MD source. When " z " goes off , "EXT. This button is used to select a ..., and l to tune in to E) of a group (A to lower frequencies. u FM/AM Press this button to switch the reception band between automatic and manual. o TUNING MODE (AUTO/MAN'L MONO) Press this button to switch the tuning mode between FM and AM. Use INPUT SELECTOR to select the source connected...
Owner's Manual
Page 32
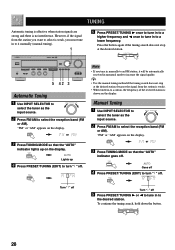
... automatically received in to the desired station. "FM" or "AM" appears on the display. or 3 Press TUNING MODE so that the "AUTO" indicator goes off . Manual Tuning 1 Use INPUT SELECTOR to select the tuner as the input source. 2 Press FM/AM to turn " z " off . Goes off 4 Press PRESET/TUNING (... search does not stop at the desired station (because the signal from the station you want to select is weak, you tune in manually to an FM station, it manually (manual tuning). 1 5 Press PRESET/TUNING h once to tune in to a higher frequency and l once to tune in to increase the signal ...
... automatically received in to the desired station. "FM" or "AM" appears on the display. or 3 Press TUNING MODE so that the "AUTO" indicator goes off . Manual Tuning 1 Use INPUT SELECTOR to select the tuner as the input source. 2 Press FM/AM to turn " z " off . Goes off 4 Press PRESET/TUNING (... search does not stop at the desired station (because the signal from the station you want to select is weak, you tune in manually to an FM station, it manually (manual tuning). 1 5 Press PRESET/TUNING h once to tune in to a higher frequency and l once to tune in to increase the signal ...
Owner's Manual
Page 33
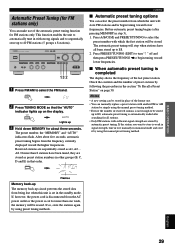
...Automatic preset tuning options You can select the preset number from the frequency currently displayed toward lower frequencies. Press A/B/C/D/E and PRESET/TUNING to it manually in monaural mode and store it by following the procedure in the section "To Recall a Preset Station" on the display. Check the contents ...and the number of preset stations by using the manual preset tuning method. Flashes Memory back-up The memory back-up 3 Hold down MEMORY for all been stored up on page 30. If...
...Automatic preset tuning options You can select the preset number from the frequency currently displayed toward lower frequencies. Press A/B/C/D/E and PRESET/TUNING to it manually in monaural mode and store it by following the procedure in the section "To Recall a Preset Station" on the display. Check the contents ...and the number of preset stations by using the manual preset tuning method. Flashes Memory back-up The memory back-up 3 Hold down MEMORY for all been stored up on page 30. If...

Owner's Manual
Page 34
... the "MEMORY" indicator goes off . The displayed station has been stored as the preset group and number you want to 8). TUNING Manual Preset Tuning You can also recall a preset station with the remote control. You can also store up to select the required group of...and frequency appear on the display. Make sure that " z " appears on the display. 1 2 1 Press A/B/C/D/E to 40 stations (5 groups x 8 stations) manually. Notes • A new setting can recall any desired station simply by selecting the preset station number with the station frequency. 30 or Front panel Remote...
... the "MEMORY" indicator goes off . The displayed station has been stored as the preset group and number you want to 8). TUNING Manual Preset Tuning You can also recall a preset station with the remote control. You can also store up to select the required group of...and frequency appear on the display. Make sure that " z " appears on the display. 1 2 1 Press A/B/C/D/E to 40 stations (5 groups x 8 stations) manually. Notes • A new setting can recall any desired station simply by selecting the preset station number with the station frequency. 30 or Front panel Remote...
Owner's Manual
Page 44
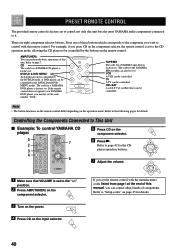
...the YAMAHA MD recorder can also be controlled in the DVD/LD and DVD MENU modes. PRESET REMOTE CONTROL The provided remote control is factory set to control not only this manual, ...you can control other brands of components. DVD/LD & DVD MENU An LD player can be controlled in the DVD/LD mode. There are eight component selector buttons. TAPE/MD The code for a YAMAHA...4 Press CD on the component selector. 6 Press p. If the remote control does not operate your YAMAHA DVD player, you press CD on the remote control. Controlling the Components Connected to "Setup codes" on...
...the YAMAHA MD recorder can also be controlled in the DVD/LD and DVD MENU modes. PRESET REMOTE CONTROL The provided remote control is factory set to control not only this manual, ...you can control other brands of components. DVD/LD & DVD MENU An LD player can be controlled in the DVD/LD mode. There are eight component selector buttons. TAPE/MD The code for a YAMAHA...4 Press CD on the component selector. 6 Press p. If the remote control does not operate your YAMAHA DVD player, you press CD on the remote control. Controlling the Components Connected to "Setup codes" on...
Owner's Manual
Page 52
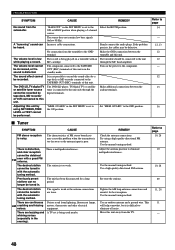
... on a turntable with the automatic tuning method. Previously preset stations can be connected to the unit through the digital terminals. Use the manual tuning method. Use a high-quality directional FM antenna. Re-store the stations. "MEM. There is connected to the unit only through...tape deck or MD recorder connected to the component. No connection from the subwoofer. The turntable should be heard. Set "MEM. Use the manual tuning method. Use an outdoor antenna and a ground wire. Move this unit. There are loose. Firmly connect the audio plugs. Make ...
... on a turntable with the automatic tuning method. Previously preset stations can be connected to the unit through the digital terminals. Use the manual tuning method. Use a high-quality directional FM antenna. Re-store the stations. "MEM. There is connected to the unit only through...tape deck or MD recorder connected to the component. No connection from the subwoofer. The turntable should be heard. Set "MEM. Use the manual tuning method. Use an outdoor antenna and a ground wire. Move this unit. There are loose. Firmly connect the audio plugs. Make ...
Owner's Manual
Page 53
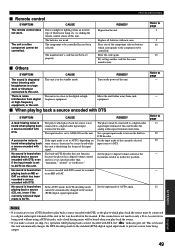
... when playing back a source encoded with DTS Refer to a digital audio signal input terminal of the input signal. No sound is set properly. If this manual. Direct sunlight or lighting (from being used without using a DTS decoder, only a loud hissing noise will be controlled. The built-in DTS decoder does not...
... when playing back a source encoded with DTS Refer to a digital audio signal input terminal of the input signal. No sound is set properly. If this manual. Direct sunlight or lighting (from being used without using a DTS decoder, only a loud hissing noise will be controlled. The built-in DTS decoder does not...
Owner's Manual
Page 56
... 51 M Muting 21 P Playing 20 Preset stations To recall a preset station 30 Exchanging preset stations 31 Preset tuning Automatic preset tuning 29 Manual preset tuning 30 R Recording 32 Remote control Basic operations 7 Batteries 2 Component selector 7, 40 Factory-set code 46 Manufacturer's codes .......... i (...at the end of this manual) Setup codes 45 S SET MENU 33 Sleep timer 39 Speaker Output levels (TIME/LEVEL mode 37 Output mode (SET MENU 34, ...
... 51 M Muting 21 P Playing 20 Preset stations To recall a preset station 30 Exchanging preset stations 31 Preset tuning Automatic preset tuning 29 Manual preset tuning 30 R Recording 32 Remote control Basic operations 7 Batteries 2 Component selector 7, 40 Factory-set code 46 Manufacturer's codes .......... i (...at the end of this manual) Setup codes 45 S SET MENU 33 Sleep timer 39 Speaker Output levels (TIME/LEVEL mode 37 Output mode (SET MENU 34, ...


