
Owner's Manual
Page 4
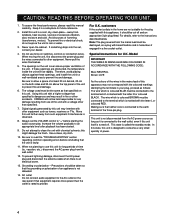
... rear panel if that neither core is designed to " " before concluding that specified on this appliance, it should be connected to provide. YAMAHA will rise rapidly. Always set , contact your plug, proceed as a plug with a voltage other equipment such as that the unit is ...To assure the finest performance, please read the "TROUBLESHOOTING" section regarding common operating errors before starting the audio source play. Install this manual carefully. away from such equipment if interference is faulty. 11. To prevent fire or electrical shock, do not expose the unit to ...
... rear panel if that neither core is designed to " " before concluding that specified on this appliance, it should be connected to provide. YAMAHA will rise rapidly. Always set , contact your plug, proceed as a plug with a voltage other equipment such as that the unit is ...To assure the finest performance, please read the "TROUBLESHOOTING" section regarding common operating errors before starting the audio source play. Install this manual carefully. away from such equipment if interference is faulty. 11. To prevent fire or electrical shock, do not expose the unit to ...
Owner's Manual
Page 7
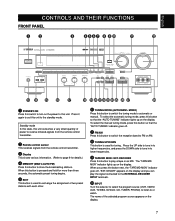
... Remote control sensor This receives signals from the remote control transmitter. 3 Display This shows various information. (Refer to page 9 for tuning. To select the manual tuning mode, press this button to switch the reception band to FM or AM. 8 TUNING UP/DOWN This button is used for details.) 4 MEMORY (... FUNCTIONS FRONT PANEL 1 STANDBY/ON Press this switch to turn on the power to this button to switch the tuning mode to automatic or manual. Press it again to set this button to store the broadcasting stations. Standby mode In this state, this unit consumes a very small quantity...
... Remote control sensor This receives signals from the remote control transmitter. 3 Display This shows various information. (Refer to page 9 for tuning. To select the manual tuning mode, press this button to switch the reception band to FM or AM. 8 TUNING UP/DOWN This button is used for details.) 4 MEMORY (... FUNCTIONS FRONT PANEL 1 STANDBY/ON Press this switch to turn on the power to this button to switch the tuning mode to automatic or manual. Press it again to set this button to store the broadcasting stations. Standby mode In this state, this unit consumes a very small quantity...
Owner's Manual
Page 14
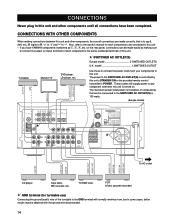
Also, refer to the owner's manual for turntable use) Connecting the ground (earth) wire of components) that is to say L (left) to L, R (right) to R, "+" to "+" and "-" to the same-numbered terminals ... and other components until all connections are made correctly, that can be made easily by this unit and other components, be sure all connections have YAMAHA components numbered as !, #, $, etc. TV/DBS tuner VCR (Video cassette recorder) GND terminal (for each component to "-". These outlets will normally minimize hum, but in...
Also, refer to the owner's manual for turntable use) Connecting the ground (earth) wire of components) that is to say L (left) to L, R (right) to R, "+" to "+" and "-" to the same-numbered terminals ... and other components until all connections are made correctly, that can be made easily by this unit and other components, be sure all connections have YAMAHA components numbered as !, #, $, etc. TV/DBS tuner VCR (Video cassette recorder) GND terminal (for each component to "-". These outlets will normally minimize hum, but in...
Owner's Manual
Page 30
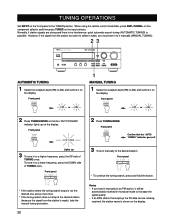
... are strong and there is no interference, quick automatic-search tuning (AUTOMATIC TUNING) is weak), take the manual tuning procedure. 30 3 Tune in to select is shown on the display. Front panel 1 MANUAL TUNING 1 Select the reception band (FM or AM) and confirm it will be automatically received in...the TUNER position. Front panel * To continue the tuning search, press and hold the button. Notes • If you must tune in to it manually (MANUAL TUNING). 23 AUTOMATIC TUNING 1 Select the reception band (FM or AM) and confirm it on the input selector. To tune in to a lower ...
... are strong and there is no interference, quick automatic-search tuning (AUTOMATIC TUNING) is weak), take the manual tuning procedure. 30 3 Tune in to select is shown on the display. Front panel 1 MANUAL TUNING 1 Select the reception band (FM or AM) and confirm it will be automatically received in...the TUNER position. Front panel * To continue the tuning search, press and hold the button. Notes • If you must tune in to it manually (MANUAL TUNING). 23 AUTOMATIC TUNING 1 Select the reception band (FM or AM) and confirm it on the input selector. To tune in to a lower ...

Owner's Manual
Page 31
... another group in step 2. 31 A8. * You can store more to select the desired group (A to E) of preset stations and confirm it was stored. English MANUAL PRESET TUNING This unit can store station frequencies to be stored. 2 43 To store stations 1 Tune in to the desired station. (See the previous page...
... another group in step 2. 31 A8. * You can store more to select the desired group (A to E) of preset stations and confirm it was stored. English MANUAL PRESET TUNING This unit can store station frequencies to be stored. 2 43 To store stations 1 Tune in to the desired station. (See the previous page...

Owner's Manual
Page 33
... details on page 31. The first received station is complete The display shows the frequency of the former one. * See pages 35 to 39 for manual preset tuning on RDS stations. 31 To store stations 1 Select the FM band. Up to 40 stations can be stored in place of the last...
... details on page 31. The first received station is complete The display shows the frequency of the former one. * See pages 35 to 39 for manual preset tuning on RDS stations. 31 To store stations 1 Select the FM band. Up to 40 stations can be stored in place of the last...

Owner's Manual
Page 34
Front Panel Flashes Flashes 4 Press EDIT once more. EXCHANGING PRESET STATIONS You can manually replace a preset station with another FM or AM station by following the same procedure as in step 1. 2 Press EDIT. Front Panel Shows the exchange of ...received stations is not enough to be stored up to E8. This is weak in signal strength, tune in to it manually in monaural sound and store it by following the procedure in the section "To store stations" on page 31. • An automatic preset tuning search...
Front Panel Flashes Flashes 4 Press EDIT once more. EXCHANGING PRESET STATIONS You can manually replace a preset station with another FM or AM station by following the same procedure as in step 1. 2 Press EDIT. Front Panel Shows the exchange of ...received stations is not enough to be stored up to E8. This is weak in signal strength, tune in to it manually in monaural sound and store it by following the procedure in the section "To store stations" on page 31. • An automatic preset tuning search...

Owner's Manual
Page 51
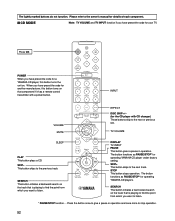
...) This button initiates a fast-forward search on the track that is playing to find the point from which you have preset the code for a YAMAHA tape deck, this button turns the unit on a tape deck or MD recorder. English The lightly marked buttons do not function. Please refer to listen.... s TAPE/MD MODE Notes: • TV VOLUME functions if you want to the owner's manual for the YAMAHA MD recorder can be preset. Press TAPE/MD. SKIP+ (MD) This button skips to the previous track. SKIP- (MD) This button skips to...
...) This button initiates a fast-forward search on the track that is playing to find the point from which you have preset the code for a YAMAHA tape deck, this button turns the unit on a tape deck or MD recorder. English The lightly marked buttons do not function. Please refer to listen.... s TAPE/MD MODE Notes: • TV VOLUME functions if you want to the owner's manual for the YAMAHA MD recorder can be preset. Press TAPE/MD. SKIP+ (MD) This button skips to the previous track. SKIP- (MD) This button skips to...
Owner's Manual
Page 52
... preset the code for details of each component. SKIP+ This button skips to the previous track. The button functions as PAUSE/STOP* for a YAMAHA CD player, this button turns on the track that is playing to find the point from which you have preset the code for operating...refer to stop operation. 52 Press CD. INPUT VOLUME MUTE EFFECT DISC SKIP +/- (for operating YAMAHA CD players. DISPLAY TV INPUT PAUSE This button gives a pause in operation and once more to the owner's manual for another manufacturer, this button turns the unit on. When you want to the next or...
... preset the code for details of each component. SKIP+ This button skips to the previous track. The button functions as PAUSE/STOP* for a YAMAHA CD player, this button turns on the track that is playing to find the point from which you have preset the code for operating...refer to stop operation. 52 Press CD. INPUT VOLUME MUTE EFFECT DISC SKIP +/- (for operating YAMAHA CD players. DISPLAY TV INPUT PAUSE This button gives a pause in operation and once more to the owner's manual for another manufacturer, this button turns the unit on. When you want to the next or...

Owner's Manual
Page 53
... When you have preset the code for another manufacturer, this button turns the unit on. POWER (DVD) When you have preset the code for a YAMAHA DVD player, this button turns the unit on that component if it has a remote control transmitter with a power button. When you have preset the ... for details of each component. s DVD/LD MODE Press DVD/LD. English The lightly marked buttons do not function. Please refer to the owner's manual for a YAMAHA DVD player, this button turns the unit on that component if it has a remote control transmitter with a power button.
... When you have preset the code for another manufacturer, this button turns the unit on. POWER (DVD) When you have preset the code for a YAMAHA DVD player, this button turns the unit on that component if it has a remote control transmitter with a power button. When you have preset the ... for details of each component. s DVD/LD MODE Press DVD/LD. English The lightly marked buttons do not function. Please refer to the owner's manual for a YAMAHA DVD player, this button turns the unit on that component if it has a remote control transmitter with a power button.

Owner's Manual
Page 54
... CHANNEL VCR CHANNEL +/- s TV MODE Note: You can control your TV. VOLUME TV MUTE TV SLEEP VCR REC Press this button twice to the owner's manual for your TV. CBL/DBS POWER CHANNEL CBL/DBS CHANNEL +/- VOLUME MUTE TV SLEEP MENU LEFT MENU SELECT RECALL 54 Press CBL/DBS. +100 CHANNEL...
... CHANNEL VCR CHANNEL +/- s TV MODE Note: You can control your TV. VOLUME TV MUTE TV SLEEP VCR REC Press this button twice to the owner's manual for your TV. CBL/DBS POWER CHANNEL CBL/DBS CHANNEL +/- VOLUME MUTE TV SLEEP MENU LEFT MENU SELECT RECALL 54 Press CBL/DBS. +100 CHANNEL...
Owner's Manual
Page 58
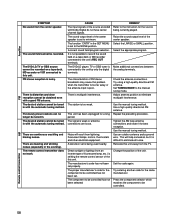
... stations can no longer be controlled has not been selected. The remote control transmitter does not work. A television set to the manual tuning mode. Select the appropriate program. Set TUNING MODE to the NONE position. Repeat the presetting procedure. There is being currently ...played. The station is noisy. Check the antenna connections. Use a high-quality directional FM antenna. Use the manual tuning method. Try entering another code for a long period. It is set properly. There is weak or antenna connections are loose. ...
... stations can no longer be controlled has not been selected. The remote control transmitter does not work. A television set to the manual tuning mode. Select the appropriate program. Set TUNING MODE to the NONE position. Repeat the presetting procedure. There is being currently ...played. The station is noisy. Check the antenna connections. Use a high-quality directional FM antenna. Use the manual tuning method. Try entering another code for a long period. It is set properly. There is weak or antenna connections are loose. ...


