
Owner's Manual
Page 3
... Power Main: 60 W + 60 W (8 Ω) Center: 60 W (8 Ω) Rear: 60 W + 60 W (8 Ω) q Digital Sound Field Processor q Dolby Digital Decoder q Dolby Pro Logic Surround Decoder q CINEMA DSP: Theater-like Sound Experience by the Combination of Dolby Surround and YAMAHA DSP Technology q 6-Channel External Decoder Input for DTS and other future formats q Automatic Input Balance Control for Dolby Pro Logic Surround q Test Tone Generator for Easier Speaker Balance Adjustment q Speaker Output Mode Changing Capability q 40-Station Random Access Preset Tuning q Automatic Preset Tuning q Preset...
... Power Main: 60 W + 60 W (8 Ω) Center: 60 W (8 Ω) Rear: 60 W + 60 W (8 Ω) q Digital Sound Field Processor q Dolby Digital Decoder q Dolby Pro Logic Surround Decoder q CINEMA DSP: Theater-like Sound Experience by the Combination of Dolby Surround and YAMAHA DSP Technology q 6-Channel External Decoder Input for DTS and other future formats q Automatic Input Balance Control for Dolby Pro Logic Surround q Test Tone Generator for Easier Speaker Balance Adjustment q Speaker Output Mode Changing Capability q 40-Station Random Access Preset Tuning q Automatic Preset Tuning q Preset...
Owner's Manual
Page 4
... operating errors before starting the audio source play. Never pull the wires themselves. 5. Do not attempt to " " before concluding that equipment requires more power than specified. 7. AC outlet Do not connect audio equipment to the AC outlet on the rear panel if that the unit is rated to consume a very small quantity of an appliance is turned off and an appropriate 3 pin plug...
... operating errors before starting the audio source play. Never pull the wires themselves. 5. Do not attempt to " " before concluding that equipment requires more power than specified. 7. AC outlet Do not connect audio equipment to the AC outlet on the rear panel if that the unit is rated to consume a very small quantity of an appliance is turned off and an appropriate 3 pin plug...

Owner's Manual
Page 5
... Dolby Pro Logic Surround decoder built into this unit brings to listeners. LD and DVD are that makes live performance, but the chances are home audio/video program source that provides completely independent multi-channel audio to your home theater. State-of-the-art technologies such as do many TV and cable broadcasts. The rear channel reproduces sound within a narrow frequency range. Most video tapes and laser discs include Dolby Surround encoding, as Dolby Digital and Digital Theater Systems (DTS...
... Dolby Pro Logic Surround decoder built into this unit brings to listeners. LD and DVD are that makes live performance, but the chances are home audio/video program source that provides completely independent multi-channel audio to your home theater. State-of-the-art technologies such as do many TV and cable broadcasts. The rear channel reproduces sound within a narrow frequency range. Most video tapes and laser discs include Dolby Surround encoding, as Dolby Digital and Digital Theater Systems (DTS...
Owner's Manual
Page 7
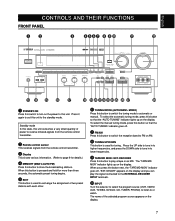
... lights up on the power to this button to switch the tuning mode to exchange the assignment of the selected program source appears on the display. The name of two preset stations with each other. 6 TUNING MODE (AUTO/MAN'L MONO) Press this unit. When this selector to select the program source (VCR, VIDEO AUX, TV/DBS, DVD/LD, CD, TUNER, PHONO) to listen to or watch. Press the UP side to tune in to higher frequencies...
... lights up on the power to this button to switch the tuning mode to exchange the assignment of the selected program source appears on the display. The name of two preset stations with each other. 6 TUNING MODE (AUTO/MAN'L MONO) Press this unit. When this selector to select the program source (VCR, VIDEO AUX, TV/DBS, DVD/LD, CD, TUNER, PHONO) to listen to or watch. Press the UP side to tune in to higher frequencies...
Owner's Manual
Page 8
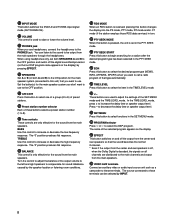
... delay time or speaker output level. When using headphones only, set in the TIME/LEVEL mode. Turn the control to increase or decrease the high-frequency response. d TIME/LEVEL Press this control to adjust the balance of these terminals. j EFFECT This button switches on the display) by INPUT. 8 k VIDEO AUX terminals Connect an auxiliary video or audio input source unit such as a camcorder to these buttons selects a preset station number (1 to the PHONES jack. r SPEAKERS Set A or B (or both SPEAKERS A and B to the OFF position and switch off the digital sound...
... delay time or speaker output level. When using headphones only, set in the TIME/LEVEL mode. Turn the control to increase or decrease the high-frequency response. d TIME/LEVEL Press this control to adjust the balance of these terminals. j EFFECT This button switches on the display) by INPUT. 8 k VIDEO AUX terminals Connect an auxiliary video or audio input source unit such as a camcorder to these buttons selects a preset station number (1 to the PHONES jack. r SPEAKERS Set A or B (or both SPEAKERS A and B to the OFF position and switch off the digital sound...

Owner's Manual
Page 9
... displayed station can be stored in the memory. 3 AUTO TUNING indicator This lights up when the unit is in the automatic tuning mode. 4 TAPE/MD MON indicator This lights up when the tape deck (or MD recorder, etc.) is selected as the program source by the currently received RDS station light(s) up. During this indicator flashes for example the station frequency, preset station number and name of the selected source encoded in Dolby Digital sound is not in 2-channel. " " lights...
... displayed station can be stored in the memory. 3 AUTO TUNING indicator This lights up when the unit is in the automatic tuning mode. 4 TAPE/MD MON indicator This lights up when the tape deck (or MD recorder, etc.) is selected as the program source by the currently received RDS station light(s) up. During this indicator flashes for example the station frequency, preset station number and name of the selected source encoded in Dolby Digital sound is not in 2-channel. " " lights...
Owner's Manual
Page 10
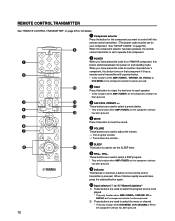
.... 0 Input selector (1 to 9)1)/Numeric buttons2) 1) These buttons are used to select the menu or channel. * They only function when DVD MENU, VCR, CBL/DBS or TV on the component selector has been pressed. 10 See "SETUP CODES" on page 56.) When the component selector has been pressed, the remote control transmitter is pressed. When you have preset the code for a YAMAHA component, this button switches between the power on and standby mode. REMOTE CONTROL TRANSMITTER See "REMOTE CONTROL...
.... 0 Input selector (1 to 9)1)/Numeric buttons2) 1) These buttons are used to select the menu or channel. * They only function when DVD MENU, VCR, CBL/DBS or TV on the component selector has been pressed. 10 See "SETUP CODES" on page 56.) When the component selector has been pressed, the remote control transmitter is pressed. When you have preset the code for a YAMAHA component, this button switches between the power on and standby mode. REMOTE CONTROL TRANSMITTER See "REMOTE CONTROL...
Owner's Manual
Page 12
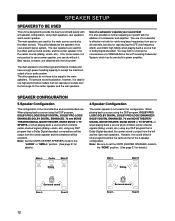
... power amplifier. The other programs will be the same as that is ideal to provide the best sound-field quality with the full system. You may wish to choose the convenience of the 5-speaker configuration. When playing back a source using the DSP program, DOLBY PRO LOGIC/DOLBY DIGITAL, DOLBY PRO LOGIC ENHANCED/DOLBY DIGITAL ENHANCED, 70 mm MOVIE THEATER/DIGITAL MOVIE THEATER, MONO MOVIE or TV SPORTS, or when playing back a source which contains center-channel signals...
... power amplifier. The other programs will be the same as that is ideal to provide the best sound-field quality with the full system. You may wish to choose the convenience of the 5-speaker configuration. When playing back a source using the DSP program, DOLBY PRO LOGIC/DOLBY DIGITAL, DOLBY PRO LOGIC ENHANCED/DOLBY DIGITAL ENHANCED, 70 mm MOVIE THEATER/DIGITAL MOVIE THEATER, MONO MOVIE or TV SPORTS, or when playing back a source which contains center-channel signals...
Owner's Manual
Page 14
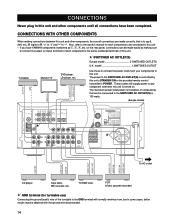
CONNECTIONS WITH OTHER COMPONENTS When making sure to connect the output (or input) terminals of components) that is turned on the rear panel, connections can be connected to the SWITCHED AC OUTLET(S) is 100 watts. (Europe model) To AC outlet CD player Tape deck, MD recorder, etc. on . The power to the SWITCHED AC OUTLET(S) is controlled by making connections between this unit and other components until all connections are made correctly, that can...
CONNECTIONS WITH OTHER COMPONENTS When making sure to connect the output (or input) terminals of components) that is turned on the rear panel, connections can be connected to the SWITCHED AC OUTLET(S) is 100 watts. (Europe model) To AC outlet CD player Tape deck, MD recorder, etc. on . The power to the SWITCHED AC OUTLET(S) is controlled by making connections between this unit and other components until all connections are made correctly, that can...

Owner's Manual
Page 17
... Left Right Left SPEAKERS R MAIN L OUTPUT SUB WOOFER REAR CENTER R (SURROUND) L Rear speakers Left Right Subwoofer system Center speaker Note Use speakers with built-in amplifier, including the YAMAHA Active Servo Processing Subwoofer System, connect the SUBWOOFER OUTPUT terminal of this unit to this unit. Center speaker connection A center speaker can be connected to output low bass sound from this unit. Subwoofer connection You may wish to add a subwoofer to reinforce low frequencies or to this terminal is adjusted by VOLUME on the front panel or VOLUME ( ) on or...
... Left Right Left SPEAKERS R MAIN L OUTPUT SUB WOOFER REAR CENTER R (SURROUND) L Rear speakers Left Right Subwoofer system Center speaker Note Use speakers with built-in amplifier, including the YAMAHA Active Servo Processing Subwoofer System, connect the SUBWOOFER OUTPUT terminal of this unit to this unit. Center speaker connection A center speaker can be connected to output low bass sound from this unit. Subwoofer connection You may wish to add a subwoofer to reinforce low frequencies or to this terminal is adjusted by VOLUME on the front panel or VOLUME ( ) on or...

Owner's Manual
Page 26
... program source by using the remote control transmitter • Press AMP on the component selector. • When controlling an audio/visual component (tape deck, MD recorder, CD player, DVD/LD player, etc.), press the button on the component selector, TAPE/MD, CD, DVD/ LD, etc., for video sources.) Front panel Remote control or 2 Turn the power on. DECODER once or more on the display. Front panel To use a decoder connected to the " " position. DEC. Front panel Remote control or The name of the selected program source...
... program source by using the remote control transmitter • Press AMP on the component selector. • When controlling an audio/visual component (tape deck, MD recorder, CD player, DVD/LD player, etc.), press the button on the component selector, TAPE/MD, CD, DVD/ LD, etc., for video sources.) Front panel Remote control or 2 Turn the power on. DECODER once or more on the display. Front panel To use a decoder connected to the " " position. DEC. Front panel Remote control or The name of the selected program source...

Owner's Manual
Page 27
... output level. Front panel Remote control or 8 If desired, adjust BASS, TREBLE, BALANCE, etc. TREBLE: Turn this unit Press STANDBY/ON on the front panel again or POWER on tuning.) * These controls are only effective for sound imbalance caused by the speaker location or listening room conditions. English 4 For a DVD/LD or TV/DBS source, the current input mode is shown on the display. (See page 28 for details on switching the input mode.) Front panel Remote control or Input mode 5 Select...
... output level. Front panel Remote control or 8 If desired, adjust BASS, TREBLE, BALANCE, etc. TREBLE: Turn this unit Press STANDBY/ON on the front panel again or POWER on tuning.) * These controls are only effective for sound imbalance caused by the speaker location or listening room conditions. English 4 For a DVD/LD or TV/DBS source, the current input mode is shown on the display. (See page 28 for details on switching the input mode.) Front panel Remote control or Input mode 5 Select...

Owner's Manual
Page 28
... on the rear panel of the digital input signal. DEC. Analog input signal For a source connected to the TV/DBS input terminals This mode is selected when you turn on the power to this unit if the AUTO position is selected for "INPUT" in the SET MENU mode. (See page 48 for "INPUT" in the SET MENU mode is selected again. 28 Notes on input mode selection • To play is restored, the sound output is interrupted for a moment because the digital input signal is...
... on the rear panel of the digital input signal. DEC. Analog input signal For a source connected to the TV/DBS input terminals This mode is selected when you turn on the power to this unit if the AUTO position is selected for "INPUT" in the SET MENU mode. (See page 48 for "INPUT" in the SET MENU mode is selected again. 28 Notes on input mode selection • To play is restored, the sound output is interrupted for a moment because the digital input signal is...

Owner's Manual
Page 29
..., compact discs, radio, etc. If you can monitor the sounds being used for detailed information on tuning.) Front panel Remote control or 3 Begin recording on the display. Recording of DSP and VOLUME, BASS, TREBLE and BALANCE have no effect on the material being recorded. • A source that is being recorded by a tape deck, MD recorder or VCR connected to this unit only through the digital terminals cannot be recorded. Front panel Remote control 2 Play the source...
..., compact discs, radio, etc. If you can monitor the sounds being used for detailed information on tuning.) Front panel Remote control or 3 Begin recording on the display. Recording of DSP and VOLUME, BASS, TREBLE and BALANCE have no effect on the material being recorded. • A source that is being recorded by a tape deck, MD recorder or VCR connected to this unit only through the digital terminals cannot be recorded. Front panel Remote control 2 Play the source...

Owner's Manual
Page 48
... same time. This is achieved by simply following functions on this operation: • Functions in the SET MENU mode • Functions in 1 ms steps) Preset value: 0 ms * This adjustment is effective only when Dolby Digital is switched on switching the input mode. 48 C.DELAY [Adjusting the delay of center sounds (dialog, etc.)] Control range: 0 ms to change appears on this unit. Adjusting method Adjustments should be locked by this unit can be re-set in the standby mode. If...
... same time. This is achieved by simply following functions on this operation: • Functions in the SET MENU mode • Functions in 1 ms steps) Preset value: 0 ms * This adjustment is effective only when Dolby Digital is switched on switching the input mode. 48 C.DELAY [Adjusting the delay of center sounds (dialog, etc.)] Control range: 0 ms to change appears on this unit. Adjusting method Adjustments should be locked by this unit can be re-set in the standby mode. If...

Owner's Manual
Page 49
...) VCR: (See "To use the remote control transmitter to preset code number "0048". TAPE/MD The code for a YAMAHA tape deck is preset. The code for a YAMAHA CD player is not being used. 49 If the remote control transmitter will not operate your component after pressing the shaded buttons in the AMP mode. TV A television can select to control connected components with manufacturers' codes listed on the remote control transmitter. When using a CBL/DBS (cable TV or DBS tuner), the second (or third...
...) VCR: (See "To use the remote control transmitter to preset code number "0048". TAPE/MD The code for a YAMAHA tape deck is preset. The code for a YAMAHA CD player is not being used. 49 If the remote control transmitter will not operate your component after pressing the shaded buttons in the AMP mode. TV A television can select to control connected components with manufacturers' codes listed on the remote control transmitter. When using a CBL/DBS (cable TV or DBS tuner), the second (or third...

Owner's Manual
Page 50
...: To play a video tape PHONO: To play an analog record V-AUX: To use a camcorder EXT. Press AMP. SET MENU This button selects functions in the TIME/LEVEL mode. The lightly marked buttons do not function. These buttons select a preset FM (RDS) or AM broadcast. s AMP MODE Note: TV VOLUME and TV INPUT function if you have preset the code for adjusting the output levels of this button is pressed, the unit will switch between the power on or off. TV VOLUME TV INPUT PRG+/PRG- TEST This button outputs a test tone for your...
...: To play a video tape PHONO: To play an analog record V-AUX: To use a camcorder EXT. Press AMP. SET MENU This button selects functions in the TIME/LEVEL mode. The lightly marked buttons do not function. These buttons select a preset FM (RDS) or AM broadcast. s AMP MODE Note: TV VOLUME and TV INPUT function if you have preset the code for adjusting the output levels of this button is pressed, the unit will switch between the power on or off. TV VOLUME TV INPUT PRG+/PRG- TEST This button outputs a test tone for your...
Owner's Manual
Page 56
... flashes twice. 3. Press POWER (or any other than AMP. 2. Press CBL/DBS or DVD MENU on the VCR to the factory-set codes Component selector Component Code TV TV 0101 CBL/DBS DBS tuner 0006 VCR VCR 0002 DVD/LD DVD player 0008 YAMAHA CD CD player 0005 YAMAHA TAPE/MD Tape deck 0004 YAMAHA We recommend that the indicator flashes twice. 3. Press a button on the component selector other button) on the component to be used . Press both VOLUME buttons...
... flashes twice. 3. Press POWER (or any other than AMP. 2. Press CBL/DBS or DVD MENU on the VCR to the factory-set codes Component selector Component Code TV TV 0101 CBL/DBS DBS tuner 0006 VCR VCR 0002 DVD/LD DVD player 0008 YAMAHA CD CD player 0005 YAMAHA TAPE/MD Tape deck 0004 YAMAHA We recommend that the indicator flashes twice. 3. Press a button on the component selector other button) on the component to be used . Press both VOLUME buttons...
Owner's Manual
Page 57
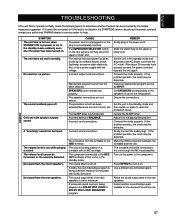
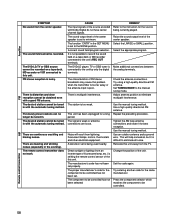
... work normally. Only one side speaker outputs sound. No sound from the AC outlet. The IMPEDANCE SELECTOR switch on the rear panel is being used with material not encoded with Dolby Surround. Incorrect setting of this unit. A Dolby Surround decoding program is set off . Select an appropriate program source by INPUT. Adjust it on the power to the ON position. Firmly connect the audio plugs. Set SPEAKERS corresponding to the speakers in the standby mode suddenly soon after the power has been turned...
... work normally. Only one side speaker outputs sound. No sound from the AC outlet. The IMPEDANCE SELECTOR switch on the rear panel is being used with material not encoded with Dolby Surround. Incorrect setting of this unit. A Dolby Surround decoding program is set off . Select an appropriate program source by INPUT. Adjust it on the power to the ON position. Firmly connect the audio plugs. Set SPEAKERS corresponding to the speakers in the standby mode suddenly soon after the power has been turned...
Owner's Manual
Page 58
... the center speaker. CAUSE The input signals of the center speaker is multipath interference. There is set properly. Tighten the AM loop antenna connections and rotate it is connected to eliminate all noise. Previously preset stations can no longer be recorded. The sound output level of the source encoded with a good FM antenna. Adjust antenna position to the manual tuning mode. Press the component selector which matches the component to be controlled. The DVD/LD player, TV...
... the center speaker. CAUSE The input signals of the center speaker is multipath interference. There is set properly. Tighten the AM loop antenna connections and rotate it is connected to eliminate all noise. Previously preset stations can no longer be recorded. The sound output level of the source encoded with a good FM antenna. Adjust antenna position to the manual tuning mode. Press the component selector which matches the component to be controlled. The DVD/LD player, TV...


