
Owners Manual
Page 2
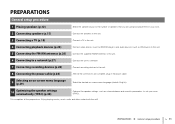
... B speakers 16 Input/output jacks and cables 17 3 Connecting a TV 18 4 Connecting playback devices 23 Connecting video devices (such as BD/DVD players 23 Connecting audio devices (such as CD players 25 Connecting to the jacks on the front panel 26 5 Connecting the FM/AM antennas 26 6 Connecting to a network 27...
... B speakers 16 Input/output jacks and cables 17 3 Connecting a TV 18 4 Connecting playback devices 23 Connecting video devices (such as BD/DVD players 23 Connecting audio devices (such as CD players 25 Connecting to the jacks on the front panel 26 5 Connecting the FM/AM antennas 26 6 Connecting to a network 27...
Owners Manual
Page 3
...Playing back iTunes/iPod music via a network (AirPlay 58 Playback of iTunes/iPod music contents 58 Playing back music in multiple rooms (RX-V573 only 60 Preparing Zone B 60 Configuring playback settings for different playback sources (Option menu 62 Option menu items 62 CONFIGURATIONS 66 ...AM radio 90 USB and network 90 Remote control 91 Error indications on the front display 92 Glossary 93 Audio information 93 HDMI and video information 94 Yamaha technologies 95 Video signal flow 96 Information on HDMI 96 HDMI Control 96 HDMI signal compatibility 98 Reference diagram ...
...Playing back iTunes/iPod music via a network (AirPlay 58 Playback of iTunes/iPod music contents 58 Playing back music in multiple rooms (RX-V573 only 60 Preparing Zone B 60 Configuring playback settings for different playback sources (Option menu 62 Option menu items 62 CONFIGURATIONS 66 ...AM radio 90 USB and network 90 Remote control 91 Error indications on the front display 92 Glossary 93 Audio information 93 HDMI and video information 94 Yamaha technologies 95 Video signal flow 96 Information on HDMI 96 HDMI Control 96 HDMI signal compatibility 98 Reference diagram ...
Owners Manual
Page 5
... to 5.1-channel (to suit your favorite acoustic spaces in multiple rooms . p.35 Supports 2- p.60 (Zone B)* * RX-V573 only HDMI Control Audio Video TV TV remote control Sequential operation of supported content • iPod/iPhone/iPad • USB • Media server...compressed music with the supplied remote control . p.56 . p.58 * * iPod/iPhone/iPad Network contents Audio USB device 3D and 4K signals supported HDMI Control Speakers Audio BD/DVD player Audio/Video AV receiver (the unit) Operating external devices with . p.50 . p.82 The unit's remote ...
... to 5.1-channel (to suit your favorite acoustic spaces in multiple rooms . p.35 Supports 2- p.60 (Zone B)* * RX-V573 only HDMI Control Audio Video TV TV remote control Sequential operation of supported content • iPod/iPhone/iPad • USB • Media server...compressed music with the supplied remote control . p.56 . p.58 * * iPod/iPhone/iPad Network contents Audio USB device 3D and 4K signals supported HDMI Control Speakers Audio BD/DVD player Audio/Video AV receiver (the unit) Operating external devices with . p.50 . p.82 The unit's remote ...
Owners Manual
Page 6
... as presets. ❑ Enjoying pure high fidelity sound (p.40) When the direct playback mode is equipped with a single HDMI cable connection (Audio Return Channel: ARC) (p.18) When using the on-screen menu. ❑ Low power consumption The ECO mode (power saving function) reduces...72). Your TV speakers may be selected as CD players), game consoles, camcorders, and other settings are not synchronized... I want to hear audio from external device ❑ Creating 3-dimensional sound fields (p.37) The Virtual Presence Speaker (VPS) function allows you to create a 3-dimensional sound...
... as presets. ❑ Enjoying pure high fidelity sound (p.40) When the direct playback mode is equipped with a single HDMI cable connection (Audio Return Channel: ARC) (p.18) When using the on-screen menu. ❑ Low power consumption The ECO mode (power saving function) reduces...72). Your TV speakers may be selected as CD players), game consoles, camcorders, and other settings are not synchronized... I want to hear audio from external device ❑ Creating 3-dimensional sound fields (p.37) The Virtual Presence Speaker (VPS) function allows you to create a 3-dimensional sound...
Owners Manual
Page 7
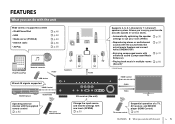
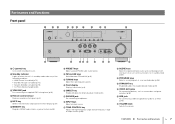
... 7 8 9: A YPAO MIC PHONES SILENT CINEMA INFO MEMORY PRESET FM AM TUNING INPUT BD DVD SCENE TV NET RADIO TONE CONTROL PROGRAM STRAIGHT VIDEO AUX USB AUDIO VIDEO iPod/iPhone/iPad 5V 2.1A DIRECT VOLUME B 1 z (power) key Turns on the front display (p.34). 6 MEMORY key Registers FM/AM radio stations as camcorders...
... 7 8 9: A YPAO MIC PHONES SILENT CINEMA INFO MEMORY PRESET FM AM TUNING INPUT BD DVD SCENE TV NET RADIO TONE CONTROL PROGRAM STRAIGHT VIDEO AUX USB AUDIO VIDEO iPod/iPhone/iPad 5V 2.1A DIRECT VOLUME B 1 z (power) key Turns on the front display (p.34). 6 MEMORY key Registers FM/AM radio stations as camcorders...
Owners Manual
Page 8
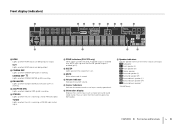
... OUT Lights up when HDMI signals are being output. 2 CINEMA DSP Lights up when the sleep timer is on. 8 MUTE Blinks when audio is working . 5 STEREO Lights up when HDMI signals are output. CINEMA DSP n Lights up when CINEMA DSP 3D (p.39) is working...A Front speaker (L) S Front speaker (R) D Center speaker F Surround speaker (L) G Surround speaker (R) H Surround back speaker (L)* J Surround back speaker (R)* K Surround back speaker* * RX-V573 only FEATURES ➤ Part names and functions En 8 You can switch the information by pressing INFO (p.34). MUTE SW L CR SL SR SBL SB...
... OUT Lights up when HDMI signals are being output. 2 CINEMA DSP Lights up when the sleep timer is on. 8 MUTE Blinks when audio is working . 5 STEREO Lights up when HDMI signals are output. CINEMA DSP n Lights up when CINEMA DSP 3D (p.39) is working...A Front speaker (L) S Front speaker (R) D Center speaker F Surround speaker (L) G Surround speaker (R) H Surround back speaker (L)* J Surround back speaker (R)* K Surround back speaker* * RX-V573 only FEATURES ➤ Part names and functions En 8 You can switch the information by pressing INFO (p.34). MUTE SW L CR SL SR SBL SB...
Owners Manual
Page 9
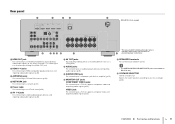
... ANTENNA AM FM COMPONENT VIDEO PR PB Y MONITOR OUT NETWORK FRONT CENTER SPEAKERS SURROUND SURROUND BACK/BI AMP /ZONE B SINGLE 5 (RX-V573 U.S.A. model) OPTICAL AV 1 COAXIAL AV 2 COAXIAL AV 3 OPTICAL ( TV ) AV 4 AV 5 AV 6 AV OUT SUBWOOFER AUDIO 6 789 : A 1 HDMI OUT jack For connecting to B prevent improper connections. When using ARC, TV...
... ANTENNA AM FM COMPONENT VIDEO PR PB Y MONITOR OUT NETWORK FRONT CENTER SPEAKERS SURROUND SURROUND BACK/BI AMP /ZONE B SINGLE 5 (RX-V573 U.S.A. model) OPTICAL AV 1 COAXIAL AV 2 COAXIAL AV 3 OPTICAL ( TV ) AV 4 AV 5 AV 6 AV OUT SUBWOOFER AUDIO 6 789 : A 1 HDMI OUT jack For connecting to B prevent improper connections. When using ARC, TV...
Owners Manual
Page 10
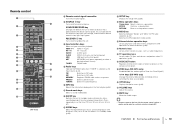
... device. C Numeric keys Let you enter numerical values, such as the input source (p.42). F ZONE keys (RX-V573 only) Enable/disable the audio output to Zone A or Zone B (p.61). ★/★★ keys (RX-V473 only) Change the external device to FM radio. Remote control 1 2 3 4 5 6 7 8 9 :... A B C D CODE SET SOURCE RECEIVER HDMI 1 2 3 4 AV 1 2 3 4 5 6 AUDIO A V-AUX USB TUNER NET B ZONE FM AM PRESET TUNING INFO ...
... device. C Numeric keys Let you enter numerical values, such as the input source (p.42). F ZONE keys (RX-V573 only) Enable/disable the audio output to Zone A or Zone B (p.61). ★/★★ keys (RX-V473 only) Change the external device to FM radio. Remote control 1 2 3 4 5 6 7 8 9 :... A B C D CODE SET SOURCE RECEIVER HDMI 1 2 3 4 AV 1 2 3 4 5 6 AUDIO A V-AUX USB TUNER NET B ZONE FM AM PRESET TUNING INFO ...
Owners Manual
Page 11
... speakers to the unit. 3 Connecting a TV (p.18) Connect a TV to the unit. 4 Connecting playback devices (p.23) Connect video devices (such as BD/DVD players) and audio devices (such as CD players) to the unit. 5 Connecting the FM/AM antennas (p.26) Connect the supplied FM/AM antennas to the unit. 6 Connecting to...
... speakers to the unit. 3 Connecting a TV (p.18) Connect a TV to the unit. 4 Connecting playback devices (p.23) Connect video devices (such as BD/DVD players) and audio devices (such as CD players) to the unit. 5 Connecting the FM/AM antennas (p.26) Connect the supplied FM/AM antennas to the unit. 6 Connecting to...
Owners Manual
Page 15
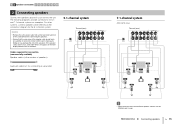
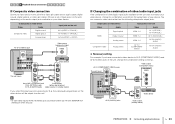
...will appear on the front display when the unit is turned on. For other systems, connect speakers while referring to the unit. Audio pin cable (x1: for 5.1and 7.1-channel systems as examples. The following diagrams provide connections for connecting a subwoofer) 5.1-channel ...system PB Y OR OUT The unit (rear) FRONT CENTER SPEAKERS SURROUND SURROUND BACK/BI AMP /ZONE B SINGLE SUBWOOFER 1 2 9 3 4 5 7.1-channel system (RX-V573 only) PB Y OR OUT The unit (rear) FRONT CENTER SPEAKERS SURROUND SURROUND BACK/BI AMP /ZONE B SINGLE SUBWOOFER 1 2 9 3 4 6 5 7 ...
...will appear on the front display when the unit is turned on. For other systems, connect speakers while referring to the unit. Audio pin cable (x1: for 5.1and 7.1-channel systems as examples. The following diagrams provide connections for connecting a subwoofer) 5.1-channel ...system PB Y OR OUT The unit (rear) FRONT CENTER SPEAKERS SURROUND SURROUND BACK/BI AMP /ZONE B SINGLE SUBWOOFER 1 2 9 3 4 5 7.1-channel system (RX-V573 only) PB Y OR OUT The unit (rear) FRONT CENTER SPEAKERS SURROUND SURROUND BACK/BI AMP /ZONE B SINGLE SUBWOOFER 1 2 9 3 4 6 5 7 ...
Owners Manual
Page 16
... (-) terminal of the terminal. If you to the FRONT jacks and SURROUND BACK/BI-AMP/ZONE B jacks. Audio pin cable Y MONITOR OUT AV6 AV OUT AUDIO SUBWOOFER Connecting front speakers that support bi-amp connections (RX-V573 only) When using front speakers that connect a woofer with a tweeter. d Tighten the terminal. + (red) c b FRONT - (black...
... (-) terminal of the terminal. If you to the FRONT jacks and SURROUND BACK/BI-AMP/ZONE B jacks. Audio pin cable Y MONITOR OUT AV6 AV OUT AUDIO SUBWOOFER Connecting front speakers that support bi-amp connections (RX-V573 only) When using front speakers that connect a woofer with a tweeter. d Tighten the terminal. + (red) c b FRONT - (black...
Owners Manual
Page 17
...PB), and chrominance red (PR). Use a stereo mini-plug cable. We recommend using the cable. Digital coaxial cable ❑ AUDIO jacks (Stereo L/R jacks) Transmit analog stereo audio signals. Use a stereo pin cable. Use a digital coaxial cable. Digital optical cable OPTICAL ( TV ) AV 4 ❑... COAXIAL jacks Transmit digital audio signals. Input/output jacks and cables ■ Video/audio jacks ❑ HDMI jacks Transmit digital video and digital sound through output) features. • Use high speed ...
...PB), and chrominance red (PR). Use a stereo mini-plug cable. We recommend using the cable. Digital coaxial cable ❑ AUDIO jacks (Stereo L/R jacks) Transmit analog stereo audio signals. Use a stereo pin cable. Use a digital coaxial cable. Digital optical cable OPTICAL ( TV ) AV 4 ❑... COAXIAL jacks Transmit digital audio signals. Input/output jacks and cables ■ Video/audio jacks ❑ HDMI jacks Transmit digital video and digital sound through output) features. • Use high speed ...
Owners Manual
Page 18
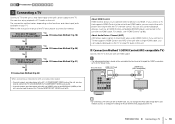
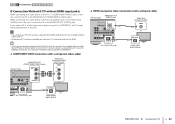
... connected to the unit with an HDMI cable, you can navigate the iPod, USB storage device and network sources, or configure the settings of TV audio on the assumption that supports HDMI Control to the TV. If you connect a TV that supports HDMI Control and ARC to the unit with a single... the unit with an HDMI cable. • The following explanation is based on the unit. Yes ■ Connection Method 1 (p.18) No Does your TV support Audio Return Channel (ARC)? If you connect a TV that you have an HDMI input jack? Does your TV support HDMI Control? The unit (rear) HDMI OUT...
... connected to the unit with an HDMI cable, you can navigate the iPod, USB storage device and network sources, or configure the settings of TV audio on the assumption that supports HDMI Control to the TV. If you connect a TV that supports HDMI Control and ARC to the unit with a single... the unit with an HDMI cable. • The following explanation is based on the unit. Yes ■ Connection Method 1 (p.18) No Does your TV support Audio Return Channel (ARC)? If you connect a TV that you have an HDMI input jack? Does your TV support HDMI Control? The unit (rear) HDMI OUT...
Owners Manual
Page 19
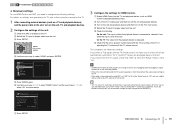
... 3 Configure the settings for SCENE(TV). c Turn on the unit and playback devices and then turn on the TV and playback devices (such as TV audio input at the factory. 1 2 3 TV connection 4 5 6 7 8 9 10 ❑ Necessary settings To use HDMI Control and ARC, you have connected any external device to ...to which the playback device is connected is interrupted while using ARC, set "ARC" (p.73) in the "Setup" menu to "Off" and use "TV Audio Input" (p.72) in the "Setup" menu to configure the following . If you also need to change the input assignment for HDMI Control. It may ...
... 3 Configure the settings for SCENE(TV). c Turn on the unit and playback devices and then turn on the TV and playback devices (such as TV audio input at the factory. 1 2 3 TV connection 4 5 6 7 8 9 10 ❑ Necessary settings To use HDMI Control and ARC, you have connected any external device to ...to which the playback device is connected is interrupted while using ARC, set "ARC" (p.73) in the "Setup" menu to "Off" and use "TV Audio Input" (p.72) in the "Setup" menu to configure the following . If you also need to change the input assignment for HDMI Control. It may ...
Owners Manual
Page 20
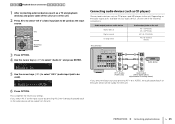
... HDMI PB Y COMPONENT VIDEO VIDEO OPTICAL AV 1 COAXIAL AV 2 COAXIAL AV 3 OPTICAL ( TV ) AV 4 AV 5 OPTICAL AV 6 (TOVA) AV 4 OPTICAL O O AV 4 (OPTICAL) jack Audio output (digital optical) TV • By connecting a TV to the unit with an HDMI cable, you can navigate the iPod, USB storage device and network... that you need to select "On" as a TV and playback devices) and power cable of the unit. b Press SETUP. Configuration HDMI Control On Audio Output Auto Standby Through Auto TV Audio Input AV4 Standby Sync Auto ARC On SCENE Back: RETURN f Press SETUP.
... HDMI PB Y COMPONENT VIDEO VIDEO OPTICAL AV 1 COAXIAL AV 2 COAXIAL AV 3 OPTICAL ( TV ) AV 4 AV 5 OPTICAL AV 6 (TOVA) AV 4 OPTICAL O O AV 4 (OPTICAL) jack Audio output (digital optical) TV • By connecting a TV to the unit with an HDMI cable, you can navigate the iPod, USB storage device and network... that you need to select "On" as a TV and playback devices) and power cable of the unit. b Press SETUP. Configuration HDMI Control On Audio Output Auto Standby Through Auto TV Audio Input AV4 Standby Sync Auto ARC On SCENE Back: RETURN f Press SETUP.
Owners Manual
Page 21
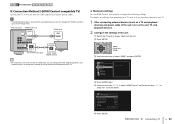
... cable, you can navigate the iPod, USB storage device and network sources, or configure the settings of the audio output setting on the TV. ■ Connection Method 3 (TV with the TV remote control. To use...Turn off the TV's main power and then turn on the TV and playback devices (such as TV audio input at the factory. On the TV: The video from the unit. If you select a TV ...d Switch the TV input to one of the unit will be automatically switched to "AV 4" and the TV audio will be played back on the unit. • If HDMI Control does not work properly, try turning off and...
... cable, you can navigate the iPod, USB storage device and network sources, or configure the settings of the audio output setting on the TV. ■ Connection Method 3 (TV with the TV remote control. To use...Turn off the TV's main power and then turn on the TV and playback devices (such as TV audio input at the factory. On the TV: The video from the unit. If you select a TV ...d Switch the TV input to one of the unit will be automatically switched to "AV 4" and the TV audio will be played back on the unit. • If HDMI Control does not work properly, try turning off and...
Owners Manual
Page 22
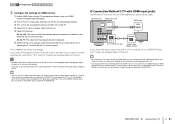
... 4 jacks or if you also need to change the input assignment for connecting the TV, connect the TV to one of the AV 1-6 and AUDIO jacks. To use the SCENE function (p.35), you want to use another input jack (other than OPTICAL) for SCENE(TV). ❑ COMPONENT VIDEO...Y MONITOR OUT VIDEO Y MONITOR OUT COAXIAL AV 2 COAXIAL AV 3 OPTICAL ( TV ) AV 4 AV 5 OPTICAL AV 6 AV OUT SUBWOOFER AUDIO O (TV) AV 4 AV 4 (OPTICAL) jack OPTICAL O TV Audio output (digital optical) ❑ VIDEO (composite video) connection (with TV screen are available only when your TV is connected to the unit...
... 4 jacks or if you also need to change the input assignment for connecting the TV, connect the TV to one of the AV 1-6 and AUDIO jacks. To use the SCENE function (p.35), you want to use another input jack (other than OPTICAL) for SCENE(TV). ❑ COMPONENT VIDEO...Y MONITOR OUT VIDEO Y MONITOR OUT COAXIAL AV 2 COAXIAL AV 3 OPTICAL ( TV ) AV 4 AV 5 OPTICAL AV 6 AV OUT SUBWOOFER AUDIO O (TV) AV 4 AV 4 (OPTICAL) jack OPTICAL O TV Audio output (digital optical) ❑ VIDEO (composite video) connection (with TV screen are available only when your TV is connected to the unit...
Owners Manual
Page 23
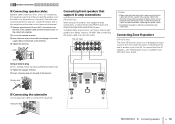
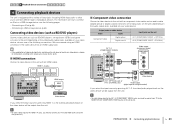
... output jacks of your device (p.24). ■ HDMI connection Connect a video device to the unit with a component video cable and an audio cable (digital optical or digital coaxial). For information on how to connect an iPod or a USB storage device, see the following connections....PR PB Y MONITOR OUT HDMI HDMI output HDMI HDMI OPTICAL AV 1 COAXIAL AV 2 COAXIAL AV 3 OPTICAL ( TV ) AV 4 AV 5 AV 6 AV OUT SUBWOOFER AUDIO Video device If you to connect different types of playback devices. 1 2 3 4 Playback device connections 5 6 7 8 9 10 4 Connecting playback devices The unit is...
... output jacks of your device (p.24). ■ HDMI connection Connect a video device to the unit with a component video cable and an audio cable (digital optical or digital coaxial). For information on how to connect an iPod or a USB storage device, see the following connections....PR PB Y MONITOR OUT HDMI HDMI output HDMI HDMI OPTICAL AV 1 COAXIAL AV 2 COAXIAL AV 3 OPTICAL ( TV ) AV 4 AV 5 AV 6 AV OUT SUBWOOFER AUDIO Video device If you to connect different types of playback devices. 1 2 3 4 Playback device connections 5 6 7 8 9 10 4 Connecting playback devices The unit is...
Owners Manual
Page 24
...8226; To watch videos input to the AV 3-6 (VIDEO) jacks, you have connected a video device to AV 2 (COMPONENT VIDEO) and AV 5 (AUDIO) jacks of the unit, change its combination according to the output jacks of your device. Choose a set of input jacks (on the unit) depending on... the audio output jacks available on your video device, change the combination setting as follows. 1 2 3 4 Playback device connections 5 6 7 8 9 10 ■ Composite video ...
...8226; To watch videos input to the AV 3-6 (VIDEO) jacks, you have connected a video device to AV 2 (COMPONENT VIDEO) and AV 5 (AUDIO) jacks of the unit, change its combination according to the output jacks of your device. Choose a set of input jacks (on the unit) depending on... the audio output jacks available on your video device, change the combination setting as follows. 1 2 3 4 Playback device connections 5 6 7 8 9 10 ■ Composite video ...
Owners Manual
Page 25
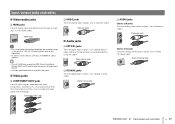
...COAXIAL L OPTICAL AV 1 COAXIAL AV 2 COAXIAL AV 3 OPTICAL ( TV ) AV 4 AV 5 AV 6 AV OUT SUB AUDIO R O C L R O C L R OPTICAL COAXIAL L R Audio device AV 1-6 jacks AUDIO jacks Audio output (either digital optical, digital coaxial, or analog stereo) If you select "AV 2" as the input source by pressing AV ...1-6 or AUDIO, the audio played back on the audio device will be output from the unit. HDMI 1 2 3 4 AV 1 2 3 4 5 6 AUDIO A BD DVD TV NET RADIO SETUP OPTION AV 2 OPTION ENTER VOLUME RETURN DISPLAY...
...COAXIAL L OPTICAL AV 1 COAXIAL AV 2 COAXIAL AV 3 OPTICAL ( TV ) AV 4 AV 5 AV 6 AV OUT SUB AUDIO R O C L R O C L R OPTICAL COAXIAL L R Audio device AV 1-6 jacks AUDIO jacks Audio output (either digital optical, digital coaxial, or analog stereo) If you select "AV 2" as the input source by pressing AV ...1-6 or AUDIO, the audio played back on the audio device will be output from the unit. HDMI 1 2 3 4 AV 1 2 3 4 5 6 AUDIO A BD DVD TV NET RADIO SETUP OPTION AV 2 OPTION ENTER VOLUME RETURN DISPLAY...


