
Owner's Manual
Page 1
... The exclamation point within the product's enclosure that may be of sufficient magnitude to constitute a risk of electric shock to persons. RX-V490/390 Natural Sound Stereo Receiver Thank you to the presence of important operating and maintenance (servicing) instructions in the literature accompanying... the appliance. Retain this YAMAHA stereo receiver. WARNING TO REDUCE THE RISK OF FIRE OR ELECTRIC SHOCK, DO NOT EXPOSE THIS UNIT TO RAIN OR MOISTURE. ...
... The exclamation point within the product's enclosure that may be of sufficient magnitude to constitute a risk of electric shock to persons. RX-V490/390 Natural Sound Stereo Receiver Thank you to the presence of important operating and maintenance (servicing) instructions in the literature accompanying... the appliance. Retain this YAMAHA stereo receiver. WARNING TO REDUCE THE RISK OF FIRE OR ELECTRIC SHOCK, DO NOT EXPOSE THIS UNIT TO RAIN OR MOISTURE. ...
Owner's Manual
Page 2
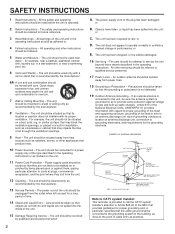
The unit should be cleaned only as recommended by the manufacturer. 8 Ventilation - The unit should be situated away from the outlet when left unused for future reference. 3 Heed Warnings - The unit should be adhered to a power supply only of the type described in particular, specifies that may block the ventilation openings; or D. NATIONAL ELECTRICAL CODE ANTENNA LEAD IN WIRE ANTENNA DISCHARGE UNIT (NEC SECTION 810-20) GROUNDING CONDUCTORS (NEC SECTION 810-21) GROUND CLAMPS POWER SERVICE GROUNDING ELECTRODE SYSTEM (NEC ART 250. The unit should be connected to . ...
The unit should be cleaned only as recommended by the manufacturer. 8 Ventilation - The unit should be situated away from the outlet when left unused for future reference. 3 Heed Warnings - The unit should be adhered to a power supply only of the type described in particular, specifies that may block the ventilation openings; or D. NATIONAL ELECTRICAL CODE ANTENNA LEAD IN WIRE ANTENNA DISCHARGE UNIT (NEC SECTION 810-20) GROUNDING CONDUCTORS (NEC SECTION 810-21) GROUND CLAMPS POWER SERVICE GROUNDING ELECTRODE SYSTEM (NEC ART 250. The unit should be connected to . ...
Owner's Manual
Page 3
... devices. This product, when installed as indicated in the instructions contained in the USA. 3. Modifications not expressly approved by Yamaha may void your equipment by playing it at a safe level. Since hearing damage from loud sounds is often undetectable until ...and/or another product use of product. FCC INFORMATION 1. IMPORTANT : When connecting this type of this product is too late, YAMAHA and the Electronic Industries Association's Consumer Electronics Group recommend you to other equipment. Compliance with other electronic devices. Utilize power outlets that...
... devices. This product, when installed as indicated in the instructions contained in the USA. 3. Modifications not expressly approved by Yamaha may void your equipment by playing it at a safe level. Since hearing damage from loud sounds is often undetectable until ...and/or another product use of product. FCC INFORMATION 1. IMPORTANT : When connecting this type of this product is too late, YAMAHA and the Electronic Industries Association's Consumer Electronics Group recommend you to other equipment. Compliance with other electronic devices. Utilize power outlets that...
Owner's Manual
Page 4
...0.04% THD, 20-20,000 Hz Center: 70W (8Ω) RMS Output Power, 0.1% THD, 1 kHz Rear: 15W + 15W (8Ω) RMS Output Power, 0.7% THD, 1 kHz RX-V390 Front: 60W + 60W (8Ω) RMS Output Power, 0.04% THD, 20-20,000 Hz Center: 60W (8Ω) RMS Output Power, 0.2% THD, 1 kHz Rear: 15W (8Ω) ... 4 Programs for Digital Sound Field Processing 2 Programs for Dolby Surround Decoding (DOLBY PRO LOGIC and DOLBY PRO LOGIC ENHANCED) RX-V390 2 Programs for Digital Sound Field Processing 2 Programs for Dolby Surround Decoding (DOLBY PRO LOGIC and DOLBY 3 STEREO) q Automatic Input Balance Control for ...
...0.04% THD, 20-20,000 Hz Center: 70W (8Ω) RMS Output Power, 0.1% THD, 1 kHz Rear: 15W + 15W (8Ω) RMS Output Power, 0.7% THD, 1 kHz RX-V390 Front: 60W + 60W (8Ω) RMS Output Power, 0.04% THD, 20-20,000 Hz Center: 60W (8Ω) RMS Output Power, 0.2% THD, 1 kHz Rear: 15W (8Ω) ... 4 Programs for Digital Sound Field Processing 2 Programs for Dolby Surround Decoding (DOLBY PRO LOGIC and DOLBY PRO LOGIC ENHANCED) RX-V390 2 Programs for Digital Sound Field Processing 2 Programs for Dolby Surround Decoding (DOLBY PRO LOGIC and DOLBY 3 STEREO) q Automatic Input Balance Control for ...
Owner's Manual
Page 5
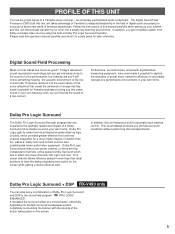
...center channel, so there are four independent channels, unlike passive Dolby Surround which provides greater effective front and rear channel separation for Yamaha engineers to bring you a whole new world of listening experiences. Follow the instructions in this manual carefully when setting up your ...professional-grade steering logic circuitry, which has in effect only three channels: left, right, and rear. Dolby Pro Logic Surround + DSP RX-V490 only You can also enjoy a combination of Dolby Pro Logic Surround and DSP in automatic input balance control. Furthermore, our technicians...
...center channel, so there are four independent channels, unlike passive Dolby Surround which provides greater effective front and rear channel separation for Yamaha engineers to bring you a whole new world of listening experiences. Follow the instructions in this manual carefully when setting up your ...professional-grade steering logic circuitry, which has in effect only three channels: left, right, and rear. Dolby Pro Logic Surround + DSP RX-V490 only You can also enjoy a combination of Dolby Pro Logic Surround and DSP in automatic input balance control. Furthermore, our technicians...
Owner's Manual
Page 6
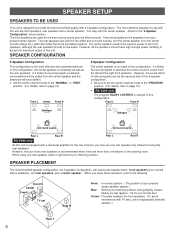
...front speakers. (To avoid interference with a monaural amplifier for the rear channel, you place these speakers, refer to page 12.) q RX-V390 only The program DOLBY 3 STEREO is useless in this configuration. In this configuration, the center speaker is the most effective speakers to the... source sound plus a center speaker. Front L Front R Dialogue Dialogue Surround sound Surround sound Rear L Rear R Rear L Rear R * RX-V390 only As this unit is recommended when there are used for the center sounds (dialog etc.) within the Dolby Surround encoded programs. The center ...
...front speakers. (To avoid interference with a monaural amplifier for the rear channel, you place these speakers, refer to page 12.) q RX-V390 only The program DOLBY 3 STEREO is useless in this configuration. In this configuration, the center speaker is the most effective speakers to the... source sound plus a center speaker. Front L Front R Dialogue Dialogue Surround sound Surround sound Rear L Rear R Rear L Rear R * RX-V390 only As this unit is recommended when there are used for the center sounds (dialog etc.) within the Dolby Surround encoded programs. The center ...

Owner's Manual
Page 7
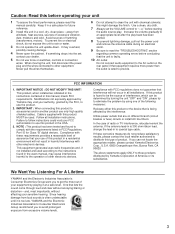
Front speakers A Right Left OUTPUT GND VIDEO IN VIDEO OUT AUDIO OUT FM 75Ω ANT UNBAL GND AM ANT VIDEO SIGNAL GND LD/TV IN VCR OUT MONITOR OUT PHONO TAPE CD LD/TV TAPE PB REC OUT AUDIO SIGNAL VCR IN OUT (U.S.A. model) SPEAKERS FRONT A A B B A OR B:6ΩMIN./SPEAKER A B:l2ΩMIN./SPEAKER AC OUTLETS SWITCHED 120V 60Hz 100W MAX. Also, refer to the owner's manual for each component to be connected to this unit. TOTAL To AC outlet OUTPUT LINE OUT LINE IN AUDIO OUT AUDIO IN VIDEO IN VIDEO OUT CD player Tape deck Right Left Video cassette ...
Front speakers A Right Left OUTPUT GND VIDEO IN VIDEO OUT AUDIO OUT FM 75Ω ANT UNBAL GND AM ANT VIDEO SIGNAL GND LD/TV IN VCR OUT MONITOR OUT PHONO TAPE CD LD/TV TAPE PB REC OUT AUDIO SIGNAL VCR IN OUT (U.S.A. model) SPEAKERS FRONT A A B B A OR B:6ΩMIN./SPEAKER A B:l2ΩMIN./SPEAKER AC OUTLETS SWITCHED 120V 60Hz 100W MAX. Also, refer to the owner's manual for each component to be connected to this unit. TOTAL To AC outlet OUTPUT LINE OUT LINE IN AUDIO OUT AUDIO IN VIDEO IN VIDEO OUT CD player Tape deck Right Left Video cassette ...

Owner's Manual
Page 8
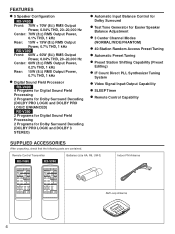
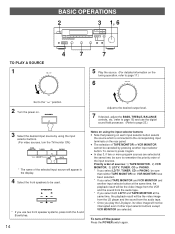
RX-V490 Rear speakers L R RX-V390 Rear speakers L R Center speaker REAR CENTER REAR Center speaker REAR CENTER REAR Only one rear speaker, follow the method shown below . For connecting one rear speaker can also be used in place of two rear speakers. Center and rear speakers Connect the respective speakers to this unit as figured below . Rear speaker REAR CENTER REAR REAR SINGLE 8
RX-V490 Rear speakers L R RX-V390 Rear speakers L R Center speaker REAR CENTER REAR Center speaker REAR CENTER REAR Only one rear speaker, follow the method shown below . For connecting one rear speaker can also be used in place of two rear speakers. Center and rear speakers Connect the respective speakers to this unit as figured below . Rear speaker REAR CENTER REAR REAR SINGLE 8
Owner's Manual
Page 9
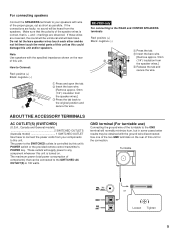
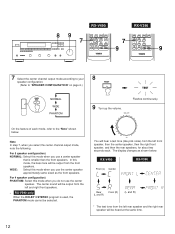
... the provided remote control transmitter's POWER key. These outlets will lack bass. Turntable FM 75Ω ANT UNBAL GND AM ANT GND or Loosen Tighten 9 RX-V390 only For connecting to the SWITCHED outlets is , + and - The power to the REAR and CENTER SPEAKERS terminals Red: positive (+) Black: negative (-) Œ Press the...
... the provided remote control transmitter's POWER key. These outlets will lack bass. Turntable FM 75Ω ANT UNBAL GND AM ANT GND or Loosen Tighten 9 RX-V390 only For connecting to the SWITCHED outlets is , + and - The power to the REAR and CENTER SPEAKERS terminals Red: positive (+) Black: negative (-) Œ Press the...

Owner's Manual
Page 10
Outdoor FM antenna Indoor FM antenna (included) Outdoor AM antenna 300-ohm feeder FM 75Ω ANT UNBAL. GND AM ANT AM loop antenna (included) 75-ohm coaxial cable 75-ohm/300-ohm antenna adapter Ground Connecting the AM loop antenna 1 2 3 Œ Ž Orient so that the best reception is connected to the following diagram. In locations troubled by electrical interference, coaxial cable is a metal stake driven into moist earth. 10 Notes q When connecting the indoor FM antenna, insert its connector into the FM ANT terminal firmly. q Both AM and FM indoor ...
Outdoor FM antenna Indoor FM antenna (included) Outdoor AM antenna 300-ohm feeder FM 75Ω ANT UNBAL. GND AM ANT AM loop antenna (included) 75-ohm coaxial cable 75-ohm/300-ohm antenna adapter Ground Connecting the AM loop antenna 1 2 3 Œ Ž Orient so that the best reception is connected to the following diagram. In locations troubled by electrical interference, coaxial cable is a metal stake driven into moist earth. 10 Notes q When connecting the indoor FM antenna, insert its connector into the FM ANT terminal firmly. q Both AM and FM indoor ...
Owner's Manual
Page 11
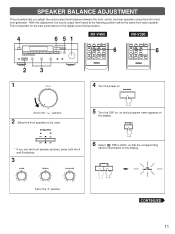
.... 5 Turn the DSP on, so that the corresponding name is important for the best performance of the digital sound field processor. 4 6 51 RX-V490 REC/PAUSE STOP DECK A/B VCR MON CENTER MODE PRO LOGIC ENHANCED CNCT VIDEO SUR. + MONO MOVIE ROCK HALL DELAY TIME - SPEAKER BALANCE ...built-in test tone generator. This is illuminated on . EFFECT 6 Select PRO LOGIC, so that a program name appears on the display. VOLUME + 6 RX-V390 REC/PAUSE STOP DECK A/B VCR MON CENTER MODE PRO LOGIC 3 STEREO SUR. + HALL ROCK DELAY TIME - With this adjustment, the sound output level ...
.... 5 Turn the DSP on, so that the corresponding name is important for the best performance of the digital sound field processor. 4 6 51 RX-V490 REC/PAUSE STOP DECK A/B VCR MON CENTER MODE PRO LOGIC ENHANCED CNCT VIDEO SUR. + MONO MOVIE ROCK HALL DELAY TIME - SPEAKER BALANCE ...built-in test tone generator. This is illuminated on . EFFECT 6 Select PRO LOGIC, so that a program name appears on the display. VOLUME + 6 RX-V390 REC/PAUSE STOP DECK A/B VCR MON CENTER MODE PRO LOGIC 3 STEREO SUR. + HALL ROCK DELAY TIME - With this adjustment, the sound output level ...
Owner's Manual
Page 12
...that is used, the PHANTOM mode cannot be selected. The center sound will be output from the left and right front speakers. * RX-V390 only When the DOLBY 3 STEREO program is smaller than the front speakers. WIDE: Select this mode, the bass tone will be ...MON CENTER MODE PRO LOGIC 3 STEREO SUR. + HALL ROCK DELAY TIME - TEST Flashes continuously. RX-V490 RX-V390 Front (L) Center Rear Front (R) (L and R) (L and R) * The test tone from the front speakers. 8 9 RX-V490 RX-V390 7 REC/PAUSE STOP DECK A/B VCR MON CENTER MODE PRO LOGIC ENHANCED CNCT VIDEO SUR. + MONO...
...that is used, the PHANTOM mode cannot be selected. The center sound will be output from the left and right front speakers. * RX-V390 only When the DOLBY 3 STEREO program is smaller than the front speakers. WIDE: Select this mode, the bass tone will be ...MON CENTER MODE PRO LOGIC 3 STEREO SUR. + HALL ROCK DELAY TIME - TEST Flashes continuously. RX-V490 RX-V390 Front (L) Center Rear Front (R) (L and R) (L and R) * The test tone from the front speakers. 8 9 RX-V490 RX-V390 7 REC/PAUSE STOP DECK A/B VCR MON CENTER MODE PRO LOGIC ENHANCED CNCT VIDEO SUR. + MONO...

Owner's Manual
Page 13
q In step 11, if the center channel mode is automatically output from the left front speaker and the right front speaker are the same. 11 13 10 12 10 Adjust the BALANCE control so that the effect sound output level of the left and right front speakers. 12 Adjust the sound output level of the rear speakers to be at the same level as that of the front speakers with the REAR LEVEL control. TEST "TEST" stops flashing and disappears. CENTER LEVEL 0 l0 13 Cancel the test tone. q If you can adjust whole sound level on your audio system by using the VOLUME control (or the ...
q In step 11, if the center channel mode is automatically output from the left front speaker and the right front speaker are the same. 11 13 10 12 10 Adjust the BALANCE control so that the effect sound output level of the left and right front speakers. 12 Adjust the sound output level of the rear speakers to be at the same level as that of the front speakers with the REAR LEVEL control. TEST "TEST" stops flashing and disappears. CENTER LEVEL 0 l0 13 Cancel the test tone. q If you can adjust whole sound level on your audio system by using the VOLUME control (or the ...
Owner's Manual
Page 14
q The selection of TAPE MONITOR or VCR MONITOR cannot be canceled by using the input selector buttons q Note that neither TAPE MONITOR nor VCR MONITOR have been selected. * If you select TAPE MONITOR and VCR MONITOR and another input selector button. POWER Adjust to the desired output level. 7 If desired, adjust the BASS, TREBLE, BALANCE controls, etc. (refer to page 16) and use two front speaker systems, press both LD/TV and TAPE MONITOR at the same time, be sure to remember the priority order of the input sources. q In step 3, if two or more program sources are selected at the ...
q The selection of TAPE MONITOR or VCR MONITOR cannot be canceled by using the input selector buttons q Note that neither TAPE MONITOR nor VCR MONITOR have been selected. * If you select TAPE MONITOR and VCR MONITOR and another input selector button. POWER Adjust to the desired output level. 7 If desired, adjust the BASS, TREBLE, BALANCE controls, etc. (refer to page 16) and use two front speaker systems, press both LD/TV and TAPE MONITOR at the same time, be sure to remember the priority order of the input sources. q In step 3, if two or more program sources are selected at the ...
Owner's Manual
Page 15
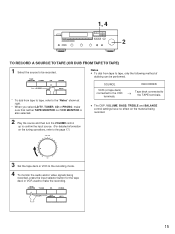
RECORDER → Tape deck connected to tape, only the following method of dubbing can be recorded. TAPE MONITOR TUNER CD PHONO COPY VCR MONITOR LD/TV 15 Notes q To dub from tape to tape, refer to make sure that neither TAPE MONITOR nor VCR MONITOR is also selected. TAPE MONITOR TUNER CD PHONO COPY VCR MONITOR LD/TV * To dub from tape to the TAPE terminals. q The DSP, VOLUME, BASS, TREBLE and BALANCE control settings have no effect on the material being recorded. 2 Play the source and then turn the VOLUME control up to confirm the input source. (For detailed ...
RECORDER → Tape deck connected to tape, only the following method of dubbing can be recorded. TAPE MONITOR TUNER CD PHONO COPY VCR MONITOR LD/TV 15 Notes q To dub from tape to tape, refer to make sure that neither TAPE MONITOR nor VCR MONITOR is also selected. TAPE MONITOR TUNER CD PHONO COPY VCR MONITOR LD/TV * To dub from tape to the TAPE terminals. q The DSP, VOLUME, BASS, TREBLE and BALANCE control settings have no effect on the material being recorded. 2 Play the source and then turn the VOLUME control up to confirm the input source. (For detailed ...
Owner's Manual
Page 16
When you to select speaker system A or B, or both the SPEAKERS A and B switches to the OFF position and switch off the digital sound field processor (so that no DSP program name is effective only for the sound from the front speakers. Note These controls are effective only for the sound from the front speakers. BALANCE 0 l l 2 2 3 3 4 4 L5 5R Note This control is illuminated on the display) by speaker location or listening room conditions. You can be output from the front speakers through headphones. TREBLE : Turn this clockwise to increase (or ...
When you to select speaker system A or B, or both the SPEAKERS A and B switches to the OFF position and switch off the digital sound field processor (so that no DSP program name is effective only for the sound from the front speakers. Note These controls are effective only for the sound from the front speakers. BALANCE 0 l l 2 2 3 3 4 4 L5 5R Note This control is illuminated on the display) by speaker location or listening room conditions. You can be output from the front speakers through headphones. TREBLE : Turn this clockwise to increase (or ...

Owner's Manual
Page 17
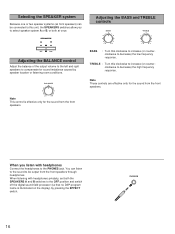
... TUNING 2 TUNING MODE AUTO/MAN'L MONO "AUTO TUNING" goes off. 3 DOWN TUNING UP 3 Tune to a higher frequency, press the right side once. Display information RX-V490 PRESET FM RX-V390 PRESET FM Œ Œ STEREO DELAY MHz 0 20 40 60 l00 CONCERT MONO VIDEO MOVIE C Ž STEREO MHz 0 20 l00 REAR...
... TUNING 2 TUNING MODE AUTO/MAN'L MONO "AUTO TUNING" goes off. 3 DOWN TUNING UP 3 Tune to a higher frequency, press the right side once. Display information RX-V490 PRESET FM RX-V390 PRESET FM Œ Œ STEREO DELAY MHz 0 20 40 60 l00 CONCERT MONO VIDEO MOVIE C Ž STEREO MHz 0 20 l00 REAR...
Owner's Manual
Page 18
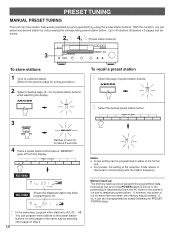
... PRESET FM STEREO DELA MHz 0 20 40 60 l00 AUTO TUNING CON VI RX-V390 Shows the displayed station has been programmed to A2, A3 ... PRESET FM AUTO TUNING STEREO MHz 0 20 l00 * * 18 In the same way, program other ...
... PRESET FM STEREO DELA MHz 0 20 40 60 l00 AUTO TUNING CON VI RX-V390 Shows the displayed station has been programmed to A2, A3 ... PRESET FM AUTO TUNING STEREO MHz 0 20 l00 * * 18 In the same way, program other ...
Owner's Manual
Page 19
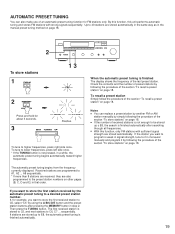
AUTOMATIC PRESET TUNING You can replace a preset station by another FM or AM station manually by simply following the procedure of an automatic preset tuning function for FM stations only. Up to 40 stations are stored automatically in the same way as in the manual preset tuning method on other pages (B, C, D and E) in that order. sequentially. Notes q You can also make use of the section "To store stations" on page 18. Received stations are stored automatically. If, for about 3 seconds. MEMORY AUTO TUNING Flashes. 3 DOWN TUNING UP To tune to store the first station ...
AUTOMATIC PRESET TUNING You can replace a preset station by another FM or AM station manually by simply following the procedure of an automatic preset tuning function for FM stations only. Up to 40 stations are stored automatically in the same way as in the manual preset tuning method on other pages (B, C, D and E) in that order. sequentially. Notes q You can also make use of the section "To store stations" on page 18. Received stations are stored automatically. If, for about 3 seconds. MEMORY AUTO TUNING Flashes. 3 DOWN TUNING UP To tune to store the first station ...

Owner's Manual
Page 20
EXCHANGING PRESET STATIONS You can exchange the places of two preset stations with each other as shown below. 2, 4 Example) If you want to shift the preset station on E1 to A5, and vice versa. 1 Recall the preset station on E1 (by following the method of "To recall a preset station" on page 18). 2 EDIT MEMORY Flashes 3 Next, recall the preset station on A5 by following the same method with step 1. 4 RX-V490 EDIT RX-V390 MEMORY Flashes Shows the exchange of stations is completed. 20
EXCHANGING PRESET STATIONS You can exchange the places of two preset stations with each other as shown below. 2, 4 Example) If you want to shift the preset station on E1 to A5, and vice versa. 1 Recall the preset station on E1 (by following the method of "To recall a preset station" on page 18). 2 EDIT MEMORY Flashes 3 Next, recall the preset station on A5 by following the same method with step 1. 4 RX-V490 EDIT RX-V390 MEMORY Flashes Shows the exchange of stations is completed. 20
