
Owner's Manual
Page 5
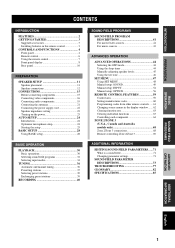
... the power supply cord 22 Speaker impedance setting 23 Turning on the power 23 AUTO SETUP 24 Introduction 24 Optimizer microphone setup 24 Starting the setup 25 BASIC SETUP 28 Using BASIC setup 28 BASIC OPERATION PLAYBACK 30 Basic operations 30 Selecting sound field programs 32 Selecting input ... 44 Manually adjusting speaker levels 45 Using the test tone 46 SET MENU 47 Using SET MENU 48 Manual setup: SOUND 49 Manual setup: INPUT 54 Manual setup: OPTION 56 REMOTE CONTROL FEATURES 59 Control area 59 Setting manufacturer codes 60 Programming codes from other remote controls...
... the power supply cord 22 Speaker impedance setting 23 Turning on the power 23 AUTO SETUP 24 Introduction 24 Optimizer microphone setup 24 Starting the setup 25 BASIC SETUP 28 Using BASIC setup 28 BASIC OPERATION PLAYBACK 30 Basic operations 30 Selecting sound field programs 32 Selecting input ... 44 Manually adjusting speaker levels 45 Using the test tone 46 SET MENU 47 Using SET MENU 48 Manual setup: SOUND 49 Manual setup: INPUT 54 Manual setup: OPTION 56 REMOTE CONTROL FEATURES 59 Control area 59 Setting manufacturer codes 60 Programming codes from other remote controls...
Owner's Manual
Page 6
...a trademark of THX Ltd. All rights reserved. "DTS" and "DTS-ES Digital Surround" and "Neo:6" are registered trademarks of YAMAHA CORPORATION. Design and specifications are trademarks of Digital Theater Systems, Inc. In cases when the button names differ between the manual and ...Tuning ◆ Automatic Preset Tuning ◆ Preset Station Shifting Capability (Preset Editing) Other features ◆ YPAO: YAMAHA Parametric Room Acoustic Optimizer for Automatic Speaker Setup ◆ 192-kHz/24-bit D/A Converter ◆ "SET MENU" which Provides You with Items for Optimizing ...
...a trademark of THX Ltd. All rights reserved. "DTS" and "DTS-ES Digital Surround" and "Neo:6" are registered trademarks of YAMAHA CORPORATION. Design and specifications are trademarks of Digital Theater Systems, Inc. In cases when the button names differ between the manual and ...Tuning ◆ Automatic Preset Tuning ◆ Preset Station Shifting Capability (Preset Editing) Other features ◆ YPAO: YAMAHA Parametric Room Acoustic Optimizer for Automatic Speaker Setup ◆ 192-kHz/24-bit D/A Converter ◆ "SET MENU" which Provides You with Items for Optimizing ...
Owner's Manual
Page 9
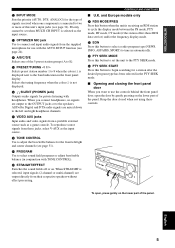
...). C OPTIMIZER MIC jack Use to connect and input audio signals from their respective speakers without effect processing. When you want to use with the AUTO SETUP function (see page 34). CONTROLS AND FUNCTIONS ■ U.K. D A/B/C/D/E Selects one component is not displayed. Selects the tuning frequency when the colon (:) is connected to two...
...). C OPTIMIZER MIC jack Use to connect and input audio signals from their respective speakers without effect processing. When you want to use with the AUTO SETUP function (see page 34). CONTROLS AND FUNCTIONS ■ U.K. D A/B/C/D/E Selects one component is not displayed. Selects the tuning frequency when the colon (:) is connected to two...
Owner's Manual
Page 12
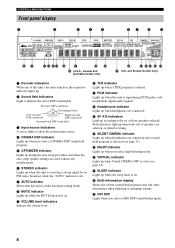
... indicator Lights up when Virtual CINEMA DSP is reproducing PCM (pulse code modulation) digital audio signals. F VIRTUAL indicator Lights up during the auto setup procedure and when the auto setup speaker settings are connected and a sound field program is selected (see page 34). I HiFi DSP Lights when you select night listening mode...
... indicator Lights up when Virtual CINEMA DSP is reproducing PCM (pulse code modulation) digital audio signals. F VIRTUAL indicator Lights up during the auto setup procedure and when the auto setup speaker settings are connected and a sound field program is selected (see page 34). I HiFi DSP Lights when you select night listening mode...
Owner's Manual
Page 15
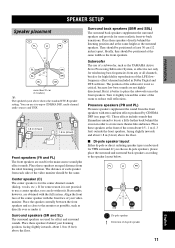
...video monitor should be positioned at least 30 cm (12 inches) apart. Place these speakers at the same height as the YAMAHA Active Servo Processing Subwoofer System, is not practical to reduce wall reflections. Place these speakers an equal distance from the front ...1 m (1-3 feet) outside the front speakers, facing slightly inwards, and about 1.8 m (6 feet) above shows the standard ITU-R speaker setting. SPEAKER SETUP + SPEAKER SETUP PREPARATION Speaker placement PL PR FL C FR 30˚ SL 60˚ SL 80˚ SBL SR SR SBR more theater-like ambience. Subwoofer The...
...video monitor should be positioned at least 30 cm (12 inches) apart. Place these speakers at the same height as the YAMAHA Active Servo Processing Subwoofer System, is not practical to reduce wall reflections. Place these speakers an equal distance from the front ...1 m (1-3 feet) outside the front speakers, facing slightly inwards, and about 1.8 m (6 feet) above shows the standard ITU-R speaker setting. SPEAKER SETUP + SPEAKER SETUP PREPARATION Speaker placement PL PR FL C FR 30˚ SL 60˚ SL 80˚ SBL SR SR SBR more theater-like ambience. Subwoofer The...

Owner's Manual
Page 16
... (3/8") 1 2 1 Remove approximately 10 mm (3/8") of insulation from the speakers, and if the polarity of speakers still creates the interference with a stripe, groove or ridges. SPEAKER SETUP Speaker connections Be sure to prevent short circuits. 3 Unscrew the knob. If the connections are faulty, no sound will be sure to set this unit...
... (3/8") 1 2 1 Remove approximately 10 mm (3/8") of insulation from the speakers, and if the polarity of speakers still creates the interference with a stripe, groove or ridges. SPEAKER SETUP Speaker connections Be sure to prevent short circuits. 3 Unscrew the knob. If the connections are faulty, no sound will be sure to set this unit...
Owner's Manual
Page 17
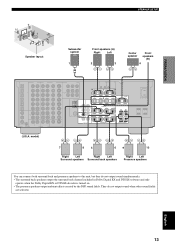
... ES decoder is turned on. • The presence speakers output ambient effects created by the DSP sound fields. English 13 PREPARATION 9 10 4 3 2 1 7 8 5 6 Speaker layout SPEAKER SETUP Subwoofer system Front speakers (A) Right Left 1 2 3 Center speaker Front speakers (B) 4 (U.S.A.
... ES decoder is turned on. • The presence speakers output ambient effects created by the DSP sound fields. English 13 PREPARATION 9 10 4 3 2 1 7 8 5 6 Speaker layout SPEAKER SETUP Subwoofer system Front speakers (A) Right Left 1 2 3 Center speaker Front speakers (B) 4 (U.S.A.
Owner's Manual
Page 18
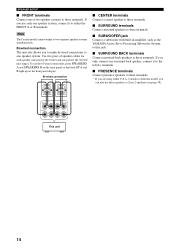
... A or B terminals. Use two pairs of speaker cables for each speaker (one pair for the tweeter/ mid-range). SPEAKER SETUP ■ FRONT terminals Connect one surround back speaker, connect it to either U.S.A., Canada or Australia model, you can also use these speakers as ...the YAMAHA Active Servo Processing Subwoofer System, to this jack. ■ SURROUND BACK terminals Connect surround back speakers to these terminals. Bi-wired connection...
... A or B terminals. Use two pairs of speaker cables for each speaker (one pair for the tweeter/ mid-range). SPEAKER SETUP ■ FRONT terminals Connect one surround back speaker, connect it to either U.S.A., Canada or Australia model, you can also use these speakers as ...the YAMAHA Active Servo Processing Subwoofer System, to this jack. ■ SURROUND BACK terminals Connect surround back speakers to these terminals. Bi-wired connection...
Owner's Manual
Page 28
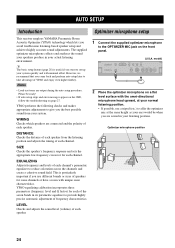
... Checks the speaker's frequency response and sets the appropriate low frequency crossover for some channels or have a room with minimal effort. AUTO SETUP AUTO SETUP Introduction This receiver employs YAMAHA Parametric Room Acoustic Optimizer (YPAO) technology which speakers are connected and the polarity of each speaker. EQUALIZING Adjusts frequency and levels of YPAO...
... Checks the speaker's frequency response and sets the appropriate low frequency crossover for some channels or have a room with minimal effort. AUTO SETUP AUTO SETUP Introduction This receiver employs YAMAHA Parametric Room Acoustic Optimizer (YPAO) technology which speakers are connected and the polarity of each speaker. EQUALIZING Adjusts frequency and levels of YPAO...
Owner's Manual
Page 29
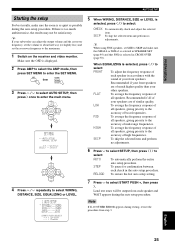
...your front speakers. y If your front speakers are of mid-range frequencies. AMP then SET MENU MENU A/B/C/D/E 3 Press u / d to select AUTO SETUP, then press i once to select: CHECK SKIP To automatically check and adjust the selected item. PRESET TV MUTE SELECT TV VOL - CH + PRESET ...SET MENU . ;AUTO SETUP ;MANUAL SETUP / : Up/Down SELECT : Select p p + TV VOL CH - LOW To average the frequency response of all speakers, giving priority to SKIP and...
...your front speakers. y If your front speakers are of mid-range frequencies. AMP then SET MENU MENU A/B/C/D/E 3 Press u / d to select AUTO SETUP, then press i once to select: CHECK SKIP To automatically check and adjust the selected item. PRESET TV MUTE SELECT TV VOL - CH + PRESET ...SET MENU . ;AUTO SETUP ;MANUAL SETUP / : Up/Down SELECT : Select p p + TV VOL CH - LOW To average the frequency response of all speakers, giving priority to SKIP and...
Owner's Manual
Page 30
... . FRONT L;;;;3.20m CENTER;;;;;3.30m FRONT R;;;;2.90m PRES L;;;;;1.70m PRES R;;;;;1.50m / : Up/Down -/+ : Back/Next p p RESULT:LEVEL 1 . To cancel the auto setup procedure, press j / i to select CANCEL, then press d to exit. If you are set for a few seconds after each check. 8 Press j / i... Pressing d returns to the RESULT:EXIT display. 8 To apply the changes, press j / i to select SET, then press d to exit the auto setup. EXIT Then press d to exit. y You can display each result by pressing u once and pressing i repeatedly before exiting. Notes • If you change...
... . FRONT L;;;;3.20m CENTER;;;;;3.30m FRONT R;;;;2.90m PRES L;;;;;1.70m PRES R;;;;;1.50m / : Up/Down -/+ : Back/Next p p RESULT:LEVEL 1 . To cancel the auto setup procedure, press j / i to select CANCEL, then press d to exit. If you are set for a few seconds after each check. 8 Press j / i... Pressing d returns to the RESULT:EXIT display. 8 To apply the changes, press j / i to select SET, then press d to exit the auto setup. EXIT Then press d to exit. y You can display each result by pressing u once and pressing i repeatedly before exiting. Notes • If you change...
Owner's Manual
Page 31
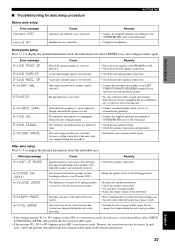
... Cause Speaker polarity is not detected. Remedy • Check the speaker connections. • Bring the speaker closer to try auto setup procedure again. The difference of volume level among speakers is excessive. (No level correction is (are) connected, though surround L/R speakers...of similar quality. • Adjust the output volume of the subwoofer is detected. PREPARATION ■ Troubleshooting for auto setup procedure Before auto setup Error message Connect MIC! Background noise is over 24 meters (80ft.). A presence channel signal is not connected. The ...
... Cause Speaker polarity is not detected. Remedy • Check the speaker connections. • Bring the speaker closer to try auto setup procedure again. The difference of volume level among speakers is excessive. (No level correction is (are) connected, though surround L/R speakers...of similar quality. • Adjust the output volume of the subwoofer is detected. PREPARATION ■ Troubleshooting for auto setup procedure Before auto setup Error message Connect MIC! Background noise is over 24 meters (80ft.). A presence channel signal is not connected. The ...
Owner's Manual
Page 32
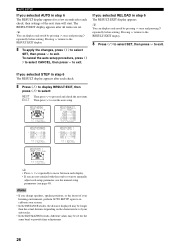
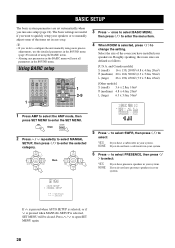
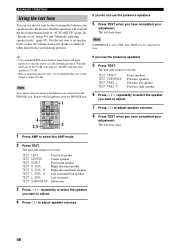
... mode, then press SET MENU to open SET MENU again. 28 CH + PRESET then CH - PRESET TV MUTE SELECT TV VOL - Using BASIC setup TRANSMIT RE-NAME CLEAR LEARN SYSTEM POWER STANDBY SLEEP INPUT MODE PHONO TUNER CD MULTI CH IN V-AUX CBL/SAT MD/TAPE CD-R DTV VCR...AV AMP REC DISC SKIP AUDIO + VOL - y • If you have presence speakers in . AMP then SET MENU MENU A/B/C/D/E 2 Press u / d repeatedly to select MANUAL SETUP, then press j / i to enter the menu item. 4 When ROOM is selected, SET MENU will reset all parameters in your system. PRESET TV MUTE SELECT TV...
... mode, then press SET MENU to open SET MENU again. 28 CH + PRESET then CH - PRESET TV MUTE SELECT TV VOL - Using BASIC setup TRANSMIT RE-NAME CLEAR LEARN SYSTEM POWER STANDBY SLEEP INPUT MODE PHONO TUNER CD MULTI CH IN V-AUX CBL/SAT MD/TAPE CD-R DTV VCR...AV AMP REC DISC SKIP AUDIO + VOL - y • If you have presence speakers in . AMP then SET MENU MENU A/B/C/D/E 2 Press u / d repeatedly to select MANUAL SETUP, then press j / i to enter the menu item. 4 When ROOM is selected, SET MENU will reset all parameters in your system. PRESET TV MUTE SELECT TV...

Owner's Manual
Page 33
... 1 BASIC MENU 2/2 . Front L/R, - To adjust each speaker. However, if the power cord is disconnected from being lost . PREPARATION BASIC SETUP 7 Press d to select SPEAKERS, then press j / i to select the number of speakers connected to select: SET CANCEL To apply the changes....selected) B)SP LEVEL - + . Surround back L/R 9 Press d to select CHECK OK?, then press j / i to select: YES NO To exit the setup if the test tones were satisfactory. L CR SL SB SR 3 - Surround L/R, Surround back Presence L/R, L CR SL SB SR Front L/R, 9 Center, Surround L/R, -...
... 1 BASIC MENU 2/2 . Front L/R, - To adjust each speaker. However, if the power cord is disconnected from being lost . PREPARATION BASIC SETUP 7 Press d to select SPEAKERS, then press j / i to select the number of speakers connected to select: SET CANCEL To apply the changes....selected) B)SP LEVEL - + . Surround back L/R 9 Press d to select CHECK OK?, then press j / i to select: YES NO To exit the setup if the test tones were satisfactory. L CR SL SB SR 3 - Surround L/R, Surround back Presence L/R, L CR SL SB SR Front L/R, 9 Center, Surround L/R, -...
Owner's Manual
Page 49
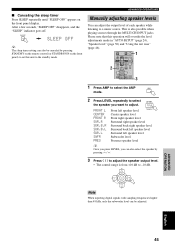
... sleep timer Press SLEEP repeatedly until "SLEEP OFF" appears on the front panel) to set this operation will override the level adjustments made in "AUTO SETUP" (page 24), "Speaker level" (page 50) and "Using the test tone" (page 46). 2 POWER TV REC DISC SKIP POWER AV AMP AUDIO + VOL...
... sleep timer Press SLEEP repeatedly until "SLEEP OFF" appears on the front panel) to set this operation will override the level adjustments made in "AUTO SETUP" (page 24), "Speaker level" (page 50) and "Using the test tone" (page 46). 2 POWER TV REC DISC SKIP POWER AV AMP AUDIO + VOL...
Owner's Manual
Page 50
... SUBWOOFER Front left speaker Presence right speaker 6 Press u / d repeatedly to select the speaker you have completed your listening position. Note If PRESENCE is in "AUTO SETUP" (page 24), "Speaker level" (page 50) and "Manually adjusting speaker levels" (page 45).
... SUBWOOFER Front left speaker Presence right speaker 6 Press u / d repeatedly to select the speaker you have completed your listening position. Note If PRESENCE is in "AUTO SETUP" (page 24), "Speaker level" (page 50) and "Manually adjusting speaker levels" (page 45).
Owner's Manual
Page 51
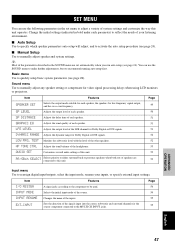
...Use to manually adjust any speaker setting or compensate for low-frequency signal output, and the cross over frequency. Sound menu Use to quickly setup basic system parameters (see page 28). Adjusts the delay time of the LFE channel for Dolby Digital or DTS signals. Adjusts the output ...MULTI CH INPUT jacks. 55 ADVANCED OPERATION English 47 You can use the SOUND menu to make further adjustments, but we recommend running auto setup first. Page 54 54 55 EXT.INPUT Sets the direction of system settings and customize the way this unit. Matches the subwoofer level with...
...Use to manually adjust any speaker setting or compensate for low-frequency signal output, and the cross over frequency. Sound menu Use to quickly setup basic system parameters (see page 28). Adjusts the delay time of the LFE channel for Dolby Digital or DTS signals. Adjusts the output ...MULTI CH INPUT jacks. 55 ADVANCED OPERATION English 47 You can use the SOUND menu to make further adjustments, but we recommend running auto setup first. Page 54 54 55 EXT.INPUT Sets the direction of system settings and customize the way this unit. Matches the subwoofer level with...

Owner's Manual
Page 52
...PRESET or STEREO 1 HALL 2 ENTERTAIN 5 MUSIC 6 THX 9 /DTS 0 JAZZ 3 ROCK 4 TV THTR 7 MOVIE 8 NIGHT +10 EX/ES ENTER CHP/INDEX 2 Press u / d to select AUTO SETUP or MANUAL SETUP, then press j / i to open SET MENU again. 48 CH + PRESET Memory back-up The memory back-up circuit prevents the stored data from the... AC outlet, or the power supply is selected, SET MENU will be lost even if this operation to navigate to and enter the setup mode of the item you want to adjust. 5 To exit, press u / d repeatedly until the menu disappears or just press one week, the stored ...
...PRESET or STEREO 1 HALL 2 ENTERTAIN 5 MUSIC 6 THX 9 /DTS 0 JAZZ 3 ROCK 4 TV THTR 7 MOVIE 8 NIGHT +10 EX/ES ENTER CHP/INDEX 2 Press u / d to select AUTO SETUP or MANUAL SETUP, then press j / i to open SET MENU again. 48 CH + PRESET Memory back-up The memory back-up circuit prevents the stored data from the... AC outlet, or the power supply is selected, SET MENU will be lost even if this operation to navigate to and enter the setup mode of the item you want to adjust. 5 To exit, press u / d repeatedly until the menu disappears or just press one week, the stored ...
Owner's Manual
Page 53
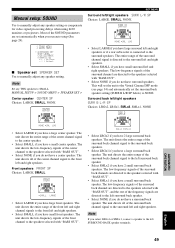
...SURR B L/R SP Choices: LRGx2, LRGx1, SMLx2, SMLx1, NONE SURR.B NONE [SML LRG • Select LARGE if you have a large center speaker. MANUAL SETUP > SOUND MENU > SPEAKER SET > Center speaker CENTER SP Choices: LARGE, SMALL, NONE CENTER SET MENU Surround left/right speakers SURR L/R SP Choices: LARGE, ...LRGx1 or SMLx1, connect a speaker to the surround back speakers. • Select LRGx1 if you have a large surround back speaker. p p Manual setup: SOUND Use to the speakers selected with "BASS OUT". • Select NONE if you do not have a center speaker. Most of the center ...
...SURR B L/R SP Choices: LRGx2, LRGx1, SMLx2, SMLx1, NONE SURR.B NONE [SML LRG • Select LARGE if you have a large center speaker. MANUAL SETUP > SOUND MENU > SPEAKER SET > Center speaker CENTER SP Choices: LARGE, SMALL, NONE CENTER SET MENU Surround left/right speakers SURR L/R SP Choices: LARGE, ...LRGx1 or SMLx1, connect a speaker to the surround back speakers. • Select LRGx1 if you have a large surround back speaker. p p Manual setup: SOUND Use to the speakers selected with "BASS OUT". • Select NONE if you do not have a center speaker. Most of the center ...
Owner's Manual
Page 54
... subwoofer (subwoofer can be used for all low-frequency signals. Cross over (cut-off) frequency for both the subwoofer and the other speaker settings. MANUAL SETUP > SOUND MENU > SP LEVEL > B)SP LEVEL - + . FREQ;;;80Hz(THX) 50 y Use a handheld SPL meter, hold at arms length and point ...left and surround right speakers. • SWFR adjusts the balance of the front left speakers and each speaker to select a cross-over CROSS OVER MANUAL SETUP > SOUND MENU > SPEAKER SET > CROSS OVER Use this unit decodes a Dolby Digital or DTS signal. Choices: SWFR (subwoofer), FRNT, BOTH THX...
... subwoofer (subwoofer can be used for all low-frequency signals. Cross over (cut-off) frequency for both the subwoofer and the other speaker settings. MANUAL SETUP > SOUND MENU > SP LEVEL > B)SP LEVEL - + . FREQ;;;80Hz(THX) 50 y Use a handheld SPL meter, hold at arms length and point ...left and surround right speakers. • SWFR adjusts the balance of the front left speakers and each speaker to select a cross-over CROSS OVER MANUAL SETUP > SOUND MENU > SPEAKER SET > CROSS OVER Use this unit decodes a Dolby Digital or DTS signal. Choices: SWFR (subwoofer), FRNT, BOTH THX...


