Easy Start Guide
Page 1
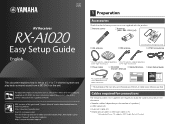
...; Speaker cables (depending on natural resources, the Owner's Manual for additional information, FAQ's, downloads such as "Owner's Manual" and product updates. model, unless otherwise specified. To reduce the impact on the number of speakers) • HDMI cable (x2) • Audio pin cable (x1) • Digital optical cable or stereo pin cable (x1*) * Not required if your TV supports ARC (Audio Return Channel) Cables required for connections The following cables (not supplied) are required to set up a 5.1- AV Receiver UAB...
...; Speaker cables (depending on natural resources, the Owner's Manual for additional information, FAQ's, downloads such as "Owner's Manual" and product updates. model, unless otherwise specified. To reduce the impact on the number of speakers) • HDMI cable (x2) • Audio pin cable (x1) • Digital optical cable or stereo pin cable (x1*) * Not required if your TV supports ARC (Audio Return Channel) Cables required for connections The following cables (not supplied) are required to set up a 5.1- AV Receiver UAB...

Easy Start Guide
Page 2
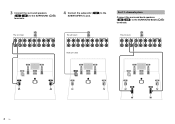
For information on other speaker systems, refer to "Owner's Manual". 5.1-channel system 1 2 9 3 4 10° to 30° 10° to 30° 5 2 En 7.1-channel system 1 2 9 3 4 10° to 30° 6 5 10° to 30° 7 30 cm (1 ft) or more 1 Front speaker (L) 2 Front speaker (R) 3 Center speaker 4 Surround speaker (L) 5 Surround speaker (R) 6 Surround back speaker (L) 7 Surround back speaker (R) 9 Subwoofer 2 Placing speakers Set up the speakers in the room using the following diagram as a reference.
For information on other speaker systems, refer to "Owner's Manual". 5.1-channel system 1 2 9 3 4 10° to 30° 10° to 30° 5 2 En 7.1-channel system 1 2 9 3 4 10° to 30° 6 5 10° to 30° 7 30 cm (1 ft) or more 1 Front speaker (L) 2 Front speaker (R) 3 Center speaker 4 Surround speaker (L) 5 Surround speaker (R) 6 Surround back speaker (L) 7 Surround back speaker (R) 9 Subwoofer 2 Placing speakers Set up the speakers in the room using the following diagram as a reference.

Easy Start Guide
Page 3
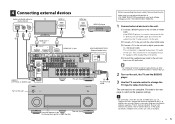
... General models only) a Tighten the speaker terminal. BACK SUBWOOFER CENTER SPEAKERS R SURROUND BACK L CENTER R FRONT L R ZONE 2/F.PRESENCE/ BI-AMP EXTRA SP L SINGLE 1 2 9 3 4 5 En 3 When connecting 6-ohm speakers, set the unit's speaker impedance to the FRONT (//\) terminals. CENTER ZONE OUT PRE OUT (SINGLE) 1 The unit (rear) 2 ROUND SUR. BACK SUBWOOFER ZONE 2 R SURROUND L FRONT SURROUND SUR. b c + (red) + FRONT - - (black) da b Loosen the speaker terminal. CENTER ZONE OUT PRE OUT (SINGLE) 1 The unit (rear) 2 ROUND SUR. If the speaker cables short...
... General models only) a Tighten the speaker terminal. BACK SUBWOOFER CENTER SPEAKERS R SURROUND BACK L CENTER R FRONT L R ZONE 2/F.PRESENCE/ BI-AMP EXTRA SP L SINGLE 1 2 9 3 4 5 En 3 When connecting 6-ohm speakers, set the unit's speaker impedance to the FRONT (//\) terminals. CENTER ZONE OUT PRE OUT (SINGLE) 1 The unit (rear) 2 ROUND SUR. BACK SUBWOOFER ZONE 2 R SURROUND L FRONT SURROUND SUR. b c + (red) + FRONT - - (black) da b Loosen the speaker terminal. CENTER ZONE OUT PRE OUT (SINGLE) 1 The unit (rear) 2 ROUND SUR. If the speaker cables short...
Easy Start Guide
Page 4
...BACK SUBWOOFER CENTER SPEAKERS R SURROUND BACK L CENTER R FRONT L R ZONE 2/F.PRESENCE/ BI-AMP EXTRA SP L SINGLE Audio pin cable For 7.1-channel system Connect the surround back speakers (6/7) to the SUBWOOFER (1) jack. 3 Connect the surround speakers (4/5) to the SURROUND (//\) terminals. 4 Connect the subwoofer (9) to the SURROUND BACK (//\) terminals. BACK SUBWOOFER ZONE 2 R SURROUND L FRONT SURROUND SUR. BACK SUBWOOFER CENTER SPEAKERS R SURROUND BACK L CENTER R FRONT L R ZONE 2/F.PRESENCE/ BI-AMP EXTRA SP L SINGLE CENTER ZONE OUT PRE OUT (SINGLE) 1 The unit (rear...
...BACK SUBWOOFER CENTER SPEAKERS R SURROUND BACK L CENTER R FRONT L R ZONE 2/F.PRESENCE/ BI-AMP EXTRA SP L SINGLE Audio pin cable For 7.1-channel system Connect the surround back speakers (6/7) to the SUBWOOFER (1) jack. 3 Connect the surround speakers (4/5) to the SURROUND (//\) terminals. 4 Connect the subwoofer (9) to the SURROUND BACK (//\) terminals. BACK SUBWOOFER ZONE 2 R SURROUND L FRONT SURROUND SUR. BACK SUBWOOFER CENTER SPEAKERS R SURROUND BACK L CENTER R FRONT L R ZONE 2/F.PRESENCE/ BI-AMP EXTRA SP L SINGLE CENTER ZONE OUT PRE OUT (SINGLE) 1 The unit (rear...
Easy Start Guide
Page 5
.../ ZONE OUT Y AV 1 A COMPONENT VIDEO PB PR Y AV 3 PB C PR MONITOR OUT/ZONE OUT Y PB PR REMOTE IN OUT AV 2 B AUDIO 1 AV 4 D L (2 TV) AUDIO 1 AUDIO 2 AUDIO 3 AUDIO 4 (2 TV) MULTI CH INPUT CENTER ZONE OUT PRE OUT (SINGLE) 1 L R 2 RS-232C TRIGGER OUT 1 2 12V 0.1A VOLTAGE SELECTOR 220V240V 110V120V 1 COAXIAL 2 COAXIAL 3 OPTICAL 4 OPTICAL 5 OPTICAL 6 COAXIAL R ANTENNA HD Radio (4 RADIO) 5 75Ω FM AM OPTICAL FRONT SURROUND SUR. For details, refer to the unit with the menu displayed on -screen menu language from English (default...
.../ ZONE OUT Y AV 1 A COMPONENT VIDEO PB PR Y AV 3 PB C PR MONITOR OUT/ZONE OUT Y PB PR REMOTE IN OUT AV 2 B AUDIO 1 AV 4 D L (2 TV) AUDIO 1 AUDIO 2 AUDIO 3 AUDIO 4 (2 TV) MULTI CH INPUT CENTER ZONE OUT PRE OUT (SINGLE) 1 L R 2 RS-232C TRIGGER OUT 1 2 12V 0.1A VOLTAGE SELECTOR 220V240V 110V120V 1 COAXIAL 2 COAXIAL 3 OPTICAL 4 OPTICAL 5 OPTICAL 6 COAXIAL R ANTENNA HD Radio (4 RADIO) 5 75Ω FM AM OPTICAL FRONT SURROUND SUR. For details, refer to the unit with the menu displayed on -screen menu language from English (default...
Easy Start Guide
Page 6
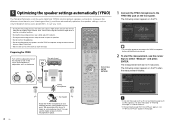
... room. The following screen appears on the front panel. 5 Optimizing the speaker settings automatically (YPAO) The Yamaha Parametric room Acoustic Optimizer (YPAO) function detects speaker connections, measures the distances from using this function at high volume. Ensure that the test tones do not frighten small children. Preparing for YPAO SOURCE RECEIVER AV 1 2 3 4 5 6 7 V-AUX AUDIO 1 2 3 4 PHONO MULTI USB NET TUNER MAIN ZONE 2 PARTY HDMI OUT 1 BD/DVD SCENE 2 3 TV NET 4 RADIO Turn on the TV when...
... room. The following screen appears on the front panel. 5 Optimizing the speaker settings automatically (YPAO) The Yamaha Parametric room Acoustic Optimizer (YPAO) function detects speaker connections, measures the distances from using this function at high volume. Ensure that the test tones do not frighten small children. Preparing for YPAO SOURCE RECEIVER AV 1 2 3 4 5 6 7 V-AUX AUDIO 1 2 3 4 PHONO MULTI USB NET TUNER MAIN ZONE 2 PARTY HDMI OUT 1 BD/DVD SCENE 2 3 TV NET 4 RADIO Turn on the TV when...

Easy Start Guide
Page 7
... press ENTER. 5 Disconnect the YPAO microphone from the unit. a Use the cursor keys to step 3. If the speaker is connected correctly: You can save the current settings. c Check the cable connections (+/-) of AV equipment). Press RETURN and proceed to select "Result" and press ENTER. If the speaker is connected incorrectly: Turn off the unit, reconnect the speaker cable, and then try YPAO measurement...
... press ENTER. 5 Disconnect the YPAO microphone from the unit. a Use the cursor keys to step 3. If the speaker is connected correctly: You can save the current settings. c Check the cable connections (+/-) of AV equipment). Press RETURN and proceed to select "Result" and press ENTER. If the speaker is connected incorrectly: Turn off the unit, reconnect the speaker cable, and then try YPAO measurement...

Easy Start Guide
Page 8
... unit. SOURCE RECEIVER AV 1 2 3 4 5 6 7 V-AUX AUDIO 1 2 3 4 PHONO MULTI USB NET TUNER MAIN ZONE 2 PARTY HDMI OUT 1 BD/DVD SCENE 2 3 TV NET 4 RADIO PROGRAM MUTE VOLUME AV 1 VOLUME TOP MENU ON SCREEN POP-UP/MENU OPTION ENTER RETURN MODE TUNING DISPLAY BAND PRESET MOVIE INFO SUR. Many more ) to FM/AM radio ■ Playing back music stored on the BD/DVD player. 3 Press STRAIGHT repeatedly to adjust the volume. If surround sound is not working Sound is coming from iPod By using a USB cable supplied with...
... unit. SOURCE RECEIVER AV 1 2 3 4 5 6 7 V-AUX AUDIO 1 2 3 4 PHONO MULTI USB NET TUNER MAIN ZONE 2 PARTY HDMI OUT 1 BD/DVD SCENE 2 3 TV NET 4 RADIO PROGRAM MUTE VOLUME AV 1 VOLUME TOP MENU ON SCREEN POP-UP/MENU OPTION ENTER RETURN MODE TUNING DISPLAY BAND PRESET MOVIE INFO SUR. Many more ) to FM/AM radio ■ Playing back music stored on the BD/DVD player. 3 Press STRAIGHT repeatedly to adjust the volume. If surround sound is not working Sound is coming from iPod By using a USB cable supplied with...


