

Owner's Manual
Page 2
... or exhibits a marked change in installation, such as recommended by qualified service personnel when: A. The power cord of important operating and maintenance (servicing) instructions in the operating instructions should be serviced by the manufacturer. 13 Nonuse Periods - The power-supply cord or the plug has been damaged; The unit does not appear to persons. Power-supply cords should be unplugged from heat sources such as marked on...
... or exhibits a marked change in installation, such as recommended by qualified service personnel when: A. The power cord of important operating and maintenance (servicing) instructions in the operating instructions should be serviced by the manufacturer. 13 Nonuse Periods - The power-supply cord or the plug has been damaged; The unit does not appear to persons. Power-supply cords should be unplugged from heat sources such as marked on...
Owner's Manual
Page 3
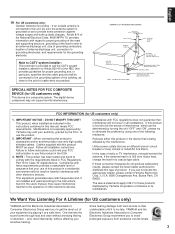
... "B" digital devices. This equipment generates/uses radio frequencies and, if not installed and used . If these requirements provides a reasonable level of product. The above statements apply ONLY to accessories and/or another product use of this product MUST be used according to the instructions found to be connected to the grounding system of cable entry as practical. Since hearing damage from excessive volume levels...
... "B" digital devices. This equipment generates/uses radio frequencies and, if not installed and used . If these requirements provides a reasonable level of product. The above statements apply ONLY to accessories and/or another product use of this product MUST be used according to the instructions found to be connected to the grounding system of cable entry as practical. Since hearing damage from excessive volume levels...
Owner's Manual
Page 4
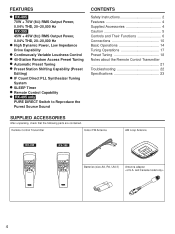
...RX-395 45W + 45W (8Ω) RMS Output Power, 0.04% THD, 20-20,000 Hz q High Dynamic Power, Low Impedance Drive Capability q Continuously Variable Loudness Control q 40-Station Random Access Preset Tuning q Automatic Preset Tuning q Preset Station Shifting Capability (Preset Editing) q IF Count Direct PLL Synthesizer Tuning System q SLEEP Timer q Remote Control Capability q RX-495 only PURE DIRECT Switch to Reproduce the Purest Source Sound CONTENTS Safety Instructions 2 Features 4 Supplied Accessories 4 Caution 5 Controls and Their Functions 6 Connections 10 Basic Operations 14 Tuning...
...RX-395 45W + 45W (8Ω) RMS Output Power, 0.04% THD, 20-20,000 Hz q High Dynamic Power, Low Impedance Drive Capability q Continuously Variable Loudness Control q 40-Station Random Access Preset Tuning q Automatic Preset Tuning q Preset Station Shifting Capability (Preset Editing) q IF Count Direct PLL Synthesizer Tuning System q SLEEP Timer q Remote Control Capability q RX-495 only PURE DIRECT Switch to Reproduce the Purest Source Sound CONTENTS Safety Instructions 2 Features 4 Supplied Accessories 4 Caution 5 Controls and Their Functions 6 Connections 10 Basic Operations 14 Tuning...
Owner's Manual
Page 5
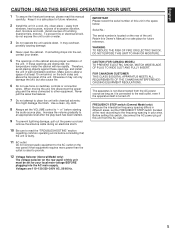
... level after the play . Otherwise it in different areas, set the VOLUME control to clean the unit with chemical solvents; English CAUTION : READ THIS BEFORE OPERATING YOUR UNIT. 1 To assure the finest performance, please read the "TROUBLESHOOTING" section regarding common operating errors before starting the audio source play back has been started. 9 To prevent lightning damage, pull out the power cord and remove the antenna cable...
... level after the play . Otherwise it in different areas, set the VOLUME control to clean the unit with chemical solvents; English CAUTION : READ THIS BEFORE OPERATING YOUR UNIT. 1 To assure the finest performance, please read the "TROUBLESHOOTING" section regarding common operating errors before starting the audio source play back has been started. 9 To prevent lightning damage, pull out the power cord and remove the antenna cable...

Owner's Manual
Page 6
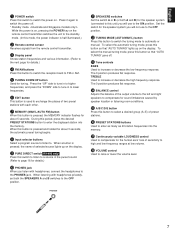
... 9 4 56 8 7 PURE DIRECT VOLUME l8 l6 l4 20 l2 24 l0 28 8 34 6 40 4 50 60 70 3 2 l 0 -dB 0A B C D EF G H RX-395 12 3 4 5 67 8 NATURAL SOUND STEREO RECEIVER POWER PRESET AM FM MEMORY ENTER TAPE MONITOR 12 STEREO MHz 0 20 l00 AUTO TUNING SLEEP TUNING MODE FM/AM DOWN TUNING UP AUTO/MAN'L MONO EDIT MEMORY MAN'L/AUTO FM TUNER CD TAPE MONITOR AUX PHONO A/B/C/D/E PRESET STATIONS 1 2 3 4 5 6 7 8 PHONES SPEAKERS A B ON ON OFF OFF BASS 0 l l 2 2 3 3 4 5 4 5 TREBLE 0 l l 2 2 3 3 4 5 4 5 BALANCE 0 l l 2 2 3 3 4 L5 4 5R...
... 9 4 56 8 7 PURE DIRECT VOLUME l8 l6 l4 20 l2 24 l0 28 8 34 6 40 4 50 60 70 3 2 l 0 -dB 0A B C D EF G H RX-395 12 3 4 5 67 8 NATURAL SOUND STEREO RECEIVER POWER PRESET AM FM MEMORY ENTER TAPE MONITOR 12 STEREO MHz 0 20 l00 AUTO TUNING SLEEP TUNING MODE FM/AM DOWN TUNING UP AUTO/MAN'L MONO EDIT MEMORY MAN'L/AUTO FM TUNER CD TAPE MONITOR AUX PHONO A/B/C/D/E PRESET STATIONS 1 2 3 4 5 6 7 8 PHONES SPEAKERS A B ON ON OFF OFF BASS 0 l l 2 2 3 3 4 5 4 5 TREBLE 0 l l 2 2 3 3 4 5 4 5 BALANCE 0 l l 2 2 3 3 4 L5 4 5R...
Owner's Manual
Page 7
... button so that "AUTO TUNING" lights up on the remote control transmitter switches the unit to the standby mode. (In this mode, the power indicator is on, pressing the POWER key on the display. 9 PURE DIRECT switch RX-495 only Press this button to switch the reception band to FM or AM. 5 TUNING DOWN/UP button Used for about 3 seconds, the automatic preset tuning begins. 8 Input selector buttons Select a program source to listen to increase or decrease the low frequency...
... button so that "AUTO TUNING" lights up on the remote control transmitter switches the unit to the standby mode. (In this mode, the power indicator is on, pressing the POWER key on the display. 9 PURE DIRECT switch RX-495 only Press this button to switch the reception band to FM or AM. 5 TUNING DOWN/UP button Used for about 3 seconds, the automatic preset tuning begins. 8 Input selector buttons Select a program source to listen to increase or decrease the low frequency...
Owner's Manual
Page 8
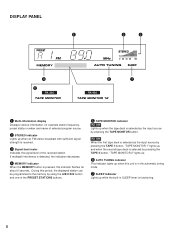
...-in SLEEP timer is functioning. 8 DISPLAY PANEL 1 2 3 PRESET FM MEMORY TAPE MONITOR STEREO MHz 0 20 40 60 l00 AUTO TUNING SLEEP 4 6 7 5 RX-395 TAPE MONITOR RX-495 TAPE MONITOR 12 1 Multi-information display Displays various information, for about 5 seconds. RX-495 When the first tape deck is selected as the input source by using the A/B/C/D/E button and one of the PRESET STATIONS buttons. 5 TAPE MONITOR indicator RX-395 Lights up when this period, the displayed station can be programmed to the memory by pressing the TAPE MONITOR button. If multipath interfernce...
...-in SLEEP timer is functioning. 8 DISPLAY PANEL 1 2 3 PRESET FM MEMORY TAPE MONITOR STEREO MHz 0 20 40 60 l00 AUTO TUNING SLEEP 4 6 7 5 RX-395 TAPE MONITOR RX-495 TAPE MONITOR 12 1 Multi-information display Displays various information, for about 5 seconds. RX-495 When the first tape deck is selected as the input source by using the A/B/C/D/E button and one of the PRESET STATIONS buttons. 5 TAPE MONITOR indicator RX-395 Lights up when this period, the displayed station can be programmed to the memory by pressing the TAPE MONITOR button. If multipath interfernce...
Owner's Manual
Page 9
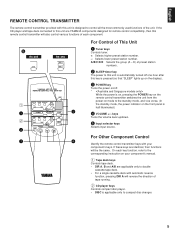
.... PRESET + A/B/C/D/E TUNER DISC PLAY CD PHONO POWER SLEEP VOLUME 5 4 For Control of the unit. keys Turns the volume level up on the display). 3 POWER key Turns the power on/off one hour after this remote control transmitter will reverse the direction of each key function, refer to compact disc changer. 9 If the CD player and tape deck connected to this unit are YAMAHA components designed for remote control compatibility, then this key is pressed (so that "SLEEP" lights up /down. 5 Input...
.... PRESET + A/B/C/D/E TUNER DISC PLAY CD PHONO POWER SLEEP VOLUME 5 4 For Control of the unit. keys Turns the volume level up on the display). 3 POWER key Turns the power on/off one hour after this remote control transmitter will reverse the direction of each key function, refer to compact disc changer. 9 If the CD player and tape deck connected to this unit are YAMAHA components designed for remote control compatibility, then this key is pressed (so that "SLEEP" lights up /down. 5 Input...
Owner's Manual
Page 10
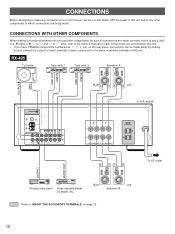
... owner's manual for each component to this unit. * If you have YAMAHA components numbered as 1, 2, 3, etc. TOTAL To AC outlet OUTPUT AUDIO OUT Compact disc player Video cassette player, LD player, etc. on page 12. 10 RX-495 Turntable Tape deck 1 Tape deck 2 Speakers A OUTPUT GND LINE OUT LINE IN LINE OUT LINE IN GND FM ANT GND AM ANT 75Ω UNBAL. 3 or 5 4 or 6 3 4 TAPE PB REC OUT TAPE PB REC OUT PHONO...
... owner's manual for each component to this unit. * If you have YAMAHA components numbered as 1, 2, 3, etc. TOTAL To AC outlet OUTPUT AUDIO OUT Compact disc player Video cassette player, LD player, etc. on page 12. 10 RX-495 Turntable Tape deck 1 Tape deck 2 Speakers A OUTPUT GND LINE OUT LINE IN LINE OUT LINE IN GND FM ANT GND AM ANT 75Ω UNBAL. 3 or 5 4 or 6 3 4 TAPE PB REC OUT TAPE PB REC OUT PHONO...
Owner's Manual
Page 11
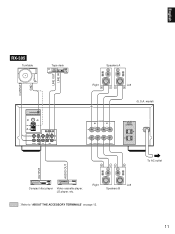
Right Left Speakers B : Refer to "ABOUT THE ACCESSORY TERMINALS" on page 12. 11 model) SPEAKERS A B A OR B : 6ΩMIN./SPEAKER A B : l2ΩMIN./SPEAKER AC OUTLETS SWITCHED I20V 60Hz I00W MAX. English RX-395 Turntable Tape deck OUTPUT GND LINE OUT LINE IN GND FM ANT GND AM ANT 75Ω UNBAL. 3 or 5 4 or 6 TAPE PB REC OUT PHONO CD 1 AUX TAPE Speakers A Right Left (U.S.A. TOTAL To AC outlet OUTPUT AUDIO OUT Compact disc player Video cassette player, LD player, etc.
Right Left Speakers B : Refer to "ABOUT THE ACCESSORY TERMINALS" on page 12. 11 model) SPEAKERS A B A OR B : 6ΩMIN./SPEAKER A B : l2ΩMIN./SPEAKER AC OUTLETS SWITCHED I20V 60Hz I00W MAX. English RX-395 Turntable Tape deck OUTPUT GND LINE OUT LINE IN GND FM ANT GND AM ANT 75Ω UNBAL. 3 or 5 4 or 6 TAPE PB REC OUT PHONO CD 1 AUX TAPE Speakers A Right Left (U.S.A. TOTAL To AC outlet OUTPUT AUDIO OUT Compact disc player Video cassette player, LD player, etc.

Owner's Manual
Page 12
... Use these wires are faulty, no sound will supply power to the GND terminal will lack bass. The maximum power (total power consumption of the speaker wires is correct, that can be heard from the speakers. Make sure that the polarity of components) that is controlled by this unit for the connection. These outlets will be connected to the SWITCHED AC OUTLETS is turned on the rear...
... Use these wires are faulty, no sound will supply power to the GND terminal will lack bass. The maximum power (total power consumption of the speaker wires is correct, that can be heard from the speakers. Make sure that the polarity of components) that is controlled by this unit for the connection. These outlets will be connected to the SWITCHED AC OUTLETS is turned on the rear...
Owner's Manual
Page 14
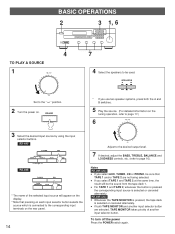
.... 2 Turn the power on the rear panel. 14 Adjust to the desired output level. 7 If desired, adjust the BASS, TREBLE, BALANCE and LOUDNESS controls, etc. (refer to be the sound from the tape deck 1. To turn off the power Press the POWER switch again. RX-395 only q Whenever the TAPE MONITOR is pressed, the tape deck is selected or canceled alternately. Notes RX-495 only q If you use two speaker systems, press both TAPE MONITOR and another input selector button. q For TAPE 1 and TAPE 2, whenever...
.... 2 Turn the power on the rear panel. 14 Adjust to the desired output level. 7 If desired, adjust the BASS, TREBLE, BALANCE and LOUDNESS controls, etc. (refer to be the sound from the tape deck 1. To turn off the power Press the POWER switch again. RX-395 only q Whenever the TAPE MONITOR is pressed, the tape deck is selected or canceled alternately. Notes RX-495 only q If you use two speaker systems, press both TAPE MONITOR and another input selector button. q For TAPE 1 and TAPE 2, whenever...
Owner's Manual
Page 15
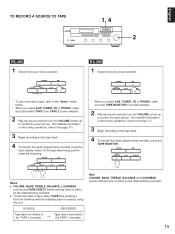
...selected. 2 Play the source and then turn the VOLUME control up to confirm the input source. (For detailed information on the tuning operations, refer to tape, select TAPE 2 by using this unit. TUNER CD TAPE MONITOR AUX PHONO Note VOLUME, BASS, TREBLE, BALANCE and LOUDNESS control settings have no effect on the tape deck. 4 To monitor the audio signals being recorded. 15 SOURCE RECORDER Tape deck connected to the TAPE 2 terminals. → Tape deck connected to the TAPE 1 terminals. * When you select AUX, TUNER, CD or PHONO, make the recording. RX-395 1 Select...
...selected. 2 Play the source and then turn the VOLUME control up to confirm the input source. (For detailed information on the tuning operations, refer to tape, select TAPE 2 by using this unit. TUNER CD TAPE MONITOR AUX PHONO Note VOLUME, BASS, TREBLE, BALANCE and LOUDNESS control settings have no effect on the tape deck. 4 To monitor the audio signals being recorded. 15 SOURCE RECORDER Tape deck connected to the TAPE 2 terminals. → Tape deck connected to the TAPE 1 terminals. * When you select AUX, TUNER, CD or PHONO, make the recording. RX-395 1 Select...
Owner's Manual
Page 16
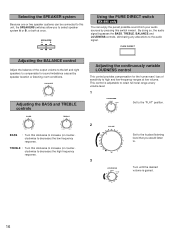
... OFF Using the PURE DIRECT switch RX-495 only You can be connected to this unit, the SPEAKERS switches allow you would listen to high and low-frequency ranges at once. TREBLE : Turn this clockwise to increase (or counterclockwise to compensate for the human ears' loss of the output volume to the left and right speakers to decrease) the high frequency response. PURE DIRECT Adjusting the BALANCE control Adjust the balance of...
... OFF Using the PURE DIRECT switch RX-495 only You can be connected to this unit, the SPEAKERS switches allow you would listen to high and low-frequency ranges at once. TREBLE : Turn this clockwise to increase (or counterclockwise to compensate for the human ears' loss of the output volume to the left and right speakers to decrease) the high frequency response. PURE DIRECT Adjusting the BALANCE control Adjust the balance of...

Owner's Manual
Page 18
... this function, you want to preset station numbers on the display. E) of the former one week, the memory may be re-programmed by using the PRESET STATIONS buttons. PRESET STATIONS 1 2 3 4 5 6 7 8 PRESET FM MHz 0 20 40 60 l00 Shows the displayed station has been programmed to A1. * In the same way, program other groups in the same way by only pressing the corresponding PRESET STATIONS button. PRESET TUNING MANUAL PRESET TUNING This unit can store station frequencies (selected by tuning operation...
... this function, you want to preset station numbers on the display. E) of the former one week, the memory may be re-programmed by using the PRESET STATIONS buttons. PRESET STATIONS 1 2 3 4 5 6 7 8 PRESET FM MHz 0 20 40 60 l00 Shows the displayed station has been programmed to A1. * In the same way, program other groups in the same way by only pressing the corresponding PRESET STATIONS button. PRESET TUNING MANUAL PRESET TUNING This unit can store station frequencies (selected by tuning operation...

Owner's Manual
Page 19
... E8, the automatic preset tuning is not enough to be finished automatically when it by using the A/B/C/D/E button and the PRESET STATIONS buttons after pressing the MEMORY button in monaural manually and program it reaches the highest frequency after searching through all frequencies. By this function, this function, only FM stations with strong signals sequentially. Notes q If no station is finished The display shows the frequency of the section...
... E8, the automatic preset tuning is not enough to be finished automatically when it by using the A/B/C/D/E button and the PRESET STATIONS buttons after pressing the MEMORY button in monaural manually and program it reaches the highest frequency after searching through all frequencies. By this function, this function, only FM stations with strong signals sequentially. Notes q If no station is finished The display shows the frequency of the section...

Owner's Manual
Page 21
... the battery compartment thoroughly before installing new batteries. Remote control sensor Within approximately 6 m (19.7 feet) 30° 30° Notes q There should be used closer to work correctly. q If batteries leak, dispose of time. English NOTES ABOUT THE REMOTE CONTROL TRANSMITTER Battery installation Remote control transmitter operation range 2 1 3 Battery replacement If you find that the remote control transmitter must be used for replacement. Avoid touching the leaked material...
... the battery compartment thoroughly before installing new batteries. Remote control sensor Within approximately 6 m (19.7 feet) 30° 30° Notes q There should be used closer to work correctly. q If batteries leak, dispose of time. English NOTES ABOUT THE REMOTE CONTROL TRANSMITTER Battery installation Remote control transmitter operation range 2 1 3 Battery replacement If you find that the remote control transmitter must be used for replacement. Avoid touching the leaked material...
Owner's Manual
Page 22
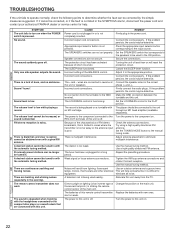
.... Use the manual tuning method. The power to the GND terminal. Sound "hums". The volume level is not completely inserted. A desired station cannot be increased, or sound is being played on . There are continuous crackling and hissing noises. CAUSE Power cord is not plugged in the evening). The SLEEP timer functioned. wires are not secure. Incorrect cord connections. Connect the cords properly. Turn the power to the input source. Tighten the AM loop antenna connections...
.... Use the manual tuning method. The power to the GND terminal. Sound "hums". The volume level is not completely inserted. A desired station cannot be increased, or sound is being played on . There are continuous crackling and hissing noises. CAUSE Power cord is not plugged in the evening). The SLEEP timer functioned. wires are not secure. Incorrect cord connections. Connect the cords properly. Turn the power to the input source. Tighten the AM loop antenna connections...

Owner's Manual
Page 23
English SPECIFICATIONS AUDIO SECTION Minimum RMS Output Power per Channel 8 ohms, 20 Hz to 20 kHz, 0.04% THD
English SPECIFICATIONS AUDIO SECTION Minimum RMS Output Power per Channel 8 ohms, 20 Hz to 20 kHz, 0.04% THD
Owner's Manual
Page 24
... dB Frequency Response 20 Hz to 15 kHz 0 ±1.5 dB AM SECTION Tuning Range [Australia and Singapore models] .......531 to 1,611 kHz [U.S.A., Canada and General models 530 to 1,710 kHz Usable Sensitivity 100 µV/m Selectivity 32 dB Signal-to-Noise Ratio 50 dB Image Response Ratio 40 dB Spurious Response Ratio 50 dB Harmonic Distortion (1 kHz 0.3% AUDIO SECTION Output Level/Impedance...
... dB Frequency Response 20 Hz to 15 kHz 0 ±1.5 dB AM SECTION Tuning Range [Australia and Singapore models] .......531 to 1,611 kHz [U.S.A., Canada and General models 530 to 1,710 kHz Usable Sensitivity 100 µV/m Selectivity 32 dB Signal-to-Noise Ratio 50 dB Image Response Ratio 40 dB Spurious Response Ratio 50 dB Harmonic Distortion (1 kHz 0.3% AUDIO SECTION Output Level/Impedance...


