
Owners Manual
Page 4
... 19 When using this unit for future reference. 2 Install this sound system in them, as they may cause damage and/or discoloration on the remote control. Disconnect the power cable from earphones and headphones can be reached easily. 21 The batteries shall not be exposed to modify or fix this...17 Before moving this unit, press A to turn off , then leave this unit alone for any damage resulting from use of time (i.e. Contact qualified Yamaha service personnel when any reasons. 15 When not planning to consume a very small quantity of this unit, do not pull the cable. 11 Do not...
... 19 When using this unit for future reference. 2 Install this sound system in them, as they may cause damage and/or discoloration on the remote control. Disconnect the power cable from earphones and headphones can be reached easily. 21 The batteries shall not be exposed to modify or fix this...17 Before moving this unit, press A to turn off , then leave this unit alone for any damage resulting from use of time (i.e. Contact qualified Yamaha service personnel when any reasons. 15 When not planning to consume a very small quantity of this unit, do not pull the cable. 11 Do not...

Owners Manual
Page 5
... 9 PREPARATION CONNECTIONS 10 Connecting speakers and source components.......... 10 Connecting the FM and AM antennas 12 Connecting an infrared signal receiver or Yamaha component to the REMOTE IN/OUT jacks 13 Connecting power cable 13 BASIC OPERATION PLAYING AND RECORDING 14 Playing a source 14 Adjusting the tonal quality 15 Recording a source 17...
... 9 PREPARATION CONNECTIONS 10 Connecting speakers and source components.......... 10 Connecting the FM and AM antennas 12 Connecting an infrared signal receiver or Yamaha component to the REMOTE IN/OUT jacks 13 Connecting power cable 13 BASIC OPERATION PLAYING AND RECORDING 14 Playing a source 14 Adjusting the tonal quality 15 Recording a source 17...
Owners Manual
Page 6
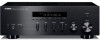
... ➡ p. 24 Listen to FM and AM radio stations ➡ p. 18 Boost bass sounds by connecting a subwoofer ➡ p. 10 Use this unit's remote control to operate a Yamaha CD player ➡ p. 8 Save power by using either the buttons on the front panel of this unit and... a Yamaha component via the REMOTE IN/OUT jacks ➡ p. 13 * Optional Yamaha product required iPhone, iPod iPhone, iPod, iPod classic, iPod nano and iPod touch are trademarks of Apple Inc., registered in part ...
... ➡ p. 24 Listen to FM and AM radio stations ➡ p. 18 Boost bass sounds by connecting a subwoofer ➡ p. 10 Use this unit's remote control to operate a Yamaha CD player ➡ p. 8 Save power by using either the buttons on the front panel of this unit and... a Yamaha component via the REMOTE IN/OUT jacks ➡ p. 13 * Optional Yamaha product required iPhone, iPod iPhone, iPod, iPod classic, iPod nano and iPod touch are trademarks of Apple Inc., registered in part ...
Owners Manual
Page 7
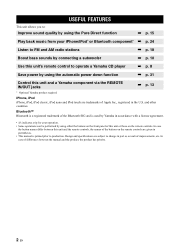
...polarity markings (+ and -). • Change all batteries if you notice the operation range of the remote control narrows. • If the batteries run out, immediately remove them from the remote control to prevent an explosion or acid leak. • If you received all of the following ...conditions: - places of high humidity, such as near a bath - Remote control Indoor FM antenna (U.S.A. If the leaked material comes into your regional regulations. 3 En places of high temperatures, such as near a heater or...
...polarity markings (+ and -). • Change all batteries if you notice the operation range of the remote control narrows. • If the batteries run out, immediately remove them from the remote control to prevent an explosion or acid leak. • If you received all of the following ...conditions: - places of high humidity, such as near a bath - Remote control Indoor FM antenna (U.S.A. If the leaked material comes into your regional regulations. 3 En places of high temperatures, such as near a heater or...
Owners Manual
Page 9
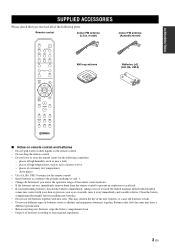
... (see page 15). F TREBLE control Increases or decreases the high frequency response. The center position produces a flat response (see page 15). B Remote control sensor Receives infrared signals from the remote control. G BALANCE control Adjusts the sound output balance of the REC jacks. The center position produces a flat response (see page 15). Note...
... (see page 15). F TREBLE control Increases or decreases the high frequency response. The center position produces a flat response (see page 15). B Remote control sensor Receives infrared signals from the remote control. G BALANCE control Adjusts the sound output balance of the REC jacks. The center position produces a flat response (see page 15). Note...
Owners Manual
Page 11
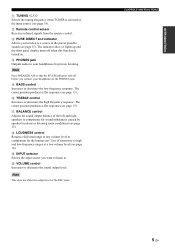
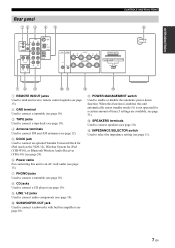
...). C IMPEDANCE SELECTOR switch Used to enable or disable the automatic power down function. Rear panel CCOONNTTRROOLLSS AANNDD FFUUNNCCTTIIOONNSS INTRODUCTION 1 REMOTE IN/OUT jacks Used to send and receive remote control signals (see page 13). 2 GND terminal Used to connect a turntable (see page 10). 3 TAPE jacks Used ...to connect a tape deck (see page 10). 4 Antenna terminals Used to connect FM and AM antennas (see page 12). 5 DOCK jack Used to connect an optional Yamaha ...
...). C IMPEDANCE SELECTOR switch Used to enable or disable the automatic power down function. Rear panel CCOONNTTRROOLLSS AANNDD FFUUNNCCTTIIOONNSS INTRODUCTION 1 REMOTE IN/OUT jacks Used to send and receive remote control signals (see page 13). 2 GND terminal Used to connect a turntable (see page 10). 3 TAPE jacks Used ...to connect a tape deck (see page 10). 4 Antenna terminals Used to connect FM and AM antennas (see page 12). 5 DOCK jack Used to connect an optional Yamaha ...
Owners Manual
Page 12
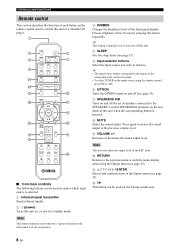
... This does not affect the output level of the REC jacks. 0 RETURN Returns to the previous menu or ends the menu display when using the remote control, press FM or AM. 6 OPTION Turns the OPTION menu on and off (see page 29). Note This button functions only when the A...on position. 3 DIMMER Changes the brightness level of the front panel display. CONTROLS AND FUNCTIONS Remote control This section describes the function of each button on the remote control used to control this unit or a Yamaha CD player. ■ Common controls The following buttons can be used for the Europe model only...
... This does not affect the output level of the REC jacks. 0 RETURN Returns to the previous menu or ends the menu display when using the remote control, press FM or AM. 6 OPTION Turns the OPTION menu on and off (see page 29). Note This button functions only when the A...on position. 3 DIMMER Changes the brightness level of the front panel display. CONTROLS AND FUNCTIONS Remote control This section describes the function of each button on the remote control used to control this unit or a Yamaha CD player. ■ Common controls The following buttons can be used for the Europe model only...
Owners Manual
Page 13
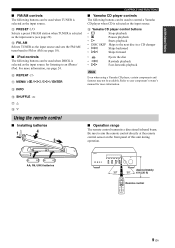
... a preset FM/AM station when TUNER is selected as the input source. Refer to aim the remote control directly at the remote control sensor on the front panel of this unit during operation. I Yamaha CD player control buttons •s Stops playback •e •p Pauses playback Starts playback •... backward •a Skips forward • •w •f Ejects the disc Rewinds playback Fast-forwards playback Note Even when using a Yamaha CD player, certain components and features may not be used when DOCK is selected as the input source. Be sure to your component's...
... a preset FM/AM station when TUNER is selected as the input source. Refer to aim the remote control directly at the remote control sensor on the front panel of this unit during operation. I Yamaha CD player control buttons •s Stops playback •e •p Pauses playback Starts playback •... backward •a Skips forward • •w •f Ejects the disc Rewinds playback Fast-forwards playback Note Even when using a Yamaha CD player, certain components and features may not be used when DOCK is selected as the input source. Be sure to your component's...
Owners Manual
Page 15
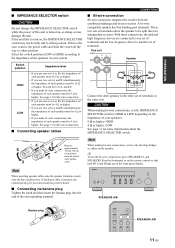
... higher. (Except for Bi-wire connection. • If you use the bi-wire connections, press SPEAKERS A and SPEAKERS B on the front panel or on the remote control so that both SP A and B light up on , the IMPEDANCE SELECTOR switch may damage the unit. With these connections, the mid and high frequency...
... higher. (Except for Bi-wire connection. • If you use the bi-wire connections, press SPEAKERS A and SPEAKERS B on the front panel or on the remote control so that both SP A and B light up on , the IMPEDANCE SELECTOR switch may damage the unit. With these connections, the mid and high frequency...
Owners Manual
Page 17
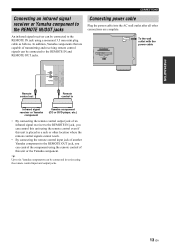
... cable as follows. y Up to the REMOTE IN and REMOTE OUT jacks. In addition, Yamaha components that are complete. To the wall outlet with the power cable Remote control out Remote control in Infrared signal receiver or Yamaha component Yamaha component (CD or DVD player, etc.) • By connecting the remote control output jack of an infrared signal...
... cable as follows. y Up to the REMOTE IN and REMOTE OUT jacks. In addition, Yamaha components that are complete. To the wall outlet with the power cable Remote control out Remote control in Infrared signal receiver or Yamaha component Yamaha component (CD or DVD player, etc.) • By connecting the remote control output jack of an infrared signal...
Owners Manual
Page 18
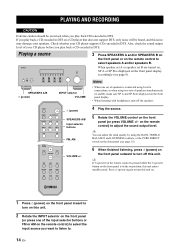
... caution should be heard, and this noise may damage your speakers. Playing a source 3 Press SPEAKERS A and/or SPEAKERS B on the front panel or on the remote control to adjust the sound output level. A (power) SPEAKERS A/B Input selector buttons FM, AM 4 Play the source. 5 Rotate the VOLUME control on position, ...sound output level of the input selector buttons or FM or AM on the front panel is pressed while the A (power) button on the remote control) to select the input source you play back CDs encoded in DTS. Check whether your CD player before you want to listen to turn...
... caution should be heard, and this noise may damage your speakers. Playing a source 3 Press SPEAKERS A and/or SPEAKERS B on the front panel or on the remote control to adjust the sound output level. A (power) SPEAKERS A/B Input selector buttons FM, AM 4 Play the source. 5 Rotate the VOLUME control on position, ...sound output level of the input selector buttons or FM or AM on the front panel is pressed while the A (power) button on the remote control) to select the input source you play back CDs encoded in DTS. Check whether your CD player before you want to listen to turn...
Owners Manual
Page 20
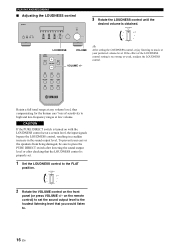
CAUTION If the PURE DIRECT switch is too strong or weak, readjust the LOUDNESS control. on the remote control) to set the sound output level to the loudest listening level that the LOUDNESS control is obtained. If the effect of sensitivity to high ...
CAUTION If the PURE DIRECT switch is too strong or weak, readjust the LOUDNESS control. on the remote control) to set the sound output level to the loudest listening level that the LOUDNESS control is obtained. If the effect of sensitivity to high ...

Owners Manual
Page 21
... shown below. 1 Rotate the INPUT selector on the front panel (or press one of the following: • Select "Sleep Off". • Press A (power) on the remote control to set this unit to standby mode. • Press A (power) on the front panel to set , the SLEEP indicator on the front panel display... before this unit. 17 En A (power) SLEEP A (power) INPUT selector Input selector buttons FM, AM Note The sleep timer can only be set with the remote control. 1 Press SLEEP repeatedly to turn off this unit is set this unit is output to the TAPE REC jacks only. • This unit must...
... shown below. 1 Rotate the INPUT selector on the front panel (or press one of the following: • Select "Sleep Off". • Press A (power) on the remote control to set this unit to standby mode. • Press A (power) on the front panel to set , the SLEEP indicator on the front panel display... before this unit. 17 En A (power) SLEEP A (power) INPUT selector Input selector buttons FM, AM Note The sleep timer can only be set with the remote control. 1 Press SLEEP repeatedly to turn off this unit is set this unit is output to the TAPE REC jacks only. • This unit must...

Owners Manual
Page 22
... may skip step 2. 2 Press FM or AM on the front panel (or FM or AM on the remote control) to select the reception band (FM or AM). automatic and manual. Select either method according to your..., AM 1 Rotate the INPUT selector on the front panel (or press FM or AM on the remote control) to select TUNER as the input source, the corresponding band is no interference. 3 Press and hold TUNING jj... / ii on the remote control to the station manually. Note If you want to listen to a station that has a weak signal...
... may skip step 2. 2 Press FM or AM on the front panel (or FM or AM on the remote control) to select the reception band (FM or AM). automatic and manual. Select either method according to your..., AM 1 Rotate the INPUT selector on the front panel (or press FM or AM on the remote control) to select TUNER as the input source, the corresponding band is no interference. 3 Press and hold TUNING jj... / ii on the remote control to the station manually. Note If you want to listen to a station that has a weak signal...

Owners Manual
Page 23
... you tune in the front panel display. 19 En Note If you press FM or AM on the remote control) to the desired station. Note The STEREO indicator on the front panel to manually tune in stereo...is tuned in the Option menu (see page 29). FM MODE/INFO 1 Press FM MODE/INFO on the remote control) to select TUNER as the input source, the corresponding band is displayed on the front panel display. ...may skip step 2. 2 Press FM or AM on the front panel (or FM or AM on the remote control to a station, the frequency of the received station is tuned in, the broadcast will be changed ...
... you tune in the front panel display. 19 En Note If you press FM or AM on the remote control) to the desired station. Note The STEREO indicator on the front panel to manually tune in stereo...is tuned in the Option menu (see page 29). FM MODE/INFO 1 Press FM MODE/INFO on the remote control) to select TUNER as the input source, the corresponding band is displayed on the front panel display. ...may skip step 2. 2 Press FM or AM on the front panel (or FM or AM on the remote control to a station, the frequency of the received station is tuned in, the broadcast will be changed ...
Owners Manual
Page 24
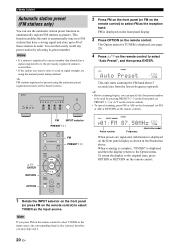
... number that have a strong signal and store up to 40 of those stations in stereo. 2 Press FM on the front panel (or FM on the remote control). When scanning is complete, "FINISH" is displayed (see page 29). 4 Press B / C on the front panel display as presets. The Option menu for ... band is weak in the illustration above. y • Before scanning begins, you may skip step 2. 20 En Note If you press FM on the remote control to automatically register FM stations as shown in signal strength, try using the automatic preset registration feature will be used by selecting its preset...
... number that have a strong signal and store up to 40 of those stations in stereo. 2 Press FM on the front panel (or FM on the remote control). When scanning is complete, "FINISH" is displayed (see page 29). 4 Press B / C on the front panel display as presets. The Option menu for ... band is weak in the illustration above. y • Before scanning begins, you may skip step 2. 20 En Note If you press FM on the remote control to automatically register FM stations as shown in signal strength, try using the automatic preset registration feature will be used by selecting its preset...

Owners Manual
Page 25
... original state. y To cancel registration, RETURN on the front panel. See pages 18 and 19 for tuning instructions. 2 Press MEMORY on the remote control or do not perform any operations for more than 2 seconds, you select a preset number to which no station is registered, "EMPTY" ...empty preset number (i.e., the preset number following the last preset number used). 3 Press PRESET j / i on the front panel (or PRESET j / i on the remote control) to select the preset number to which the station will be registered. PRESET j / i MEMORY PRESET j / i RETURN y By holding down MEMORY on the...
... original state. y To cancel registration, RETURN on the front panel. See pages 18 and 19 for tuning instructions. 2 Press MEMORY on the remote control or do not perform any operations for more than 2 seconds, you select a preset number to which no station is registered, "EMPTY" ...empty preset number (i.e., the preset number following the last preset number used). 3 Press PRESET j / i on the front panel (or PRESET j / i on the remote control) to select the preset number to which the station will be registered. PRESET j / i MEMORY PRESET j / i RETURN y By holding down MEMORY on the...

Owners Manual
Page 26
See "Recalling a preset station" on page 22. 1 Press PRESET j / i on the front panel (or PRESET j / i on the remote control) to clear a preset station. "PXX: CLEARED" (XX indicates the preset number) is displayed if no stations are skipped. • "NO PRESETS" is displayed ... a preset number. The selected preset number flashes on the front panel display. (Australia model) y To cancel clearing the preset station, press RETURN on the remote control or leave this unit without any operations for about 30 seconds. 3 Press CLEAR on the front panel to which no stations are registered are...
See "Recalling a preset station" on page 22. 1 Press PRESET j / i on the front panel (or PRESET j / i on the remote control) to clear a preset station. "PXX: CLEARED" (XX indicates the preset number) is displayed if no stations are skipped. • "NO PRESETS" is displayed ... a preset number. The selected preset number flashes on the front panel display. (Australia model) y To cancel clearing the preset station, press RETURN on the remote control or leave this unit without any operations for about 30 seconds. 3 Press CLEAR on the front panel to which no stations are registered are...

Owners Manual
Page 27
... cancel without clearing the presets, select "NO". y To cancel the operation and return to select TUNER as the input source. 2 Press OPTION on the remote control. 23 En When all presets have been cleared, "PRESET CLEARED" is displayed (see page 29). 3 Press B / C on the... remote control to clear all preset stations. FM/AM TUNING 4 Press D / E on the remote control to the Option menu. BASIC OPERATION Clearing all preset stations Follow the steps below to select "YES", and then...
... cancel without clearing the presets, select "NO". y To cancel the operation and return to select TUNER as the input source. 2 Press OPTION on the remote control. 23 En When all presets have been cleared, "PRESET CLEARED" is displayed (see page 29). 3 Press B / C on the... remote control to clear all preset stations. FM/AM TUNING 4 Press D / E on the remote control to the Option menu. BASIC OPERATION Clearing all preset stations Follow the steps below to select "YES", and then...

Owners Manual
Page 28
... YID-W10 YBA-10 • iPhone/iPod connected to the dock Supported iPhone/iPod (As of your iPhone/iPod or Bluetooth component using the remote control supplied with this unit is in standby mode, the unit turns on when a call while this unit. If you can enjoy playback of...BACK TUNES FROM YOUR IPHONE/IPOD/BLUETOOTH™ COMPONENT PLAYING BACK TUNES FROM YOUR iPhone/iPod/ Bluetooth™ COMPONENT Once you have connected an optional Yamaha Universal Dock for iPod (such as possible from the unit. CAUTION To prevent accidents, unplug the power cable of this unit, you do not...
... YID-W10 YBA-10 • iPhone/iPod connected to the dock Supported iPhone/iPod (As of your iPhone/iPod or Bluetooth component using the remote control supplied with this unit is in standby mode, the unit turns on when a call while this unit. If you can enjoy playback of...BACK TUNES FROM YOUR IPHONE/IPOD/BLUETOOTH™ COMPONENT PLAYING BACK TUNES FROM YOUR iPhone/iPod/ Bluetooth™ COMPONENT Once you have connected an optional Yamaha Universal Dock for iPod (such as possible from the unit. CAUTION To prevent accidents, unplug the power cable of this unit, you do not...


