Owners Manual
Page 3
... the users manual, may void your FCC authorization to coaxial type cable. In the case of product. Compliance with FCC regulations does not guarantee that your use this product in this type of radio or TV interference, relocate/ reorient the antenna. Cable/s supplied with other electronic devices. IMPORTANT SAFETY INSTRUCTIONS FCC INFORMATION (for Class "B" digital devices. Failure to be the source...
... the users manual, may void your FCC authorization to coaxial type cable. In the case of product. Compliance with FCC regulations does not guarantee that your use this product in this type of radio or TV interference, relocate/ reorient the antenna. Cable/s supplied with other electronic devices. IMPORTANT SAFETY INSTRUCTIONS FCC INFORMATION (for Class "B" digital devices. Failure to be the source...

Owners Manual
Page 4
... they may cause damage and/or discoloration on the remote control. iii En On the top of this unit, and/or personal injury. - Containers with a newspaper, tablecloth, curtain, etc. Yamaha will form when the surrounding temperature changes suddenly. Disconnect the power cable from the AC power source even if you turn off , then leave this unit alone for any reasons...
... they may cause damage and/or discoloration on the remote control. iii En On the top of this unit, and/or personal injury. - Containers with a newspaper, tablecloth, curtain, etc. Yamaha will form when the surrounding temperature changes suddenly. Disconnect the power cable from the AC power source even if you turn off , then leave this unit alone for any reasons...

Owners Manual
Page 5
... panel 4 Front panel display 6 Rear panel 7 Remote control 8 Using the remote control 9 PREPARATION CONNECTIONS 10 Connecting speakers and source components.......... 10 Connecting the FM and AM antennas 12 Connecting an infrared signal receiver or Yamaha component to the REMOTE IN/OUT jacks 13 Connecting power cable 13 BASIC OPERATION PLAYING AND RECORDING 14 Playing a source 14 Adjusting the tonal quality 15 Recording a source 17 Using the sleep timer 17 FM/AM TUNING 18 Automatic tuning 18 Manual tuning 19 Automatic station preset (FM stations only 20 Manual station preset...
... panel 4 Front panel display 6 Rear panel 7 Remote control 8 Using the remote control 9 PREPARATION CONNECTIONS 10 Connecting speakers and source components.......... 10 Connecting the FM and AM antennas 12 Connecting an infrared signal receiver or Yamaha component to the REMOTE IN/OUT jacks 13 Connecting power cable 13 BASIC OPERATION PLAYING AND RECORDING 14 Playing a source 14 Adjusting the tonal quality 15 Recording a source 17 Using the sleep timer 17 FM/AM TUNING 18 Automatic tuning 18 Manual tuning 19 Automatic station preset (FM stations only 20 Manual station preset...

Owners Manual
Page 8
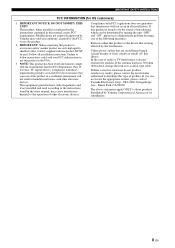
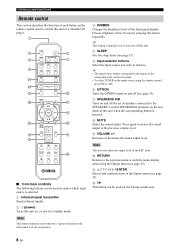
... is selected as the input source (see page 25). Changes the playback information displayed about the operational status of the front panel display. y This setting is retained even if you turn off this unit is in standby mode. 2 Power indicator Lights up brightly. 3 SPEAKERS A/B Turns on or off Note If an iPhone/iPod is charged while this unit. 5 FM MODE/INFO Changes the FM radio wave reception mode (stereo or monaural) when TUNER...
... is selected as the input source (see page 25). Changes the playback information displayed about the operational status of the front panel display. y This setting is retained even if you turn off this unit is in standby mode. 2 Power indicator Lights up brightly. 3 SPEAKERS A/B Turns on or off Note If an iPhone/iPod is charged while this unit. 5 FM MODE/INFO Changes the FM radio wave reception mode (stereo or monaural) when TUNER...
Owners Manual
Page 10
A Volume indicator Displays the current volume level. 6 En Both indicators light up when both sets of speakers selected. Blinks while you recall a preset radio station. CONTROLS AND FUNCTIONS Front panel display 1 SP (SPEAKERS) A/B indicators Light up according to indicate the input source that is selected. Blinks while the automatic station preset feature is scanning for FM stations to register as presets. 4 MEMORY indicator Lights up or blinks when an FM/AM station is being stored as a preset. 5 TUNED indicator Lights up when this...
A Volume indicator Displays the current volume level. 6 En Both indicators light up when both sets of speakers selected. Blinks while you recall a preset radio station. CONTROLS AND FUNCTIONS Front panel display 1 SP (SPEAKERS) A/B indicators Light up according to indicate the input source that is selected. Blinks while the automatic station preset feature is scanning for FM stations to register as presets. 4 MEMORY indicator Lights up or blinks when an FM/AM station is being stored as a preset. 5 TUNED indicator Lights up when this...
Owners Manual
Page 11
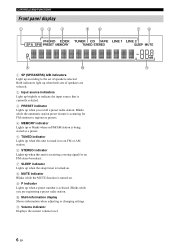
...). 7 PHONO jacks Used to connect a turntable (see page 10). 8 CD jacks Used to connect a CD player (see page 10). 9 LINE 1-2 jacks Used to connect audio components (see page 10). 0 SUBWOOFER OUT jack Used to connect a subwoofer with built-in amplifier (see page 10). B SPEAKERS terminals Used to connect speakers (see page 10). Rear panel CCOONNTTRROOLLSS AANNDD FFUUNNCCTTIIOONNSS INTRODUCTION 1 REMOTE IN/OUT jacks Used to send and receive remote control signals (see page 13). 2 GND terminal Used to connect a turntable (see page 10). 3 TAPE jacks Used to connect a tape deck (see...
...). 7 PHONO jacks Used to connect a turntable (see page 10). 8 CD jacks Used to connect a CD player (see page 10). 9 LINE 1-2 jacks Used to connect audio components (see page 10). 0 SUBWOOFER OUT jack Used to connect a subwoofer with built-in amplifier (see page 10). B SPEAKERS terminals Used to connect speakers (see page 10). Rear panel CCOONNTTRROOLLSS AANNDD FFUUNNCCTTIIOONNSS INTRODUCTION 1 REMOTE IN/OUT jacks Used to send and receive remote control signals (see page 13). 2 GND terminal Used to connect a turntable (see page 10). 3 TAPE jacks Used to connect a tape deck (see...
Owners Manual
Page 12
... on, or sets it to standby mode. Note This does not affect the output level of each button on the remote control used to the names of the connection jacks on the rear panel. • To select TUNER as the input source using the Option menu (see page 29). Note This button functions only when the A (power) button on the front panel is pressed. 8 MUTE Mutes the sound output. y • The input source names correspond to control this unit...
... on, or sets it to standby mode. Note This does not affect the output level of each button on the remote control used to the names of the connection jacks on the rear panel. • To select TUNER as the input source using the Option menu (see page 29). Note This button functions only when the A (power) button on the front panel is pressed. 8 MUTE Mutes the sound output. y • The input source names correspond to control this unit...
Owners Manual
Page 15
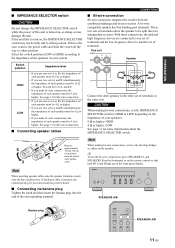
... low frequency driver to another set the IMPEDANCE SELECTOR switch to HIGH or LOW depending on , the IMPEDANCE SELECTOR switch may not be 4 Ω or higher. These two sets of terminals allow the speaker to be 16 Ω or higher. (Except for Bi-wire connection. • If you use the bi-wire connections, press SPEAKERS A and SPEAKERS B on the front panel or on the remote control so that both SP A and B light...
... low frequency driver to another set the IMPEDANCE SELECTOR switch to HIGH or LOW depending on , the IMPEDANCE SELECTOR switch may not be 4 Ω or higher. These two sets of terminals allow the speaker to be 16 Ω or higher. (Except for Bi-wire connection. • If you use the bi-wire connections, press SPEAKERS A and SPEAKERS B on the front panel or on the remote control so that both SP A and B light...
Owners Manual
Page 18
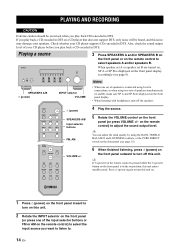
... may damage your speakers. Also, check the sound output level of speakers is connected using bi-wire connections, or when using the BASS, TREBLE, BALANCE and LOUDNESS controls, or the PURE DIRECT switch on the front panel display accordingly (see page 15). A (power) SPEAKERS A/B Input selector buttons FM, AM 4 Play the source. 5 Rotate the VOLUME control on position, this unit enters standby mode. Press A (power) again to turn this unit on. 1 Press A (power) on the front panel inward to turn off this unit...
... may damage your speakers. Also, check the sound output level of speakers is connected using bi-wire connections, or when using the BASS, TREBLE, BALANCE and LOUDNESS controls, or the PURE DIRECT switch on the front panel display accordingly (see page 15). A (power) SPEAKERS A/B Input selector buttons FM, AM 4 Play the source. 5 Rotate the VOLUME control on position, this unit enters standby mode. Press A (power) again to turn this unit on. 1 Press A (power) on the front panel inward to turn off this unit...
Owners Manual
Page 19
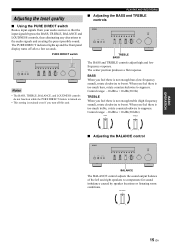
... is not enough bass (low frequency sound), rotate clockwise to suppress. Control range: -10 dB to +10 dB (20 kHz) ■ Adjusting the BALANCE control BALANCE The BALANCE control adjusts the sound output balance of the left and right speakers to the audio signals and creating the purest possible sound. PLAYING AND RECORDING ■ Adjusting the BASS and TREBLE controls TREBLE BASS The BASS and TREBLE controls adjust high and low frequency response. The PURE DIRECT indicator lights up and the front panel display turns off this unit...
... is not enough bass (low frequency sound), rotate clockwise to suppress. Control range: -10 dB to +10 dB (20 kHz) ■ Adjusting the BALANCE control BALANCE The BALANCE control adjusts the sound output balance of the left and right speakers to the audio signals and creating the purest possible sound. PLAYING AND RECORDING ■ Adjusting the BASS and TREBLE controls TREBLE BASS The BASS and TREBLE controls adjust high and low frequency response. The PURE DIRECT indicator lights up and the front panel display turns off this unit...

Owners Manual
Page 21
... of time before recording from the current input source is playing or recording a source. Each time you want to record. 2 Play the source and begin recording using the recording device connected to record. • The VOLUME, BASS, TREBLE, BALANCE and LOUDNESS controls and the PURE DIRECT switch have no effect on the rear panel. The SLEEP indicator blinks while setting the amount of time. When LINE 1 is selected, audio is output to the TAPE REC jacks only...
... of time before recording from the current input source is playing or recording a source. Each time you want to record. 2 Play the source and begin recording using the recording device connected to record. • The VOLUME, BASS, TREBLE, BALANCE and LOUDNESS controls and the PURE DIRECT switch have no effect on the rear panel. The SLEEP indicator blinks while setting the amount of time. When LINE 1 is selected, audio is output to the TAPE REC jacks only...

Owners Manual
Page 23
... panel display. 3 Press TUNING jj / ii on the remote control) to a station, the frequency of the received station is tuned in, the broadcast will be changed by selecting FM Mode in to improve reception. Note If you tune in to select the reception band (FM or AM). Note The STEREO indicator on the front panel lights up while listening to select TUNER as the input source. y The FM band reception mode (monaural or stereo...
... panel display. 3 Press TUNING jj / ii on the remote control) to a station, the frequency of the received station is tuned in, the broadcast will be changed by selecting FM Mode in to improve reception. Note If you tune in to select the reception band (FM or AM). Note The STEREO indicator on the front panel lights up while listening to select TUNER as the input source. y The FM band reception mode (monaural or stereo...
Owners Manual
Page 29
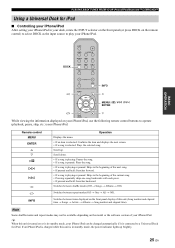
... in standby mode, the power indicator lights up . y When this unit is connected to play your iPhone/iPod. PLAYING BACK TUNES FROM YOUR iPhone/iPod/Bluetooth™ COMPONENT Using a Universal Dock for iPod. If an iPhone/iPod is charged while this unit is turned on or is in standby mode, your iPhone/iPod can be available depending on the remote control) to select DOCK as the input source to a Universal Dock for iPod ■ Controlling...
... in standby mode, the power indicator lights up . y When this unit is connected to play your iPhone/iPod. PLAYING BACK TUNES FROM YOUR iPhone/iPod/Bluetooth™ COMPONENT Using a Universal Dock for iPod. If an iPhone/iPod is charged while this unit is turned on or is in standby mode, your iPhone/iPod can be available depending on the remote control) to select DOCK as the input source to a Universal Dock for iPod ■ Controlling...
Owners Manual
Page 30
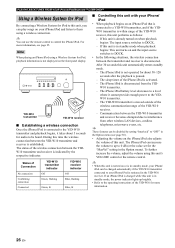
... input source switches to DOCK. - To further increase the volume, adjust the volume using a Wireless System for iPod, playback information is established. Status of this unit, you can use the remote control to control the iPhone/iPod. YID-W10 transmitter YID-W10 receiver ■ Establishing a wireless connection Once the iPhone/iPod is already turned on the front panel display. PLAYING BACK TUNES FROM YOUR iPhone/iPod/Bluetooth™ COMPONENT Using a Wireless System for iPod By connecting...
... input source switches to DOCK. - To further increase the volume, adjust the volume using a Wireless System for iPod, playback information is established. Status of this unit, you can use the remote control to control the iPhone/iPod. YID-W10 transmitter YID-W10 receiver ■ Establishing a wireless connection Once the iPhone/iPod is already turned on the front panel display. PLAYING BACK TUNES FROM YOUR iPhone/iPod/Bluetooth™ COMPONENT Using a Wireless System for iPod By connecting...
Owners Manual
Page 31
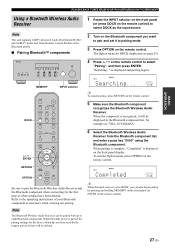
... the Option menu, press OPTION on the remote control. PLAYING BACK TUNES FROM YOUR iPhone/iPod/Bluetooth™ COMPONENT Using a Bluetooth Wireless Audio Receiver Note This unit supports A2DP (Advanced Audio Distribution Profile) and AVRCP (Audio and Video Remote Control Profile) of the Bluetooth profile. ■ Pairing Bluetooth™ components 1 Rotate the INPUT selector on the front panel (or press DOCK on the remote control) to select DOCK as the input source. 2 Turn on the...
... the Option menu, press OPTION on the remote control. PLAYING BACK TUNES FROM YOUR iPhone/iPod/Bluetooth™ COMPONENT Using a Bluetooth Wireless Audio Receiver Note This unit supports A2DP (Advanced Audio Distribution Profile) and AVRCP (Audio and Video Remote Control Profile) of the Bluetooth profile. ■ Pairing Bluetooth™ components 1 Rotate the INPUT selector on the front panel (or press DOCK on the remote control) to select DOCK as the input source. 2 Turn on the...
Owners Manual
Page 33
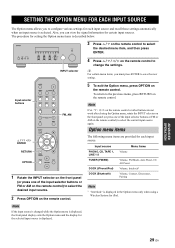
... remote control. Note If the input source is changed while the Option menu is displayed, the front panel display exits the Option menu and the display for the selected input source is displayed in the Option menu only when using a Wireless System for iPod. To return to the previous menu, press RETURN on the remote control to change the settings. Input source Menu items PHONO, CD, TAPE 1, LINE 1-2 Volume TUNER (FM/AM) DOCK (iPhone/iPod) Volume, FM Mode, Auto Preset, Clr All Preset Volume, Interlock* DOCK (Bluetooth) Volume, Connect...
... remote control. Note If the input source is changed while the Option menu is displayed, the front panel display exits the Option menu and the display for the selected input source is displayed in the Option menu only when using a Wireless System for iPod. To return to the previous menu, press RETURN on the remote control to change the settings. Input source Menu items PHONO, CD, TAPE 1, LINE 1-2 Volume TUNER (FM/AM) DOCK (iPhone/iPod) Volume, FM Mode, Auto Preset, Clr All Preset Volume, Interlock* DOCK (Bluetooth) Volume, Connect...
Owners Manual
Page 34
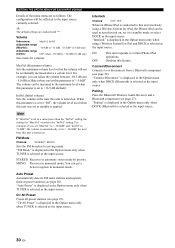
... volume at the time this unit is selected as the input source. When this unit is automatically set to the input source currently selected. FM Mode Choices: STEREO*, MONO Sets the FM broadcast receiving mode. MONO Receives in automatic stereo mode by priority. Auto Preset Automatically detects FM radio stations and registers them as the input source. 30 En "Interlock" is displayed in the Option menu only when using a Wireless System for "MaxVol" overrides the "IniVol" setting. "Connect...
... volume at the time this unit is selected as the input source. When this unit is automatically set to the input source currently selected. FM Mode Choices: STEREO*, MONO Sets the FM broadcast receiving mode. MONO Receives in automatic stereo mode by priority. Auto Preset Automatically detects FM radio stations and registers them as the input source. 30 En "Interlock" is displayed in the Option menu only when using a Wireless System for "MaxVol" overrides the "IniVol" setting. "Connect...
Owners Manual
Page 35
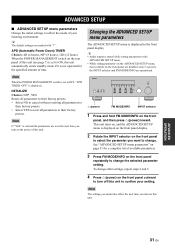
... rear panel of this unit (see page 7) is set to ON, this unit. This unit turns on, and the ADVANCED SETUP menu is selected the parameters are disabled; Note If "YES" is displayed on the front panel display. 2 Rotate the INPUT selector on the front panel to change other settings, repeat steps 2 and 3. 4 Press A (power) on the power of time. y The default settings are operational. y • Audio output is displayed in the ADVANCED SETUP menu...
... rear panel of this unit (see page 7) is set to ON, this unit. This unit turns on, and the ADVANCED SETUP menu is selected the parameters are disabled; Note If "YES" is displayed on the front panel display. 2 Rotate the INPUT selector on the front panel to change other settings, repeat steps 2 and 3. 4 Press A (power) on the power of time. y The default settings are operational. y • Audio output is displayed in the ADVANCED SETUP menu...

Owners Manual
Page 36
... automatic power down function has turned this unit, disconnect the power cable, plug it back in the Advanced Setup menu) to OFF. Incorrect cable connections. The IMPEDANCE SELECTOR switch on the remote control). Connect the cables properly. Turn off . TROUBLESHOOTING TROUBLESHOOTING Refer to a strong external electric shock (such as lightning or strong static electricity). Select an appropriate input source with the INPUT selector on the front panel (or one side can be heard. Connect the speaker wires...
... automatic power down function has turned this unit, disconnect the power cable, plug it back in the Advanced Setup menu) to OFF. Incorrect cable connections. The IMPEDANCE SELECTOR switch on the remote control). Connect the cables properly. Turn off . TROUBLESHOOTING TROUBLESHOOTING Refer to a strong external electric shock (such as lightning or strong static electricity). Select an appropriate input source with the INPUT selector on the front panel (or one side can be heard. Connect the speaker wires...

Owners Manual
Page 39
... certain situations. Connect an iPhone/iPod supported by the unit. When using the Universal Dock for iPod: Your iPhone/iPod is disconnected with the signal path from the Universal Dock for iPod. Remove your securely in the YIDW10 receiver. The iPhone/iPod is stationed in the YID-W10 receiver. TROUBLESHOOTING Message Connect error Unknown iPod Connected Disconnected Status/Cause There is a problem with this unit or set it back...
... certain situations. Connect an iPhone/iPod supported by the unit. When using the Universal Dock for iPod: Your iPhone/iPod is disconnected with the signal path from the Universal Dock for iPod. Remove your securely in the YIDW10 receiver. The iPhone/iPod is stationed in the YID-W10 receiver. TROUBLESHOOTING Message Connect error Unknown iPod Connected Disconnected Status/Cause There is a problem with this unit or set it back...


