

Firmware Update Guide
Page 1
...other countries. ・ The company names and product names in their respective companies. This guide explains how to update the QL series (QL5 and QL1) firmware and its built-in Dante module firmware. ■ Precautions (Please be sure to read this section first!) ・ The ...the update fails, and the device still does not operate correctly even after you execute the update once again, please contact your Yamaha dealer. ・ Yamaha Corporation owns exclusive copyrights for the QL series firmware, its update program, and the update guide. ・ Audinate owns exclusive copyrights...
...other countries. ・ The company names and product names in their respective companies. This guide explains how to update the QL series (QL5 and QL1) firmware and its built-in Dante module firmware. ■ Precautions (Please be sure to read this section first!) ・ The ...the update fails, and the device still does not operate correctly even after you execute the update once again, please contact your Yamaha dealer. ・ Yamaha Corporation owns exclusive copyrights for the QL series firmware, its update program, and the update guide. ・ Audinate owns exclusive copyrights...

Firmware Update Guide
Page 2
... its OS. ● The QL series firmware Download the latest firmware from the following URL. http://www.yamahaproaudio.com/downloads/ QL5/QL1 Firmware Update Guide 2 For formatting in a computer, refer to "QL5/ QL1 Reference Manual." MAIN DANTE Main firmware version on the QL series unit 3 versions of the firmware in the Dante module ■...
... its OS. ● The QL series firmware Download the latest firmware from the following URL. http://www.yamahaproaudio.com/downloads/ QL5/QL1 Firmware Update Guide 2 For formatting in a computer, refer to "QL5/ QL1 Reference Manual." MAIN DANTE Main firmware version on the QL series unit 3 versions of the firmware in the Dante module ■...
Firmware Update Guide
Page 3
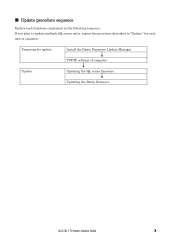
If you plan to update multiple QL series units, repeat the procedure described in "Update" for update Install the Dante Firmware Update Manager TCP/IP settings of computer Update Updating the QL series firmware Updating the Dante firmware QL5/QL1 Firmware Update Guide 3 ■ Update procedure sequence Update each unit in the following sequence. Preparing for each firmware component in sequence.
If you plan to update multiple QL series units, repeat the procedure described in "Update" for update Install the Dante Firmware Update Manager TCP/IP settings of computer Update Updating the QL series firmware Updating the Dante firmware QL5/QL1 Firmware Update Guide 3 ■ Update procedure sequence Update each unit in the following sequence. Preparing for each firmware component in sequence.
Firmware Update Guide
Page 4
...; When installing the Dante Firmware Update Manager, temporarily disable any multi-byte character (including Japanese characters). If you must install the Dante Firmware Update Manager. QL5/QL1 Firmware Update Guide 4 C:\temp). ・ The "Windows Security" dialog box may be prompted to install Bonjour. x.x.x represents the version number of the Dante Firmware Update...
...; When installing the Dante Firmware Update Manager, temporarily disable any multi-byte character (including Japanese characters). If you must install the Dante Firmware Update Manager. QL5/QL1 Firmware Update Guide 4 C:\temp). ・ The "Windows Security" dialog box may be prompted to install Bonjour. x.x.x represents the version number of the Dante Firmware Update...
Firmware Update Guide
Page 5
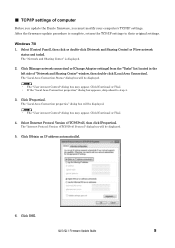
... [View network status and tasks]. Click [Continue] or [Yes]. ・ If the "Local Area Connection properties" dialog box appears, skip ahead to their original settings. QL5/QL1 Firmware Update Guide 5 The "Network and Sharing Center" is complete, return the TCP/IP settings to step 4. 3. Windows 7/8 1. Click [Manage network connection] or [Change Adapter...
... [View network status and tasks]. Click [Continue] or [Yes]. ・ If the "Local Area Connection properties" dialog box appears, skip ahead to their original settings. QL5/QL1 Firmware Update Guide 5 The "Network and Sharing Center" is complete, return the TCP/IP settings to step 4. 3. Windows 7/8 1. Click [Manage network connection] or [Change Adapter...
Firmware Update Guide
Page 6
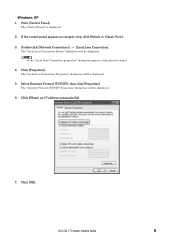
... appears, skip ahead to Classic View]. 3. Click [OK]. If the control panel appears as category view, click [Switch to step 5. 4. The "Control Panel" is displayed. 2. QL5/QL1 Firmware Update Guide 6 Select [Internet Protocol (TCP/IP)], then click [Properties]. The "Local Area Connection Status" dialog box will be displayed. 6. Click [Control Panel]. Click...
... appears, skip ahead to Classic View]. 3. Click [OK]. If the control panel appears as category view, click [Switch to step 5. 4. The "Control Panel" is displayed. 2. QL5/QL1 Firmware Update Guide 6 Select [Internet Protocol (TCP/IP)], then click [Properties]. The "Local Area Connection Status" dialog box will be displayed. 6. Click [Control Panel]. Click...
Firmware Update Guide
Page 7
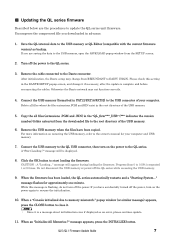
...'s manual for approximately one minute. Progress from 0 to the QL series. 3. When a "Console initialized due to the USB connector of your computer and USB memory. 7. QL5/QL1 Firmware Update Guide 7 Connect the USB memory (formatted in FAT12/FAT16/FAT32) to memory mismatch." CAUTION:A "Loading..." When the firmware has been loaded, the...
...'s manual for approximately one minute. Progress from 0 to the QL series. 3. When a "Console initialized due to the USB connector of your computer and USB memory. 7. QL5/QL1 Firmware Update Guide 7 Connect the USB memory (formatted in FAT12/FAT16/FAT32) to memory mismatch." CAUTION:A "Loading..." When the firmware has been loaded, the...

Firmware Update Guide
Page 8
12. When an "Are you sure ?" Initializing the internal memory will be started. 13. If necessary, confirm the firmware was correctly updated in the version field in the function access area. 15. QL5/QL1 Firmware Update Guide 8 Remove the USB memory after confirming the ACCESS indicator has disappeared in the SETUP screen. When the initialization is complete, press the EXIT button. 14. message appears, press the OK button.
12. When an "Are you sure ?" Initializing the internal memory will be started. 13. If necessary, confirm the firmware was correctly updated in the version field in the function access area. 15. QL5/QL1 Firmware Update Guide 8 Remove the USB memory after confirming the ACCESS indicator has disappeared in the SETUP screen. When the initialization is complete, press the EXIT button. 14. message appears, press the OK button.
Firmware Update Guide
Page 9
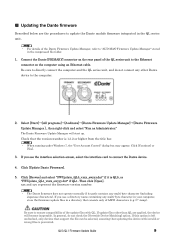
Click [Update Dante Firmware]. 5. QL5/QL1 Firmware Update Guide 9 Be sure to directly connect the computer and the QL series unit, and do not check the [Override Device Matching] option. The ... "FWUpdate_QL5_vxxx_swyyy.dnt" if it is prevented. If update files other Dante device to ensure compatibility of the update files with invalid or wrong files is QL5, or "FWUpdate_QL1_vxxx_swyyy.dnt" if QL1.
Click [Update Dante Firmware]. 5. QL5/QL1 Firmware Update Guide 9 Be sure to directly connect the computer and the QL series unit, and do not check the [Override Device Matching] option. The ... "FWUpdate_QL5_vxxx_swyyy.dnt" if it is prevented. If update files other Dante device to ensure compatibility of the update files with invalid or wrong files is QL5, or "FWUpdate_QL1_vxxx_swyyy.dnt" if QL1.

Firmware Update Guide
Page 10
...]. If update fails due to disconnection of Dante Firmware Update Manager to exit the program without turning the QL power off the power to update. QL5/QL1 Firmware Update Guide 10 Click [Next]. ・ Dante Firmware Update Manager may become inoperative. ・ If update is still not indicated after 5 minutes, or update...
...]. If update fails due to disconnection of Dante Firmware Update Manager to exit the program without turning the QL power off the power to update. QL5/QL1 Firmware Update Guide 10 Click [Next]. ・ Dante Firmware Update Manager may become inoperative. ・ If update is still not indicated after 5 minutes, or update...
Firmware Update Guide
Page 11
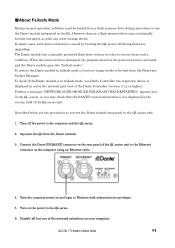
... is activated and the Dante module goes into "failsafe mode." Further, a message "NETWORK AUDIO MODULE FAILED AND WAS RESTARTED." Separate the QL from such a condition. QL5/QL1 Firmware Update Guide 11 However, data in the version field of the Dante Controller (version 3.1.x or higher). appears also in the QL screen, so you...
... is activated and the Dante module goes into "failsafe mode." Further, a message "NETWORK AUDIO MODULE FAILED AND WAS RESTARTED." Separate the QL from such a condition. QL5/QL1 Firmware Update Guide 11 However, data in the version field of the Dante Controller (version 3.1.x or higher). appears also in the QL screen, so you...
Firmware Update Guide
Page 12
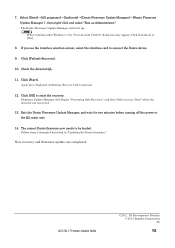
... Safe Recovery", and then "Safe recovery Done" when the device(s) are completed. Follow steps 2 through 9 described in "Updating the Dante firmware." QL5/QL1 Firmware Update Guide C.S.G., PA Development Division © 2014 Yamaha Corporation A0 12 Select [Start]→[All programs]→[Audinate]→[Dante Firmware Update Manager]→[Dante Firmware Update Manager ] , then...
... Safe Recovery", and then "Safe recovery Done" when the device(s) are completed. Follow steps 2 through 9 described in "Updating the Dante firmware." QL5/QL1 Firmware Update Guide C.S.G., PA Development Division © 2014 Yamaha Corporation A0 12 Select [Start]→[All programs]→[Audinate]→[Dante Firmware Update Manager]→[Dante Firmware Update Manager ] , then...

Owner's Manual
Page 4
...harmful interference, and 2) this type of radio or TV interference, relocate/reorient the antenna. Modifications not expressly approved by YAMAHA CORPORATION OF AMERICA. (class B) ADVARSEL! This equipment generates/uses radio frequencies and, if not installed and used according... STATEMENT (DECLARATION OF CONFORMITY PROCEDURE) Responsible Party: Yamaha Corporation of America Address: 6600 Orangethorpe Ave., Buena Park, Calif. 90620 Telephone: 714-522-9011 Type of Equipment: Digital Mixing Console Model Name: QL5/QL1 This device complies with these requirements provides a reasonable...
...harmful interference, and 2) this type of radio or TV interference, relocate/reorient the antenna. Modifications not expressly approved by YAMAHA CORPORATION OF AMERICA. (class B) ADVARSEL! This equipment generates/uses radio frequencies and, if not installed and used according... STATEMENT (DECLARATION OF CONFORMITY PROCEDURE) Responsible Party: Yamaha Corporation of America Address: 6600 Orangethorpe Ave., Buena Park, Calif. 90620 Telephone: 714-522-9011 Type of Equipment: Digital Mixing Console Model Name: QL5/QL1 This device complies with these requirements provides a reasonable...
Owner's Manual
Page 8
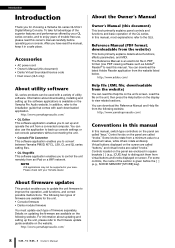
... Adobe® Reader® to read this manual, most explanations refer to the firmware update guide available on the panel are available for choosing a Yamaha QL series QL5/QL1 Digital Mixing Console. http://www.yamahaproaudio.com/ Conventions in square brackets [ ] (e.g., [CUE] key) to distinguish them from the website) This book primarily explains details...
... Adobe® Reader® to read this manual, most explanations refer to the firmware update guide available on the panel are available for choosing a Yamaha QL series QL5/QL1 Digital Mixing Console. http://www.yamahaproaudio.com/ Conventions in square brackets [ ] (e.g., [CUE] key) to distinguish them from the website) This book primarily explains details...
Owner's Manual
Page 10
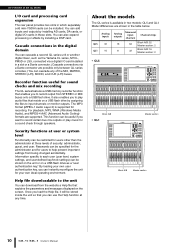
...It also enables you to play music for a sound check through speakers. The MP3 format (MPEG-1 Audio Layer-3) is available in two models: QL5 and QL1. Information specific to each user (user level, system settings, and user-defined key/knob settings) can be specified for the administrator and for sound ... recording. Once you can be stored inside the unit so that explains the parameters and messages displayed on a USB flash drive as the Yamaha CL series, M7CL, PM5D or LS9, connected via a Dante connector are possible only between QL series consoles.) You can cascade any time.
...It also enables you to play music for a sound check through speakers. The MP3 format (MPEG-1 Audio Layer-3) is available in two models: QL5 and QL1. Information specific to each user (user level, system settings, and user-defined key/knob settings) can be specified for the administrator and for sound ... recording. Once you can be stored inside the unit so that explains the parameters and messages displayed on a USB flash drive as the Yamaha CL series, M7CL, PM5D or LS9, connected via a Dante connector are possible only between QL series consoles.) You can cascade any time.
Owner's Manual
Page 16
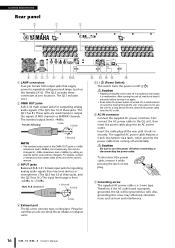
...disconnect the power cable, remove it to malfunction. Therefore, if the AC outlet used mainly to separately-sold gooseneck lamps (such as the Yamaha LA1L). (The QL5 includes these jacks. Female XLR plug 2 (Hot) 3 (Cold) 1 (Ground) NOTE • The nominal output level of these jacks, and the... on and off in securely. Caution Be sure to -2dBu (maximum level +18dBu) by setting an internal switch (a fee will be charged). The QL1 has 8.) These jacks are used is +4dBu (maximum level +24dBu), but if necessary, this screw may effectively eliminate noise such as well. Insert ...
...disconnect the power cable, remove it to malfunction. Therefore, if the AC outlet used mainly to separately-sold gooseneck lamps (such as the Yamaha LA1L). (The QL5 includes these jacks. Female XLR plug 2 (Hot) 3 (Cold) 1 (Ground) NOTE • The nominal output level of these jacks, and the... on and off in securely. Caution Be sure to -2dBu (maximum level +18dBu) by setting an internal switch (a fee will be charged). The QL1 has 8.) These jacks are used is +4dBu (maximum level +24dBu), but if necessary, this screw may effectively eliminate noise such as well. Insert ...
Owner's Manual
Page 30
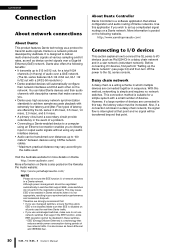
...audio signals at that point. 30 Owner's Manual However, if a large number of audio over a GbE network. (The QL series features QL5: 64 in/64 out, QL1: 32 in sequence. http://www.audinate.com/ More information on a Dante network. Before connecting I /O devices (such as Green Ethernet and ...be transferred beyond that point and no network switches. Make sure that EEE is designed to be increased. It is disabled on the Yamaha Pro Audio website: http://www.yamahaproaudio.com/ NOTE Please do not perform the negotiation properly. Daisy chain network A daisy chain is ...
...audio signals at that point. 30 Owner's Manual However, if a large number of audio over a GbE network. (The QL series features QL5: 64 in/64 out, QL1: 32 in sequence. http://www.audinate.com/ More information on a Dante network. Before connecting I /O devices (such as Green Ethernet and ...be transferred beyond that point and no network switches. Make sure that EEE is designed to be increased. It is disabled on the Yamaha Pro Audio website: http://www.yamahaproaudio.com/ NOTE Please do not perform the negotiation properly. Daisy chain network A daisy chain is ...
Owner's Manual
Page 37
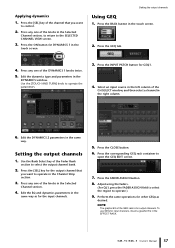
... any one of the GEQ rack is for other GEQs as for the output channel that you want to operate.) 9. Adjust using the faders. (For QL1, press the FADER ASSIGN field to select the region to control. 2. Edit the dynamics type and parameters in the same way. Setting the output channels...
... any one of the GEQ rack is for other GEQs as for the output channel that you want to operate.) 9. Adjust using the faders. (For QL1, press the FADER ASSIGN field to select the region to control. 2. Edit the dynamics type and parameters in the same way. Setting the output channels...
Owner's Manual
Page 50
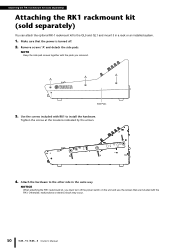
.... Attaching the RK1 rackmount kit (sold separately) Attaching the RK1 rackmount kit (sold separately) You can attach the optional RK-1 rackmount kit to the QL5 and QL1 and mount it in the same way. Make sure that are included with the RK1. Tighten the screws at the locations indicated by the arrows. 4.
.... Attaching the RK1 rackmount kit (sold separately) Attaching the RK1 rackmount kit (sold separately) You can attach the optional RK-1 rackmount kit to the QL5 and QL1 and mount it in the same way. Make sure that are included with the RK1. Tighten the screws at the locations indicated by the arrows. 4.
Owner's Manual
Page 51
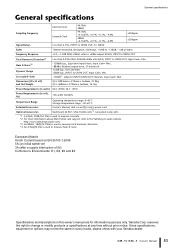
...typ., INPUT to Environments: E1, E2, E3 and E4 Specifications and descriptions in this owner's manual are for information purposes only. Yamaha Corp. Since specifications, equipment or options may not be the same in volts, Hz) Temperature Range 100-240V 50/60Hz Operating ... Lamp LA1L *1. Dimensions (W x H x D) and Net Weight QL5: 828.4mm x 272mm x 563mm, 21.8kg QL1: 468mm x 272mm x 562mm, 14.7kg Power Requirements (in watts) QL5: 200W, QL1: 135W Power Requirements (in every locale, please check with your Yamaha dealer. An 80kHz, 18dB/Oct filter is used to measure crosstalk....
...typ., INPUT to Environments: E1, E2, E3 and E4 Specifications and descriptions in this owner's manual are for information purposes only. Yamaha Corp. Since specifications, equipment or options may not be the same in volts, Hz) Temperature Range 100-240V 50/60Hz Operating ... Lamp LA1L *1. Dimensions (W x H x D) and Net Weight QL5: 828.4mm x 272mm x 563mm, 21.8kg QL1: 468mm x 272mm x 562mm, 14.7kg Power Requirements (in watts) QL5: 200W, QL1: 135W Power Requirements (in every locale, please check with your Yamaha dealer. An 80kHz, 18dB/Oct filter is used to measure crosstalk....

