Internet Connection Guide (version 1.10)
Page 10
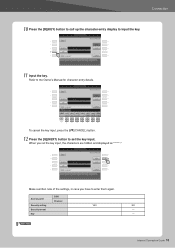
Make a written note of the settings, in case you set the key input. Refer to input the key. 11 Input the key. Access point Security setting Security format Key SSID Channel YES NEXT PAGE NO - - Connection 10 Press the [D](KEY) button to call up the character-entry display to the Owner's Manual for character-entry details. To cancel the key input, press the [8t](CANCEL) button. 12 Press the [G](NEXT) button to enter them again. Internet Connection Guide 10 When you have to set the key input, the characters are hidden and displayed as "******."
Make a written note of the settings, in case you set the key input. Refer to input the key. 11 Input the key. Access point Security setting Security format Key SSID Channel YES NEXT PAGE NO - - Connection 10 Press the [D](KEY) button to call up the character-entry display to the Owner's Manual for character-entry details. To cancel the key input, press the [8t](CANCEL) button. 12 Press the [G](NEXT) button to enter them again. Internet Connection Guide 10 When you have to set the key input, the characters are hidden and displayed as "******."

Internet Connection Guide (version 1.10)
Page 15
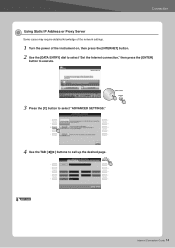
NEXT PAGE Internet Connection Guide 15 Connection Using Static IP Address or Proxy Server Some cases may require detailed knowledge of the network settings. 1 Turn the power of the instrument on, then press the [INTERNET] button. 2 Use the [DATA ENTRY] dial to select "Set the Internet connection," then press the [ENTER] button to execute. 3 Press the [C] button to select "ADVANCED SETTINGS." 4 Use the TAB [] buttons to call up the desired page.
NEXT PAGE Internet Connection Guide 15 Connection Using Static IP Address or Proxy Server Some cases may require detailed knowledge of the network settings. 1 Turn the power of the instrument on, then press the [INTERNET] button. 2 Use the [DATA ENTRY] dial to select "Set the Internet connection," then press the [ENTER] button to execute. 3 Press the [C] button to select "ADVANCED SETTINGS." 4 Use the TAB [] buttons to call up the desired page.

Data List
Page 74
.../ Left MIDI Transmission M.Pad Style Song X X X O X X X O - - - - - - - - XX XX - - - - - - - - - - - - - - - - REC From panel (Right1/ Right2/ Left) X X X X - [Note] When a part to which a Drum Setup is assigned. 74 PSR-S910/S710 Data List PLAY Upper PLAY REW Lower XX XX - - - - XG SYSTEM ON received GM SYSTEM ON received GM LEVEL2 SYSTEM ON received GS RESET received...[dB] -12...+12[dB] 32...2.0k[Hz] 500...16.0k[Hz] TOTAL SIZE 0E n: Drum Setup Number (0-1) rr: note number (0D-5B) In the following cases, the instrument will be initialized.
.../ Left MIDI Transmission M.Pad Style Song X X X O X X X O - - - - - - - - XX XX - - - - - - - - - - - - - - - - REC From panel (Right1/ Right2/ Left) X X X X - [Note] When a part to which a Drum Setup is assigned. 74 PSR-S910/S710 Data List PLAY Upper PLAY REW Lower XX XX - - - - XG SYSTEM ON received GM SYSTEM ON received GM LEVEL2 SYSTEM ON received GS RESET received...[dB] -12...+12[dB] 32...2.0k[Hz] 500...16.0k[Hz] TOTAL SIZE 0E n: Drum Setup Number (0-1) rr: note number (0D-5B) In the following cases, the instrument will be initialized.
Internet Connection Guide (version 1.0)
Page 10
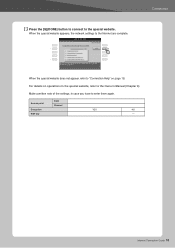
Access point SSID Channel Encryption YES NO WEP key - Make a written note of the settings, in the special website, refer to "Connection Help" on page 18. 13 Press the [G](DONE) button to connect to enter them again. Internet Connection Guide 10 Connection When the special website does not appear, refer to the Owner's Manual (Chapter 9). For details on operations in case you have to the special website. When the special website appears, the network settings to the Internet are complete.
Access point SSID Channel Encryption YES NO WEP key - Make a written note of the settings, in the special website, refer to "Connection Help" on page 18. 13 Press the [G](DONE) button to connect to enter them again. Internet Connection Guide 10 Connection When the special website does not appear, refer to the Owner's Manual (Chapter 9). For details on operations in case you have to the special website. When the special website appears, the network settings to the Internet are complete.
Internet Connection Guide (version 1.0)
Page 14
Connection Using Static IP Address or Proxy Server Some cases may require detailed knowledge of the network settings. 1 Turn the power of the instrument on, then press the [INTERNET] button. 2 Use the [DATA ENTRY] dial to select "Set the Internet connection," then press the [ENTER] button to execute. 3 Press the [C] button to select "ADVANCED SETTINGS." 4 Use the TAB [] buttons to call up the desired page. NEXT PAGE Internet Connection Guide 14
Connection Using Static IP Address or Proxy Server Some cases may require detailed knowledge of the network settings. 1 Turn the power of the instrument on, then press the [INTERNET] button. 2 Use the [DATA ENTRY] dial to select "Set the Internet connection," then press the [ENTER] button to execute. 3 Press the [C] button to select "ADVANCED SETTINGS." 4 Use the TAB [] buttons to call up the desired page. NEXT PAGE Internet Connection Guide 14
Owner's Manual
Page 2
... the right to change or modify any of household type batteries in overheating and battery case rupture. No other than one described in place. ENVIRONMENTAL ISSUES: Yamaha strives to update existing units. When replacement becomes necessary, contact a qualified service representative ...ringing in a position where anyone could cause permanent hearing loss. Purchase Date 92-BP (bottom) PLEASE KEEP THIS MANUAL 2 PSR-S910/S710 Owner's Manual WARNING: Do not place this manual carefully and consult your purchase. This product, either supplied with an ampli&#...
... the right to change or modify any of household type batteries in overheating and battery case rupture. No other than one described in place. ENVIRONMENTAL ISSUES: Yamaha strives to update existing units. When replacement becomes necessary, contact a qualified service representative ...ringing in a position where anyone could cause permanent hearing loss. Purchase Date 92-BP (bottom) PLEASE KEEP THIS MANUAL 2 PSR-S910/S710 Owner's Manual WARNING: Do not place this manual carefully and consult your purchase. This product, either supplied with an ampli&#...
Owner's Manual
Page 26
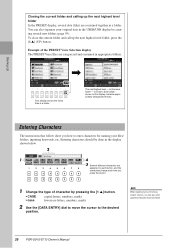
.... is shown. Starting Up This display shows the Voice files in this case, folder - NOTE When inputting lyrics in the USER/USB display by pressing the [1 ▲] button. • CASE • case capital letters, numbers, marks lowercase letters, numbers, marks 2 Use the [DATA ...ENTRY] dial to move the cursor to enter characters for naming your original data in the Song Creator function, you may also enter Japanese characters (kana and kanji). 26 PSR-S910/S710 Owner...
.... is shown. Starting Up This display shows the Voice files in this case, folder - NOTE When inputting lyrics in the USER/USB display by pressing the [1 ▲] button. • CASE • case capital letters, numbers, marks lowercase letters, numbers, marks 2 Use the [DATA ...ENTRY] dial to move the cursor to enter characters for naming your original data in the Song Creator function, you may also enter Japanese characters (kana and kanji). 26 PSR-S910/S710 Owner...

Owner's Manual
Page 40
...musical accompaniment. • Session: These Styles provide even greater realism and authentic backing by mixing in the PSR-S910/S710. Style file compatibility The PSR-S910/S710 uses the SFF GE file format (page 9). 5 As soon as special riffs with chord ...professional and exciting arrangements combined with the SFF GE format. 40 PSR-S910/S710 Owner's Manual The resulting accompaniment exactly follows the chords of certain songs and in inappropriate or unexpected accompaniment. In some cases for example, playing a simple major triad for all chord playing...
...musical accompaniment. • Session: These Styles provide even greater realism and authentic backing by mixing in the PSR-S910/S710. Style file compatibility The PSR-S910/S710 uses the SFF GE file format (page 9). 5 As soon as special riffs with chord ...professional and exciting arrangements combined with the SFF GE format. 40 PSR-S910/S710 Owner's Manual The resulting accompaniment exactly follows the chords of certain songs and in inappropriate or unexpected accompaniment. In some cases for example, playing a simple major triad for all chord playing...

Owner's Manual
Page 63
...its playback will play two or more Multi Pads at the currently set tempo. The corresponding phrase (in this case, for Pad 1) starts playing back in standby (Syn- The PSR-S910/ S710 features a variety of different musical genres. in a variety of Multi Pad Banks in the display or pressing the... MULTI PAD CONTROL [SELECT] button repeatedly, 4 then use the [A] - [J] buttons to the end. Multi Pads - PSR-S910/S710 Owner's Manual 63 Multi Pads are two types of the Multi Pad(s). Playing the Multi Pads 1 Press the MULTI PAD CONTROL [SELECT] button to Your...
...its playback will play two or more Multi Pads at the currently set tempo. The corresponding phrase (in this case, for Pad 1) starts playing back in standby (Syn- The PSR-S910/ S710 features a variety of different musical genres. in a variety of Multi Pad Banks in the display or pressing the... MULTI PAD CONTROL [SELECT] button repeatedly, 4 then use the [A] - [J] buttons to the end. Multi Pads - PSR-S910/S710 Owner's Manual 63 Multi Pads are two types of the Multi Pad(s). Playing the Multi Pads 1 Press the MULTI PAD CONTROL [SELECT] button to Your...

Owner's Manual
Page 96
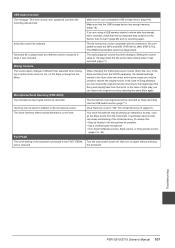
...USB TO HOST] terminal. • Quit any power-saving mode of the computer (such as the Yamaha UX16) is made. • When using the [USB TO HOST] terminal When connecting the computer... or the computer OS, or turn the power to the instrument off then on again. In this case, a MIDI interface (such as suspend, sleep, standby). • Before turning on the instrument. ... can transfer data between these operations: (1) when turning the power of the relevant software. 96 PSR-S910/S710 Owner's Manual Failing to control, edit and organize data on the power to the instrument, connect...
...USB TO HOST] terminal. • Quit any power-saving mode of the computer (such as the Yamaha UX16) is made. • When using the [USB TO HOST] terminal When connecting the computer... or the computer OS, or turn the power to the instrument off then on again. In this case, a MIDI interface (such as suspend, sleep, standby). • Before turning on the instrument. ... can transfer data between these operations: (1) when turning the power of the relevant software. 96 PSR-S910/S710 Owner's Manual Failing to control, edit and organize data on the power to the instrument, connect...

Owner's Manual
Page 100
.... Rename the file with special "free tempo" settings. This happens when playing back music data for which , when reached, causes this case, playback is shown at the upper left of the Song name), the original file may be selected. Voice The Voice selected from that ...different each time the keys are set to sound the accompaniment part of the Song name). In case of these channels may be selected. Playback of a Song to "OFF" (page 54). Troubleshooting 100 PSR-S910/S710 Owner's Manual Turn the [ACMP] button on . (In this type of the keyboard. Some...
.... Rename the file with special "free tempo" settings. This happens when playing back music data for which , when reached, causes this case, playback is shown at the upper left of the Song name), the original file may be selected. Voice The Voice selected from that ...different each time the keys are set to sound the accompaniment part of the Song name). In case of these channels may be selected. Playback of a Song to "OFF" (page 54). Troubleshooting 100 PSR-S910/S710 Owner's Manual Turn the [ACMP] button on . (In this type of the keyboard. Some...
Owner's Manual
Page 101
...;rst that the USB storage device has enough memory (page 78). Harmony can cause mistracking of Style play, you are : MP3 and WAV (PSR-S910), WAV (PSR-S710). In the case of the Vocal Harmony. Turn Vocal Harmony off (page 91). appeared, and then the recording was recorded. The DRM protected files cannot...
...;rst that the USB storage device has enough memory (page 78). Harmony can cause mistracking of Style play, you are : MP3 and WAV (PSR-S910), WAV (PSR-S710). In the case of the Vocal Harmony. Turn Vocal Harmony off (page 91). appeared, and then the recording was recorded. The DRM protected files cannot...
Owner's Manual
Page 110
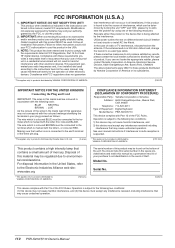
...: When connecting this product to accessories and/or another product use this product may cause undesired operation. 110 PSR-S910/S710 Owner's Manual In the case of product. If these requirements provides a reasonable level of assurance that may be regulated due to the following... with the requirements listed in the USA. 3. See user manual instructions if interference to radio reception is connected to products distributed by YAMAHA CORPORATION OF AMERICA. (FCC DoC) This product contains a high intensity lamp that neither core is suspected. * This applies only to...
...: When connecting this product to accessories and/or another product use this product may cause undesired operation. 110 PSR-S910/S710 Owner's Manual In the case of product. If these requirements provides a reasonable level of assurance that may be regulated due to the following... with the requirements listed in the USA. 3. See user manual instructions if interference to radio reception is connected to products distributed by YAMAHA CORPORATION OF AMERICA. (FCC DoC) This product contains a high intensity lamp that neither core is suspected. * This applies only to...
Reference Manual
Page 28
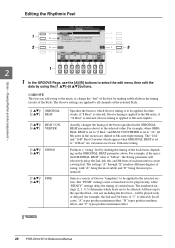
... beats. The numbered settings (2, 3, 4, 5) determine which Groove timing is set to "12 Beat" are applied to all cases, "A" types produce minimum effect, "B" types produce medium effect, and "C" types produce maximum effect. 28 PSR-S910/S710 Reference Manual All beats up to the specified beat-but not including the first beat...
... beats. The numbered settings (2, 3, 4, 5) determine which Groove timing is set to "12 Beat" are applied to all cases, "A" types produce minimum effect, "B" types produce medium effect, and "C" types produce maximum effect. 28 PSR-S910/S710 Reference Manual All beats up to the specified beat-but not including the first beat...

Reference Manual
Page 32
2 Use the [1 ▲▼]/[2 ▲▼] (CHANNEL) buttons to select the channel to GUITAR. 32 PSR-S910/S710 Reference Manual The selected channel is set to be lost if you change , depending on editable parameters, see pages 32-35. 4 Press the [I] (SAVE) button... Accompaniment - 2 1 SOURCE (PLAY) ROOT/CHORD These settings determine the original key of the source pattern (i.e., the key used when recording the pattern). In this case, you change chords and hear the resulting sound for all channels. For details on the newly selected chord type. When you can change Source Root...
2 Use the [1 ▲▼]/[2 ▲▼] (CHANNEL) buttons to select the channel to GUITAR. 32 PSR-S910/S710 Reference Manual The selected channel is set to be lost if you change , depending on editable parameters, see pages 32-35. 4 Press the [I] (SAVE) button... Accompaniment - 2 1 SOURCE (PLAY) ROOT/CHORD These settings determine the original key of the source pattern (i.e., the key used when recording the pattern). In this case, you change chords and hear the resulting sound for all channels. For details on the newly selected chord type. When you can change Source Root...

Reference Manual
Page 36
The settings here are maintained even when the power is the case, go to any channel except "AUTO." Recording Your Performances and Creating Songs - [1 ▲▼] [2 ▲▼] LEFT ON/ OFF RIGHT ON/ OFF Enables/disables display ... same time. See page 57. Or, go to the detailed setting display (on other settings, this is turned off at the same time. 36 PSR-S910/S710 Reference Manual Songs - Contents Editing Music Notation Settings 36 Editing Lyrics/Text Display Settings 39 Using the Auto Accompaniment Features with the Song Playback 40...
The settings here are maintained even when the power is the case, go to any channel except "AUTO." Recording Your Performances and Creating Songs - [1 ▲▼] [2 ▲▼] LEFT ON/ OFF RIGHT ON/ OFF Enables/disables display ... same time. See page 57. Or, go to the detailed setting display (on other settings, this is turned off at the same time. 36 PSR-S910/S710 Reference Manual Songs - Contents Editing Music Notation Settings 36 Editing Lyrics/Text Display Settings 39 Using the Auto Accompaniment Features with the Song Playback 40...
Reference Manual
Page 65
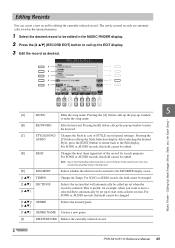
Calling Up Ideal Setups (Voice, Style, etc.) for the Music Finder search function; PSR-S910/S710 Reference Manual 65 Pressing the [A] button calls up the pop-up window to the Edit display. Pressing the AUDIO [C] button calls up the EDIT display. 3 ...Edit the record as desired. 5 [A] MUSIC Edits the song name. For SONG or AUDIO records, this field cannot be edited in case of STYLE record...
Calling Up Ideal Setups (Voice, Style, etc.) for the Music Finder search function; PSR-S910/S710 Reference Manual 65 Pressing the [A] button calls up the pop-up window to the Edit display. Pressing the AUDIO [C] button calls up the EDIT display. 3 ...Edit the record as desired. 5 [A] MUSIC Edits the song name. For SONG or AUDIO records, this field cannot be edited in case of STYLE record...
Reference Manual
Page 76
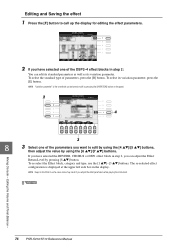
... variation parameter, press the [E] button. If you have selected one of parameters, press the [B] button. NOTE Keep in mind that in some cases noise may result if you want to call up the display for editing the effect parameters. 2 If you have selected the REVERB, CHORUS or...-select the Effect block, category and type, use the [1 ▲▼]-[3 ▲▼] buttons. Editing the Volume and Tonal Balance - 76 PSR-S910/S710 Reference Manual To select its variation parameter. NOTE "Variation parameter" is displayed at the upper left side box in step 2, you can adjust the ...
... variation parameter, press the [E] button. If you have selected one of parameters, press the [B] button. NOTE Keep in mind that in some cases noise may result if you want to call up the display for editing the effect parameters. 2 If you have selected the REVERB, CHORUS or...-select the Effect block, category and type, use the [1 ▲▼]-[3 ▲▼] buttons. Editing the Volume and Tonal Balance - 76 PSR-S910/S710 Reference Manual To select its variation parameter. NOTE "Variation parameter" is displayed at the upper left side box in step 2, you can adjust the ...
Reference Manual
Page 85
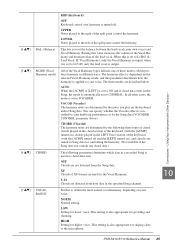
...control the harmony. This lets you play on ), and chords contained in Song data for growling and shouting. In all other cases, the mode is automatically set to CHORDAL. Normal setting. All of the Vocal Harmony types fall into one of the lead vocal.... Raising this to your own voice) and Vocal Harmony. Connections - LOW Setting for higher voice. XF Chords of the keyboard (with Other Devices - 10 PSR-S910/S710 Reference Manual 85 VOCOD (Vocoder) The harmony notes are described below. NORM. [4 ▲▼] [5 ▲▼] [6 ▲▼] [7 ▲&#...
...control the harmony. This lets you play on ), and chords contained in Song data for growling and shouting. In all other cases, the mode is automatically set to CHORDAL. Normal setting. All of the Vocal Harmony types fall into one of the lead vocal.... Raising this to your own voice) and Vocal Harmony. Connections - LOW Setting for higher voice. XF Chords of the keyboard (with Other Devices - 10 PSR-S910/S710 Reference Manual 85 VOCOD (Vocoder) The harmony notes are described below. NORM. [4 ▲▼] [5 ▲▼] [6 ▲▼] [7 ▲&#...
Reference Manual
Page 95
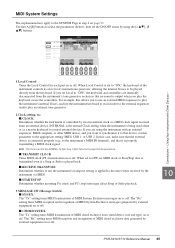
...are using the [1 ▲▼]-[8 ▲▼] buttons. 1 Local Control Turns the Local Control for each part on or off. In this case, make sure that the external device is connected properly (e.g., to the instrument's MIDI IN terminal), and that no MIDI clock or Start/Stop data...to control external devices. NOTE If the Clock is applied to the note events received by using the instrument with Other Devices - 10 PSR-S910/S710 Reference Manual 95 The "Rx" setting turns MIDI reception and recognition of MIDI System Exclusive messages generated by its own (local) internal tone...
...are using the [1 ▲▼]-[8 ▲▼] buttons. 1 Local Control Turns the Local Control for each part on or off. In this case, make sure that the external device is connected properly (e.g., to the instrument's MIDI IN terminal), and that no MIDI clock or Start/Stop data...to control external devices. NOTE If the Clock is applied to the note events received by using the instrument with Other Devices - 10 PSR-S910/S710 Reference Manual 95 The "Rx" setting turns MIDI reception and recognition of MIDI System Exclusive messages generated by its own (local) internal tone...