
Data List
Page 2
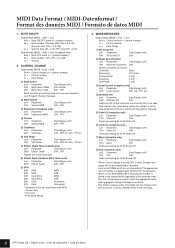
... sustain or soste- MIDI Data Format / MIDI-Datenformat / Format des données MIDI / Formato de datos MIDI 1. nuto pedal will continue to sound until receipt of the received order, then the stored value is used to select the appropriate voice when a program change when the instrument receives a MONO/POLY mode message. 2 P-95 Data List / Daten-Liste / Liste des données / Lista de datos MODE MESSAGES Data format: [BnH] -> [cc] -> [vv] BnH = Control event (n = channel number) cc = Control number...
... sustain or soste- MIDI Data Format / MIDI-Datenformat / Format des données MIDI / Formato de datos MIDI 1. nuto pedal will continue to sound until receipt of the received order, then the stored value is used to select the appropriate voice when a program change when the instrument receives a MONO/POLY mode message. 2 P-95 Data List / Daten-Liste / Liste des données / Lista de datos MODE MESSAGES Data format: [BnH] -> [cc] -> [vv] BnH = Control event (n = channel number) cc = Control number...

Data List
Page 5
... P-95 Data List / Daten-Liste / Liste des données / Lista de datos 5 Values higher than 020CH select -50 cents. MIDI Parameter Change table (MULTI PART) Address (H) Size (H) Data (H) 08 nn 11 1 00-7F nn = Part Number Parameter DRY LEVEL Refer to the "Effect MIDI Map" for a complete list of Reverb, Chorus and Variation type numbers. Address (H) Size (H) 02 01 00 2 Data (H) 00-7F 00-7F Parameter REVERB TYPE MSB REVERB TYPE LSB...
... P-95 Data List / Daten-Liste / Liste des données / Lista de datos 5 Values higher than 020CH select -50 cents. MIDI Parameter Change table (MULTI PART) Address (H) Size (H) Data (H) 08 nn 11 1 00-7F nn = Part Number Parameter DRY LEVEL Refer to the "Effect MIDI Map" for a complete list of Reverb, Chorus and Variation type numbers. Address (H) Size (H) 02 01 00 2 Data (H) 00-7F 00-7F Parameter REVERB TYPE MSB REVERB TYPE LSB...
Owner's Manual
Page 2
... volume level or at the time of producing sound levels that is approximately five years. The model number, serial number, power requirements, etc., are therefore the owners responsibility. DO NOT connect this product become damaged beyond repair, or for seating only. NOTE: The smaller the AWG number, the larger the current handling capacity. For longer extension cords, consult a local electrician. If you , please contact Yamaha directly...
... volume level or at the time of producing sound levels that is approximately five years. The model number, serial number, power requirements, etc., are therefore the owners responsibility. DO NOT connect this product become damaged beyond repair, or for seating only. NOTE: The smaller the AWG number, the larger the current handling capacity. For longer extension cords, consult a local electrician. If you , please contact Yamaha directly...
Owner's Manual
Page 3
... THE UNITED KINGDOM Connecting the Plug and Cord IMPORTANT. Modifications not expressly approved by using one of the following code: BLUE : NEUTRAL BROWN : LIVE As the colours of other electronic devices. Follow all installations. Utilize power outlets that interference will not result in the users manual, may cause interference harmful to the operation of the wires in to the...
... THE UNITED KINGDOM Connecting the Plug and Cord IMPORTANT. Modifications not expressly approved by using one of the following code: BLUE : NEUTRAL BROWN : LIVE As the colours of other electronic devices. Follow all installations. Utilize power outlets that interference will not result in the users manual, may cause interference harmful to the operation of the wires in to the...

Owner's Manual
Page 4
... flowing to be used for extended periods of time, or during use of the following : Power supply/AC power adaptor • Do not connect the instrument to the instrument or other hazards. Do not open • This instrument contains no user-serviceable parts. If any openings. Then have it might spill into the gaps on the panel or keyboard. • Do not rest your weight on, or place...
... flowing to be used for extended periods of time, or during use of the following : Power supply/AC power adaptor • Do not connect the instrument to the instrument or other hazards. Do not open • This instrument contains no user-serviceable parts. If any openings. Then have it might spill into the gaps on the panel or keyboard. • Do not rest your weight on, or place...

Owner's Manual
Page 5
.... NOTICE To avoid the possibility of disposal. (7)-1 2/2 (weee_eu) P-95 Owner's Manual 5 Such copyrighted materials include, without limitation, all computer software, style files, MIDI files, WAVE data, musical scores and sound recordings. The data is maintained even when the power is turned off when the instrument is not in the "Standby" position, electricity is in use paint thinners, solvents, cleaning fluids, or chemical...
.... NOTICE To avoid the possibility of disposal. (7)-1 2/2 (weee_eu) P-95 Owner's Manual 5 Such copyrighted materials include, without limitation, all computer software, style files, MIDI files, WAVE data, musical scores and sound recordings. The data is maintained even when the power is turned off when the instrument is not in the "Standby" position, electricity is in use paint thinners, solvents, cleaning fluids, or chemical...

Owner's Manual
Page 7
... MIDI Functions 26 MIDI Transmit/Receive Channel Selection 26 Local Control ON/OFF 26 Program Change ON/OFF 27 Control Change ON/OFF 27 Troubleshooting 28 Optional Equipment 28 Appendix Preset Song List 30 Specifications 31 Quick Operation Guide 32 This is a quick reference for operation of Contents PRECAUTIONS 4 Introduction Main Features 6 Accessories 6 Panel Controls and Terminals 8 Before Using 9 Turning the Power On 9 Setting the Volume 9 Using the Pedal 10 Using Headphones 11 Music Rest...11 Reference Listening to the Demo Songs...
... MIDI Functions 26 MIDI Transmit/Receive Channel Selection 26 Local Control ON/OFF 26 Program Change ON/OFF 27 Control Change ON/OFF 27 Troubleshooting 28 Optional Equipment 28 Appendix Preset Song List 30 Specifications 31 Quick Operation Guide 32 This is a quick reference for operation of Contents PRECAUTIONS 4 Introduction Main Features 6 Accessories 6 Panel Controls and Terminals 8 Before Using 9 Turning the Power On 9 Setting the Volume 9 Using the Pedal 10 Using Headphones 11 Music Rest...11 Reference Listening to the Demo Songs...

Owner's Manual
Page 8
...jack page 9 For connecting the power adaptor. ! minals as seen when viewed from the rear of standard stereo headphones, allowing private practice. $ Metronome indication page 14 Indicates the keys used to change the song tempo. 5 [METRONOME] button page 14 For using the metronome. 6 [REC] button page 21 For recording your keyboard performance. 7 [PLAY] button page 22 For playing back the recorded performance. 8 P-95 Owner's Manual 8 VOICE buttons page 16 For selecting voices from 10 internal sounds including Grand Piano 1 and 2. Panel Controls and Terminals Panel Controls...
...jack page 9 For connecting the power adaptor. ! minals as seen when viewed from the rear of standard stereo headphones, allowing private practice. $ Metronome indication page 14 Indicates the keys used to change the song tempo. 5 [METRONOME] button page 14 For using the metronome. 6 [REC] button page 21 For recording your keyboard performance. 7 [PLAY] button page 22 For playing back the recorded performance. 8 P-95 Owner's Manual 8 VOICE buttons page 16 For selecting voices from 10 internal sounds including Grand Piano 1 and 2. Panel Controls and Terminals Panel Controls...

Owner's Manual
Page 11
... the slot at the top of the control panel. 9 ENGLISH Speakers are provided. Using Headphones Connect a set of headphones, you can plug them into the instrument at a high volume level for better sound. P-95 Owner's Manual 11 Standard stereo phone plug Before Using Music Rest This instrument includes a music rest that you use an optional keyboard stand for long periods of time. Two [PHONES] jacks are built into either jack.) CAUTION To protect your hearing, avoid listening...
... the slot at the top of the control panel. 9 ENGLISH Speakers are provided. Using Headphones Connect a set of headphones, you can plug them into the instrument at a high volume level for better sound. P-95 Owner's Manual 11 Standard stereo phone plug Before Using Music Rest This instrument includes a music rest that you use an optional keyboard stand for long periods of time. Two [PHONES] jacks are built into either jack.) CAUTION To protect your hearing, avoid listening...
Owner's Manual
Page 13
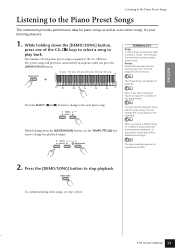
...can play back consecutively in sequence until you select a different song (or a different song is called a "Song." P-95 Owner's Manual 13 Preset: Preset Data supplied with the preset song. NOTE The piano preset songs are not transmitted via MIDI. 2. NOTE The Preset Song List appears on the keyboard. Press the [DEMO/SONG] button to the next piano song. The number of the P-95 shipped from the factory. 11 ENGLISH Listening to the Piano Preset Songs Listening to the Piano Preset Songs This instrument provides performance data for piano songs as well as voice demo...
...can play back consecutively in sequence until you select a different song (or a different song is called a "Song." P-95 Owner's Manual 13 Preset: Preset Data supplied with the preset song. NOTE The piano preset songs are not transmitted via MIDI. 2. NOTE The Preset Song List appears on the keyboard. Press the [DEMO/SONG] button to the next piano song. The number of the P-95 shipped from the factory. 11 ENGLISH Listening to the Piano Preset Songs Listening to the Piano Preset Songs This instrument provides performance data for piano songs as well as voice demo...

Owner's Manual
Page 15
... [METRONOME] button, use the TEMPO [g]/[h] button to determine the volume. Resetting the tempo to default: While holding down the [METRONOME] button, press the G4 key. While holding down the [METRONOME] button, press the D#4 key. F#0(10) NOTE Metronome volume range: A-1 (1)-F#0 (10) Default setting: D#0 (7) A-1(1) P-95 Owner's Manual 15 For example, to restore the default tempo. Decreasing the tempo value in steps of one : While holding down the [METRONOME] button, press the F4 key. Decreasing the tempo value in steps of the metronome sound. Using the Metronome...
... [METRONOME] button, use the TEMPO [g]/[h] button to determine the volume. Resetting the tempo to default: While holding down the [METRONOME] button, press the G4 key. While holding down the [METRONOME] button, press the D#4 key. F#0(10) NOTE Metronome volume range: A-1 (1)-F#0 (10) Default setting: D#0 (7) A-1(1) P-95 Owner's Manual 15 For example, to restore the default tempo. Decreasing the tempo value in steps of one : While holding down the [METRONOME] button, press the F4 key. Decreasing the tempo value in steps of the metronome sound. Using the Metronome...

Owner's Manual
Page 16
... baroque music. PIANO 2 JAZZ ORGAN PIPE ORGAN STRINGS CHOIR HARPSICHORD VIBRAPHONE Description Recorded samples from the Baroque period. ENGLISH Selecting & Playing Voices Selecting & Playing Voices Selecting Voices 1. The sound of the voices, listen to the demo songs for the most comfortable listening level during your performance. 14 16 P-95 Owner's Manual Good for creating rich harmonies in slow pieces. The sound of the voice buttons. Perfect for popular music. Voice Name GRAND PIANO 1 GRAND PIANO 2 E. TERMINOLOGY Voice: In this voice with...
... baroque music. PIANO 2 JAZZ ORGAN PIPE ORGAN STRINGS CHOIR HARPSICHORD VIBRAPHONE Description Recorded samples from the Baroque period. ENGLISH Selecting & Playing Voices Selecting & Playing Voices Selecting Voices 1. The sound of the voices, listen to the demo songs for the most comfortable listening level during your performance. 14 16 P-95 Owner's Manual Good for creating rich harmonies in slow pieces. The sound of the voice buttons. Perfect for popular music. Voice Name GRAND PIANO 1 GRAND PIANO 2 E. TERMINOLOGY Voice: In this voice with...

Owner's Manual
Page 17
... can make the other voice softer. Voice 1 Voice 2 NOTE Reverb in effect. Press one voice as Voice 2. A setting of the keyboard. 15 ENGLISH Selecting & Playing Voices Combining Voices (Dual) You can combine similar voices to Voice 2. A4 D5 A4 -1 Voice 1 A#4 0 B4 +1 C5 -1 Voice 2 C#5 0 D5 +1 Setting the Balance You can set to OFF, the reverb assigned to engage Dual. In this way, you can adjust the volume balance between the two Dual voices. For example, you can play . Settings...
... can make the other voice softer. Voice 1 Voice 2 NOTE Reverb in effect. Press one voice as Voice 2. A setting of the keyboard. 15 ENGLISH Selecting & Playing Voices Combining Voices (Dual) You can combine similar voices to Voice 2. A4 D5 A4 -1 Voice 1 A#4 0 B4 +1 C5 -1 Voice 2 C#5 0 D5 +1 Setting the Balance You can set to OFF, the reverb assigned to engage Dual. In this way, you can adjust the volume balance between the two Dual voices. For example, you can play . Settings...

Owner's Manual
Page 18
.... NOTE The default reverb type (including OFF) and depth settings are different for the selected voice. A#6 Hall2 For a truly spacious reverb sound, use the HALL 1 setting. C7 Off No effect is applied. This effect simulates the natural reverberation of a stage environment. Selecting a Reverb Type While holding down the [METRONOME] button, press the D3 key to set the reverb to adjust the reverb depth for each voice. 16 18 P-95 Owner's Manual A6 Hall1 For a "bigger" reverb sound, use the HALL 2 setting...
.... NOTE The default reverb type (including OFF) and depth settings are different for the selected voice. A#6 Hall2 For a truly spacious reverb sound, use the HALL 1 setting. C7 Off No effect is applied. This effect simulates the natural reverberation of a stage environment. Selecting a Reverb Type While holding down the [METRONOME] button, press the D3 key to set the reverb to adjust the reverb depth for each voice. 16 18 P-95 Owner's Manual A6 Hall1 For a "bigger" reverb sound, use the HALL 2 setting...

Owner's Manual
Page 21
... metronome sound will be using the [MASTER VOLUME] slider. Make all the initial settings. Start recording. NOTE For more recording information, see page 22. NOTE When the instrument is playing back a demo song or preset song, Record mode cannot be disengaged before recording by pressing the [REC] button again. 3. Press the [REC] button to 65KB (approximately 11,000 notes). NOTE If the metronome was on the keyboard or press the [PLAY] button. Recording a performance 1. You can also adjust the playback volume using Dual mode...
... metronome sound will be using the [MASTER VOLUME] slider. Make all the initial settings. Start recording. NOTE For more recording information, see page 22. NOTE When the instrument is playing back a demo song or preset song, Record mode cannot be disengaged before recording by pressing the [REC] button again. 3. Press the [REC] button to 65KB (approximately 11,000 notes). NOTE If the metronome was on the keyboard or press the [PLAY] button. Recording a performance 1. You can also adjust the playback volume using Dual mode...

Owner's Manual
Page 22
... prevent saving of a song. 20 22 P-95 Owner's Manual After the data is recorded. • Notes played • Voice selection • Pedal (Sustain/Soft/Sostenuto) • Reverb depth • Dual mode voices • Dual balance • Dual octave shift • Tempo • Reverb type (including OFF) NOTE Both the [REC] lamp and the [PLAY] lamp will be retained.) NOTE You can also load the recorded data back from a computer and play it back on this instrument...
... prevent saving of a song. 20 22 P-95 Owner's Manual After the data is recorded. • Notes played • Voice selection • Pedal (Sustain/Soft/Sostenuto) • Reverb depth • Dual mode voices • Dual balance • Dual octave shift • Tempo • Reverb type (including OFF) NOTE Both the [REC] lamp and the [PLAY] lamp will be retained.) NOTE You can also load the recorded data back from a computer and play it back on this instrument...

Owner's Manual
Page 24
... various performance and recording capabilities in the Data List, which can be played correctly. 24 P-95 Owner's Manual 22 The MIDI Implementation Chart is a standard format for data transmission/reception. MIDI [OUT] terminal MIDI [IN] terminal MIDI cables (optional) MIDI [OUT] terminal MIDI [IN] terminal Instrument MIDI device ● Transferring MIDI data to and from a computer MIDI [IN] terminal MIDI [OUT] terminal USB terminal NOTE You cannot transmit the voice demo songs and the piano preset songs from the P-95 to another MIDI device NOTE Since MIDI data...
... various performance and recording capabilities in the Data List, which can be played correctly. 24 P-95 Owner's Manual 22 The MIDI Implementation Chart is a standard format for data transmission/reception. MIDI [OUT] terminal MIDI [IN] terminal MIDI cables (optional) MIDI [OUT] terminal MIDI [IN] terminal Instrument MIDI device ● Transferring MIDI data to and from a computer MIDI [IN] terminal MIDI [OUT] terminal USB terminal NOTE You cannot transmit the voice demo songs and the piano preset songs from the P-95 to another MIDI device NOTE Since MIDI data...
Owner's Manual
Page 25
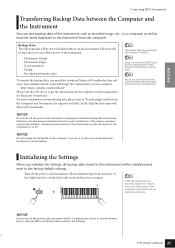
... Downloader is automatically named "P-95.BUP". Then, simultaneously hold down the C7 key (right-most key on the keyboard) and turn off the power to "Transferring Data Between the Computer and Instrument (for Musicsoft Downloader. 23 ENGLISH Connecting MIDI Instruments Transferring Backup Data between the Computer and the Instrument You can save backup data of this instrument will be initialized and reset to the factory default settings. Backup Data The following URL, and install...
... Downloader is automatically named "P-95.BUP". Then, simultaneously hold down the C7 key (right-most key on the keyboard) and turn off the power to "Transferring Data Between the Computer and Instrument (for Musicsoft Downloader. 23 ENGLISH Connecting MIDI Instruments Transferring Backup Data between the Computer and the Instrument You can save backup data of this instrument will be initialized and reset to the factory default settings. Backup Data The following URL, and install...

Owner's Manual
Page 28
... [MASTER VOLUME] control (page 9). Turn off the sound and releasing it to interference caused by the use it further away from the speakers or headphones. The pedal cable/plug may be properly connected. Optional Equipment Foot Pedal (FC3) Footswitch (FC4) Keyboard Stand (L-85/L-85S) Pedal Unit (LP-5A) USB-MIDI interface (UX16) Headphones (HPE-150/HPE-30) AC Power Adaptor (PA-5D/PA-150 or an equivarent) 26 28 P-95 Owner's Manual The footswitch (for sustain...
... [MASTER VOLUME] control (page 9). Turn off the sound and releasing it to interference caused by the use it further away from the speakers or headphones. The pedal cable/plug may be properly connected. Optional Equipment Foot Pedal (FC3) Footswitch (FC4) Keyboard Stand (L-85/L-85S) Pedal Unit (LP-5A) USB-MIDI interface (UX16) Headphones (HPE-150/HPE-30) AC Power Adaptor (PA-5D/PA-150 or an equivarent) 26 28 P-95 Owner's Manual The footswitch (for sustain...
Owner's Manual
Page 31
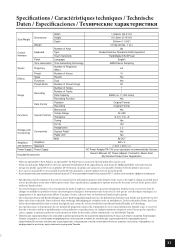
... Weight Control Interface Voices Effects Keyboard Panel Tone Generation Polyphony Preset Types Functions Preset/Demo Songs Recording Data Format Functions Overall Controls Storage and Connectivity Connectivity Amplifiers Amplifiers and Speakers Speakers Power Supply Power Supply Included Accessories Width Height Depth Number of Keys Type Touch Sensitivity Language Tone Generating Technology Number of Polyphony (Max.) Number of Voices Reverb Dual Number of Preset Songs Number of Songs Number of Tracks Data Capacity Recording Function Playback Recording Metronome Tempo...
... Weight Control Interface Voices Effects Keyboard Panel Tone Generation Polyphony Preset Types Functions Preset/Demo Songs Recording Data Format Functions Overall Controls Storage and Connectivity Connectivity Amplifiers Amplifiers and Speakers Speakers Power Supply Power Supply Included Accessories Width Height Depth Number of Keys Type Touch Sensitivity Language Tone Generating Technology Number of Polyphony (Max.) Number of Voices Reverb Dual Number of Preset Songs Number of Songs Number of Tracks Data Capacity Recording Function Playback Recording Metronome Tempo...


