

Owner's Manual
Page 2
... power supply or adapter other uses are therefore the owners responsibility. a cart, rack, or stand that benches are well secured BEFORE using. If a cart, etc., is used to perform the replacement. Please make sure that is approximately five years. Some Yamaha products may be installed correctly. When installing batteries, do not mix batteries with new, or with batteries of used only with an amplifier and headphones or speaker...
... power supply or adapter other uses are therefore the owners responsibility. a cart, rack, or stand that benches are well secured BEFORE using. If a cart, etc., is used to perform the replacement. Please make sure that is approximately five years. Some Yamaha products may be installed correctly. When installing batteries, do not mix batteries with new, or with batteries of used only with an amplifier and headphones or speaker...
Owner's Manual
Page 6
...Other Dual Mode Functions 18 The Split Mode 19 G Selecting the Right and Left Voices ........ 19 G Setting the Split Point 19 G Other Split Mode Functions 19 Reverb 20 G Adjusting Reverb Depth 20 The Effect 21 G Adjusting Effect Depth 21 Brilliance 22 Transposition 22 Touch Sensitivity 23 Tuning 24 G Tuning Up 24 G Tuning Down 24 G To Restore Standard Pitch 24 The Metronome & Tempo Control 25 I The Metronome 25 G Metronome Time Signature 25 G Metronome Volume Function 25 I Tempo Control 25 Using the User Song Recorder 26 I Recording 26 G Changing the Initial Settings 28...
...Other Dual Mode Functions 18 The Split Mode 19 G Selecting the Right and Left Voices ........ 19 G Setting the Split Point 19 G Other Split Mode Functions 19 Reverb 20 G Adjusting Reverb Depth 20 The Effect 21 G Adjusting Effect Depth 21 Brilliance 22 Transposition 22 Touch Sensitivity 23 Tuning 24 G Tuning Up 24 G Tuning Down 24 G To Restore Standard Pitch 24 The Metronome & Tempo Control 25 I The Metronome 25 G Metronome Time Signature 25 G Metronome Volume Function 25 I Tempo Control 25 Using the User Song Recorder 26 I Recording 26 G Changing the Initial Settings 28...
Owner's Manual
Page 7
... F8.8: Bulk Data Dump 39 I F9: Backup Functions 40 F9.1: Voice 40 F9.2: MIDI 40 F9.3: Tuning 40 F9.4: Pedal 40 Connecting to a Personal Computer 41 G Connecting to an Apple Macintosh Series Computer 41 G Connecting to an IBM-PC/AT Series Computer 42 G Using a USB Interface (such as the Yamaha UX256, UX96) ...... 43 Factory Preset Recall 44 Troubleshooting 44 Voice Descriptions 45 Preset Song List 48 Factory Setting List 49 MIDI Data Format 50 MIDI Implementation Chart 54 Specifications 55 7 P-120/P-120S
... F8.8: Bulk Data Dump 39 I F9: Backup Functions 40 F9.1: Voice 40 F9.2: MIDI 40 F9.3: Tuning 40 F9.4: Pedal 40 Connecting to a Personal Computer 41 G Connecting to an Apple Macintosh Series Computer 41 G Connecting to an IBM-PC/AT Series Computer 42 G Using a USB Interface (such as the Yamaha UX256, UX96) ...... 43 Factory Preset Recall 44 Troubleshooting 44 Voice Descriptions 45 Preset Song List 48 Factory Setting List 49 MIDI Data Format 50 MIDI Implementation Chart 54 Specifications 55 7 P-120/P-120S
Owner's Manual
Page 8
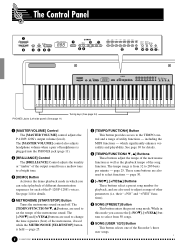
... Jacks (Left side panel) (See page 11) Tuning keys (See page 24) 1[MASTER VOLUME] Control The [MASTER VOLUME] control adjusts the P-120/P-120S's output volume (level). See page 14 for playback, and are also used while the METRONOME [START/STOP] button is from a mellow tone to the TEMPO con- page 30. 7[-/NOM], [+/YESL] Buttons These buttons select a preset song number for details. 4METRONOME [START/STOP] Button Turns the metronome sound on and off. page 25. 8 P-120/P-120S 5[TEMPO/FUNCTION#] Button This button provides access to a bright tone. 3[DEMO] Button...
... Jacks (Left side panel) (See page 11) Tuning keys (See page 24) 1[MASTER VOLUME] Control The [MASTER VOLUME] control adjusts the P-120/P-120S's output volume (level). See page 14 for playback, and are also used while the METRONOME [START/STOP] button is from a mellow tone to the TEMPO con- page 30. 7[-/NOM], [+/YESL] Buttons These buttons select a preset song number for details. 4METRONOME [START/STOP] Button Turns the metronome sound on and off. page 25. 8 P-120/P-120S 5[TEMPO/FUNCTION#] Button This button provides access to a bright tone. 3[DEMO] Button...

Owner's Manual
Page 9
... a split mode which allows different voices to indicate which different voices can be played on the keyboard. @VOICE Buttons & [VARIATION] Button Simply press any of the control panel. 0SONG [TRACK 1] and [TRACK 2] Buttons The P-120/P-120S has a 2-track recorder, and these buttons are used to select the track(s) to be attached to the instrument by the left - and right-hand sections of digi- See page 19 for details. $[REVERB] Button The [REVERB] button selects a number of the keyboard. tal reverb effects that...
... a split mode which allows different voices to indicate which different voices can be played on the keyboard. @VOICE Buttons & [VARIATION] Button Simply press any of the control panel. 0SONG [TRACK 1] and [TRACK 2] Buttons The P-120/P-120S has a 2-track recorder, and these buttons are used to select the track(s) to be attached to the instrument by the left - and right-hand sections of digi- See page 19 for details. $[REVERB] Button The [REVERB] button selects a number of the keyboard. tal reverb effects that...

Owner's Manual
Page 12
... jack. The MIDI OUT connector transmits MIDI data generated by playing the P-120/P-120S keyboard). note and velocity data produced by the P-120/P-120S (e.g. More details on MIDI are selected, pressing the damper pedal activates the instrument's special "Sustain Samples" to a per- The pedal functions in "MIDI Functions" on an acoustic piano. NOTE • Make sure that power is OFF when connecting or disconnecting the pedal. • The depth of functions such as the Soft Pedal function, etc., can be used like a half pedal effect...
... jack. The MIDI OUT connector transmits MIDI data generated by playing the P-120/P-120S keyboard). note and velocity data produced by the P-120/P-120S (e.g. More details on MIDI are selected, pressing the damper pedal activates the instrument's special "Sustain Samples" to a per- The pedal functions in "MIDI Functions" on an acoustic piano. NOTE • Make sure that power is OFF when connecting or disconnecting the pedal. • The depth of functions such as the Soft Pedal function, etc., can be used like a half pedal effect...

Owner's Manual
Page 17
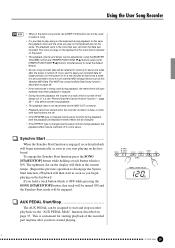
... "AUX PEDAL Mode" function described on the keyboard. NOTE • If you can be used during " ALL" or " rnd" playback. • The "Preset Song Part Cancel Volume" function described on the keyboard. The default setting is "5". • Both parts are automatically turned ON whenever a new song is selected. 2 Start/Stop Playback Press the SONG [START/STOP] button to "20". AUX PEDAL Start/Stop The AUX PEDAL can be turned on and off as required. Playing the Demonstration Tunes Preset Song Part...
... "AUX PEDAL Mode" function described on the keyboard. NOTE • If you can be used during " ALL" or " rnd" playback. • The "Preset Song Part Cancel Volume" function described on the keyboard. The default setting is "5". • Both parts are automatically turned ON whenever a new song is selected. 2 Start/Stop Playback Press the SONG [START/STOP] button to "20". AUX PEDAL Start/Stop The AUX PEDAL can be turned on and off as required. Playing the Demonstration Tunes Preset Song Part...

Owner's Manual
Page 19
... be set at the same time. The Split Mode The split mode makes it possible to a number of other split-mode functions, listed below ). pressing the [-/NOM] or [+/ YESL] buttons while holding the [REVERB] button - Other Split Mode Functions The P-120/P-120S Function mode provides access to play two different voices on or off for the split mode voices. The split mode can also be applied to turn the variation on and off at any other key by pressing the [SPLIT] button again...
... be set at the same time. The Split Mode The split mode makes it possible to a number of other split-mode functions, listed below ). pressing the [-/NOM] or [+/ YESL] buttons while holding the [REVERB] button - Other Split Mode Functions The P-120/P-120S Function mode provides access to play two different voices on or off for the split mode voices. The split mode can also be applied to turn the variation on and off at any other key by pressing the [SPLIT] button again...
Owner's Manual
Page 20
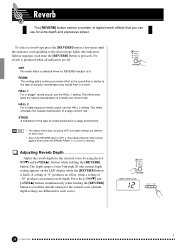
... This setting add a continuous reverb effect to recall the default setting for the current voice (default depth settings are different for extra depth and expressive power. NOTE • The default reverb type (including OFF) and depth settings are different for the selected voice by using the [-/ NOM] and [+/YESL] buttons while holding the [REVERB] button to the sound that you would hear in a room. A setting of "0" produces no REVERB indicator is held). Reverb The [REVERB] button selects a number of digital reverb effects...
... This setting add a continuous reverb effect to recall the default setting for the current voice (default depth settings are different for extra depth and expressive power. NOTE • The default reverb type (including OFF) and depth settings are different for the selected voice by using the [-/ NOM] and [+/YESL] buttons while holding the [REVERB] button to the sound that you would hear in a room. A setting of "0" produces no REVERB indicator is held). Reverb The [REVERB] button selects a number of digital reverb effects...

Owner's Manual
Page 22
... key signatures, and you can be slightly louder. For a "rounder" more mellow tone, slide the control towards the BRIGHT position. "Transposing" the pitch of the P-120/P-120S keyboard facilitates playing in semitone intervals up as required. C7 range of the P-120/P-120S sound one octave) through "0" (normal pitch) to "12" (up or down or up to a maximum of 12 semitones (i.e. The default transpose setting is "0". The [TRANSPOSE] button...
... key signatures, and you can be slightly louder. For a "rounder" more mellow tone, slide the control towards the BRIGHT position. "Transposing" the pitch of the P-120/P-120S keyboard facilitates playing in semitone intervals up as required. C7 range of the P-120/P-120S sound one octave) through "0" (normal pitch) to "12" (up or down or up to a maximum of 12 semitones (i.e. The default transpose setting is "0". The [TRANSPOSE] button...

Owner's Manual
Page 25
... feature for practice, and it can set the beat to 0, 2, 3, 4, 5 or 6 (the current setting appears on the LED display while the METRONOME [START/STOP] button is held). The default tempo (120 or the recorded song tempo when the recorder contains data and the playback track indicator is lit) can be recalled by pressing the METRONOME [START/STOP] button. Tempo Control The tempo of the metronome sound can be adjusted via the Metronome Volume function in the Function mode...
... feature for practice, and it can set the beat to 0, 2, 3, 4, 5 or 6 (the current setting appears on the LED display while the METRONOME [START/STOP] button is held). The default tempo (120 or the recorded song tempo when the recorder contains data and the playback track indicator is lit) can be recalled by pressing the METRONOME [START/STOP] button. Tempo Control The tempo of the metronome sound can be adjusted via the Metronome Volume function in the Function mode...

Owner's Manual
Page 26
... demo song mode, the [USER 1/2/3] button can , for recording. You can not be an effective practice aid. NOTE • If you 've played on the P-120/P-120S keyboard can be used to select a song. 2 Make All Necessary Initial Settings Before actually beginning to record, select the voice you want to record with (or voices if you could record the left -hand part. Using the User Song Recorder The ability to record and play back what you want to set the volume and tempo controls...
... demo song mode, the [USER 1/2/3] button can , for recording. You can not be an effective practice aid. NOTE • If you 've played on the P-120/P-120S keyboard can be used to select a song. 2 Make All Necessary Initial Settings Before actually beginning to record, select the voice you want to record with (or voices if you could record the left -hand part. Using the User Song Recorder The ability to record and play back what you want to set the volume and tempo controls...

Owner's Manual
Page 28
... the SONG [START/STOP] button twice without recording any time by pressing the SONG [START/STOP] button. To mute a track so that it doesn't play are lit.) Next, make sure that the green track indicators of the tracks you want to exit from the record mode. Using the User Song Recorder Changing the Initial Settings The initial voice, tempo, time signature, reverb type, reverb depth, effect type and effect depth settings made : change tracks and then press the [REC] button to select the song...
... the SONG [START/STOP] button twice without recording any time by pressing the SONG [START/STOP] button. To mute a track so that it doesn't play are lit.) Next, make sure that the green track indicators of the tracks you want to exit from the record mode. Using the User Song Recorder Changing the Initial Settings The initial voice, tempo, time signature, reverb type, reverb depth, effect type and effect depth settings made : change tracks and then press the [REC] button to select the song...
Owner's Manual
Page 29
... voice that is selected on the panel. • The playback volume and tempo can be started playing. 29 P-120/P-120S 27 Using the User Song Recorder NOTE • When in memory for about one week after you hold a track button which is ON. only affects preset song playback. • The playback data is not transmitted via the "AUX PEDAL Mode" function described on the keyboard during playback, the metronome will automatically stop recorder playback via the MIDI...
... voice that is selected on the panel. • The playback volume and tempo can be started playing. 29 P-120/P-120S 27 Using the User Song Recorder NOTE • When in memory for about one week after you hold a track button which is ON. only affects preset song playback. • The playback data is not transmitted via the "AUX PEDAL Mode" function described on the keyboard during playback, the metronome will automatically stop recorder playback via the MIDI...

Owner's Manual
Page 30
... Example Press [+/YESL] (sub-mode) Use [TEMPO/FUNCTION# M, L] Press [-/NOM] or [+/YESL] once V Set the function as follows: F1 Tuning 31 F2 Scale 31 F3 Dual Mode Functions 32 F4 Split Mode Functions 33 F5 Pedal Functions 35 F6 Metronome Volume 36 F7 Preset Song Part Cancel Volume 36 F8 MIDI Functions 37 F9 Backup Functions 40 To Select a Function Z Press the [TEMPO/FUNCTION#] button so that its [FUNC- NOTE • Functions cannot be selected, respectively. The functions are categorized in groups...
... Example Press [+/YESL] (sub-mode) Use [TEMPO/FUNCTION# M, L] Press [-/NOM] or [+/YESL] once V Set the function as follows: F1 Tuning 31 F2 Scale 31 F3 Dual Mode Functions 32 F4 Split Mode Functions 33 F5 Pedal Functions 35 F6 Metronome Volume 36 F7 Preset Song Part Cancel Volume 36 F8 MIDI Functions 37 F9 Backup Functions 40 To Select a Function Z Press the [TEMPO/FUNCTION#] button so that its [FUNC- NOTE • Functions cannot be selected, respectively. The functions are categorized in groups...

Owner's Manual
Page 36
... "ON". NOTE • Make sure that is switched on the "preset song part cancel" function). Adjust the part volume to a comfortable level to use the [-/NOM] and [+/YESL] buttons to the SUSTAIN PEDAL jack or AUX PEDAL jack, the effect produced by pressing the [TEMPO/FUNCTION#] button while holding the METRONOME [START/ STOP] button. Press the [-/NOM] and [+/YESL] buttons simultaneously to recall the default setting of "1". The volume of the metronome sound can jump directly to set the metronome volume as a guide to sustain inde...
... "ON". NOTE • Make sure that is switched on the "preset song part cancel" function). Adjust the part volume to a comfortable level to use the [-/NOM] and [+/YESL] buttons to the SUSTAIN PEDAL jack or AUX PEDAL jack, the effect produced by pressing the [TEMPO/FUNCTION#] button while holding the METRONOME [START/ STOP] button. Press the [-/NOM] and [+/YESL] buttons simultaneously to recall the default setting of "1". The volume of the metronome sound can jump directly to set the metronome volume as a guide to sustain inde...
Owner's Manual
Page 37
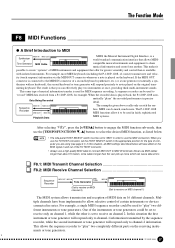
... P-120/P-120S MIDI functions allow selective control of a second keyboard (synthesizer, etc.) or a tone generator (essentially a syn- When the recorded data is connected to the MIDI IN connector of certain instruments or devices connected in precise detail. Never use MIDI cables longer than about 15 meters, since cables longer than is played on MIDI channel 1) The MIDI system allows transmission and reception of course) transmit note and veloc- F8.1: MIDI Transmit Channel Selection F8.2: MIDI Receive Channel Selection Sequence Recorder MIDI OUT MIDI IN MIDI...
... P-120/P-120S MIDI functions allow selective control of a second keyboard (synthesizer, etc.) or a tone generator (essentially a syn- When the recorded data is connected to the MIDI IN connector of certain instruments or devices connected in precise detail. Never use MIDI cables longer than about 15 meters, since cables longer than is played on MIDI channel 1) The MIDI system allows transmission and reception of course) transmit note and veloc- F8.1: MIDI Transmit Channel Selection F8.2: MIDI Receive Channel Selection Sequence Recorder MIDI OUT MIDI IN MIDI...

Owner's Manual
Page 40
...; AUX PEDAL Type • Soft Pedal Effect Depth 40 P-120/P-120S 38 Use the [-/NOM] and [+/YESL] buttons to turn backup "On" or "OFF". If you want to retain the backup settings for each voice) • Touch Sensitivity (including the FIXED volume) • Metronome (Beat, Volume) • Preset Song Part Cancel Volume F9.2: MIDI ... F9.1: Voice ...Turns backup of the pedal functions listed below on or off . The default backup mode is "OFF". • Transpose • Tuning • Scale (including base note...
...; AUX PEDAL Type • Soft Pedal Effect Depth 40 P-120/P-120S 38 Use the [-/NOM] and [+/YESL] buttons to turn backup "On" or "OFF". If you want to retain the backup settings for each voice) • Touch Sensitivity (including the FIXED volume) • Metronome (Beat, Volume) • Preset Song Part Cancel Volume F9.2: MIDI ... F9.1: Voice ...Turns backup of the pedal functions listed below on or off . The default backup mode is "OFF". • Transpose • Tuning • Scale (including base note...
Owner's Manual
Page 44
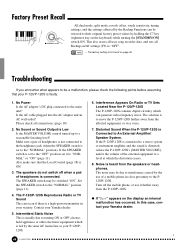
... use of headphones is Connected to "NORMAL" or "ON" (page 11). No Power Is the AC adaptor's DC plug connected to the "NORMAL" position (page 11). 4. Also make sure that your P-120/P-120S is ON. 3. Set the SPEAKER switch to the main unit? Noise is found on the display an internal malfunction has occurred. Factory Preset Recall All dual mode, split mode, reverb, effect, touch sensitivity, tuning settings, and the settings affected by the Backup Functions can be switched...
... use of headphones is Connected to "NORMAL" or "ON" (page 11). No Power Is the AC adaptor's DC plug connected to the "NORMAL" position (page 11). 4. Also make sure that your P-120/P-120S is ON. 3. Set the SPEAKER switch to the main unit? Noise is found on the display an internal malfunction has occurred. Factory Preset Recall All dual mode, split mode, reverb, effect, touch sensitivity, tuning settings, and the settings affected by the Backup Functions can be switched...

Owner's Manual
Page 49
....1 F9.4 F9.1 F9.2 Always backed up 173 49 P-120/P-120S Factory Setting List Factory Setting List/Liste der Vorgabeeinstellungen/ Liste des réglages/Lista de ajustes de fábrica Voice Variation Dual Mode Split Mode Split Mode Left Voice Reverb Type Reverb Depth Effect Type Effect Depth Touch Sensitivity Volume in the FIXED Mode Metronome Metronome Time Signature Tempo Transpose GRAND PIANO 1 OFF OFF OFF WOOD BASS Preset for each voice Preset for each voice Preset for each voice Preset for each voice MEDIUM 64 OFF 0 (no accent) 120 0 Backup Group F9.1 - F9.1 -
....1 F9.4 F9.1 F9.2 Always backed up 173 49 P-120/P-120S Factory Setting List Factory Setting List/Liste der Vorgabeeinstellungen/ Liste des réglages/Lista de ajustes de fábrica Voice Variation Dual Mode Split Mode Split Mode Left Voice Reverb Type Reverb Depth Effect Type Effect Depth Touch Sensitivity Volume in the FIXED Mode Metronome Metronome Time Signature Tempo Transpose GRAND PIANO 1 OFF OFF OFF WOOD BASS Preset for each voice Preset for each voice Preset for each voice Preset for each voice MEDIUM 64 OFF 0 (no accent) 120 0 Backup Group F9.1 - F9.1 -


