Owners Manual
Page 1
NS-AW570 INDOOR / OUTDOOR SPEAKER SYSTEM CONTENTS CONSUMER PRECAUTIONS 2 UNPACKING 3 ATTACHING THE GRILLE 4 MOUNTING THE SPEAKERS 4 CONNECTIONS TO YOUR AMPLIFIER 6 SETTING UP THE SPEAKERS 7 PAINTING THE SPEAKER CASING AND GRILLE (OPTIONAL) 8 SPECIFICATIONS 9 OWNER'S MANUAL
NS-AW570 INDOOR / OUTDOOR SPEAKER SYSTEM CONTENTS CONSUMER PRECAUTIONS 2 UNPACKING 3 ATTACHING THE GRILLE 4 MOUNTING THE SPEAKERS 4 CONNECTIONS TO YOUR AMPLIFIER 6 SETTING UP THE SPEAKERS 7 PAINTING THE SPEAKER CASING AND GRILLE (OPTIONAL) 8 SPECIFICATIONS 9 OWNER'S MANUAL
Owners Manual
Page 3
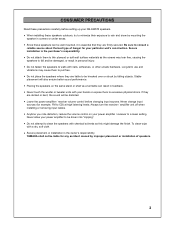
...the power amplifier / receiver volume control before setting up your NS-AW570 speakers. • When installing these speakers outdoors, try to minimize their exposure to rain and snow by mounting the speaker in corners or under eaves. • Since these speakers can result in personal injury. • Do not fasten...they are liable to be liable for any accident caused by falling objects. To clean wipe with your particular wall's construction. YAMAHA shall not be knocked over or struck by improper placement or installation of hanger for example, FM to excessive physical shock. ...
...the power amplifier / receiver volume control before setting up your NS-AW570 speakers. • When installing these speakers outdoors, try to minimize their exposure to rain and snow by mounting the speaker in corners or under eaves. • Since these speakers can result in personal injury. • Do not fasten...they are liable to be liable for any accident caused by falling objects. To clean wipe with your particular wall's construction. YAMAHA shall not be knocked over or struck by improper placement or installation of hanger for example, FM to excessive physical shock. ...
Owners Manual
Page 4
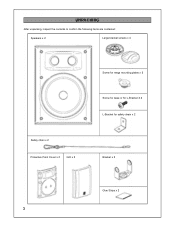
UNPACKING After unpacking, inspect the contents to confirm the following items are contained: Speakers x 2 Large bracket screws x 4 Safety chain x 2 Protective Paint Cover x 2 Grill x 2 Screw for mega mounting plates x 2 Screw for base or for L-Bracket X 2 L-Bracket for safety chain x 2 Bracket x 2 Glue Strips x 2 3
UNPACKING After unpacking, inspect the contents to confirm the following items are contained: Speakers x 2 Large bracket screws x 4 Safety chain x 2 Protective Paint Cover x 2 Grill x 2 Screw for mega mounting plates x 2 Screw for base or for L-Bracket X 2 L-Bracket for safety chain x 2 Bracket x 2 Glue Strips x 2 3
Owners Manual
Page 5
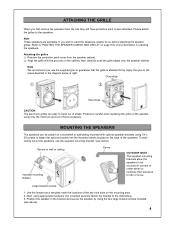
... easy to be placed on a bookshelf or wall/ceiling mounted with the grooves on painting the speakers. MOUNTING THE SPEAKERS The speakers can be mounted in the diagram below at right. Large bracket screws 1. Attaching the grilles ᕃ Remove the protective paint cover from the box they will have protective paint covers attached. Position...
... easy to be placed on a bookshelf or wall/ceiling mounted with the grooves on painting the speakers. MOUNTING THE SPEAKERS The speakers can be mounted in the diagram below at right. Large bracket screws 1. Attaching the grilles ᕃ Remove the protective paint cover from the box they will have protective paint covers attached. Position...
Owners Manual
Page 6
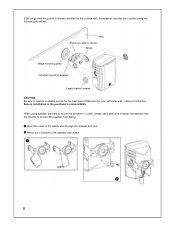
...reliable source for the best type of the safety wire through the bracket and loop. ᕢ Attach the L-bracket to prevent the speaker from falling. ᕡ Insert the clasp of fasteners for your particular wall / ceiling construction. Secure installation is already installed on the outside... wall, the speaker can also be mounted using speaker brackets to mount the speaker on a wall, please use safety wire between the speaker and the bracket to the speaker with screw. ᕡ ᕢ 5 If the mega mounting plate is...
...reliable source for the best type of the safety wire through the bracket and loop. ᕢ Attach the L-bracket to prevent the speaker from falling. ᕡ Insert the clasp of fasteners for your particular wall / ceiling construction. Secure installation is already installed on the outside... wall, the speaker can also be mounted using speaker brackets to mount the speaker on a wall, please use safety wire between the speaker and the bracket to the speaker with screw. ᕡ ᕢ 5 If the mega mounting plate is...
Owners Manual
Page 7
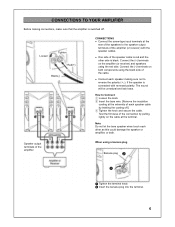
.... CONNECTIONS TO YOUR AMPLIFIER Before making sure not to reverse the polarity (+,-). Connect the (+) terminals on the cable at the terminal. If the speaker is switched off .] Tighten the knob and secure the cable. Insert the banana plug into the terminal. 6 Test the firmness of the amplifier... When using the red side. Note Do not let the bare speaker wires touch each other side is black. The sound will be unnatural and lack bass. Loosen Tighten Red(+) Black(-) CONNECTIONS • Connect the...
.... CONNECTIONS TO YOUR AMPLIFIER Before making sure not to reverse the polarity (+,-). Connect the (+) terminals on the cable at the terminal. If the speaker is switched off .] Tighten the knob and secure the cable. Insert the banana plug into the terminal. 6 Test the firmness of the amplifier... When using the red side. Note Do not let the bare speaker wires touch each other side is black. The sound will be unnatural and lack bass. Loosen Tighten Red(+) Black(-) CONNECTIONS • Connect the...
Owners Manual
Page 8
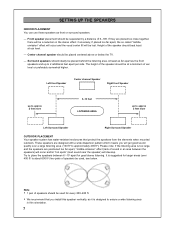
... ideally be placed behind the listening area, At least as far apart as the front speakers and up to approx 2 feet more Left Surround Speaker Right Surround Speaker OUTDOOR PLACEMENT Your speaker system has water-resistant enclosures that you will be a reduction in the stereo effect. Conversely, If placed too far apart, the so called "middleomission...
... ideally be placed behind the listening area, At least as far apart as the front speakers and up to approx 2 feet more Left Surround Speaker Right Surround Speaker OUTDOOR PLACEMENT Your speaker system has water-resistant enclosures that you will be a reduction in the stereo effect. Conversely, If placed too far apart, the so called "middleomission...
Owners Manual
Page 9
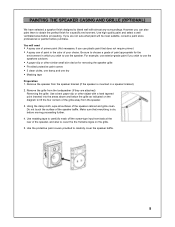
...Do not touch the surface of the speaker, and also to cover the the Yamaha logos on the diagram to lift the four corners of paint in which you wish to carefully mask off the screw-type input terminals at the rear of the speaker baffle. Use the protective paint covers provided...does not require primer) • A spray can also paint them to choose a grade of paint appropriate for the environment in the color of the speaker cabinet and grille clean. You will be most suitable, consult a paint store professional or painter before purchase. Removing the grille: Use a bent paper clip...
...Do not touch the surface of the speaker, and also to cover the the Yamaha logos on the diagram to lift the four corners of paint in which you wish to carefully mask off the screw-type input terminals at the rear of the speaker baffle. Use the protective paint covers provided...does not require primer) • A spray can also paint them to choose a grade of paint appropriate for the environment in the color of the speaker cabinet and grille clean. You will be most suitable, consult a paint store professional or painter before purchase. Removing the grille: Use a bent paper clip...
Owners Manual
Page 10
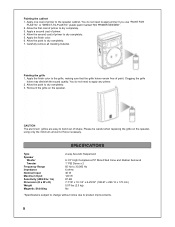
... the finish color. 6. Painting the grille 1, Apply the finish color to product improvements. 9 Apply a second coat of force necessary. SPECIFICATIONS Type Speaker Woofer Tweeter Frequency Range Impedance Nominal Input Maximum Input Sensitivity (dB/2.83v. 1m) Dimension (H x W x D) Weight Magnetic Shielding 2-way Acoustic Suspension 6-1/2" High ...PAINT FOR PLASTIC" or "DIRECT-TO-PLASTIC" plastic paint marked "NO PRIMER NEEDED". 2. Painting the cabinet 1. Allow the paint to the speaker cabinet. Remount the grille on the speaker, using only the minimum amount of primer. 4.
... the finish color. 6. Painting the grille 1, Apply the finish color to product improvements. 9 Apply a second coat of force necessary. SPECIFICATIONS Type Speaker Woofer Tweeter Frequency Range Impedance Nominal Input Maximum Input Sensitivity (dB/2.83v. 1m) Dimension (H x W x D) Weight Magnetic Shielding 2-way Acoustic Suspension 6-1/2" High ...PAINT FOR PLASTIC" or "DIRECT-TO-PLASTIC" plastic paint marked "NO PRIMER NEEDED". 2. Painting the cabinet 1. Allow the paint to the speaker cabinet. Remount the grille on the speaker, using only the minimum amount of primer. 4.


