
Owners Manual
Page 1
NS-AW570 INDOOR / OUTDOOR SPEAKER SYSTEM CONTENTS CONSUMER PRECAUTIONS 2 UNPACKING 3 ATTACHING THE GRILLE 4 MOUNTING THE SPEAKERS 4 CONNECTIONS TO YOUR AMPLIFIER 6 SETTING UP THE SPEAKERS 7 PAINTING THE SPEAKER CASING AND GRILLE (OPTIONAL) 8 SPECIFICATIONS 9 OWNER'S MANUAL
NS-AW570 INDOOR / OUTDOOR SPEAKER SYSTEM CONTENTS CONSUMER PRECAUTIONS 2 UNPACKING 3 ATTACHING THE GRILLE 4 MOUNTING THE SPEAKERS 4 CONNECTIONS TO YOUR AMPLIFIER 6 SETTING UP THE SPEAKERS 7 PAINTING THE SPEAKER CASING AND GRILLE (OPTIONAL) 8 SPECIFICATIONS 9 OWNER'S MANUAL
Owners Manual
Page 3
... power amplifier / receiver volume control before setting up your NS-AW570 speakers. • When installing these speakers outdoors, try to minimize their exposure to rain and snow by mounting the speaker in corners or under eaves. • Since these speakers can result in personal injury. • Do not fasten the speakers to walls with nails, adhesives, or other unsafe hardware. Always turn the receiver / amplifier unit off when installing or removing input cables...
... power amplifier / receiver volume control before setting up your NS-AW570 speakers. • When installing these speakers outdoors, try to minimize their exposure to rain and snow by mounting the speaker in corners or under eaves. • Since these speakers can result in personal injury. • Do not fasten the speakers to walls with nails, adhesives, or other unsafe hardware. Always turn the receiver / amplifier unit off when installing or removing input cables...
Owners Manual
Page 4
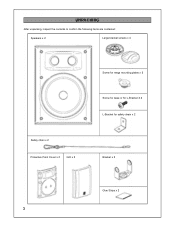
UNPACKING After unpacking, inspect the contents to confirm the following items are contained: Speakers x 2 Large bracket screws x 4 Safety chain x 2 Protective Paint Cover x 2 Grill x 2 Screw for mega mounting plates x 2 Screw for base or for L-Bracket X 2 L-Bracket for safety chain x 2 Bracket x 2 Glue Strips x 2 3
UNPACKING After unpacking, inspect the contents to confirm the following items are contained: Speakers x 2 Large bracket screws x 4 Safety chain x 2 Protective Paint Cover x 2 Grill x 2 Screw for mega mounting plates x 2 Screw for base or for L-Bracket X 2 L-Bracket for safety chain x 2 Bracket x 2 Glue Strips x 2 3
Owners Manual
Page 5
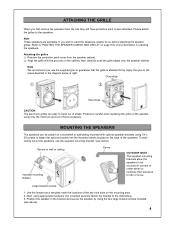
... force necessary. Refer to guarantee that the grille is attached firmly. Please be careful when replacing the grille on the speaker, using 1/4 x 20 screws to be placed on a bookshelf or wall/ceiling mounted with the grooves on painting the speakers. If you use the supplied mounting bracket. (see above) 4 Next, using the two large bracket screws included. (see below at right. Note We recommend you wish to...
... force necessary. Refer to guarantee that the grille is attached firmly. Please be careful when replacing the grille on the speaker, using 1/4 x 20 screws to be placed on a bookshelf or wall/ceiling mounted with the grooves on painting the speakers. If you use the supplied mounting bracket. (see above) 4 Next, using the two large bracket screws included. (see below at right. Note We recommend you wish to...
Owners Manual
Page 6
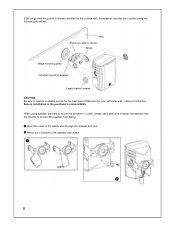
... the speaker with screw. ᕡ ᕢ 5 Secure installation is already installed on a wall, please use safety wire between the speaker and the bracket to prevent the speaker from falling. ᕡ Insert the clasp of fasteners for the best type of the safety wire through the bracket and loop. ᕢ Attach the L-bracket to consult a reliable source for your particular wall / ceiling construction. If the mega mounting plate...
... the speaker with screw. ᕡ ᕢ 5 Secure installation is already installed on a wall, please use safety wire between the speaker and the bracket to prevent the speaker from falling. ᕡ Insert the clasp of fasteners for the best type of the safety wire through the bracket and loop. ᕢ Attach the L-bracket to consult a reliable source for your particular wall / ceiling construction. If the mega mounting plate...
Owners Manual
Page 7
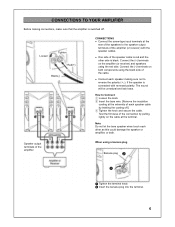
... connection by pulling lightly on the cable at the extremity of the amplifier (or receiver) with reversed polarity. Connect the (-) terminals on the amplifier (or receiver) and speakers using a banana plug Banana plug Tighten the terminal knob. Note Do not let the bare speaker wires touch each speaker making connections, make sure that the amplifier is switched off .] Tighten the knob and secure the cable. How to the speaker output terminals of each speaker cable...
... connection by pulling lightly on the cable at the extremity of the amplifier (or receiver) with reversed polarity. Connect the (-) terminals on the amplifier (or receiver) and speakers using a banana plug Banana plug Tighten the terminal knob. Note Do not let the bare speaker wires touch each speaker making connections, make sure that the amplifier is switched off .] Tighten the knob and secure the cable. How to the speaker output terminals of each speaker cable...
Owners Manual
Page 8
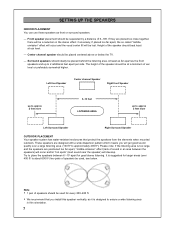
... . Left front Speaker Center channel Speaker Right front Speaker up to approx 2 feet more Left Surround Speaker Right Surround Speaker OUTDOOR PLACEMENT Your speaker system has water-resistant enclosures that you will develop. The height of the speaker should be at ear level. - It is too large, and the speakers are positioned too far apart, "middle-omission" effect (lack of speakers be lost. SETTING UP THE SPEAKERS INDOOR PLACEMENT You can use these speakers as...
... . Left front Speaker Center channel Speaker Right front Speaker up to approx 2 feet more Left Surround Speaker Right Surround Speaker OUTDOOR PLACEMENT Your speaker system has water-resistant enclosures that you will develop. The height of the speaker should be at ear level. - It is too large, and the speakers are positioned too far apart, "middle-omission" effect (lack of speakers be lost. SETTING UP THE SPEAKERS INDOOR PLACEMENT You can use these speakers as...
Owners Manual
Page 9
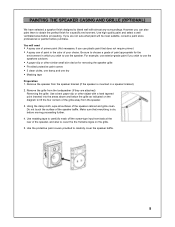
..., wipe all surfaces of the speaker baffle. Remove the grille from the speaker. 3. If you use the speaker. Use masking tape to carefully mask off the screw-type input terminals at the rear of the speaker, and also to cover the the Yamaha logos on the diagram to lift the four corners of your choice. PAINTING THE SPEAKER CASING AND GRILLE (OPTIONAL) We have selected...
..., wipe all surfaces of the speaker baffle. Remove the grille from the speaker. 3. If you use the speaker. Use masking tape to carefully mask off the screw-type input terminals at the rear of the speaker, and also to cover the the Yamaha logos on the diagram to lift the four corners of your choice. PAINTING THE SPEAKER CASING AND GRILLE (OPTIONAL) We have selected...
Owners Manual
Page 10
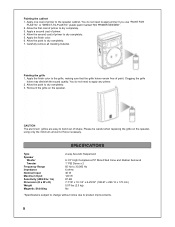
.... 5. Clogging the grille holes may diminish the sound quality. Apply the finish color. 6. Apply one coat of primer to the speaker cabinet. Painting the cabinet 1. SPECIFICATIONS Type Speaker Woofer Tweeter Frequency Range Impedance Nominal Input Maximum Input Sensitivity (dB/2.83v. 1m) Dimension (H x W x D) Weight Magnetic Shielding 2-way Acoustic Suspension 6-1/2" High Compliance P.P Mica Filled Cone and Rubber Surround 1" PEI Dome x 2 60 Hz to 30,000 Hz 6 ohms 40 W 120...
.... 5. Clogging the grille holes may diminish the sound quality. Apply the finish color. 6. Apply one coat of primer to the speaker cabinet. Painting the cabinet 1. SPECIFICATIONS Type Speaker Woofer Tweeter Frequency Range Impedance Nominal Input Maximum Input Sensitivity (dB/2.83v. 1m) Dimension (H x W x D) Weight Magnetic Shielding 2-way Acoustic Suspension 6-1/2" High Compliance P.P Mica Filled Cone and Rubber Surround 1" PEI Dome x 2 60 Hz to 30,000 Hz 6 ohms 40 W 120...
Owners Manual
Page 11
... or removed. www.yamaha.ca 10 date of improper operations, maintenance or repair. 2. ROUTINE MAINTENANCE WORK AND THE RESULTS OF NORMAL WEAR ARE NOT COVERED BY THIS WARRANTY (see exclusions). This coverage extends to the guitar amplifier and/or electronic auto-tuner, if included by the original purchaser. 7. Guitars no longer owned by Yamaha in the box with your Yamaha...
... or removed. www.yamaha.ca 10 date of improper operations, maintenance or repair. 2. ROUTINE MAINTENANCE WORK AND THE RESULTS OF NORMAL WEAR ARE NOT COVERED BY THIS WARRANTY (see exclusions). This coverage extends to the guitar amplifier and/or electronic auto-tuner, if included by the original purchaser. 7. Guitars no longer owned by Yamaha in the box with your Yamaha...


