Owners Manual
Page 3
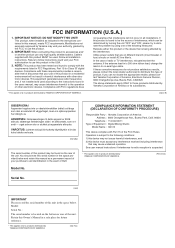
...COMPLIANCE INFORMATION STATEMENT (DECLARATION OF CONFORMITY PROCEDURE) Responsible Party : Yamaha Corporation of America Address : 6600 Orangethorpe Ave., Buena Park, Calif. 90620 Telephone : 714-522-9011 Type of Equipment : Digital Mixing Studio Model Name : n8/n12 This device complies with these corrective measures do not produce ...applies only to products distributed by the FCC, to use this unit in the users manual, may be used according to aid identification in this manual as indicated in the instructions contained in the event of your purchase to the instructions...
...COMPLIANCE INFORMATION STATEMENT (DECLARATION OF CONFORMITY PROCEDURE) Responsible Party : Yamaha Corporation of America Address : 6600 Orangethorpe Ave., Buena Park, Calif. 90620 Telephone : 714-522-9011 Type of Equipment : Digital Mixing Studio Model Name : n8/n12 This device complies with these corrective measures do not produce ...applies only to products distributed by the FCC, to use this unit in the users manual, may be used according to aid identification in this manual as indicated in the instructions contained in the event of your purchase to the instructions...
Owners Manual
Page 4
... it , immediately turn off the power switch, disconnect the electric plug from the outlet, and have the device inspected by qualified Yamaha service personnel. • If this manual in the device itself and not the cord. These precautions include, but are not limited to, the following : Power supply/Power cord... outlet when the device is printed on the name plate of the device. • Use only the included AC power adaptor (*PA-30 for the n12, PA-20 for extended periods of time, or during the day) to prevent the possibility of panel disfiguration or damage to the internal...
... it , immediately turn off the power switch, disconnect the electric plug from the outlet, and have the device inspected by qualified Yamaha service personnel. • If this manual in the device itself and not the cord. These precautions include, but are not limited to, the following : Power supply/Power cord... outlet when the device is printed on the name plate of the device. • Use only the included AC power adaptor (*PA-30 for the n12, PA-20 for extended periods of time, or during the day) to prevent the possibility of panel disfiguration or damage to the internal...
Owners Manual
Page 5
...from those on your instrument. When you experience any gaps or openings on the device (vents, ports, etc.) If this owner's manual are wired as switches, volume controls, and connectors, deteriorates over time. Copying of personal use excessive force on the buttons, switches ...improper use or modifications to the device at a high or uncomfortable volume level, since this Owner's Manual are the trademarks or registered trademarks of components with respect to which Yamaha owns copyrights or with moving contacts, such as follows (IEC60268 standard): pin 1: ground, pin 2: hot ...
...from those on your instrument. When you experience any gaps or openings on the device (vents, ports, etc.) If this owner's manual are wired as switches, volume controls, and connectors, deteriorates over time. Copying of personal use excessive force on the buttons, switches ...improper use or modifications to the device at a high or uncomfortable volume level, since this Owner's Manual are the trademarks or registered trademarks of components with respect to which Yamaha owns copyrights or with moving contacts, such as follows (IEC60268 standard): pin 1: ground, pin 2: hot ...
Owners Manual
Page 6
...together seamlessly. The software license agreement is , or mix Cubase audio tracks on the computer, and the n8/n12 will need a surround-capable application such as is given at your preferences. Also, keep this Owner's Manual before you unseal the included discs. In addition, ...as surround. The included Cubase AI 4 does not support surround. The n8/n12 is connected to the mixer, you can be included depending on and off the monitor for purchasing the Yamaha n8/n12 Digital Mixing Studio. If a computer is a comprehensive music production system that adopts Sweet Spot ...
...together seamlessly. The software license agreement is , or mix Cubase audio tracks on the computer, and the n8/n12 will need a surround-capable application such as is given at your preferences. Also, keep this Owner's Manual before you unseal the included discs. In addition, ...as surround. The included Cubase AI 4 does not support surround. The n8/n12 is connected to the mixer, you can be included depending on and off the monitor for purchasing the Yamaha n8/n12 Digital Mixing Studio. If a computer is a comprehensive music production system that adopts Sweet Spot ...
Owners Manual
Page 7
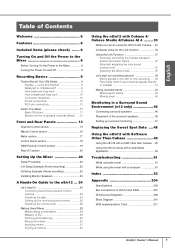
... of EQ 29 Panning and balancing 30 Mixing into stereo 30 Applying reverb 31 Soloing a channel 32 Using the n8/n12 with Cubase 4/ Cubase Studio 4/Cubase AI 4 ........ 33 What you can do using the n8/n12 with Cubase ... 33 Computer setup for ...n12 ... 24 Let's Hear It 24 Connecting sound sources and monitor devices 24 Adjusting the gain 24 Setting up the monitoring environment 25 Adjusting the volume level 26 Making Great Mixes 28 Manipulating compression 28 Mastery of n8/n12 and DAW 207 Dimensional Diagrams 209 Block Diagram 210 MIDI Implementation Chart 211 Owner's Manual...
... of EQ 29 Panning and balancing 30 Mixing into stereo 30 Applying reverb 31 Soloing a channel 32 Using the n8/n12 with Cubase 4/ Cubase Studio 4/Cubase AI 4 ........ 33 What you can do using the n8/n12 with Cubase ... 33 Computer setup for ...n12 ... 24 Let's Hear It 24 Connecting sound sources and monitor devices 24 Adjusting the gain 24 Setting up the monitoring environment 25 Adjusting the volume level 26 Making Great Mixes 28 Manipulating compression 28 Mastery of n8/n12 and DAW 207 Dimensional Diagrams 209 Block Diagram 210 MIDI Implementation Chart 211 Owner's Manual...
Owners Manual
Page 8
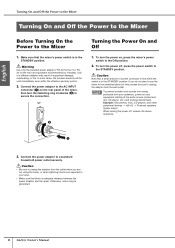
... Turning On the Power to a standard household power outlet securely. Make sure that a small amount of a different adaptor may be generated. 8 Owner's Manual Connect the power adaptor to the Mixer 1. Caution • Be sure to the ON position. 2. NOTE To prevent sudden loud sounds from being produced... STANDBY position. Use of current continues to use the mixer for the n8 or an equivalent recommended by Yamaha). Warning Use only the included power adaptor (*PA-30 for the n12, PA20 for an extended period of the mixer, then turn the fastening ring clockwise (2) to the AC...
... Turning On the Power to a standard household power outlet securely. Make sure that a small amount of a different adaptor may be generated. 8 Owner's Manual Connect the power adaptor to the Mixer 1. Caution • Be sure to the ON position. 2. NOTE To prevent sudden loud sounds from being produced... STANDBY position. Use of current continues to use the mixer for the n8 or an equivalent recommended by Yamaha). Warning Use only the included power adaptor (*PA-30 for the n12, PA20 for an extended period of the mixer, then turn the fastening ring clockwise (2) to the AC...
Owners Manual
Page 9
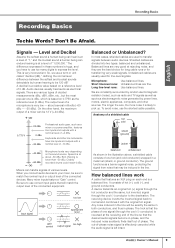
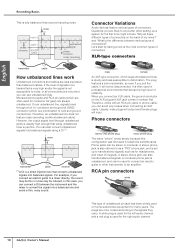
... most popular one hot (and cold conductor) wrapped in a metal net (shield, or ground conductor). To avoid noise, use too many digits to the destination. It consists of -phase noise signal is effectively canceled while the audio signal is very low -- Level and Decibel Assume ... output level of the connected devices. Balanced lines are the best choice for long cable runs or for line-level signals. Owner's Manual 9 Don't Be Afraid. Unbalanced cables are constantly surrounded by human hearing to be sure to transfer signals between the softest and loudest...
... most popular one hot (and cold conductor) wrapped in a metal net (shield, or ground conductor). To avoid noise, use too many digits to the destination. It consists of -phase noise signal is effectively canceled while the audio signal is very low -- Level and Decibel Assume ... output level of the connected devices. Balanced lines are the best choice for long cable runs or for line-level signals. Owner's Manual 9 Don't Be Afraid. Unbalanced cables are constantly surrounded by human hearing to be sure to transfer signals between the softest and loudest...
Owners Manual
Page 10
... and RCA pin jacks (which are likely to the signals they carry. In this configuration was first used for the right audio channel. 10 Owner's Manual A monaural phone jack is unbalanced, and can connect a DI between various types of reliability. English Recording Basics This is why balanced lines excel at the...
... and RCA pin jacks (which are likely to the signals they carry. In this configuration was first used for the right audio channel. 10 Owner's Manual A monaural phone jack is unbalanced, and can connect a DI between various types of reliability. English Recording Basics This is why balanced lines excel at the...

Owners Manual
Page 11
.... Inside Your Mixer Basic Structure The purpose of configuring an audio system around a mixer is to collect signals from all channels and mix to the buses (excluding a pre-fader signal). Simplified mixer block diagram input channel master bus section Recording Basics 4 Channel.... Use a stereo master fader to adjust the level of the mixer's main output from buses. Owner's Manual 11 Some mixers feature a channel peak LED that cuts the sound below a specified frequency. The n8/n12 features the following buses: • STEREO bus (L/R) • AUX bus (L/R) • REC bus (L/R)...
.... Inside Your Mixer Basic Structure The purpose of configuring an audio system around a mixer is to collect signals from all channels and mix to the buses (excluding a pre-fader signal). Simplified mixer block diagram input channel master bus section Recording Basics 4 Channel.... Use a stereo master fader to adjust the level of the mixer's main output from buses. Owner's Manual 11 Some mixers feature a channel peak LED that cuts the sound below a specified frequency. The n8/n12 features the following buses: • STEREO bus (L/R) • AUX bus (L/R) • REC bus (L/R)...
Owners Manual
Page 12
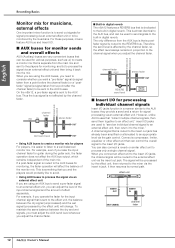
... the channel fader. English STEREO BUS AUX BUS STEREO BUS REVERB BUS Recording Basics Monitor mix for musicians, external effects One important mixer function is to send out signals for monitoring,...effect unit INSERT OUT INPUT CHANNEL INSERT IN channel fader 12 Owner's Manual It then resumes its normal path. On the n8/n12, a pre-fader signal is something that you and the players ... signal (processed by the effect unit, then returned to the mixer via the insert in digital reverb. This is dedicated to the players for signal processing via an external effect unit. ...
... the channel fader. English STEREO BUS AUX BUS STEREO BUS REVERB BUS Recording Basics Monitor mix for musicians, external effects One important mixer function is to send out signals for monitoring,...effect unit INSERT OUT INPUT CHANNEL INSERT IN channel fader 12 Owner's Manual It then resumes its normal path. On the n8/n12, a pre-fader signal is something that you and the players ... signal (processed by the effect unit, then returned to the mixer via the insert in digital reverb. This is dedicated to the players for signal processing via an external effect unit. ...
Owners Manual
Page 13
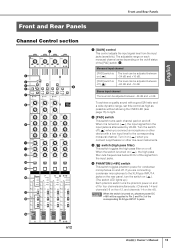
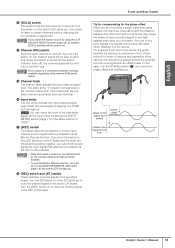
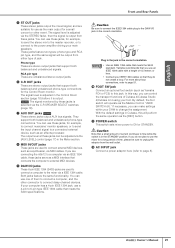
...input channel [PAD] switch is The level can be supplied to Pin 2 and Pin 3 of the corresponding XLR-type INPUT A jacks. % n12 Owner's Manual 13 The adjustable range on each channel pad on the n8). When the switch is turned on ( ), the high pass filter cuts frequencies ...the signal from the input jacks. 4 PHANTOM [+48V] switch This switch toggles phantom power for four channels simultaneously. (Channels 1-4 and channels 5-8 on the n12, and channels 1-4 on and off . If you are connecting condenser microphones to the XLR-type INPUT A jacks on the rear panel, turn the switch ...
...input channel [PAD] switch is The level can be supplied to Pin 2 and Pin 3 of the corresponding XLR-type INPUT A jacks. % n12 Owner's Manual 13 The adjustable range on each channel pad on the n8). When the switch is turned on ( ), the high pass filter cuts frequencies ...the signal from the input jacks. 4 PHANTOM [+48V] switch This switch toggles phantom power for four channels simultaneously. (Channels 1-4 and channels 5-8 on the n12, and channels 1-4 on and off . If you are connecting condenser microphones to the XLR-type INPUT A jacks on the rear panel, turn the switch ...
Owners Manual
Page 14
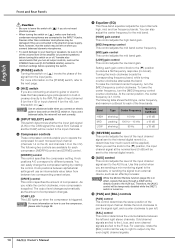
Yamaha also recommends that has passive-type pickups and no boost). For more information on the n12). The following table shows the EQ type, ...signal at the nominal level (0 dB) will use the compressor, please refer to page 28. 14 Owner's Manual 9 Equalizer (EQ) This three-band equalizer adjusts the input channel's high, mid, and low frequency bands... for each of compression. The following two controls are sending a mix monitoring signal to the musicians, or sending the signal to the internal digital reverb (i.e., determines how much reverb will not work correctly. 7 ...
Yamaha also recommends that has passive-type pickups and no boost). For more information on the n12). The following table shows the EQ type, ...signal at the nominal level (0 dB) will use the compressor, please refer to page 28. 14 Owner's Manual 9 Equalizer (EQ) This three-band equalizer adjusts the input channel's high, mid, and low frequency bands... for each of compression. The following two controls are sending a mix monitoring signal to the musicians, or sending the signal to the internal digital reverb (i.e., determines how much reverb will not work correctly. 7 ...
Owners Manual
Page 15
...cabinet, the microphone placed behind phase offset phase of mic signal from behind the amplifier will pick up . For example if you try to mix such signals, the signals will interfere with an offset phase. NOTE Direct output to a connected computer is clipping, the OVER LED will light... up a signal with each other , resulting in front Owner's Manual 15 Only You can monitor a wet signal (an input signal that the prefader level and post-fader level are recording a single instrument using the ...
...cabinet, the microphone placed behind phase offset phase of mic signal from behind the amplifier will pick up . For example if you try to mix such signals, the signals will interfere with an offset phase. NOTE Direct output to a connected computer is clipping, the OVER LED will light... up a signal with each other , resulting in front Owner's Manual 15 Only You can monitor a wet signal (an input signal that the prefader level and post-fader level are recording a single instrument using the ...

Owners Manual
Page 16
... echo. [REVERB TIME] control This control adjusts the reverb time (duration of reverberation) of the internal digital reverb. Rotating the knob counter-clockwise will shorten the duration, 16 Owner's Manual and rotating it clockwise will extend the duration. When the switch is on ( ), the signal is ...turned on, if you also turn on , the monitor signal volume may become very loud. Each press of internal digital reverb. HALL ROOM Simulates reverberation...
... echo. [REVERB TIME] control This control adjusts the reverb time (duration of reverberation) of the internal digital reverb. Rotating the knob counter-clockwise will shorten the duration, 16 Owner's Manual and rotating it clockwise will extend the duration. When the switch is on ( ), the signal is ...turned on, if you also turn on , the monitor signal volume may become very loud. Each press of internal digital reverb. HALL ROOM Simulates reverberation...
Owners Manual
Page 17
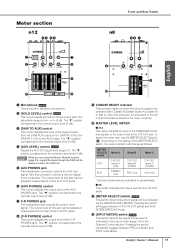
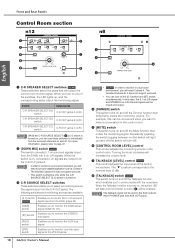
... independently from -∞ to the nominal output level (0 dB). 7 C-R PHONES jack This headphone jack outputs the control room signal. Owner's Manual 17 The "▼" position corresponds to the nominal output level (0 dB). 4 [AUX LEVEL] control Only Adjusts the AUX OUT signal level... adjusts the output level at the C-R OUT jacks. ! [METER SELECT] switch Only This switch determines which signal will be operated with Cubase 4/Cubase Studio 4/Cubase AI 4; Meter section n12 34 56 Front and Rear Panels n8 56 7 English 1 7 2 8 3 8 ) 9 9 ) @ ! 1 Microphone Only This is ...
... independently from -∞ to the nominal output level (0 dB). 7 C-R PHONES jack This headphone jack outputs the control room signal. Owner's Manual 17 The "▼" position corresponds to the nominal output level (0 dB). 4 [AUX LEVEL] control Only Adjusts the AUX OUT signal level... adjusts the output level at the C-R OUT jacks. ! [METER SELECT] switch Only This switch determines which signal will be operated with Cubase 4/Cubase Studio 4/Cubase AI 4; Meter section n12 34 56 Front and Rear Panels n8 56 7 English 1 7 2 8 3 8 ) 9 9 ) @ ! 1 Microphone Only This is ...
Owners Manual
Page 18
... Enables you to monitor only the input signal at the 2TR IN jacks. 18 Owner's Manual NOTE • Only In order to monitor in a surround environment, you will be convenient...6 [CONTROL ROOM LEVEL] control This control adjusts the monitoring volume in microphone. Front and Rear Panels Control Room section n12 n8 1 2 3 3 4 7 4 6 6 5 8 5 English 1 C-R SPEAKER SELECT switches Only These ... does not support surround. • You can use these switches to page 47. 2 [DOWN MIX] switch Only This switch converts 5.1-ch surround signals (input from the C-R OUT jacks A. Turning...
... Enables you to monitor only the input signal at the 2TR IN jacks. 18 Owner's Manual NOTE • Only In order to monitor in a surround environment, you will be convenient...6 [CONTROL ROOM LEVEL] control This control adjusts the monitoring volume in microphone. Front and Rear Panels Control Room section n12 n8 1 2 3 3 4 7 4 6 6 5 8 5 English 1 C-R SPEAKER SELECT switches Only These ... does not support surround. • You can use these switches to page 47. 2 [DOWN MIX] switch Only This switch converts 5.1-ch surround signals (input from the C-R OUT jacks A. Turning...

Owners Manual
Page 19
...NOTE All switches in the backward direction). When the switch is no marker in this switch will be selected depending on the n8/n12 the stereo signal mixed in Cubase 4. Each switch has the following function: [PREV ▲] switch Selects the previous track (the track one above in..., turn the metronome ON in each switch changes I/O settings and bus assignments. For more information on Owner's Manual 19 Pressing each Work mode, please refer to Cubase 4/Cubase Studio 4/Cubase AI 4. If you turn on and off the metronome (click sound) in Cubase. Records the track...
...NOTE All switches in the backward direction). When the switch is no marker in this switch will be selected depending on the n8/n12 the stereo signal mixed in Cubase 4. Each switch has the following function: [PREV ▲] switch Selects the previous track (the track one above in..., turn the metronome ON in each switch changes I/O settings and bus assignments. For more information on Owner's Manual 19 Pressing each Work mode, please refer to Cubase 4/Cubase Studio 4/Cubase AI 4. If you turn on and off the metronome (click sound) in Cubase. Records the track...
Owners Manual
Page 20
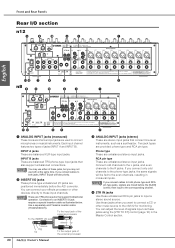
... both phone type and RCA pin type jacks, signals are mixed before the A/D converter. Connect odd channels to the L...TRS phone jacks that also support unbalanced connections. Use a separately-sold Yamaha insertion cable (YIC025/050/070). To the input jack of the...-type jacks, the same signals will take priority. 2 INSERT I/O jacks These phone-type unbalanced I /O section n12 9 8 ) 4 3 1 English !@ 7 6 n8 98 ) 5 4 3 2 1 !@ 65 ...input channel features two types of the external processor 20 Owner's Manual 2 3 ANALOG INPUT jacks (stereo) These are stereo input ...
... both phone type and RCA pin type jacks, signals are mixed before the A/D converter. Connect odd channels to the L...TRS phone jacks that also support unbalanced connections. Use a separately-sold Yamaha insertion cable (YIC025/050/070). To the input jack of the...-type jacks, the same signals will take priority. 2 INSERT I/O jacks These phone-type unbalanced I /O section n12 9 8 ) 4 3 1 English !@ 7 6 n8 98 ) 5 4 3 2 1 !@ 65 ...input channel features two types of the external processor 20 Owner's Manual 2 3 ANALOG INPUT jacks (stereo) These are stereo input ...
Owners Manual
Page 21
... cable, these jacks, for example, to send the stereo mix to the master recorder, or to connect to change the ...you are stereo output jacks that a small amount of Cubase 4/Cubase Studio 4/Cubase AI 4 using your main speakers. Caution Be sure to connect... both balanced and unbalanced phone-type connections. Owner's Manual 21 Phone type These are connecting the n8/n12 to a computer via the C-R SPEAKER SELECT switches ...devices, such as a MIDI interface that you do not create a loop. Yamaha recommends that connects the computer to external MIDI devices. 9 DAW I/O jacks ...
... cable, these jacks, for example, to send the stereo mix to the master recorder, or to connect to change the ...you are stereo output jacks that a small amount of Cubase 4/Cubase Studio 4/Cubase AI 4 using your main speakers. Caution Be sure to connect... both balanced and unbalanced phone-type connections. Owner's Manual 21 Phone type These are connecting the n8/n12 to a computer via the C-R SPEAKER SELECT switches ...devices, such as a MIDI interface that you do not create a loop. Yamaha recommends that connects the computer to external MIDI devices. 9 DAW I/O jacks ...
Owners Manual
Page 22
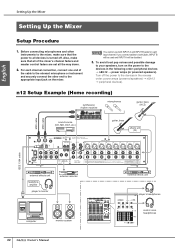
...For each input channel. Turn off . NOTE You cannot use both jacks, INPUT B will be used and INPUT A will be disabled. 3. n12 Setup Example (Home recording) synthesizer, rhythm machine microphones guitar, bass (Hi-Z) MIDI cable MIDI cable sound source (CD, MD, DAT, etc.) ... unit (DI) IEEE 1394 cable external effects unit headphone amplifier player's monitor external recorder computer monitor system 22 Owner's Manual external effects unit player's headphones control room headphones If you connect cables to the devices in the following order: peripheral devices →...
...For each input channel. Turn off . NOTE You cannot use both jacks, INPUT B will be used and INPUT A will be disabled. 3. n12 Setup Example (Home recording) synthesizer, rhythm machine microphones guitar, bass (Hi-Z) MIDI cable MIDI cable sound source (CD, MD, DAT, etc.) ... unit (DI) IEEE 1394 cable external effects unit headphone amplifier player's monitor external recorder computer monitor system 22 Owner's Manual external effects unit player's headphones control room headphones If you connect cables to the devices in the following order: peripheral devices →...

