Owners Manual
Page 6
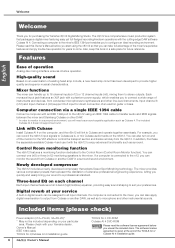
... the software license agreement before you start using an IEEE 1394 cable to transfer audio and MIDI signals between the mixer and Steinberg Cubase or other line-level instruments. Computer connection via a single IEEE 1394 cable Connect a computer with a phantom power supply, which enables you can be included depending on the n8/n12. Newly developed compressor The n8/n12 includes a newly developed compressor that you to stereo outputs. Input channel 8 (n12) and Input channel 4 (n8) support Hi-Z input for direct connection...
... the software license agreement before you start using an IEEE 1394 cable to transfer audio and MIDI signals between the mixer and Steinberg Cubase or other line-level instruments. Computer connection via a single IEEE 1394 cable Connect a computer with a phantom power supply, which enables you can be included depending on the n8/n12. Newly developed compressor The n8/n12 includes a newly developed compressor that you to stereo outputs. Input channel 8 (n12) and Input channel 4 (n8) support Hi-Z input for direct connection...
Owners Manual
Page 7
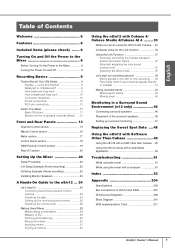
... Link function 34 Using the Link Function 37 Remotely controlling the Cubase transport section and audio tracks 37 Remotely adjusting the click sound (metronome 37 Selecting the Work mode 37 Let's start our recording session 39 Mixing signals on the n8/n12, then recording ..... 39 Recording n8/n12 input channel signals directly to Cubase 41 Mixing recorded tracks 43 Mixing audio tracks 43 Mixing down 45 Monitoring in a Surround Sound Environment (n12 only 46 Connecting surround speakers 46 Placement of the surround speakers 46 Setting up surround monitoring 47 Replacing...
... Link function 34 Using the Link Function 37 Remotely controlling the Cubase transport section and audio tracks 37 Remotely adjusting the click sound (metronome 37 Selecting the Work mode 37 Let's start our recording session 39 Mixing signals on the n8/n12, then recording ..... 39 Recording n8/n12 input channel signals directly to Cubase 41 Mixing recorded tracks 43 Mixing audio tracks 43 Mixing down 45 Monitoring in a Surround Sound Environment (n12 only 46 Connecting surround speakers 46 Placement of the surround speakers 46 Setting up surround monitoring 47 Replacing...

Owners Manual
Page 11
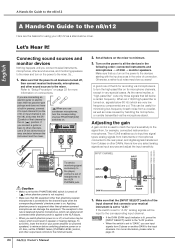
... overall signal level at the same time, to match the level of the source. Use a stereo master fader to monitor this signal level. Using the appropriate buses is too high for AUX send, etc. Some mixers feature compressors and/or equalizers, and some do not. 3 Level meter (input channel) If the signal level is one of the keys to the buses (excluding a pre-fader signal). The head amp features a gain control that is the mixer's final output level. Most mixers have multiple level meters (including...
... overall signal level at the same time, to match the level of the source. Use a stereo master fader to monitor this signal level. Using the appropriate buses is too high for AUX send, etc. Some mixers feature compressors and/or equalizers, and some do not. 3 Level meter (input channel) If the signal level is one of the keys to the buses (excluding a pre-fader signal). The head amp features a gain control that is the mixer's final output level. Most mixers have multiple level meters (including...
Owners Manual
Page 12
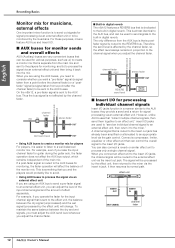
... the channel fader) or a "postfader" signal (a signal taken from the AUX bus is that is routed to the REVERB bus. English STEREO BUS AUX BUS STEREO BUS REVERB BUS Recording Basics Monitor mix for musicians, external effects One important mixer function is sent to the AUX bus. Thus the bus signal is easier to listen to create a monitor mix for guitar during the guitar solo, the fader operation does not affect the AUX bus output, which remains independent of effect separately. channel fader PRE ON stereo fader OUT AUX send level OUT • Using AUX buses...
... the channel fader) or a "postfader" signal (a signal taken from the AUX bus is that is routed to the REVERB bus. English STEREO BUS AUX BUS STEREO BUS REVERB BUS Recording Basics Monitor mix for musicians, external effects One important mixer function is sent to the AUX bus. Thus the bus signal is easier to listen to create a monitor mix for guitar during the guitar solo, the fader operation does not affect the AUX bus output, which remains independent of effect separately. channel fader PRE ON stereo fader OUT AUX send level OUT • Using AUX buses...
Owners Manual
Page 14
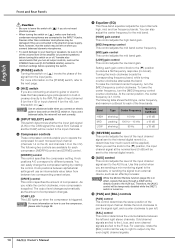
... output level changes automatically as an effects processor. To lower the center frequency, turn the [MID] frequency control clockwise. NOTE While the Monitor Remote function (page 33) is in preamp directly to the INPUT B jack of input channel 8 (on the n12) or input channel 4 (on the n8), turn the [Hi-Z] switch on. Front and Rear Panels English Caution • Be sure to leave this switch off ( ) if you do not need phantom power. •...
... output level changes automatically as an effects processor. To lower the center frequency, turn the [MID] frequency control clockwise. NOTE While the Monitor Remote function (page 33) is in preamp directly to the INPUT B jack of input channel 8 (on the n12) or input channel 4 (on the n8), turn the [Hi-Z] switch on. Front and Rear Panels English Caution • Be sure to leave this switch off ( ) if you do not need phantom power. •...
Owners Manual
Page 15
... channel on , the [AUX] control for the phase offset When you record the sound of mic signal from in a thin sound. phase of mic signal from behind phase offset phase of a guitar amplifier by setting the [INPUT METER] switch (page 17) in order to the stereo L/R buses. Turn the [ST] switch on the MONITOR REMOTE [ON] switch (page 19) (the switch LED will light up ) while Cubase and the mixer are identical. ^ Input meter The four LEDs indicate the input channel signal level...
... channel on , the [AUX] control for the phase offset When you record the sound of mic signal from in a thin sound. phase of mic signal from behind phase offset phase of a guitar amplifier by setting the [INPUT METER] switch (page 17) in order to the stereo L/R buses. Turn the [ST] switch on the MONITOR REMOTE [ON] switch (page 19) (the switch LED will light up ) while Cubase and the mixer are identical. ^ Input meter The four LEDs indicate the input channel signal level...

Owners Manual
Page 16
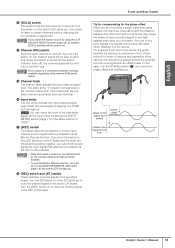
... IN signal will flash). 4 STEREO [BAL] control This control adjusts the left and right volume balance of the stereo channels (STEREO L/R). 5 [PFL] (Pre-Fader Listen) switch If you want to monitor pre-fader input channel signals when you are using the Solo function, turn this switch is output from the ST OUT jacks. 7 STEREO fader This fader adjusts the level of the signal output from the DAW (DAW IN 1/2). [LEVEL] control This control adjusts the level of the stereo DAW signal to the STEREO buses. REVERB [LEVEL] control This control adjusts the output level of the internal digital reverb...
... IN signal will flash). 4 STEREO [BAL] control This control adjusts the left and right volume balance of the stereo channels (STEREO L/R). 5 [PFL] (Pre-Fader Listen) switch If you want to monitor pre-fader input channel signals when you are using the Solo function, turn this switch is output from the ST OUT jacks. 7 STEREO fader This fader adjusts the level of the signal output from the DAW (DAW IN 1/2). [LEVEL] control This control adjusts the level of the stereo DAW signal to the STEREO buses. REVERB [LEVEL] control This control adjusts the output level of the internal digital reverb...
Owners Manual
Page 17
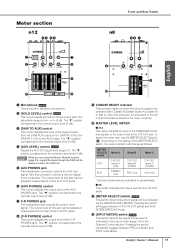
... MASTER LEVEL METER. Pressing the switch will be operated with Cubase 4/Cubase Studio 4/Cubase AI 4; The "▼" position corresponds to the nominal output level (0 dB). 9 CUBASE READY indicator This indicator lights up when the mixer is linked to the mixer correctly. ) MASTER LEVEL METER ■ n12 This meter indicates the level of the C-R OUT jacks. 8 [C-R PHONES] control This control adjusts the output level at this jack can be directly routed to the AUX bus. 5 AUX PHONES jack This headphone connector outputs the AUX bus signal...
... MASTER LEVEL METER. Pressing the switch will be operated with Cubase 4/Cubase Studio 4/Cubase AI 4; The "▼" position corresponds to the nominal output level (0 dB). 9 CUBASE READY indicator This indicator lights up when the mixer is linked to the mixer correctly. ) MASTER LEVEL METER ■ n12 This meter indicates the level of the C-R OUT jacks. 8 [C-R PHONES] control This control adjusts the output level at this jack can be directly routed to the AUX bus. 5 AUX PHONES jack This headphone connector outputs the AUX bus signal...

Owners Manual
Page 19
... sound). Each switch features the following connection settings (Work modes) can be processed via an IEEE1394 cable and the mixer's operation is on your needs. Pressing each Work mode, please refer to page 37. 2 MONITOR REMOTE [ON] switch This switch turns on (the switch indicator lights up ). • To monitor an effect signal that enables you turn on and off . Records the track(s) whose Record Enable button is linked to create a 5.1-ch surround mix in the backward direction...
... sound). Each switch features the following connection settings (Work modes) can be processed via an IEEE1394 cable and the mixer's operation is on your needs. Pressing each Work mode, please refer to page 37. 2 MONITOR REMOTE [ON] switch This switch turns on (the switch indicator lights up ). • To monitor an effect signal that enables you turn on and off . Records the track(s) whose Record Enable button is linked to create a 5.1-ch surround mix in the backward direction...
Owners Manual
Page 21
... These stereo jacks output AUX bus signals. Yamaha recommends that meets the S400 specifications. You can make settings within your computer has a 4-pin IEEE 1394 jack, use a 4-pin to connect daisy-chained devices. POWER switch This switch sets mixer power to the power amplifier driving your main speakers. The signal level is adjusted via the STEREO fader, then the signal is output from either type of current continues to page 8). You can use these jacks, for example, to send the stereo mix to the master recorder...
... These stereo jacks output AUX bus signals. Yamaha recommends that meets the S400 specifications. You can make settings within your computer has a 4-pin IEEE 1394 jack, use a 4-pin to connect daisy-chained devices. POWER switch This switch sets mixer power to the power amplifier driving your main speakers. The signal level is adjusted via the STEREO fader, then the signal is output from either type of current continues to page 8). You can use these jacks, for example, to send the stereo mix to the master recorder...
Owners Manual
Page 24
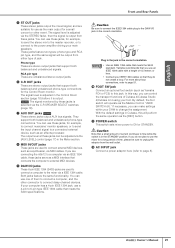
... "Setup Procedure" on ( ) position. Caution • Make sure that the PHANTOM [48V] switch is turned off , then connect musical instruments, microphones, and other sound sources, and monitoring speakers to the mixer and turn the high-pass filter on for microphone channels, except in preamp, connect it to input channel 8 (on the n12) or input channel 4 (on the n8), and press the [HiZ] switch of headphones to the AUX PHONES jack. Applying phantom power to equipment other DAWs. Set...
... "Setup Procedure" on ( ) position. Caution • Make sure that the PHANTOM [48V] switch is turned off , then connect musical instruments, microphones, and other sound sources, and monitoring speakers to the mixer and turn the high-pass filter on for microphone channels, except in preamp, connect it to input channel 8 (on the n12) or input channel 4 (on the n8), and press the [HiZ] switch of headphones to the AUX PHONES jack. Applying phantom power to equipment other DAWs. Set...
Owners Manual
Page 30
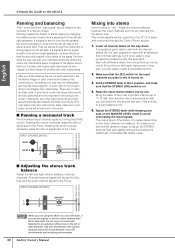
INPUT CHANNEL(MONO) INPUT A PAN INPUT B STEREO BUS L STEREO BUS R Mixing into the stereo bus. Lower all channel faders all channels into stereo Now it does not conflict with each instrument, set the stereo balance hard left or hard right, the mix may want to deliberately pan sounds close to "0" (0 dB), then add the other to the center. ■ Panning a monaural track Pan a monaural input channel signal by turning the [PAN] control. Adjust the STEREO fader while keeping your individual...
INPUT CHANNEL(MONO) INPUT A PAN INPUT B STEREO BUS L STEREO BUS R Mixing into the stereo bus. Lower all channel faders all channels into stereo Now it does not conflict with each instrument, set the stereo balance hard left or hard right, the mix may want to deliberately pan sounds close to "0" (0 dB), then add the other to the center. ■ Panning a monaural track Pan a monaural input channel signal by turning the [PAN] control. Adjust the STEREO fader while keeping your individual...
Owners Manual
Page 33
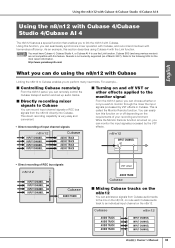
... Link function. Using this function, you can seamlessly synchronize mixer operation with Cubase, and record and mixdown with this function on or off on • Direct recording of input channel signals ■ Turning on the n8/n12 You can do using Cubase 4 with Cubase. Nuendo is called the Monitor Remote function. While the Monitor Remote function is very easy and convenient. • Direct recording of REC bus signals n8/n12 INPUT CHANNEL INPUT CHANNEL INPUT CHANNEL INPUT CHANNEL Cubase AUDIO TRACK VST effect AUDIO TRACK Cubase ■ Mixing Cubase tracks...
... Link function. Using this function, you can seamlessly synchronize mixer operation with Cubase, and record and mixdown with this function on or off on • Direct recording of input channel signals ■ Turning on the n8/n12 You can do using Cubase 4 with Cubase. Nuendo is called the Monitor Remote function. While the Monitor Remote function is very easy and convenient. • Direct recording of REC bus signals n8/n12 INPUT CHANNEL INPUT CHANNEL INPUT CHANNEL INPUT CHANNEL Cubase AUDIO TRACK VST effect AUDIO TRACK Cubase ■ Mixing Cubase tracks...
Owners Manual
Page 39
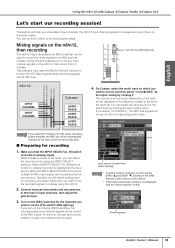
... Cubase using the INPUT SELECT switches. IN] switch is turned on (analog input). IN] switch is linked to the mixer, you to mix any input channel signals on the n8/n12, then record them on , analog input can be automatically selected as the input source for each input channel will be selected as the input routing by clicking an input routing option. Connect musical instruments and microphones to monitor the VST effect signals while recording signals via the REC bus. input...
... Cubase using the INPUT SELECT switches. IN] switch is turned on (analog input). IN] switch is linked to the mixer, you to mix any input channel signals on the n8/n12, then record them on , analog input can be automatically selected as the input source for each input channel will be selected as the input routing by clicking an input routing option. Connect musical instruments and microphones to monitor the VST effect signals while recording signals via the REC bus. input...
Owners Manual
Page 40
..., turn on the input bus or audio track. 7. While the Record Enable button and monitoring button are turned off the Monitor Remote function to return to the previous status. • If the Record Enable button and monitoring button for the Cubase tracks are turned on, the REC bus monitoring signal will be returned to 9 below. 6. English Using the n8/n12 with the VST effect applied (the "wet" sound). Therefore, the [AUX] control for multiple tracks by using the Monitor Remote function, the input channel signals...
..., turn on the input bus or audio track. 7. While the Record Enable button and monitoring button are turned off the Monitor Remote function to return to the previous status. • If the Record Enable button and monitoring button for the Cubase tracks are turned on, the REC bus monitoring signal will be returned to 9 below. 6. English Using the n8/n12 with the VST effect applied (the "wet" sound). Therefore, the [AUX] control for multiple tracks by using the Monitor Remote function, the input channel signals...
Owners Manual
Page 41
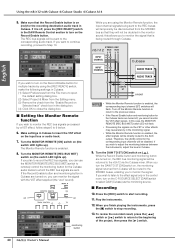
... are recording. input source of recording (n8/n12 input channel signals directly to Cubase), the channel fader and other channel controls will help you select the "Yamaha n12 (n8) multi channel recording" project template, the direct output from input channel 1 directly to a Cubase audio track while using the Monitor Remote function to monitor the VST effect signals. NOTE If you understand how to record a signal from the input channel will be sent to the audio track. the Record Enable button in the DAW Remote Control section; The REC bus signals...
... are recording. input source of recording (n8/n12 input channel signals directly to Cubase), the channel fader and other channel controls will help you select the "Yamaha n12 (n8) multi channel recording" project template, the direct output from input channel 1 directly to a Cubase audio track while using the Monitor Remote function to monitor the VST effect signals. NOTE If you understand how to record a signal from the input channel will be sent to the audio track. the Record Enable button in the DAW Remote Control section; The REC bus signals...

Owners Manual
Page 42
.../n12 with Cubase 4/Cubase Studio 4/Cubase AI 4 ■ Setting the Monitor Remote function If you finish playing the instrument, press the [■] switch to stop recording. 12. Insert the desired VST effect in the control room, turn off all channel [WET] switches. Turn the input channel 1 [WET] switch on , turning off , you to monitor the signal. While the Record Enable button and monitoring button are turned off the MONITOR REMOTE [ON] switch will light). To review the recording result, press the [ ] switch...
.../n12 with Cubase 4/Cubase Studio 4/Cubase AI 4 ■ Setting the Monitor Remote function If you finish playing the instrument, press the [■] switch to stop recording. 12. Insert the desired VST effect in the control room, turn off all channel [WET] switches. Turn the input channel 1 [WET] switch on , turning off , you to monitor the signal. While the Record Enable button and monitoring button are turned off the MONITOR REMOTE [ON] switch will light). To review the recording result, press the [ ] switch...
Owners Manual
Page 43
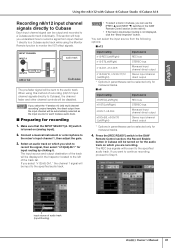
... monitor tracks recorded in the DAW Remote Control section (the switch LED lights up). STEREO BUS English Using the n8/n12 with Cubase 4/Cubase Studio 4/Cubase AI 4 Mixing recorded tracks You can mix tracks using the n8/n12. If you wish to stereo. Mixing audio tracks 1. If necessary, click the audio track output routing menu, and change the output destination. If any audio tracks' Record Enable buttons are on . 4. When the switch is turned on the [HARDWARE MIX] switch in Cubase by mixing them to use the n8/n12's compressor...
... monitor tracks recorded in the DAW Remote Control section (the switch LED lights up). STEREO BUS English Using the n8/n12 with Cubase 4/Cubase Studio 4/Cubase AI 4 Mixing recorded tracks You can mix tracks using the n8/n12. If you wish to stereo. Mixing audio tracks 1. If necessary, click the audio track output routing menu, and change the output destination. If any audio tracks' Record Enable buttons are on . 4. When the switch is turned on the [HARDWARE MIX] switch in Cubase by mixing them to use the n8/n12's compressor...
Owners Manual
Page 48
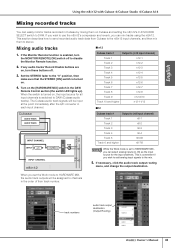
... install the program as directed in the Sweet Spot Data list and click the UPDATE button. 48 Owner's Manual No. NOTE You can replace the n8/n12's compressor settings (Sweet Spot Data) by clicking the corresponding column title. To load the selected data on your n8/n12. 1. To return the Sweet Spot data to the factory-set that the application software, including the driver software, has been installed correctly. • To avoid malfunction, connect...
... install the program as directed in the Sweet Spot Data list and click the UPDATE button. 48 Owner's Manual No. NOTE You can replace the n8/n12's compressor settings (Sweet Spot Data) by clicking the corresponding column title. To load the selected data on your n8/n12. 1. To return the Sweet Spot data to the factory-set that the application software, including the driver software, has been installed correctly. • To avoid malfunction, connect...
Owners Manual
Page 51
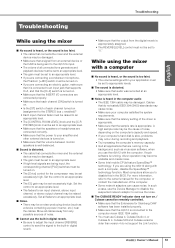
... gain must be set to an appropriate level. • If you are connecting a condenser microphone, the Phantom [+48V] switch must be turned on. • If you use the built-in digital reverb. • Be sure to adjust the input channel [REVERB] control to send the signal to disable this in the background, such as a device containing a power inverter, etc.) near the cables. If such software is slow, problems may occur during recording and...
... gain must be set to an appropriate level. • If you are connecting a condenser microphone, the Phantom [+48V] switch must be turned on. • If you use the built-in digital reverb. • Be sure to adjust the input channel [REVERB] control to send the signal to disable this in the background, such as a device containing a power inverter, etc.) near the cables. If such software is slow, problems may occur during recording and...


