

Owner's Manual
Page 2
...perform the replacement. SPECIFICATIONS SUBJECT TO CHANGE: The information contained in the ears, you , please contact Yamaha directly. Disposal Notice: Should this manual is soldered in your purchase. This product should consult an audiologist. If you experience any retailer of ... PLEASE KEEP THIS MANUAL 2 MM6/MM8 Owner's Manual We sincerely believe that contain lead, batteries, plastics, etc. This product may be used batteries promptly and as designed) are not covered by Yamaha. In keeping with the components supplied or; However, Yamaha reserves the right to...
...perform the replacement. SPECIFICATIONS SUBJECT TO CHANGE: The information contained in the ears, you , please contact Yamaha directly. Disposal Notice: Should this manual is soldered in your purchase. This product should consult an audiologist. If you experience any retailer of ... PLEASE KEEP THIS MANUAL 2 MM6/MM8 Owner's Manual We sincerely believe that contain lead, batteries, plastics, etc. This product may be used batteries promptly and as designed) are not covered by Yamaha. In keeping with the components supplied or; However, Yamaha reserves the right to...
Owner's Manual
Page 3
... on different branch (circuit breaker or fuse) circuits or install AC line filter/s. Ltd. (2 wires) MM6/MM8 Owner's Manual 3 Modifications not expressly approved by Yamaha may cause interference harmful to products distributed by YAMAHA CORPORATION OF AMERICA. (FCC DoC) IMPORTANT NOTICE FOR THE UNITED KINGDOM Connecting the Plug and Cord IMPORTANT. This...
... on different branch (circuit breaker or fuse) circuits or install AC line filter/s. Ltd. (2 wires) MM6/MM8 Owner's Manual 3 Modifications not expressly approved by Yamaha may cause interference harmful to products distributed by YAMAHA CORPORATION OF AMERICA. (FCC DoC) IMPORTANT NOTICE FOR THE UNITED KINGDOM Connecting the Plug and Cord IMPORTANT. This...

Owner's Manual
Page 4
... or damage to unplug the power cord from the AC outlet. If any dirt or dust which might accidentally fall over . 4 MM6/MM8 Owner's Manual (3)-10 1/2 The required voltage is turned off the power switch and disconnect the plug from the outlet, and have accumulated on the unit... components or result in damage to be malfunctioning, discontinue use it containing liquids which may have the instrument inspected by qualified Yamaha service personnel. • Never insert or remove an electric plug with wet hands. When attaching the stand or rack, use of ...
... or damage to unplug the power cord from the AC outlet. If any dirt or dust which might accidentally fall over . 4 MM6/MM8 Owner's Manual (3)-10 1/2 The required voltage is turned off the power switch and disconnect the plug from the outlet, and have accumulated on the unit... components or result in damage to be malfunctioning, discontinue use it containing liquids which may have the instrument inspected by qualified Yamaha service personnel. • Never insert or remove an electric plug with wet hands. When attaching the stand or rack, use of ...

Owner's Manual
Page 5
...controls while playing the instrument to set the volumes of time at their respective companies. (3)-10 2/2 MM6/MM8 Owner's Manual 5 Yamaha cannot be held responsible for damage caused by qualified Yamaha service personnel. • Do not place vinyl, plastic or rubber objects on the buttons, switches or ...your weight on, or place heavy objects on the instrument, and do not use excessive force on the instrument, since this owner's manual are not using the instrument for instructional purposes only, and may be sure to set the desired listening level. Before turning the...
...controls while playing the instrument to set the volumes of time at their respective companies. (3)-10 2/2 MM6/MM8 Owner's Manual 5 Yamaha cannot be held responsible for damage caused by qualified Yamaha service personnel. • Do not place vinyl, plastic or rubber objects on the buttons, switches or ...your weight on, or place heavy objects on the instrument, and do not use excessive force on the instrument, since this owner's manual are not using the instrument for instructional purposes only, and may be sure to set the desired listening level. Before turning the...

Owner's Manual
Page 6
...DON'T MAKE, DISTRIBUTE OR USE ILLEGAL COPIES. Copying of the commercially available musical data including but not limited to use . 6 MM6/MM8 Owner's Manual Such copyrighted materials include, without limitation, all computer software, style files, MIDI files, WAVE data, musical scores and sound...use is strictly prohibited except for your personal use others' copyrights. This product incorporates and bundles computer programs and contents in which Yamaha owns copyrights or with respect to which it has license to MIDI data and/or audio data is not permitted under relevant laws....
...DON'T MAKE, DISTRIBUTE OR USE ILLEGAL COPIES. Copying of the commercially available musical data including but not limited to use . 6 MM6/MM8 Owner's Manual Such copyrighted materials include, without limitation, all computer software, style files, MIDI files, WAVE data, musical scores and sound...use is strictly prohibited except for your personal use others' copyrights. This product incorporates and bundles computer programs and contents in which Yamaha owns copyrights or with respect to which it has license to MIDI data and/or audio data is not permitted under relevant laws....

Owner's Manual
Page 7
... includes the following items. Please check that you have them all. • Owner's Manual • Supplied Disk (supplied DAW software) • AC Power Adaptor (May not be used for your Yamaha dealer.) Since the MM6 and MM8 have finished reading the manual keep it in a safe, accessible place, and refer to it when you...
... includes the following items. Please check that you have them all. • Owner's Manual • Supplied Disk (supplied DAW software) • AC Power Adaptor (May not be used for your Yamaha dealer.) Since the MM6 and MM8 have finished reading the manual keep it in a safe, accessible place, and refer to it when you...

Owner's Manual
Page 8
... chord changes to both the patterns and your computer based music production system. 8 MM6/MM8 Owner's Manual The MM8 features an 88-key "Graded Hammer" keyboard with action that is easy because the MM6/MM8 can store data and setting to standard USB storage devices. ■ Create Music with ...), ranging from acoustic musical instruments to unique synthesizer sounds. Main Features ■ High-Quality Voices for Keyboard Performance Page 15 The MM6/MM8 contains a wide range of different musical genres simply by using a USB cable, and transfer MIDI data to and from DAW software. ...
... chord changes to both the patterns and your computer based music production system. 8 MM6/MM8 Owner's Manual The MM8 features an 88-key "Graded Hammer" keyboard with action that is easy because the MM6/MM8 can store data and setting to standard USB storage devices. ■ Create Music with ...), ranging from acoustic musical instruments to unique synthesizer sounds. Main Features ■ High-Quality Voices for Keyboard Performance Page 15 The MM6/MM8 contains a wide range of different musical genres simply by using a USB cable, and transfer MIDI data to and from DAW software. ...

Owner's Manual
Page 9
... Master EQ List 99 Effect Type List 100 Arpeggio Type List 104 MIDI Implementation Chart 106 MIDI Data Format 108 Specifications 109 Index 110 MM6/MM8 Owner's Manual 9
... Master EQ List 99 Effect Type List 100 Arpeggio Type List 104 MIDI Implementation Chart 106 MIDI Data Format 108 Specifications 109 Index 110 MM6/MM8 Owner's Manual 9

Owner's Manual
Page 10
...STANDBY. Using Headphones • Use the specified adaptor (PA-5D, PA-150, or an equivalent recommended by Yamaha) only. puter stores, and similar retail outlets. 10 MM6/MM8 Owner's Manual CAUTION • Unplug the AC Power Adaptor when not using the instrument, or during operation. CAUTION • When ... at a high volume for the USB-MIDI Driver installation procedure. Connecting to a Computer (USB Terminal) (PA-5D adaptor) (PA-150 adaptor) MM8 Wrap the DC output cable of the clip. Setting Up Be sure to do the following BEFORE turning on the power. The use a USB cable...
...STANDBY. Using Headphones • Use the specified adaptor (PA-5D, PA-150, or an equivalent recommended by Yamaha) only. puter stores, and similar retail outlets. 10 MM6/MM8 Owner's Manual CAUTION • Unplug the AC Power Adaptor when not using the instrument, or during operation. CAUTION • When ... at a high volume for the USB-MIDI Driver installation procedure. Connecting to a Computer (USB Terminal) (PA-5D adaptor) (PA-150 adaptor) MM8 Wrap the DC output cable of the clip. Setting Up Be sure to do the following BEFORE turning on the power. The use a USB cable...
Owner's Manual
Page 11
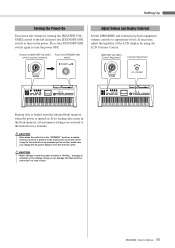
... the initial factory defaults. Setting Up Turning the Power On Turn down the volume by using the instrument for an extended period of data. MM6/MM8 Owner's Manual 11 Press the [STANDBY/ON] switch again to turn the power OFF. If necessary, adjust the legibility of the LCD display by turning the [...MASTER VOLUME] control to the left and press the [STANDBY/ON] switch to turn on . Adjust Volume and Display Contrast Set the MM6/MM8 and external playback equipment volume controls to turn the power off when a "Writing.." CAUTION • Never attempt to appropriate levels.
... the initial factory defaults. Setting Up Turning the Power On Turn down the volume by using the instrument for an extended period of data. MM6/MM8 Owner's Manual 11 Press the [STANDBY/ON] switch again to turn the power OFF. If necessary, adjust the legibility of the LCD display by turning the [...MASTER VOLUME] control to the left and press the [STANDBY/ON] switch to turn on . Adjust Volume and Display Contrast Set the MM6/MM8 and external playback equipment volume controls to turn the power off when a "Writing.." CAUTION • Never attempt to appropriate levels.
Owner's Manual
Page 12
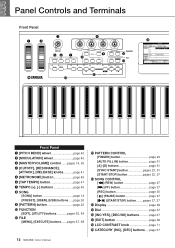
page 37 12 MM6/MM8 Owner's Manual Panel Controls and Terminals Front Panel e r q w !4 ty u i o !0 !1 !3 !2 Front Panel q [PITCH BEND] wheel page 40 w [MODULATION] wheel page 40 e [MASTER VOLUME] control.......pages 14, 36 r [CUTOFF], [...
page 37 12 MM6/MM8 Owner's Manual Panel Controls and Terminals Front Panel e r q w !4 ty u i o !0 !1 !3 !2 Front Panel q [PITCH BEND] wheel page 40 w [MODULATION] wheel page 40 e [MASTER VOLUME] control.......pages 14, 36 r [CUTOFF], [...
Owner's Manual
Page 13
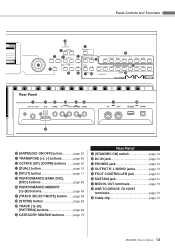
... page 41 #6 SUSTAIN jack page 41 #7 MIDI IN, OUT terminals page 73 #8 USB TO DEVICE, TO HOST terminals page 73 #9 Cable clip page 10 MM6/MM8 Owner's Manual 13
... page 41 #6 SUSTAIN jack page 41 #7 MIDI IN, OUT terminals page 73 #8 USB TO DEVICE, TO HOST terminals page 73 #9 Cable clip page 10 MM6/MM8 Owner's Manual 13

Owner's Manual
Page 14
... the Demonstration Song. 1 Press the [STANDBY/ON] button until it locks in the LCD. The Main display will not be transmitted via MIDI. 14 MM6/MM8 Owner's Manual Quick Guide Playing the Demo Song Quick Guide This instrument includes a Demonstration Song that demonstrate some of the instrument's features and capabilities. The Main display...
... the Demonstration Song. 1 Press the [STANDBY/ON] button until it locks in the LCD. The Main display will not be transmitted via MIDI. 14 MM6/MM8 Owner's Manual Quick Guide Playing the Demo Song Quick Guide This instrument includes a Demonstration Song that demonstrate some of the instrument's features and capabilities. The Main display...

Owner's Manual
Page 15
.... The Main Voice selection display will be selected and displayed in sequence. NOTE • To change the Voice category, press another CATEGORY SEARCH button. MM6/MM8 Owner's Manual 15 The currently selected category name, voice number and name will appear. MAIN VOICE selection display CATEGORY name Current selected Voice 2 Select a voice you want...
.... The Main Voice selection display will be selected and displayed in sequence. NOTE • To change the Voice category, press another CATEGORY SEARCH button. MM6/MM8 Owner's Manual 15 The currently selected category name, voice number and name will appear. MAIN VOICE selection display CATEGORY name Current selected Voice 2 Select a voice you want...

Owner's Manual
Page 16
... in addition to the main voice when you play the keyboard. NOTE • To change the Voice category, press another category search button. 16 MM6/MM8 Owner's Manual Dual Voice selection display The currently selected category Hold for longer than a second The currently selected Dual Voice 3 Select and press the desired category button...
... in addition to the main voice when you play the keyboard. NOTE • To change the Voice category, press another category search button. 16 MM6/MM8 Owner's Manual Dual Voice selection display The currently selected category Hold for longer than a second The currently selected Dual Voice 3 Select and press the desired category button...
Owner's Manual
Page 17
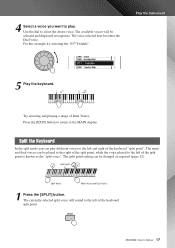
... Twinkle". Press the [EXIT] button to return to select the desire voice. The currently selected split voice will be changed as the "split voice". MM6/MM8 Owner's Manual 17 4 Select a voice you can be selected and displayed in sequence. The main and dual voices can be played to the right of the split...
... Twinkle". Press the [EXIT] button to return to select the desire voice. The currently selected split voice will be changed as the "split voice". MM6/MM8 Owner's Manual 17 4 Select a voice you can be selected and displayed in sequence. The main and dual voices can be played to the right of the split...

Owner's Manual
Page 18
... voice selected here becomes the Split voice. Try playing the selected Split Voice. Press the [EXIT] button to return to the MAIN display. 18 MM6/MM8 Owner's Manual Split Voice selection display The currently selected category Hold for longer than a second The currently selected Split Voice 3 Select and press the desired category button...
... voice selected here becomes the Split voice. Try playing the selected Split Voice. Press the [EXIT] button to return to the MAIN display. 18 MM6/MM8 Owner's Manual Split Voice selection display The currently selected category Hold for longer than a second The currently selected Split Voice 3 Select and press the desired category button...

Owner's Manual
Page 19
NOTE • See the Drum Kit List on page 90. MM6/MM8 Owner's Manual 19 Selecting a Drum Voice Drum Kits are collections of drum and percussion instruments. 1 Press the [DRUM/PERC/SE] button. Play the Instrument 2 Use the dial to select the Drum Kit you want to play (001- 023). 3 Play each key and enjoy the Drum Kit. The DRUM Kit category will appear in the display.
NOTE • See the Drum Kit List on page 90. MM6/MM8 Owner's Manual 19 Selecting a Drum Voice Drum Kits are collections of drum and percussion instruments. 1 Press the [DRUM/PERC/SE] button. Play the Instrument 2 Use the dial to select the Drum Kit you want to play (001- 023). 3 Play each key and enjoy the Drum Kit. The DRUM Kit category will appear in the display.

Owner's Manual
Page 20
Play the Instrument Using the Arpeggio Function The arpeggio function lets you play it off. 20 MM6/MM8 Owner's Manual When Dual Voice is used for music production as well as on the selected Arpeggio type. 3 When you play the notes of a triad-the root, ...
Play the Instrument Using the Arpeggio Function The arpeggio function lets you play it off. 20 MM6/MM8 Owner's Manual When Dual Voice is used for music production as well as on the selected Arpeggio type. 3 When you play the notes of a triad-the root, ...

Owner's Manual
Page 21
You can easily select any time you want to repeat your performance (page 29). Arpeggio type The sound of the arpeggio produced will appear. MM6/MM8 Owner's Manual 21 A list of the keyboard you play and the area of the available arpeggio types is automatically selected when you select a voice, but you can ...
You can easily select any time you want to repeat your performance (page 29). Arpeggio type The sound of the arpeggio produced will appear. MM6/MM8 Owner's Manual 21 A list of the keyboard you play and the area of the available arpeggio types is automatically selected when you select a voice, but you can ...


