

Owner's Manual
Page 5
... • The company names and product names in use excessive force on the panel or keyboard. Saving data Saving and backing up the USB storage device • To protect against data...for instructional purposes only, and may be held responsible for damage caused by qualified Yamaha service personnel. • Do not place vinyl, plastic or rubber objects on the instrument, ... electronic components, turn off the power for all components at their respective companies. (3)-10 2/2 MM6/MM8 Owner's Manual 5 Before turning the power on your weight on, or place heavy objects on the...
... • The company names and product names in use excessive force on the panel or keyboard. Saving data Saving and backing up the USB storage device • To protect against data...for instructional purposes only, and may be held responsible for damage caused by qualified Yamaha service personnel. • Do not place vinyl, plastic or rubber objects on the instrument, ... electronic components, turn off the power for all components at their respective companies. (3)-10 2/2 MM6/MM8 Owner's Manual 5 Before turning the power on your weight on, or place heavy objects on the...

Owner's Manual
Page 8
... simply by using a USB cable, and transfer MIDI data to and from DAW software. The MM8 features an 88-key "Graded Hammer" keyboard with action that is easy because the MM6/MM8 can store data and setting to standard USB storage devices. ■ Create Music with a Pattern...analog synthesizer style phrases in response to backing tracks, and other important settings for the voices you play (including keyboard splits and layers), the patterns you can connect the MM6/MM8 to unique synthesizer sounds. Even these detailed sonic changes can be easily recalled by a single button press. ...
... simply by using a USB cable, and transfer MIDI data to and from DAW software. The MM8 features an 88-key "Graded Hammer" keyboard with action that is easy because the MM6/MM8 can store data and setting to standard USB storage devices. ■ Create Music with a Pattern...analog synthesizer style phrases in response to backing tracks, and other important settings for the voices you play (including keyboard splits and layers), the patterns you can connect the MM6/MM8 to unique synthesizer sounds. Even these detailed sonic changes can be easily recalled by a single button press. ...

Owner's Manual
Page 9
...Response 47 Select a Master EQ Setting for the Best Sound 48 Controlling Arpeggio Volume with Keyboard Dynamics ......... 48 Transpose the Keyboard 49 Shifting Keyboard Pitch in Octaves 50 Pattern Functions 51 Pattern Variations (Sections 51 Setting the Split Point 52...but No Rhythm (Stop Accompaniment 53 Pattern Volume Adjustment 53 Chord Basics 54 Specify Chords Over the Entire Keyboard Range 56 Song Settings 57 Song Volume 57 Change the Song Tempo 57 Track Mute 58 Memorize Your ...Chart 106 MIDI Data Format 108 Specifications 109 Index 110 MM6/MM8 Owner's Manual 9
...Response 47 Select a Master EQ Setting for the Best Sound 48 Controlling Arpeggio Volume with Keyboard Dynamics ......... 48 Transpose the Keyboard 49 Shifting Keyboard Pitch in Octaves 50 Pattern Functions 51 Pattern Variations (Sections 51 Setting the Split Point 52...but No Rhythm (Stop Accompaniment 53 Pattern Volume Adjustment 53 Chord Basics 54 Specify Chords Over the Entire Keyboard Range 56 Song Settings 57 Song Volume 57 Change the Song Tempo 57 Track Mute 58 Memorize Your ...Chart 106 MIDI Data Format 108 Specifications 109 Index 110 MM6/MM8 Owner's Manual 9

Owner's Manual
Page 15
...another CATEGORY SEARCH button. The voice selected here becomes the Main voice. Press the [EXIT] button to return to play it on the keyboard. 1 Press a CATEGORY SEARCH button. The Main Voice selection display will be highlighted. MAIN VOICE selection display CATEGORY name Current selected Voice ...of realistic voices-including guitar, bass, strings, sax, trumpet, drums and percussion, sound effects, and a wide variety of Voices. MM6/MM8 Owner's Manual 15 The currently selected category name, voice number and name will be selected and displayed in sequence. Use the dial to...
...another CATEGORY SEARCH button. The voice selected here becomes the Main voice. Press the [EXIT] button to return to play it on the keyboard. 1 Press a CATEGORY SEARCH button. The Main Voice selection display will be highlighted. MAIN VOICE selection display CATEGORY name Current selected Voice ...of realistic voices-including guitar, bass, strings, sax, trumpet, drums and percussion, sound effects, and a wide variety of Voices. MM6/MM8 Owner's Manual 15 The currently selected category name, voice number and name will be selected and displayed in sequence. Use the dial to...

Owner's Manual
Page 16
... that will play in addition to the main voice when you play the keyboard. 2 Press and hold the [DUAL] button for longer than a second. NOTE • To change the Voice category, press another category search button. 16 MM6/MM8 Owner's Manual The second voice is known as the "Dual" voice. The currently... longer than a second The currently selected Dual Voice 3 Select and press the desired category button in addition to the main voice when you play the keyboard. The Dual Voice selection display will sound in the CATEGORY SEARCH section.
... that will play in addition to the main voice when you play the keyboard. 2 Press and hold the [DUAL] button for longer than a second. NOTE • To change the Voice category, press another category search button. 16 MM6/MM8 Owner's Manual The second voice is known as the "Dual" voice. The currently... longer than a second The currently selected Dual Voice 3 Select and press the desired category button in addition to the main voice when you play the keyboard. The Dual Voice selection display will sound in the CATEGORY SEARCH section.
Owner's Manual
Page 17
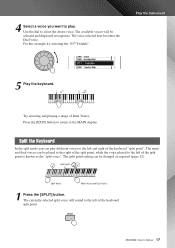
...point setting can be played to the right of the split point, while the voice played to the left of the keyboard "split point". MM6/MM8 Owner's Manual 17 Split the Keyboard In the split mode you want to play different voices to the left of Dual Voices. The main and dual voices... can play . The available voices will sound to the left and right of the keyboard split point. Try selecting and playing a range...
...point setting can be played to the right of the split point, while the voice played to the left of the keyboard "split point". MM6/MM8 Owner's Manual 17 Split the Keyboard In the split mode you want to play different voices to the left of Dual Voices. The main and dual voices... can play . The available voices will sound to the left and right of the keyboard split point. Try selecting and playing a range...

Owner's Manual
Page 18
...press the desired category button in sequence. The available voices will be highlighted. For this example try selecting the "002 Symphony Strings". 5 Play the keyboard. NOTE • To change the voice category, press another CATEGORY SEARCH button. 4 Select a voice you want to select the desired voice. .... Try playing the selected Split Voice. Use the dial to play. Press the [EXIT] button to return to the MAIN display. 18 MM6/MM8 Owner's Manual Play the Instrument 2 Press and hold the [SPLIT] button for longer than a second. The Split Voice selection display will be...
...press the desired category button in sequence. The available voices will be highlighted. For this example try selecting the "002 Symphony Strings". 5 Play the keyboard. NOTE • To change the voice category, press another CATEGORY SEARCH button. 4 Select a voice you want to select the desired voice. .... Try playing the selected Split Voice. Use the dial to play. Press the [EXIT] button to return to the MAIN display. 18 MM6/MM8 Owner's Manual Play the Instrument 2 Press and hold the [SPLIT] button for longer than a second. The Split Voice selection display will be...

Owner's Manual
Page 20
... NOTE • The Arpeggio function can be applied to create a wide range of patterns and phrases that plays depends on the keyboard. By changing the arpeggio type and the notes you play it off. 20 MM6/MM8 Owner's Manual When Dual Voice is possible to the main and dual voices. When... Keyboard Out is ON. The rhythm pattern or phrase that can only be used arpeggios will be transmitted via MIDI channel 2. 2 Play a...
... NOTE • The Arpeggio function can be applied to create a wide range of patterns and phrases that plays depends on the keyboard. By changing the arpeggio type and the notes you play it off. 20 MM6/MM8 Owner's Manual When Dual Voice is possible to the main and dual voices. When... Keyboard Out is ON. The rhythm pattern or phrase that can only be used arpeggios will be transmitted via MIDI channel 2. 2 Play a...

Owner's Manual
Page 21
...type selection display will change according to the number of notes you play in. Arpeggio type The sound of the arpeggio produced will appear. MM6/MM8 Owner's Manual 21 Play the Instrument Hold for longer than a second 2 Use the dial to select the desired arpeggio type. You can ...also record your performance (page 59). You can easily select any time you want to repeat your performance (page 29). A list of the keyboard you play and the area of the available arpeggio types is automatically selected when you select a voice, but you can save the instrument's settings ...
...type selection display will change according to the number of notes you play in. Arpeggio type The sound of the arpeggio produced will appear. MM6/MM8 Owner's Manual 21 Play the Instrument Hold for longer than a second 2 Use the dial to select the desired arpeggio type. You can ...also record your performance (page 59). You can easily select any time you want to repeat your performance (page 29). A list of the keyboard you play and the area of the available arpeggio types is automatically selected when you select a voice, but you can save the instrument's settings ...

Owner's Manual
Page 23
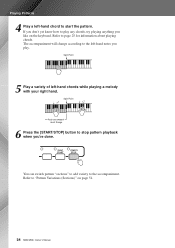
... ON. ●When FINGER is used only for specifying the accompaniment chords. The area of the keyboard to the left of the split point (54 : F sharp 2) becomes the "auto accompaniment range" and is on . MM6/MM8 Owner's Manual 23 Press the button a second time to turn the FINGER mode off . When sync... is on, the bass and chord accompaniment included in a pattern will be changed as required, as you want to play a note to left of the keyboard split point. Playing Patterns Play Along with . 1 Select the pattern you play (page 22, steps 1-2). Here we'll see how to add bass and ...
... ON. ●When FINGER is used only for specifying the accompaniment chords. The area of the keyboard to the left of the split point (54 : F sharp 2) becomes the "auto accompaniment range" and is on . MM6/MM8 Owner's Manual 23 Press the button a second time to turn the FINGER mode off . When sync... is on, the bass and chord accompaniment included in a pattern will be changed as required, as you want to play a note to left of the keyboard split point. Playing Patterns Play Along with . 1 Select the pattern you play (page 22, steps 1-2). Here we'll see how to add bass and ...
Owner's Manual
Page 24
If you don't yet know how to play . The accompaniment will change according to stop pattern playback when you like on page 51. 24 MM6/MM8 Owner's Manual Split Point Auto-accompaniment Range 6 Press the [START/STOP] button to the left-hand notes you play any chords, try playing anything you '... pattern "sections" to add variety to start the pattern. Playing Patterns 4 Play a left-hand chord to the accompaniment. Refer to "Pattern Variations (Sections)" on the keyboard.
If you don't yet know how to play . The accompaniment will change according to stop pattern playback when you like on page 51. 24 MM6/MM8 Owner's Manual Split Point Auto-accompaniment Range 6 Press the [START/STOP] button to the left-hand notes you play any chords, try playing anything you '... pattern "sections" to add variety to start the pattern. Playing Patterns 4 Play a left-hand chord to the accompaniment. Refer to "Pattern Variations (Sections)" on the keyboard.

Owner's Manual
Page 25
... nearest white key to the left of the split point (default: 54/F#2) becomes the "accompaniment range". Full Keyboard: This let you easily play the accompaniment chords freely from anywhere on page 65. MM6/MM8 Owner's Manual 25 Playing Patterns Playing Auto-accompaniment Chords There are two ways of playing auto-accompaniment chords...
... nearest white key to the left of the split point (default: 54/F#2) becomes the "accompaniment range". Full Keyboard: This let you easily play the accompaniment chords freely from anywhere on page 65. MM6/MM8 Owner's Manual 25 Playing Patterns Playing Auto-accompaniment Chords There are two ways of playing auto-accompaniment chords...

Owner's Manual
Page 29
...Track 4 Track 5 Track 6 Track 7 Track 8 Pattern Track MM6/MM8 Owner's Manual 29 These Songs can be played in the same manner as user songs 001 through 005. Each track can be recorded individually. ● Tracks [1]-[8 Record keyboard performance (main voice only). ● [PATTERN] Track Records pattern rhythm...parts. ■ Track Mute This instrument allows you to USB storage device (page 70). ■ Recordable data Eight tracks of keyboard performance and one pattern track (chord performance) can be recorded. Quick Guide Recording Your Own Performance You can record up to &#...
...Track 4 Track 5 Track 6 Track 7 Track 8 Pattern Track MM6/MM8 Owner's Manual 29 These Songs can be played in the same manner as user songs 001 through 005. Each track can be recorded individually. ● Tracks [1]-[8 Record keyboard performance (main voice only). ● [PATTERN] Track Records pattern rhythm...parts. ■ Track Mute This instrument allows you to USB storage device (page 70). ■ Recordable data Eight tracks of keyboard performance and one pattern track (chord performance) can be recorded. Quick Guide Recording Your Own Performance You can record up to &#...
Owner's Manual
Page 31
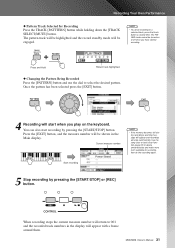
..., press that track button a second time. Press the [EXIT] button, and the measure number will be turned on or off once you play on the keyboard. Use the song clear or track clear function (page 33) to 001 and the recorded track numbers in the Main display. MM6.../MM8 Owner's Manual 31 Once the pattern has been selected press the [EXIT] button. 4 Recording will stop automatically. Current measure number NOTE • If the memory ...
..., press that track button a second time. Press the [EXIT] button, and the measure number will be turned on or off once you play on the keyboard. Use the song clear or track clear function (page 33) to 001 and the recorded track numbers in the Main display. MM6.../MM8 Owner's Manual 31 Once the pattern has been selected press the [EXIT] button. 4 Recording will stop automatically. Current measure number NOTE • If the memory ...
Owner's Manual
Page 35
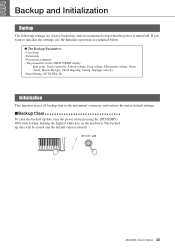
The backed up data, turn the power on by pressing the [STANDBY/ ON] switch while holding the highest white key on the keyboard. If you want to initialize the settings, use the Initialize operation as explained below. ● The Backup Parameters • User Song • Pattern file &#... default values restored. Backup and Initialization Backup The following settings are always backed up, and are maintained even when the power is turned off. MM6/MM8 Owner's Manual 35
The backed up data, turn the power on by pressing the [STANDBY/ ON] switch while holding the highest white key on the keyboard. If you want to initialize the settings, use the Initialize operation as explained below. ● The Backup Parameters • User Song • Pattern file &#... default values restored. Backup and Initialization Backup The following settings are always backed up, and are maintained even when the power is turned off. MM6/MM8 Owner's Manual 35

Owner's Manual
Page 40
... up , the greater the effect that is self-centering and will automatically return to the keyboard sound. Controllers on the front panel Pitch Bend Modulation wheel wheel Knobs ■Pitch Bend ...wheel Use the Pitch Bend wheel to several controller jacks on the keyboard. Raises the pitch Lowers the pitch ■Modulation wheel This controller is used to apply ... normal pitch when released. Try out the Modulation wheel with various Preset Voices while playing the keyboard. This wheel is applied to the sound. Try out the Pitch Bend wheel while pressing a...
... up , the greater the effect that is self-centering and will automatically return to the keyboard sound. Controllers on the front panel Pitch Bend Modulation wheel wheel Knobs ■Pitch Bend ...wheel Use the Pitch Bend wheel to several controller jacks on the keyboard. Raises the pitch Lowers the pitch ■Modulation wheel This controller is used to apply ... normal pitch when released. Try out the Modulation wheel with various Preset Voices while playing the keyboard. This wheel is applied to the sound. Try out the Pitch Bend wheel while pressing a...
Owner's Manual
Page 42
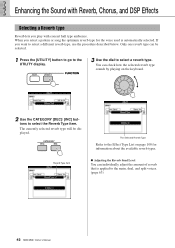
The Selected Reverb Type Refer to the main, dual, and split voices. (page 63) 42 MM6/MM8 Owner's Manual Reverb Type Item ● Adjusting the Reverb Send Level You can individually adjust the amount of reverb that is automatically selected. Enhancing the ... check how the selected reverb type sounds by playing on page 100 for the voice used is applied to the Effect Type List on the keyboard. 2 Use the CATEGORY [DEC]/ [INC] buttons to select a different reverb type, use the procedure described below.
The Selected Reverb Type Refer to the main, dual, and split voices. (page 63) 42 MM6/MM8 Owner's Manual Reverb Type Item ● Adjusting the Reverb Send Level You can individually adjust the amount of reverb that is automatically selected. Enhancing the ... check how the selected reverb type sounds by playing on page 100 for the voice used is applied to the Effect Type List on the keyboard. 2 Use the CATEGORY [DEC]/ [INC] buttons to select a different reverb type, use the procedure described below.
Owner's Manual
Page 43
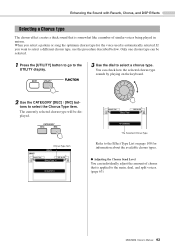
... adjust the amount of similar voices being played in unison. Chorus Type Item The Selected Chorus Type Refer to the Effect Type List on the keyboard. 2 Use the CATEGORY [DEC] / [INC] buttons to select a chorus type. If you select a pattern or song the optimum chorus type for information about... effect creates a thick sound that is somewhat like a number of chorus that is applied to the main, dual, and split voices. (page 63) MM6/MM8 Owner's Manual 43 The currently selected chorus type will be selected. 1 Press the [UTILITY] button to go to the UTILITY display. 3 Use the dial...
... adjust the amount of similar voices being played in unison. Chorus Type Item The Selected Chorus Type Refer to the Effect Type List on the keyboard. 2 Use the CATEGORY [DEC] / [INC] buttons to select a chorus type. If you select a pattern or song the optimum chorus type for information about... effect creates a thick sound that is somewhat like a number of chorus that is applied to the main, dual, and split voices. (page 63) MM6/MM8 Owner's Manual 43 The currently selected chorus type will be selected. 1 Press the [UTILITY] button to go to the UTILITY display. 3 Use the dial...
Owner's Manual
Page 44
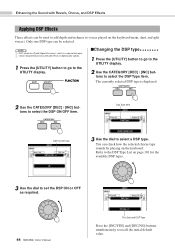
... type sounds by playing on page 101 for "Digital Signal Processor", which is displayed. 2 Use the CATEGORY [DEC] / [INC] buttons to voices played on the keyboard (main, dual, and split voices). Dsp Type Item DSP On/Off Item 3 Use the dial to select the DSP Type item. Refer to recall the.../OFF item. NOTE • DSP stands for the available DSP types. 3 Use the dial to set the DSP ON or OFF as required. 44 MM6/MM8 Owner's Manual The Selected DSP Type Press the [INC/YES] and [DEC/NO] buttons simultaneously to the DSP Type List on the...
... type sounds by playing on page 101 for "Digital Signal Processor", which is displayed. 2 Use the CATEGORY [DEC] / [INC] buttons to voices played on the keyboard (main, dual, and split voices). Dsp Type Item DSP On/Off Item 3 Use the dial to select the DSP Type item. Refer to recall the.../OFF item. NOTE • DSP stands for the available DSP types. 3 Use the dial to set the DSP ON or OFF as required. 44 MM6/MM8 Owner's Manual The Selected DSP Type Press the [INC/YES] and [DEC/NO] buttons simultaneously to the DSP Type List on the...

Owner's Manual
Page 47
...beats per minute. NOTE • The initial default touch sensitivity setting is displayed. 3 Use the dial to keyboard dynamics- The "Tempo" parameter will be too fast or slow, try changing the tempo. Using the TAP ...4 (Off), all notes will appear in response to select a touch sensitivity setting between 1 and 4. You can adjust the keyboard's sensitivity to dynamics in four steps. 1 Press the [UTILITY] button to go to increase the tempo. greater sensitivity. Setting...Tap slowly to reduce the tempo, or quickly to the UTILITY display. i.e. MM6/MM8 Owner's Manual 47
...beats per minute. NOTE • The initial default touch sensitivity setting is displayed. 3 Use the dial to keyboard dynamics- The "Tempo" parameter will be too fast or slow, try changing the tempo. Using the TAP ...4 (Off), all notes will appear in response to select a touch sensitivity setting between 1 and 4. You can adjust the keyboard's sensitivity to dynamics in four steps. 1 Press the [UTILITY] button to go to increase the tempo. greater sensitivity. Setting...Tap slowly to reduce the tempo, or quickly to the UTILITY display. i.e. MM6/MM8 Owner's Manual 47


