

MCXSP10 Manual
Page 3
.... If this type of radio or TV interference, relocate/ reorient the antenna. We Want You Listening For A Lifetime YAMAHA and the Electronic Industries Association's Consumer Electronics Group want you can be used according to the instructions found to use of...CONFORMITY PROCEDURE) Responsible Party: Address: Telephone: Fax: Type of Equipment: Model Name: Yamaha Electronics Corporation 6660 Orangethorpe Avenue Buena Park, CA90620 714-522-9105 714-670-0108 Projector LPX-510 This device complies with Part 15 of America or its subsidiaries. Modifications not...
.... If this type of radio or TV interference, relocate/ reorient the antenna. We Want You Listening For A Lifetime YAMAHA and the Electronic Industries Association's Consumer Electronics Group want you can be used according to the instructions found to use of...CONFORMITY PROCEDURE) Responsible Party: Address: Telephone: Fax: Type of Equipment: Model Name: Yamaha Electronics Corporation 6660 Orangethorpe Avenue Buena Park, CA90620 714-522-9105 714-670-0108 Projector LPX-510 This device complies with Part 15 of America or its subsidiaries. Modifications not...

MCXSP10 Manual
Page 5
...: [Menu] Indicates menu items. Example: "Image" - Alleen voor klanten in the "Appendices". (p.67) Indicates buttons on the remote control or the projector's control panel. OBSERVERA Apparaten kopplas inte bort från växelströmskällan (nätet) så länge som den ä... [(Button name)], ZOOM "(Menu name)" Indicates that an explanation of the underlined word or words in front of terms. Refer to the projector may occur if the procedures are not followed correctly. ADVARSEL Netspæendingen til dette apparat er IKKE afbrudt, sålæenge netledningen ...
...: [Menu] Indicates menu items. Example: "Image" - Alleen voor klanten in the "Appendices". (p.67) Indicates buttons on the remote control or the projector's control panel. OBSERVERA Apparaten kopplas inte bort från växelströmskällan (nätet) så länge som den ä... [(Button name)], ZOOM "(Menu name)" Indicates that an explanation of the underlined word or words in front of terms. Refer to the projector may occur if the procedures are not followed correctly. ADVARSEL Netspæendingen til dette apparat er IKKE afbrudt, sålæenge netledningen ...
MCXSP10 Manual
Page 6
Basic Operations Advanced Operations Troubleshooting Contents Notes on Handling and Storage 2 Accessories ...3 Features of the Projector 4 Basic Operations Turning On the Projector 6 Connecting the Power Cord 6 Turning On the Power and Projecting Images 7 Turning Off the Projector 9 Adjusting the Screen Image 11 Adjusting the Image Size (Zoom adjustment 11 Projection image position adjustment (Lens...
Basic Operations Advanced Operations Troubleshooting Contents Notes on Handling and Storage 2 Accessories ...3 Features of the Projector 4 Basic Operations Turning On the Projector 6 Connecting the Power Cord 6 Turning On the Power and Projecting Images 7 Turning Off the Projector 9 Adjusting the Screen Image 11 Adjusting the Image Size (Zoom adjustment 11 Projection image position adjustment (Lens...

MCXSP10 Manual
Page 7
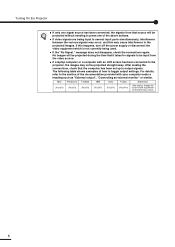
... electrical outlet. If the lamp is not broken, reinstall it is manufactured using the projector, to "Replacing the Lamp" on page 53 of this projector may be dark at all times. The LCD panel is broken. If the batteries are normal characteristics of magnetic fields. If the ...Furthermore, check that you have been disconnected. • Attach the lens cap to the projector. This is needed . • YAMAHA takes no responsibility for loss or damage caused by the characteristics of the LCD panel, and is recommended that all other cables have a spare lamp ready at all times...
... electrical outlet. If the lamp is not broken, reinstall it is manufactured using the projector, to "Replacing the Lamp" on page 53 of this projector may be dark at all times. The LCD panel is broken. If the batteries are normal characteristics of magnetic fields. If the ...Furthermore, check that you have been disconnected. • Attach the lens cap to the projector. This is needed . • YAMAHA takes no responsibility for loss or damage caused by the characteristics of the LCD panel, and is recommended that all other cables have a spare lamp ready at all times...

MCXSP10 Manual
Page 8
... PATT ESCAPE MENU ASPECT LIGHT INPUT HIDE S VIDEO A HDMI VIDEO B D4 INPUT MEMORY 1 2 3 4 5 6 Battery (AA) x 2 Setup guide Home Cinema Projector LPX-510 1 Before Using the Remote Control Inserting the batteries and replacement period Using the remote control and remote operating range 2 Setup Screen Size and... Connecting to a home theater system 4 Connecting to protect the lens. 3 Trigger-out DC plug (for USA only) When not using the projector, always be sure to attach the lens cap in order to a Computer Power cord Lens cap * The shape of the power cord will vary...
... PATT ESCAPE MENU ASPECT LIGHT INPUT HIDE S VIDEO A HDMI VIDEO B D4 INPUT MEMORY 1 2 3 4 5 6 Battery (AA) x 2 Setup guide Home Cinema Projector LPX-510 1 Before Using the Remote Control Inserting the batteries and replacement period Using the remote control and remote operating range 2 Setup Screen Size and... Connecting to a home theater system 4 Connecting to protect the lens. 3 Trigger-out DC plug (for USA only) When not using the projector, always be sure to attach the lens cap in order to a Computer Power cord Lens cap * The shape of the power cord will vary...

MCXSP10 Manual
Page 9
...watching videos or games, or in a dark environment such as when creating the atmosphere of a home theatre. (p.30) Electronic zoom and focus adjustment The projector's control panel and the accessory remote control can be used for still images. (p.32) An aspect function that allows images to be viewed in wide... allows you to the screen. (p.12) Wide range of brightness adjustments The image brightness can be adjusted within a wide range. This allows the projector to be projected onto an 80" screen even at an angle to obtain ideal results both for images with greater freedom, even if it is...
...watching videos or games, or in a dark environment such as when creating the atmosphere of a home theatre. (p.30) Electronic zoom and focus adjustment The projector's control panel and the accessory remote control can be used for still images. (p.32) An aspect function that allows images to be viewed in wide... allows you to the screen. (p.12) Wide range of brightness adjustments The image brightness can be adjusted within a wide range. This allows the projector to be projected onto an 80" screen even at an angle to obtain ideal results both for images with greater freedom, even if it is...

MCXSP10 Manual
Page 10
Basic Operations This chapter describes basic operations such as turning the projector on and off and adjusting the projected images. Turning On the Projector 6 • Connecting the Power Cord 6 • Turning On the Power and Projecting Images 7 Turning Off the Projector 9 Adjusting the Screen Image 11 • Adjusting the Image Size (Zoom adjustment 11...
Basic Operations This chapter describes basic operations such as turning the projector on and off and adjusting the projected images. Turning On the Projector 6 • Connecting the Power Cord 6 • Turning On the Power and Projecting Images 7 Turning Off the Projector 9 Adjusting the Screen Image 11 • Adjusting the Image Size (Zoom adjustment 11...

MCXSP10 Manual
Page 11
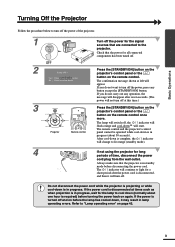
... mode. 6 Be sure to read the Safety Instructions in this manual for all components connected to the projector. 2 Connect the computer or other end of the power cord to the projector. Connecting the Power Cord 1 Check that the power cord connector is turned off for details on the... power to projecting images. Check that the power is facing the same way as the power inlet on the projector, and then insert the power cord connector securely into the projector. 5 Lights orange STANDBY/ON ESCAPE MENU PATTERN SETTING ASPECT INPUT Connect the other video source to a grounded ...
... mode. 6 Be sure to read the Safety Instructions in this manual for all components connected to the projector. 2 Connect the computer or other end of the power cord to the projector. Connecting the Power Cord 1 Check that the power cord connector is turned off for details on the... power to projecting images. Check that the power is facing the same way as the power inlet on the projector, and then insert the power cord connector securely into the projector. 5 Lights orange STANDBY/ON ESCAPE MENU PATTERN SETTING ASPECT INPUT Connect the other video source to a grounded ...

MCXSP10 Manual
Page 12
.../ON ESCAPE PATTERN ASPECT MENU SETTING INPUT ZOOM FOCUS IRIS SETTING PATT ESCAPE MENU Projector Remote control Press the [STANDBY/ON] button on the projector's control panel or the button on the remote control to press Projector or remote control Remote control A B [INPUT] or S VIDEO Display at...signal source. Select the format which matches the video signals from the connected equipment. If you press the [INPUT] button on the projector's control panel or the INPUT button on the remote control, the selection menu will be operated while the indicator is pressed. The ...
.../ON ESCAPE PATTERN ASPECT MENU SETTING INPUT ZOOM FOCUS IRIS SETTING PATT ESCAPE MENU Projector Remote control Press the [STANDBY/ON] button on the projector's control panel or the button on the remote control to press Projector or remote control Remote control A B [INPUT] or S VIDEO Display at...signal source. Select the format which matches the video signals from the connected equipment. If you press the [INPUT] button on the projector's control panel or the INPUT button on the remote control, the selection menu will be operated while the indicator is pressed. The ...
MCXSP10 Manual
Page 13
...or disconnect the video equipment which is active. 8 For details, refer to the section of the documentation provided with an LCD screen has been connected to the projector, the images may cause interference in the projected images. After making the connections, check that Mirroring is not currently being ...a laptop computer or a computer with your computer under a heading such as "External output", "Connecting an external monitor" or similar. Turning On the Projector • If only one of how to toggle output settings. message does not disappear, check the connections again.
...or disconnect the video equipment which is active. 8 For details, refer to the section of the documentation provided with an LCD screen has been connected to the projector, the images may cause interference in the projected images. After making the connections, check that Mirroring is not currently being ...a laptop computer or a computer with your computer under a heading such as "External output", "Connecting an external monitor" or similar. Turning On the Projector • If only one of how to toggle output settings. message does not disappear, check the connections again.
MCXSP10 Manual
Page 14
...control once more. If you do not carry out any button except the [STANDBY/ON] button. Always make sure that are connected to the projector. If the power cord is disconnected at times such as when projection is complete, the indicator will turn off. If you do not want ...9 The indicator will continue to light for the lamp to cool down is required) before disconnecting the power cord. Basic Operations Turning Off the Projector Follow the procedure below to turn off the power of time, disconnect the power cord plug from the wall outlet. Check that the power for...
...control once more. If you do not carry out any button except the [STANDBY/ON] button. Always make sure that are connected to the projector. If the power cord is disconnected at times such as when projection is complete, the indicator will turn off. If you do not want ...9 The indicator will continue to light for the lamp to cool down is required) before disconnecting the power cord. Basic Operations Turning Off the Projector Follow the procedure below to turn off the power of time, disconnect the power cord plug from the wall outlet. Check that the power for...

MCXSP10 Manual
Page 15
Turning Off the Projector 5 Retract 6 Retract Retract the front adjustable foot if it . Attach the lens cap. Attach the lens cap to the lens when not using the projector, in order to retract it is extended. Turn the front adjustable foot to stop the lens from getting dusty or dirty. 7 Disconnect the cords that are connecting the projector and other equipment. 10
Turning Off the Projector 5 Retract 6 Retract Retract the front adjustable foot if it . Attach the lens cap. Attach the lens cap to the lens when not using the projector, in order to retract it is extended. Turn the front adjustable foot to stop the lens from getting dusty or dirty. 7 Disconnect the cords that are connecting the projector and other equipment. 10

MCXSP10 Manual
Page 16
... mode. Adjustment is also possible while a test pattern is pressed. When the electronic zoom lock is basically determined by the distance from the projector to the screen. (Refer to the Setup Guide.) The following procedures explain how to "ON", the projection size cannot be displayed at this...; Focus → Iris Adjust the image size. If using the remote control, tilt the button to adjust the image size. If using the projector's control panel, press the or button to adjust the image size. An adjustment icon will be adjusted. Adjusting the Image Size (Zoom adjustment) ...
... mode. Adjustment is also possible while a test pattern is pressed. When the electronic zoom lock is basically determined by the distance from the projector to the screen. (Refer to the Setup Guide.) The following procedures explain how to "ON", the projection size cannot be displayed at this...; Focus → Iris Adjust the image size. If using the remote control, tilt the button to adjust the image size. If using the projector's control panel, press the or button to adjust the image size. An adjustment icon will be adjusted. Adjusting the Image Size (Zoom adjustment) ...

MCXSP10 Manual
Page 17
... adjustment (Lens shift) The lens shift function can be used to adjust the position of projected images when the projector has been set up in front to view the screen • When the projector is on top of a desk or similar The lens shift function can be set to the lowest position... at the same time. This indicates the approximate center point for the range of resistance will be felt. Horizontal lens shift: The projector can be set up anywhere from the factory, the vertical lens shift position is set up anywhere between the left and right front adjustable feet ...
... adjustment (Lens shift) The lens shift function can be used to adjust the position of projected images when the projector has been set up in front to view the screen • When the projector is on top of a desk or similar The lens shift function can be set to the lowest position... at the same time. This indicates the approximate center point for the range of resistance will be felt. Horizontal lens shift: The projector can be set up anywhere from the factory, the vertical lens shift position is set up anywhere between the left and right front adjustable feet ...

MCXSP10 Manual
Page 18
... correction is carried out, the projected image will be corrected within a maximum vertical angle of approximately 15°. Check that the projector has not been set up at the center left or right, complete keystone correction is angled, the projected image may need to readjust.../ON STANDBY/ON ESCAPE MENU ESCAPE MENU PATTERN SETTING PATTERN SETTING ASPECT INPUT LAMP/COVER TEMP/FAN ASPECT INPUT LAMP/COVER TEMP/FAN Projector Projector • The image quality will become smaller. • The keystone correction settings are memorized, so that the limit for horizontal ...
... correction is carried out, the projected image will be corrected within a maximum vertical angle of approximately 15°. Check that the projector has not been set up at the center left or right, complete keystone correction is angled, the projected image may need to readjust.../ON STANDBY/ON ESCAPE MENU ESCAPE MENU PATTERN SETTING PATTERN SETTING ASPECT INPUT LAMP/COVER TEMP/FAN ASPECT INPUT LAMP/COVER TEMP/FAN Projector Projector • The image quality will become smaller. • The keystone correction settings are memorized, so that the limit for horizontal ...

MCXSP10 Manual
Page 19
... panel or the PATT button on the remote control. 14 A pattern select menu will be used to check whether the projector is tilted or set up the projector in order to correct keystone correction and to make line menu adjustments. • Crosshatch This can be displayed. If using... the line menu. Confirm the pattern selection. Press the button on the projector's control panel or the button on the remote control. If using the remote control, tilt the button vertically. Adjusting the Screen Image Displaying a...
... panel or the PATT button on the remote control. 14 A pattern select menu will be used to check whether the projector is tilted or set up the projector in order to correct keystone correction and to make line menu adjustments. • Crosshatch This can be displayed. If using... the line menu. Confirm the pattern selection. Press the button on the projector's control panel or the button on the remote control. If using the remote control, tilt the button vertically. Adjusting the Screen Image Displaying a...

MCXSP10 Manual
Page 20
... panel to display the line menu, and then make the setting. If setting is being projected. Press the button on the projector's control panel or the button on the remote control to make the setting. Basic Operations 15 If correcting keystone distortion while a... test pattern is required, press the button on the projector's control panel or the button on the remote control. Adjusting the Screen Image 4 STANDBY/ON ESCAPE MENU IRIS SETTING PATT ESCAPE MENU ...
... panel to display the line menu, and then make the setting. If setting is being projected. Press the button on the projector's control panel or the button on the remote control to make the setting. Basic Operations 15 If correcting keystone distortion while a... test pattern is required, press the button on the projector's control panel or the button on the remote control. Adjusting the Screen Image 4 STANDBY/ON ESCAPE MENU IRIS SETTING PATT ESCAPE MENU ...

MCXSP10 Manual
Page 21
...to "OFF". (p.34) 16 Focus adjustment 1 2 STANDBY/ON ESCAPE PATTERN ASPECT MENU SETTING INPUT ZOOM FOCUS IRIS SETTING PATT ESCAPE MENU Projector Remote control STANDBY/ON ESCAPE MENU IRIS SETTING PATT ESCAPE MENU PATTERN SETTING ASPECT INPUT ASPECT LIGHT INPUT HIDE... Projector Remote control Press the [SETTING] button on the projector's control panel or the FOCUS button on the remote control. Zoom → Focus → Iris Adjust the focus. ...
...to "OFF". (p.34) 16 Focus adjustment 1 2 STANDBY/ON ESCAPE PATTERN ASPECT MENU SETTING INPUT ZOOM FOCUS IRIS SETTING PATT ESCAPE MENU Projector Remote control STANDBY/ON ESCAPE MENU IRIS SETTING PATT ESCAPE MENU PATTERN SETTING ASPECT INPUT ASPECT LIGHT INPUT HIDE... Projector Remote control Press the [SETTING] button on the projector's control panel or the FOCUS button on the remote control. Zoom → Focus → Iris Adjust the focus. ...

MCXSP10 Manual
Page 22
...the setting. 1 STANDBY/ON ESCAPE PATTERN MENU SETTING ZOOM FOCUS IRIS SETTING PATT ESCAPE MENU ASPECT INPUT Projector Remote control Press the [SETTING] button on the projector's control panel or the IRIS button on the remote control. If using the remote control, tilt the... images that are being projected. 3 STANDBY/ON ESCAPE PATTERN ASPECT MENU SETTING INPUT ZOOM FOCUS IRIS SETTING PATT ESCAPE MENU Projector Remote control Exit adjustment mode. Basic Operations Adjusting the Image Quality Brightness adjustment (Iris adjustment) The brightness of the images ...
...the setting. 1 STANDBY/ON ESCAPE PATTERN MENU SETTING ZOOM FOCUS IRIS SETTING PATT ESCAPE MENU ASPECT INPUT Projector Remote control Press the [SETTING] button on the projector's control panel or the IRIS button on the remote control. If using the remote control, tilt the... images that are being projected. 3 STANDBY/ON ESCAPE PATTERN ASPECT MENU SETTING INPUT ZOOM FOCUS IRIS SETTING PATT ESCAPE MENU Projector Remote control Exit adjustment mode. Basic Operations Adjusting the Image Quality Brightness adjustment (Iris adjustment) The brightness of the images ...

MCXSP10 Manual
Page 23
... for each mode. * If the picture mode is ideal for viewing in rooms that best suits the images. Select the picture mode. If using the projector's control panel, press the or button to select the picture mode, and press the button to "PC", then the "Gamma", "Abs. Mode name CB Filter... confirm the selection. The menu will be adjusted. 1 2 STANDBY/ON ESCAPE MENU IRIS SETTING PATT ESCAPE MENU PATTERN SETTING ASPECT INPUT ASPECT LIGHT INPUT HIDE Projector Remote control [Picture Mode] Dynamic Bright Standard Cinema Cinema Black PC Return Press the [MENU] button on the...
... for each mode. * If the picture mode is ideal for viewing in rooms that best suits the images. Select the picture mode. If using the projector's control panel, press the or button to select the picture mode, and press the button to "PC", then the "Gamma", "Abs. Mode name CB Filter... confirm the selection. The menu will be adjusted. 1 2 STANDBY/ON ESCAPE MENU IRIS SETTING PATT ESCAPE MENU PATTERN SETTING ASPECT INPUT ASPECT LIGHT INPUT HIDE Projector Remote control [Picture Mode] Dynamic Bright Standard Cinema Cinema Black PC Return Press the [MENU] button on the...

