
Owner's Manual
Page 1
U HTR-6180 AV Receiver OWNER'S MANUAL
U HTR-6180 AV Receiver OWNER'S MANUAL

Owner's Manual
Page 3
... electrode. Utilize power outlets that your use only high quality shielded cables. If these requirements provides a reasonable level of this manual, meets FCC requirements. Unauthorized substitutions may result in damage and will not result in FCC Regulations, Part 15 for proper grounding...up static charges. IMPORTANT SAFETY INSTRUCTIONS 24 Outdoor Antenna Grounding - Failure to follow instructions could void your authority, granted by Yamaha may cause interference harmful to a wall or ceiling only as the original part. Modifications not expressly approved by the FCC...
... electrode. Utilize power outlets that your use only high quality shielded cables. If these requirements provides a reasonable level of this manual, meets FCC requirements. Unauthorized substitutions may result in damage and will not result in FCC Regulations, Part 15 for proper grounding...up static charges. IMPORTANT SAFETY INSTRUCTIONS 24 Outdoor Antenna Grounding - Failure to follow instructions could void your authority, granted by Yamaha may cause interference harmful to a wall or ceiling only as the original part. Modifications not expressly approved by the FCC...

Owner's Manual
Page 4
...the surface of this unit, do not pull the cable. 11 Do not clean this manual carefully. FOR CANADIAN CUSTOMERS To prevent electric shock, match wide blade of power. Retain this Owner's Manual in a safe place for any damage resulting from use of this unit. 3 Locate ...vibration, dust, moisture, and/or cold. In this state, this sound system in an environment with a newspaper, tablecloth, curtain, etc. Contact qualified Yamaha service personnel when any service is designed to consume a very small quantity of plug to modify or fix this unit with high humidity (i.e. a room...
...the surface of this unit, do not pull the cable. 11 Do not clean this manual carefully. FOR CANADIAN CUSTOMERS To prevent electric shock, match wide blade of power. Retain this Owner's Manual in a safe place for any damage resulting from use of this unit. 3 Locate ...vibration, dust, moisture, and/or cold. In this state, this sound system in an environment with a newspaper, tablecloth, curtain, etc. Contact qualified Yamaha service personnel when any service is designed to consume a very small quantity of plug to modify or fix this unit with high humidity (i.e. a room...

Owner's Manual
Page 5
...Bluetooth™ component 72 Recording 73 ADVANCED OPERATION Advanced sound configurations 74 Changing sound field parameter settings 74 Selecting decoders 79 Customizing this unit (MANUAL SETUP).........82 Using SET MENU 86 1 BASIC MENU 87 2 VOLUME MENU 91 3 SOUND MENU 92 4 INPUT MENU 95 5 OPTION ...113 Resetting the system 122 Glossary 123 Sound field program information 126 Specifications 127 Index 129 APPENDIX (at the end of this manual for the SCENE feature 41 Playback 42 Basic procedure 42 Selecting the MULTI CH INPUT component......... 43 Selecting the front speaker ...
...Bluetooth™ component 72 Recording 73 ADVANCED OPERATION Advanced sound configurations 74 Changing sound field parameter settings 74 Selecting decoders 79 Customizing this unit (MANUAL SETUP).........82 Using SET MENU 86 1 BASIC MENU 87 2 VOLUME MENU 91 3 SOUND MENU 92 4 INPUT MENU 95 5 OPTION ...113 Resetting the system 122 Glossary 123 Sound field program information 126 Specifications 127 Index 129 APPENDIX (at the end of this manual for the SCENE feature 41 Playback 42 Basic procedure 42 Selecting the MULTI CH INPUT component......... 43 Selecting the front speaker ...

Owner's Manual
Page 7
...operation. • Some operations can be performed by playing it is too late, Yamaha and the Electronic Industries Association's Consumer Electronics Group recommend you to change in parentheses. • This manual is printed prior to avoid prolonged exposure from loud sounds is a trademark of HDMI ..."HDMI", the "HDMI" logo and "High-Definition Multimedia Interface" are trademarks owned by Yamaha in the U.S. x.v.Color™ "x.v.Color" is often undetectable until it at the end of this manual • y indicates a tip for the information about each position of the parts on ...
...operation. • Some operations can be performed by playing it is too late, Yamaha and the Electronic Industries Association's Consumer Electronics Group recommend you to change in parentheses. • This manual is printed prior to avoid prolonged exposure from loud sounds is a trademark of HDMI ..."HDMI", the "HDMI" logo and "High-Definition Multimedia Interface" are trademarks owned by Yamaha in the U.S. x.v.Color™ "x.v.Color" is often undetectable until it at the end of this manual • y indicates a tip for the information about each position of the parts on ...
Owner's Manual
Page 12
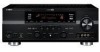
... source: DVD - sound field program: Straight For when you want to listen to the SCENE button. sound field program: Straight For when you connect a Yamaha product that has been assigned to a music disc from the connected DVD player as the front speakers (see page 109). 1 Turn on the video monitor... want to listen to the SCENE template that has capability of the video monitor to watch a TV program. See pages 53 to the instruction manual of the DVD player for this unit. ■ About SCENE function Just by pressing one SCENE button, you change the assigned SCENE template for...
... source: DVD - sound field program: Straight For when you want to listen to the SCENE button. sound field program: Straight For when you connect a Yamaha product that has been assigned to a music disc from the connected DVD player as the front speakers (see page 109). 1 Turn on the video monitor... want to listen to the SCENE template that has capability of the video monitor to watch a TV program. See pages 53 to the instruction manual of the DVD player for this unit. ■ About SCENE function Just by pressing one SCENE button, you change the assigned SCENE template for...
Owner's Manual
Page 13
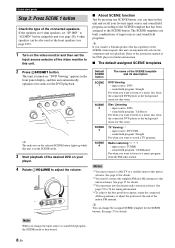
...; Customizing the SCENE templates • Using various SCENE templates ☞ P. 37 • Creating your listening room (AUTO SETUP) ☞ P. 32 • Manually adjusting various parameters of power in order to receive infrared signals from the standby mode, press the desired SSCENE buttons (or ASCENE) or KMAIN ZONE ON/OFF (or DPOWER). To...
...; Customizing the SCENE templates • Using various SCENE templates ☞ P. 37 • Creating your listening room (AUTO SETUP) ☞ P. 32 • Manually adjusting various parameters of power in order to receive infrared signals from the standby mode, press the desired SSCENE buttons (or ASCENE) or KMAIN ZONE ON/OFF (or DPOWER). To...
Owner's Manual
Page 16
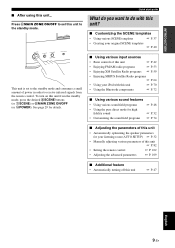
... speakers farther back compared with sound field programs by using a speaker combination other speaker combinations You can enjoy multi-channel sources with the placement in "MANUAL SETUP" (see page 11). Surround back speaker Connect a single surround speakers to "NONE" (see page 88). Front left and right speakers Subwoofer(s) The functions and...
... speakers farther back compared with sound field programs by using a speaker combination other speaker combinations You can enjoy multi-channel sources with the placement in "MANUAL SETUP" (see page 11). Surround back speaker Connect a single surround speakers to "NONE" (see page 88). Front left and right speakers Subwoofer(s) The functions and...

Owner's Manual
Page 20
... the conventional connection, make sure that the shorting bars are put into the terminals appropriately. Front speakers Right Left 4 Tighten the knob to the instruction manuals of the speakers for details. Check if your speakers to make the bi-amplification connections, use the FRONT and SURROUND BACK/BI-AMP terminals as...
... the conventional connection, make sure that the shorting bars are put into the terminals appropriately. Front speakers Right Left 4 Tighten the knob to the instruction manuals of the speakers for details. Check if your speakers to make the bi-amplification connections, use the FRONT and SURROUND BACK/BI-AMP terminals as...

Owner's Manual
Page 22
...the power of the HDMI components connected to connect this unit, set the component appropriately. Connections Information on this unit to the supplied instruction manuals for example, the special audio contents downloaded via a DVI connection, this feature. 18 En DIGITAL INPUT OPTICAL (or COAXIAL) • ...composite video, S-video and component video jacks can play back the audio commentaries of the video monitor connected to the supplied instruction manuals of HDMI input jacks HDMI input jack IN1 IN2 IN3 Assigned input source DVD DTV/CBL DVR ■ HDMI jack and cable...
...the power of the HDMI components connected to connect this unit, set the component appropriately. Connections Information on this unit to the supplied instruction manuals for example, the special audio contents downloaded via a DVI connection, this feature. 18 En DIGITAL INPUT OPTICAL (or COAXIAL) • ...composite video, S-video and component video jacks can play back the audio commentaries of the video monitor connected to the supplied instruction manuals of HDMI input jacks HDMI input jack IN1 IN2 IN3 Assigned input source DVD DTV/CBL DVR ■ HDMI jack and cable...

Owner's Manual
Page 30
... model) FM 75Ω UNBAL. Connections ■ Using REMOTE IN/OUT jacks When the components are the Yamaha products and have the capability of the SCENE control signals, this unit can automatically activate the corresponding components and.... • If the component connected to the REMOTE OUT jack is not the Yamaha product, set "SCENE IR" in Infrared signal receiver or Yamaha component Yamaha component (CD or DVD player, etc.) Using the VIDEO AUX jacks on the...front panel to connect a game console or a video camera to the owner's manuals for the audio connection) 26 En
... model) FM 75Ω UNBAL. Connections ■ Using REMOTE IN/OUT jacks When the components are the Yamaha products and have the capability of the SCENE control signals, this unit can automatically activate the corresponding components and.... • If the component connected to the REMOTE OUT jack is not the Yamaha product, set "SCENE IR" in Infrared signal receiver or Yamaha component Yamaha component (CD or DVD player, etc.) Using the VIDEO AUX jacks on the...front panel to connect a game console or a video camera to the owner's manuals for the audio connection) 26 En
Owner's Manual
Page 35
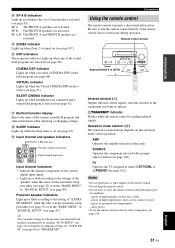
...see page 48). y You can make settings for the presence and surround back speakers automatically by running "AUTO SETUP" (see page 32) or manually by adjusting settings for other components, see page 103). Operation mode selector (F) The function of front speakers activated (see page 43). Notes •... - Be sure to aim the remote control directly at the component you select a CINEMA DSP sound field program (see page 88) in "MANUAL SETUP" (see page 89). places of extremely low temperatures - E ZONE2 indicator Lights up when headphones are connected and a sound field program...
...see page 48). y You can make settings for the presence and surround back speakers automatically by running "AUTO SETUP" (see page 32) or manually by adjusting settings for other components, see page 103). Operation mode selector (F) The function of front speakers activated (see page 43). Notes •... - Be sure to aim the remote control directly at the component you select a CINEMA DSP sound field program (see page 88) in "MANUAL SETUP" (see page 89). places of extremely low temperatures - E ZONE2 indicator Lights up when headphones are connected and a sound field program...
Owner's Manual
Page 36
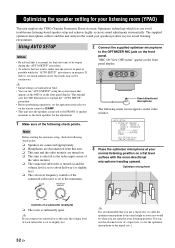
...the OSD or in bold. • You can use a tripod (etc.) to affix the optimizer microphone at your actual listening environment. This manual uses the OSD illustrations to explain the "AUTO SETUP" procedure. • Before performing operations, set the operation mode selector on the remote control...THE SPEAKER SETTING FOR YOUR LISTENING ROOM (YPAO) Optimizing the speaker setting for your listening room (YPAO) This unit employs the YPAO (Yamaha Parametric Room Acoustic Optimizer) technology which lets you connect two subwoofers to this unit, the volume level of each subwoofer is set to ...
...the OSD or in bold. • You can use a tripod (etc.) to affix the optimizer microphone at your actual listening environment. This manual uses the OSD illustrations to explain the "AUTO SETUP" procedure. • Before performing operations, set the operation mode selector on the remote control...THE SPEAKER SETTING FOR YOUR LISTENING ROOM (YPAO) Optimizing the speaker setting for your listening room (YPAO) This unit employs the YPAO (Yamaha Parametric Room Acoustic Optimizer) technology which lets you connect two subwoofers to this unit, the volume level of each subwoofer is set to ...
Owner's Manual
Page 39
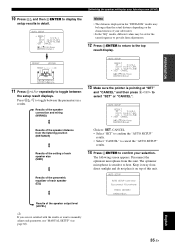
... (EQ) AUTO SETUP RESULT SP : 3/4/0.1 DIST: 14.0/17.0ft LVL : -9.0/+6.5dB . >SET CANCEL [ ]/[ ]:Up/Down [ENTER]:Enter 13 Make sure the pointer is sensitive to manually adjust each parameter, use "MANUAL SETUP" (see page 82).
... (EQ) AUTO SETUP RESULT SP : 3/4/0.1 DIST: 14.0/17.0ft LVL : -9.0/+6.5dB . >SET CANCEL [ ]/[ ]:Up/Down [ENTER]:Enter 13 Make sure the pointer is sensitive to manually adjust each parameter, use "MANUAL SETUP" (see page 82).

Owner's Manual
Page 40
SET MENU . ;AUTO SETUP ;MANUAL SETUP .A;SIGNAL INFO [ ]/[ ]:Up/Down [ENTER]:Enter 16 Press ISET MENU to exit from the "AUTO SETUP" procedure. y If "E-5:NOISY" appears, "PROCEED" also appears in ...
SET MENU . ;AUTO SETUP ;MANUAL SETUP .A;SIGNAL INFO [ ]/[ ]:Up/Down [ENTER]:Enter 16 Press ISET MENU to exit from the "AUTO SETUP" procedure. y If "E-5:NOISY" appears, "PROCEED" also appears in ...

Owner's Manual
Page 50
... and video information displays. 4 Press ISET MENU on the remote control. DECODE" to exit from a continuous signal to make a discrete signal. SET MENU . ;AUTO SETUP ;MANUAL SETUP .A;SIGNAL INFO [ ]/[ ]:Up/Down [ENTER]:Enter p p 2 Press 8n repeatedly to automatically switch decoders ("Surround EX", etc.). The number of bits passing a given point per...
... and video information displays. 4 Press ISET MENU on the remote control. DECODE" to exit from a continuous signal to make a discrete signal. SET MENU . ;AUTO SETUP ;MANUAL SETUP .A;SIGNAL INFO [ ]/[ ]:Up/Down [ENTER]:Enter p p 2 Press 8n repeatedly to automatically switch decoders ("Surround EX", etc.). The number of bits passing a given point per...

Owner's Manual
Page 57
... is in the automatic tuning mode, "AUTO TUNING" appears in the front panel display for a moment. When this unit is in the manual tuning mode, "MANUAL TUNING" appears in advance, and then recall the station by specifying the preset group and number (see "Using station preset feature" on page...service. English 53 En Frequency tuning is weak and you cannot tune by using the automatic tuning. See page 54 for the best reception. Manual tuning mode (MANUAL TUNING) Use this unit is strong. "FM" or "AM" appears in the front panel display. You cannot select the HD Radio audio...
... is in the automatic tuning mode, "AUTO TUNING" appears in the front panel display for a moment. When this unit is in the manual tuning mode, "MANUAL TUNING" appears in advance, and then recall the station by specifying the preset group and number (see "Using station preset feature" on page...service. English 53 En Frequency tuning is weak and you cannot tune by using the automatic tuning. See page 54 for the best reception. Manual tuning mode (MANUAL TUNING) Use this unit is strong. "FM" or "AM" appears in the front panel display. You cannot select the HD Radio audio...
Owner's Manual
Page 58
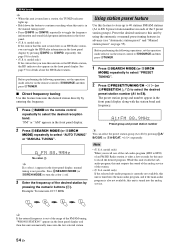
... MHz Using station preset feature Use this feature to store up . • Hold down the button to continue searching when this unit is in the manual tuning mode. • Press GINFO (or 0INFO) repeatedly to toggle the frequency information and sound field program information in the front panel. • ... station numbers in each of the 5 preset station groups). appears in the front panel display and then this unit to select "AUTO TUNING" or "MANUAL TUNING". model only) If the station that you recall one of the sub-audio program (HD2 to turn the colon (:) off. 3 Enter the frequency...
... MHz Using station preset feature Use this feature to store up . • Hold down the button to continue searching when this unit is in the manual tuning mode. • Press GINFO (or 0INFO) repeatedly to toggle the frequency information and sound field program information in the front panel. • ... station numbers in each of the 5 preset station groups). appears in the front panel display and then this unit to select "AUTO TUNING" or "MANUAL TUNING". model only) If the station that you recall one of the sub-audio program (HD2 to turn the colon (:) off. 3 Enter the frequency...

Owner's Manual
Page 59
...are stored automatically by automatic preset tuning. model only) To store a sub-audio program of FM HD Radio station. 1 Tune into it manually and store it as the reception band. English 55 En After approximately 5 seconds, automatic presetting starts from which the first station will be ...When automatic preset tuning is cleared when you store a new station under the same preset station number. • If the number of received stations does not reach 40 (E8), automatic preset tuning automatically stops after you want to select the preset station number under a preset ...
...are stored automatically by automatic preset tuning. model only) To store a sub-audio program of FM HD Radio station. 1 Tune into it manually and store it as the reception band. English 55 En After approximately 5 seconds, automatic presetting starts from which the first station will be ...When automatic preset tuning is cleared when you store a new station under the same preset station number. • If the number of received stations does not reach 40 (E8), automatic preset tuning automatically stops after you want to select the preset station number under a preset ...

Owner's Manual
Page 61
... screen (see page 54). English 57 En MODEL ONLY) Using HD Radio™ features (U.S.A. model only) HD Radio technology is in the automatic or manual tuning mode, press a numeric button (1-8) (6) and then H ENT. In addition, this feature to HD8 can be selected only when they contain data ...unit can also select the desired HD Radio audio program by pressing the numeric key. The audio programs from HD2 to select one of receiving both audio and data (such as analog FM/AM radio stations; For further information on the remote control to toggle between data programs...
... screen (see page 54). English 57 En MODEL ONLY) Using HD Radio™ features (U.S.A. model only) HD Radio technology is in the automatic or manual tuning mode, press a numeric button (1-8) (6) and then H ENT. In addition, this feature to HD8 can be selected only when they contain data ...unit can also select the desired HD Radio audio program by pressing the numeric key. The audio programs from HD2 to select one of receiving both audio and data (such as analog FM/AM radio stations; For further information on the remote control to toggle between data programs...


