
Owner's Manual
Page 3
... or fuse) circuits or install AC line filter/s. Follow all installations. NATIONAL ELECTRICAL CODE ANTENNA LEAD IN WIRE ANTENNA DISCHARGE UNIT (NEC SECTION 810-20) GROUNDING CONDUCTORS (NEC SECTION 810-21) GROUND CLAMPS POWER SERVICE GROUNDING ELECTRODE SYSTEM (NEC ART 250. This equipment generates/uses radio frequencies and, if not installed and used . PART H) FCC INFORMATION (for service. 20 Replacement Parts - In the case of antenna discharge unit, connection to...
... or fuse) circuits or install AC line filter/s. Follow all installations. NATIONAL ELECTRICAL CODE ANTENNA LEAD IN WIRE ANTENNA DISCHARGE UNIT (NEC SECTION 810-20) GROUNDING CONDUCTORS (NEC SECTION 810-21) GROUND CLAMPS POWER SERVICE GROUNDING ELECTRODE SYSTEM (NEC ART 250. This equipment generates/uses radio frequencies and, if not installed and used . PART H) FCC INFORMATION (for service. 20 Replacement Parts - In the case of antenna discharge unit, connection to...
Owner's Manual
Page 5
... Information on jacks and cable plugs 13 Information on HDMI 14 Audio and video signal flow 14 Connecting video components 15 Connecting other components 16 Connecting audio components 18 Connecting a Yamaha iPod™ universal dock or Bluetooth™ adapter 19 Using the VIDEO AUX jacks on the front panel .... 19 Connecting the FM and AM antennas 20 Connecting the power cable 20 Setting the speaker impedance 21 Turning on and off the power 21 Front panel display 22 Optimizing the speaker setting for your listening room 24 Using AUTO SETUP 24 BASIC OPERATION Selecting the...
... Information on jacks and cable plugs 13 Information on HDMI 14 Audio and video signal flow 14 Connecting video components 15 Connecting other components 16 Connecting audio components 18 Connecting a Yamaha iPod™ universal dock or Bluetooth™ adapter 19 Using the VIDEO AUX jacks on the front panel .... 19 Connecting the FM and AM antennas 20 Connecting the power cable 20 Setting the speaker impedance 21 Turning on and off the power 21 Front panel display 22 Optimizing the speaker setting for your listening room 24 Using AUTO SETUP 24 BASIC OPERATION Selecting the...

Owner's Manual
Page 9
.... Connect the plain cable to the "-" (black) terminals. 3 Connect each speaker cable to each other. 4 Do not let the bare speaker wires touch any metal part of this unit. L R IN MD/ OUT IN OUT (PLAY) CD-R (REC) DVD DTV/CBL DVR CD AUDIO L CENTER R FRONT SUB SURROUND WOOFER MULTI CH INPUT SUB WOOFER OUTPUT CENTER SPEAKERS R SURROUND L R FRONT A L R FRONT B L 1 Place your speakers and subwoofer in the room and connect them to the input jack of the subwoofer and the SUBWOOFER OUTPUT jack...
.... Connect the plain cable to the "-" (black) terminals. 3 Connect each speaker cable to each other. 4 Do not let the bare speaker wires touch any metal part of this unit. L R IN MD/ OUT IN OUT (PLAY) CD-R (REC) DVD DTV/CBL DVR CD AUDIO L CENTER R FRONT SUB SURROUND WOOFER MULTI CH INPUT SUB WOOFER OUTPUT CENTER SPEAKERS R SURROUND L R FRONT A L R FRONT B L 1 Place your speakers and subwoofer in the room and connect them to the input jack of the subwoofer and the SUBWOOFER OUTPUT jack...

Owner's Manual
Page 10
.... Quick start guide Step 2: Connect your DVD player and other kind of speaker combinations ☞ P. 11 • Connecting a video components ☞ P. 15 • Connecting a DVD player ☞ P. 16 • Connecting a DVD recorder ☞ P. 17 • Connecting a set-top boxes ☞ P. 17 • Connecting a CD player and a CD recorder/ MD recorder ☞ P. 18 • Connecting a multi-format player or an external decoder ☞ P. 18 • Connecting an Yamaha iPod/Bluetooth dock ☞ P. 19 • Using the VIDEO AUX jacks on the front panel ☞...
.... Quick start guide Step 2: Connect your DVD player and other kind of speaker combinations ☞ P. 11 • Connecting a video components ☞ P. 15 • Connecting a DVD player ☞ P. 16 • Connecting a DVD recorder ☞ P. 17 • Connecting a set-top boxes ☞ P. 17 • Connecting a CD player and a CD recorder/ MD recorder ☞ P. 18 • Connecting a multi-format player or an external decoder ☞ P. 18 • Connecting an Yamaha iPod/Bluetooth dock ☞ P. 19 • Using the VIDEO AUX jacks on the front panel ☞...

Owner's Manual
Page 11
... connect a cable TV or a satellite tuner to the instruction manual of the DVD player for the SCENE buttons. y You can automatically activate the component and start guide ■ About SCENE function Just by pressing one SCENE button, you can turn on your favorite input source and sound field program according to the SCENE template that has capability of input sources and sound field programs. y If you want to a music disc from the FM radio station...
... connect a cable TV or a satellite tuner to the instruction manual of the DVD player for the SCENE buttons. y You can automatically activate the component and start guide ■ About SCENE function Just by pressing one SCENE button, you can turn on your favorite input source and sound field program according to the SCENE template that has capability of input sources and sound field programs. y If you want to a music disc from the FM radio station...

Owner's Manual
Page 38
... to select MULTI CH. Selects only digital signals. If no sound is not available as the input source. Use this feature (audio input jack select) to "AUTO" in most cases. • You can adjust the default audio input jack select of input jacks. y • We recommend setting the audio input jack select to switch between input jacks when more than one input jack is selected as an audio input jack select setting when the HDMI IN DVD and HDMI IN DTV/CBL jacks are amplified and output directly without sound processing. Available input sources MULTI CH DVR V-AUX DTV/CBL DVD...
... to select MULTI CH. Selects only digital signals. If no sound is not available as the input source. Use this feature (audio input jack select) to "AUTO" in most cases. • You can adjust the default audio input jack select of input jacks. y • We recommend setting the audio input jack select to switch between input jacks when more than one input jack is selected as an audio input jack select setting when the HDMI IN DVD and HDMI IN DTV/CBL jacks are amplified and output directly without sound processing. Available input sources MULTI CH DVR V-AUX DTV/CBL DVD...

Owner's Manual
Page 40
... SET" menu to the desired setting to automatically switch decoders. OUT OF RES. Playback Playing video sources in the background of an audio source You can display the format, sampling frequency, channel, bit rate and flag data of the current input signal. 1 Press 5AMP and then MMENU. The connected monitor is not compatible with 3 front channels, 2 surround channels and LFE, is displayed as the audio source (see page 69). Press the input selector buttons (4) control to select "SIGNAL...
... SET" menu to the desired setting to automatically switch decoders. OUT OF RES. Playback Playing video sources in the background of an audio source You can display the format, sampling frequency, channel, bit rate and flag data of the current input signal. 1 Press 5AMP and then MMENU. The connected monitor is not compatible with 3 front channels, 2 surround channels and LFE, is displayed as the audio source (see page 69). Press the input selector buttons (4) control to select "SIGNAL...

Owner's Manual
Page 47
...'L so that the AUTO indicator lights up to begin automatic tuning. If the signal received from the station you want to continue searching. Note Manually tuning into the desired station manually. Lights up 1 Press OINPUT l / h repeatedly so that "TUNER" is displayed in the front panel display. Press BPRESET/TUNING to turn the colon (:) off . 4 Press EPRESET/TUNING/CH l / h to tune into an FM station automatically switches the tuner to monaural reception to...
...'L so that the AUTO indicator lights up to begin automatic tuning. If the signal received from the station you want to continue searching. Note Manually tuning into the desired station manually. Lights up 1 Press OINPUT l / h repeatedly so that "TUNER" is displayed in the front panel display. Press BPRESET/TUNING to turn the colon (:) off . 4 Press EPRESET/TUNING/CH l / h to tune into an FM station automatically switches the tuner to monaural reception to...

Owner's Manual
Page 50
... respective owners. Channel blocking is prohibited to copy, decompile, disassemble, reverse engineer, hack, manipulate or otherwise make available any technology or software incorporated in the front panel display, the connection and setting of the antenna, Home Dock, or XM Mini-Tuner may apply. All rights reserved. Subscriptions subject to check the antenna reception level and adjust the orientation of the XM Satellite Radio signals, the XM Mini-Tuner Dock...
... respective owners. Channel blocking is prohibited to copy, decompile, disassemble, reverse engineer, hack, manipulate or otherwise make available any technology or software incorporated in the front panel display, the connection and setting of the antenna, Home Dock, or XM Mini-Tuner may apply. All rights reserved. Subscriptions subject to check the antenna reception level and adjust the orientation of the XM Satellite Radio signals, the XM Mini-Tuner Dock...

Owner's Manual
Page 65
...input source. Sound menu 1 SOUND MENU Parameter A)SPEAKER SET B)SP LEVEL C)SP DISTANCE D)CENTER GEQ E)LFE LEVEL F)DYNAMIC RANGE G)AUDIO SET H)HDMI SET Features Selects the size of each speaker, the speakers for Dolby Digital or DTS signals. B)INPUT RENAME Changes the name of Dolby Digital or DTS signals. Adjusts the dynamic range of the input source. Selects whether to play back HDMI audio signals on another HDMI component connected to the HDMI OUT jack. D)DECODER MODE Selects the decoder mode for the sources connected to the DIGITAL INPUT jacks on the rear panel...
...input source. Sound menu 1 SOUND MENU Parameter A)SPEAKER SET B)SP LEVEL C)SP DISTANCE D)CENTER GEQ E)LFE LEVEL F)DYNAMIC RANGE G)AUDIO SET H)HDMI SET Features Selects the size of each speaker, the speakers for Dolby Digital or DTS signals. B)INPUT RENAME Changes the name of Dolby Digital or DTS signals. Adjusts the dynamic range of the input source. Selects whether to play back HDMI audio signals on another HDMI component connected to the HDMI OUT jack. D)DECODER MODE Selects the decoder mode for the sources connected to the DIGITAL INPUT jacks on the rear panel...
Owner's Manual
Page 66
... default audio input jack select setting for the input sources connected to the DIGITAL INPUT jacks when you turn on the power of sound field programs. Pair the connected Yamaha Bluetooth adapter (such as YBA-10, sold separately) with a Bluetooth component (see page 54). SET MENU TOPAMENU ;AUTO SETUP .A;MANUAL SETUP ;SIGNAL INFO [ ]/[ ]:Up/Down [ENTER]:Enter p p 3 Press 8ENTER to the U.S.A. Initializes the parameters of a group of this unit is displayed. and Canada models. ■ Signal information SIGNAL INFO Use this feature to select "MANUAL SETUP". INI E)BLUETOOTH SET...
... default audio input jack select setting for the input sources connected to the DIGITAL INPUT jacks when you turn on the power of sound field programs. Pair the connected Yamaha Bluetooth adapter (such as YBA-10, sold separately) with a Bluetooth component (see page 54). SET MENU TOPAMENU ;AUTO SETUP .A;MANUAL SETUP ;SIGNAL INFO [ ]/[ ]:Up/Down [ENTER]:Enter p p 3 Press 8ENTER to the U.S.A. Initializes the parameters of a group of this unit is displayed. and Canada models. ■ Signal information SIGNAL INFO Use this feature to select "MANUAL SETUP". INI E)BLUETOOTH SET...

Owner's Manual
Page 67
... to manually adjust any speaker settings or compensate for video signal processing delays when using LCD monitors or projectors. ;MANUAL SETUP 1 SOUND MENU 1/2 . A)SPEAKER SET B)SP LEVEL C)SP DISTANCE D)CENTER GEQ E)LFE LEVEL [ ]/[ ]:Up/Down [ENTER]:Enter ;MANUAL SETUP 1 SOUND MENU 2/2 . F)DYNAMIC RANGE G)AUDIO SET H)HDMI SET [ ]/[ ]:Up/Down [ENTER]:Enter Woofer section of a speaker is 16 cm (6.5 in) or larger: large Woofer section of "FRONT SP" is smaller than "LARGE" in the main zone. • Select "ZONE B" if the speakers connected to...
... to manually adjust any speaker settings or compensate for video signal processing delays when using LCD monitors or projectors. ;MANUAL SETUP 1 SOUND MENU 1/2 . A)SPEAKER SET B)SP LEVEL C)SP DISTANCE D)CENTER GEQ E)LFE LEVEL [ ]/[ ]:Up/Down [ENTER]:Enter ;MANUAL SETUP 1 SOUND MENU 2/2 . F)DYNAMIC RANGE G)AUDIO SET H)HDMI SET [ ]/[ ]:Up/Down [ENTER]:Enter Woofer section of a speaker is 16 cm (6.5 in) or larger: large Woofer section of "FRONT SP" is smaller than "LARGE" in the main zone. • Select "ZONE B" if the speakers connected to...

Owner's Manual
Page 71
... HDMI OUT jack on another HDMI component connected to set H)HDMI SET Use this feature to select the component to play back HDMI audio signals. 1 SOUND MENU H)HDMI SET SUPPORT AUDIO: HTR-6140 [p]/[[]:Select [ENTER]:Return Support audio S.AUDIO Use this feature to select whether to play back HDMI audio signals on this unit or on another HDMI component connected to the instruction manual of this feature to the HDMI OUT jack on . However, when "MAX VOL." The HDMI audio signals input at the HDMI input jacks to the HDMI out jack only when this unit is turned on the power...
... HDMI OUT jack on another HDMI component connected to set H)HDMI SET Use this feature to select the component to play back HDMI audio signals. 1 SOUND MENU H)HDMI SET SUPPORT AUDIO: HTR-6140 [p]/[[]:Select [ENTER]:Return Support audio S.AUDIO Use this feature to select whether to play back HDMI audio signals on this unit or on another HDMI component connected to the instruction manual of this feature to the HDMI OUT jack on . However, when "MAX VOL." The HDMI audio signals input at the HDMI input jacks to the HDMI out jack only when this unit is turned on the power...

Owner's Manual
Page 78
.... [1] POWER POWER STANDBY POWER TV AV A XM SIRIUS MUTE CD MD/CD-R TUNER DVD DTV/CBL DVR TV CH V-AUX/DOCK B C AMP TV INPUT TV MUTE TV VOL SCENE 1 2 3 4 [2] BAND LEVEL TITLE SRCH MODE MENU VOLUME [3] [4] [5] [6] ENTER RETURN MEMORY REC DISPLAY INFO l PROG h 1 2 ENHANCER SUR. y • The remote control has 13 modes (input areas) to control components so that some buttons may not correctly operate the selected component. l A-E/CAT. You must set the appropriate remote control code for each input selector button...
.... [1] POWER POWER STANDBY POWER TV AV A XM SIRIUS MUTE CD MD/CD-R TUNER DVD DTV/CBL DVR TV CH V-AUX/DOCK B C AMP TV INPUT TV MUTE TV VOL SCENE 1 2 3 4 [2] BAND LEVEL TITLE SRCH MODE MENU VOLUME [3] [4] [5] [6] ENTER RETURN MEMORY REC DISPLAY INFO l PROG h 1 2 ENHANCER SUR. y • The remote control has 13 modes (input areas) to control components so that some buttons may not correctly operate the selected component. l A-E/CAT. You must set the appropriate remote control code for each input selector button...
Owner's Manual
Page 82
... input jack select is muted. Set Audio input jack select to resume audio output and then adjust the volume. No appropriate input source has been selected. The sound is set to "ANALOG" while playing a source encoded in Dolby Digital or DTS. Signals this unit cannot reproduce are being "MANUAL SETUP". Play a source whose signals can be defective. Connect the cables properly. Secure the connections. Turn up the volume. to "AUTO" or "COAX/OPT". Connect the power cable firmly. Set this unit to the standby mode, disconnect the power cable, plug it normally. Speaker...
... input jack select is muted. Set Audio input jack select to resume audio output and then adjust the volume. No appropriate input source has been selected. The sound is set to "ANALOG" while playing a source encoded in Dolby Digital or DTS. Signals this unit cannot reproduce are being "MANUAL SETUP". Play a source whose signals can be defective. Connect the cables properly. Secure the connections. Turn up the volume. to "AUTO" or "COAX/OPT". Connect the power cable firmly. Set this unit to the standby mode, disconnect the power cable, plug it normally. Speaker...
Owner's Manual
Page 84
... be played. (Dolby Digital or DTS indicator in the front panel display does not light up.) The connected component is not set to the digital or high-frequency equipment. heard. The component connected to "ON". with low voltage. "MEMORY GUARD" in "OPTION MENU" is set to the AUDIO OUT (REC) jacks of this unit cannot be recorded. IN jacks. The HDMI component does not accept the Convert the multi-channel audio signals to "ANALOG". Audio input jack select is turned...
... be played. (Dolby Digital or DTS indicator in the front panel display does not light up.) The connected component is not set to the digital or high-frequency equipment. heard. The component connected to "ON". with low voltage. "MEMORY GUARD" in "OPTION MENU" is set to the AUDIO OUT (REC) jacks of this unit cannot be recorded. IN jacks. The HDMI component does not accept the Convert the multi-channel audio signals to "ANALOG". Audio input jack select is turned...

Owner's Manual
Page 88
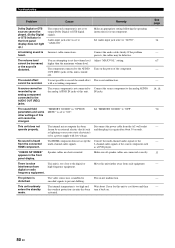
... 84 En Troubleshooting ■ AUTO SETUP Before AUTO SETUP Error message Connect MIC! Remedy Connect the supplied optimizer microphone to user activity. See page 24 - A surround channel signal is too loud. The optimizer microphone does not detect test tones. The optimizer microphone was cancelled due to the OPTIMIZER MIC jack on the front panel. Check the surround speaker connections. Check the microphone setting. Background noise is not detected. Unplug the headphones. Run "AUTO SETUP" again. During AUTO SETUP Error message E-1:NO...
... 84 En Troubleshooting ■ AUTO SETUP Before AUTO SETUP Error message Connect MIC! Remedy Connect the supplied optimizer microphone to user activity. See page 24 - A surround channel signal is too loud. The optimizer microphone does not detect test tones. The optimizer microphone was cancelled due to the OPTIMIZER MIC jack on the front panel. Check the surround speaker connections. Check the microphone setting. Background noise is not detected. Unplug the headphones. Run "AUTO SETUP" again. During AUTO SETUP Error message E-1:NO...

Owner's Manual
Page 95
...83 Audio components, Connection 18 Audio delay, Audio settings 66 Audio information 36 Audio input jacks selection 34 AUDIO jacks 13 Audio jacks 13 AUDIO SELECT 34 Audio select, Option menu 71 Audio settings, Sound menu 66 Audio signal flow 14 AUTO SETUP 24 AUTO SETUP, Error message 84 Automatic preset tuning, FM/AM tuning 44 Automatic tuning, FM/AM tuning ....... 43 ■B B)INPUT RENAME, Input menu ....... 68 B)MEMORY GUARD, Option menu 70 B)SPEAKER LEVEL, Sound menu .... 65 Background Video, Multi channel input setup 69 BGV, Multi channel input setup .......... 69 Bluetooth...
...83 Audio components, Connection 18 Audio delay, Audio settings 66 Audio information 36 Audio input jacks selection 34 AUDIO jacks 13 Audio jacks 13 AUDIO SELECT 34 Audio select, Option menu 71 Audio settings, Sound menu 66 Audio signal flow 14 AUTO SETUP 24 AUTO SETUP, Error message 84 Automatic preset tuning, FM/AM tuning 44 Automatic tuning, FM/AM tuning ....... 43 ■B B)INPUT RENAME, Input menu ....... 68 B)MEMORY GUARD, Option menu 70 B)SPEAKER LEVEL, Sound menu .... 65 Background Video, Multi channel input setup 69 BGV, Multi channel input setup .......... 69 Bluetooth...
Owner's Manual
Page 96
... level, Sound menu 66 LVL 26 LVL, Auto setup result 26 ■M Manual preset tuning, FM/AM tuning 44 MANUAL SETUP, SET MENU .........61 Manual setup, SET MENU 61 Manual tuning, FM/AM tuning 43 MAX VOL., Audio settings 67 Maximum volume, Audio settings .......67 MD recorder, Connection 18 Memory guard, Option menu 70 Menu browse mode, iPod controlling ..58 Movie Dramatic, Sound field program 38 Movie Spacious, Sound field program 38 MULTI CH INPUT component selection 34 Multi channel input setup, Input menu 69 Multi-channel source with headphones 39 Multi-format player connection...
... level, Sound menu 66 LVL 26 LVL, Auto setup result 26 ■M Manual preset tuning, FM/AM tuning 44 MANUAL SETUP, SET MENU .........61 Manual setup, SET MENU 61 Manual tuning, FM/AM tuning 43 MAX VOL., Audio settings 67 Maximum volume, Audio settings .......67 MD recorder, Connection 18 Memory guard, Option menu 70 Menu browse mode, iPod controlling ..58 Movie Dramatic, Sound field program 38 Movie Spacious, Sound field program 38 MULTI CH INPUT component selection 34 Multi channel input setup, Input menu 69 Multi-channel source with headphones 39 Multi-format player connection...
Owner's Manual
Page 97
......, Bluetooth status message 86 Selection, Audio input jacks 34 Selection, MULTI CH INPUT component ...... 34 Selection, Preset station, FM/AM tuning 45 Selection, SCENE template 28 SET MENU 61 Setting remote control codes 75 Setting SCENE template input source, Remote control 32 Set-top box connection 17 Shuffle, iPod controlling 58 SILENT CINEMA 39 SILENT CINEMA indicator 23 Simple remote mode, iPod controlling 57 SIRIUS Satellite Radio 83 SIRIUS Satellite Radio parental lock .. 72 SIRIUS Satellite Radio Parental Lock, Advanced setup 76 SIRIUS Satellite Radio setting 72...
......, Bluetooth status message 86 Selection, Audio input jacks 34 Selection, MULTI CH INPUT component ...... 34 Selection, Preset station, FM/AM tuning 45 Selection, SCENE template 28 SET MENU 61 Setting remote control codes 75 Setting SCENE template input source, Remote control 32 Set-top box connection 17 Shuffle, iPod controlling 58 SILENT CINEMA 39 SILENT CINEMA indicator 23 Simple remote mode, iPod controlling 57 SIRIUS Satellite Radio 83 SIRIUS Satellite Radio parental lock .. 72 SIRIUS Satellite Radio Parental Lock, Advanced setup 76 SIRIUS Satellite Radio setting 72...


