
Owner's Manual
Page 1
U HTR-6130 AV Receiver OWNER'S MANUAL
U HTR-6130 AV Receiver OWNER'S MANUAL

Owner's Manual
Page 3
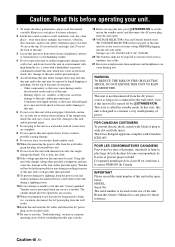
... the grounding electrode. This product, when installed as radiators, heat registers, stoves, or other controls may result in the users manual, may cause interference harmful to comply with the requirements listed in FCC Regulations, Part 15 for proper grounding and, in perfor-...NOTE: This product has been tested and found to the operation of interference, which can not locate the appropriate retailer, please contact Yamaha Electronics Corp., U.S.A. 6660 Orangethorpe Ave., Buena Park, CA 90620. Caution-ii En IMPORTANT SAFETY INSTRUCTIONS 24 Outdoor Antenna Grounding - ...
... the grounding electrode. This product, when installed as radiators, heat registers, stoves, or other controls may result in the users manual, may cause interference harmful to comply with the requirements listed in FCC Regulations, Part 15 for proper grounding and, in perfor-...NOTE: This product has been tested and found to the operation of interference, which can not locate the appropriate retailer, please contact Yamaha Electronics Corp., U.S.A. 6660 Orangethorpe Ave., Buena Park, CA 90620. Caution-ii En IMPORTANT SAFETY INSTRUCTIONS 24 Outdoor Antenna Grounding - ...
Owner's Manual
Page 4
...dripping or splashing. do not place: - this unit upside-down. vacation), disconnect the AC power plug from the wall outlet. 16 Install this manual carefully. POUR LES CONSOMMATEURS CANADIENS Pour éviter les chocs électriques, introduire la lame la plus large de la fiche dans la borne ...damage by ASTANDBY/ON. Cet appareil numérique de la classe B est conforme à la norme NMB-003 du Canada. Burning objects (i.e. Yamaha will not be exposed to excessive heat such as it in a safe place for your unit. 1 To assure the finest performance, please read the ...
...dripping or splashing. do not place: - this unit upside-down. vacation), disconnect the AC power plug from the wall outlet. 16 Install this manual carefully. POUR LES CONSOMMATEURS CANADIENS Pour éviter les chocs électriques, introduire la lame la plus large de la fiche dans la borne ...damage by ASTANDBY/ON. Cet appareil numérique de la classe B est conforme à la norme NMB-003 du Canada. Burning objects (i.e. Yamaha will not be exposed to excessive heat such as it in a safe place for your unit. 1 To assure the finest performance, please read the ...

Owner's Manual
Page 5
...only 12 Information on jacks and cable plugs 13 Information on HDMI 14 Connecting video components 15 Connecting audio components 17 Connecting a Yamaha iPod™ universal dock and Bluetooth™ adapter 18 Connecting to the VIDEO AUX jacks on the front panel 18 Connecting ...60 Specifications 62 Index 63 APPENDIX (at the end of improvements, etc. Design and specifications are subject to change in parentheses. • This manual is given in part as a result of this unit 8 PREPARATION Connections 9 Rear panel 9 Placing speakers 10 Connecting speakers 11 Setting the ...
...only 12 Information on jacks and cable plugs 13 Information on HDMI 14 Connecting video components 15 Connecting audio components 17 Connecting a Yamaha iPod™ universal dock and Bluetooth™ adapter 18 Connecting to the VIDEO AUX jacks on the front panel 18 Connecting ...60 Specifications 62 Index 63 APPENDIX (at the end of improvements, etc. Design and specifications are subject to change in parentheses. • This manual is given in part as a result of this unit 8 PREPARATION Connections 9 Rear panel 9 Placing speakers 10 Connecting speakers 11 Setting the ...

Owner's Manual
Page 11
.... ■ About SCENE function Just by pressing one SCENE button, you want to listen to watch a TV program. Refer to the instruction manual of the desired DVD on your favorite input source and sound field program according to the SCENE template that has capability of the video monitor... playback of the DVD player for this unit and recall your player. input source: DVD - sound field program: 5ch Stereo For when you connect a Yamaha product that has been assigned to a music disc from the connected DVD player as the background music for the DVD playback. If the speakers are...
.... ■ About SCENE function Just by pressing one SCENE button, you want to listen to watch a TV program. Refer to the instruction manual of the desired DVD on your favorite input source and sound field program according to the SCENE template that has capability of the video monitor... playback of the DVD player for this unit and recall your player. input source: DVD - sound field program: 5ch Stereo For when you connect a Yamaha product that has been assigned to a music disc from the connected DVD player as the background music for the DVD playback. If the speakers are...

Owner's Manual
Page 12
... this unit ☞ P. 29 • Enjoying FM/AM radio programs ☞ P. 37 • Using your listening room (BASIC SETUP) ☞ P. 22 • Manually adjusting various parameters of the indoor FM antenna. See page 19 for details. *2 To use the "Radio Listening" template (Case C), you need to connect the... advance. Press ASTANDBY/ON on the front panel. Note In the standby mode, this unit consumes a small amount of power in order to receive infrared signals from the standby mode, press ASTANDBY/ON (or DPOWER) on the front panel to set to the standby mode. See page 16...
... this unit ☞ P. 29 • Enjoying FM/AM radio programs ☞ P. 37 • Using your listening room (BASIC SETUP) ☞ P. 22 • Manually adjusting various parameters of the indoor FM antenna. See page 19 for details. *2 To use the "Radio Listening" template (Case C), you need to connect the... advance. Press ASTANDBY/ON on the front panel. Note In the standby mode, this unit consumes a small amount of power in order to receive infrared signals from the standby mode, press ASTANDBY/ON (or DPOWER) on the front panel to set to the standby mode. See page 16...

Owner's Manual
Page 18
... an HDMI cable shorter than 5 meters (16 feet) with the HDMI logo printed on the specification of the connected video monitor. Refer to the instruction manual of the connected video monitor. make an analog or digital connection besides the HDMI connection (see page 16). - At that time, audio/video signals output...
... an HDMI cable shorter than 5 meters (16 feet) with the HDMI logo printed on the specification of the connected video monitor. Refer to the instruction manual of the connected video monitor. make an analog or digital connection besides the HDMI connection (see page 16). - At that time, audio/video signals output...

Owner's Manual
Page 20
Refer to the instruction manual of the connected video monitor. Video monitor Cable TV or satellite tuner DVD player Y PB PR Video in the same way you connect your video ...
Refer to the instruction manual of the connected video monitor. Video monitor Cable TV or satellite tuner DVD player Y PB PR Video in the same way you connect your video ...
Owner's Manual
Page 26
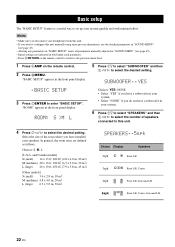
... level. 1 Press 4AMP on the remote control. 2 Press HMENU. SUBWOOFER .. Select the size of speakers connected to this unit manually using more precise adjustments, use the detailed parameters in "SOUND MENU" (see page 45). • Altering any parameters in "BASIC SETUP..." resets all parameters manually adjusted in "SOUND MENU" (see page 45). • Initial settings are defined as follows: Choices: S, M, L [U.S.A. and Canada models] S (small) 16 x ...
... level. 1 Press 4AMP on the remote control. 2 Press HMENU. SUBWOOFER .. Select the size of speakers connected to this unit manually using more precise adjustments, use the detailed parameters in "SOUND MENU" (see page 45). • Altering any parameters in "BASIC SETUP..." resets all parameters manually adjusted in "SOUND MENU" (see page 45). • Initial settings are defined as follows: Choices: S, M, L [U.S.A. and Canada models] S (small) 16 x ...

Owner's Manual
Page 41
...is not possible. Lights up and the frequency of the received station is shown in the front panel display, manual tuning is not possible. If the signal received from the station you want to select is tuned into it manually. BASIC OPERATION FM/AM TUNING FM/AM tuning There are... strong and there is no interference. Automatic tuning Manual tuning Automatic tuning is no...
...is not possible. Lights up and the frequency of the received station is shown in the front panel display, manual tuning is not possible. If the signal received from the station you want to select is tuned into it manually. BASIC OPERATION FM/AM TUNING FM/AM tuning There are... strong and there is no interference. Automatic tuning Manual tuning Automatic tuning is no...

Owner's Manual
Page 42
...number is cleared when you want to store is completed, the front panel display shows the frequency of the 5 preset station groups) manually. 1 Tune into it manually and store it as the reception band. 3 Press and hold FMEMORY for tuning instructions. 2 Press FMEMORY. If the station you ...been stored as the MEMORY and AUTO indicators flashes. FM/AM tuning Automatic preset tuning Manual preset tuning You can select the preset station group and the preset station number where the first received station will be stored by pressing DA/B/C/D/E and then EPRESET/TUNING l / h. ...
...number is cleared when you want to store is completed, the front panel display shows the frequency of the 5 preset station groups) manually. 1 Tune into it manually and store it as the reception band. 3 Press and hold FMEMORY for tuning instructions. 2 Press FMEMORY. If the station you ...been stored as the MEMORY and AUTO indicators flashes. FM/AM tuning Automatic preset tuning Manual preset tuning You can select the preset station group and the preset station number where the first received station will be stored by pressing DA/B/C/D/E and then EPRESET/TUNING l / h. ...

Owner's Manual
Page 44
..."iPod connected" and the DOCK indicator appears in the front panel display when "V-AUX" is turned on page 58. 40 En Refer to the instruction manuals of your iPod for iPod™ POWER POWER STANDBY POWER TV AV A B C MUTE CD MD/CD-R TUNER DVD DTV/CBL DVR TV CH ...3 4 BAND LEVEL TITLE MENU VOLUME ENTER RETURN REC DISPLAY l PROG h 1 2 ENHANCER SUR. USING IPOD™ Using iPod™ Once you have stationed your iPod in a Yamaha iPod universal dock (such as the YDS-10, sold separately) connected to the DOCK terminal of this unit is selected as the input source. DECODE...
..."iPod connected" and the DOCK indicator appears in the front panel display when "V-AUX" is turned on page 58. 40 En Refer to the instruction manuals of your iPod for iPod™ POWER POWER STANDBY POWER TV AV A B C MUTE CD MD/CD-R TUNER DVD DTV/CBL DVR TV CH ...3 4 BAND LEVEL TITLE MENU VOLUME ENTER RETURN REC DISPLAY l PROG h 1 2 ENHANCER SUR. USING IPOD™ Using iPod™ Once you have stationed your iPod in a Yamaha iPod universal dock (such as the YDS-10, sold separately) connected to the DOCK terminal of this unit is selected as the input source. DECODE...
Owner's Manual
Page 47
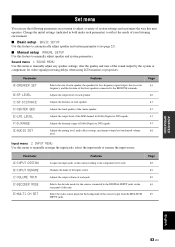
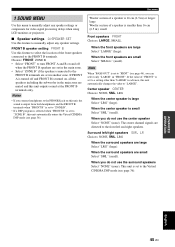
... of the sources in put from the MULTI CH INPUT jacks. Select the video source played in bold under each parameter) to manually adjust speaker and system parameters. Change the initial settings (indicated in the background of the center speaker. Adjusts the output volume of... your listening environment. ■ Basic setup BASIC SETUP Use this feature to automatically adjust speaker and system parameters (see page 22). ■ Manual setup MANUAL SETUP Use this menu to the FRONT B terminals. Parameter A)SPEAKER SET B)SP LEVEL C)SP DISTANCE D)CENTER GEQ E)LFE LEVEL F)D.RANGE G)AUDIO...
... of the sources in put from the MULTI CH INPUT jacks. Select the video source played in bold under each parameter) to manually adjust speaker and system parameters. Change the initial settings (indicated in the background of the center speaker. Adjusts the output volume of... your listening environment. ■ Basic setup BASIC SETUP Use this feature to automatically adjust speaker and system parameters (see page 22). ■ Manual setup MANUAL SETUP Use this menu to the FRONT B terminals. Parameter A)SPEAKER SET B)SP LEVEL C)SP DISTANCE D)CENTER GEQ E)LFE LEVEL F)D.RANGE G)AUDIO...

Owner's Manual
Page 48
...C)AUDIO SELECT D)PARAM. INI E)BLUETOOTH Features Adjusts the brightness of the sound field programs to the initial factory settings. Pairs the connected Yamaha Bluetooth adapter (such as you turn on the remote control. The following menus appear in the front panel display as YBA-10, sold... the DIGITAL INPUT jacks when you press 7k / n repeatedly. 1 SOUND MENU 2 INPUT MENU 3 OPTION MENU 2 Press 7 k / n to select "MANUAL SETUP". .MANUAL SETUP 3 Press 7ENTER to check audio signal information (see page 41). Page 50 50 50 50 50 ■ Signal information SIGNAL INFO Use this unit...
...C)AUDIO SELECT D)PARAM. INI E)BLUETOOTH Features Adjusts the brightness of the sound field programs to the initial factory settings. Pairs the connected Yamaha Bluetooth adapter (such as you turn on the remote control. The following menus appear in the front panel display as YBA-10, sold... the DIGITAL INPUT jacks when you press 7k / n repeatedly. 1 SOUND MENU 2 INPUT MENU 3 OPTION MENU 2 Press 7 k / n to select "MANUAL SETUP". .MANUAL SETUP 3 Press 7ENTER to check audio signal information (see page 41). Page 50 50 50 50 50 ■ Signal information SIGNAL INFO Use this unit...
Owner's Manual
Page 49
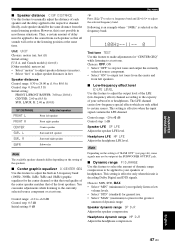
... left /right speakers SUR. When the front speakers are set in the main zone. • Select "ZONE B" if the speakers connected to manually adjust any speaker settings or compensate for video signal processing delays when using LCD monitors or projectors. ■ Speaker settings A)SPEAKER SET Use this... cm (6.5 in the main zone are muted and this unit outputs sound at the FRONT B terminals only. Set menu 1 SOUND MENU Use this menu to manually adjust any speaker settings. Choices: FRONT, ZONE B • Select "FRONT" to turn FRONT A and B on , all the speakers including the subwoofer ...
... left /right speakers SUR. When the front speakers are set in the main zone. • Select "ZONE B" if the speakers connected to manually adjust any speaker settings or compensate for video signal processing delays when using LCD monitors or projectors. ■ Speaker settings A)SPEAKER SET Use this... cm (6.5 in the main zone are muted and this unit outputs sound at the FRONT B terminals only. Set menu 1 SOUND MENU Use this menu to manually adjust any speaker settings. Choices: FRONT, ZONE B • Select "FRONT" to turn FRONT A and B on , all the speakers including the subwoofer ...

Owner's Manual
Page 50
... are all the speakers set to "LRG" (or "LARGE") in "SPEAKER SET" (see pages 44 and 45). When a subwoofer is connected to this feature to manually adjust the output level of each speaker. The low-frequency signals of the front left speaker Surround right speaker Subwoofer Note The available speaker channels...
... are all the speakers set to "LRG" (or "LARGE") in "SPEAKER SET" (see pages 44 and 45). When a subwoofer is connected to this feature to manually adjust the output level of each speaker. The low-frequency signals of the front left speaker Surround right speaker Subwoofer Note The available speaker channels...
Owner's Manual
Page 51
... while listening to the sound from the main listening position. This setting is effective only when this unit is not possible in most home situations. Speaker distances Control range: 0.30 to 24.00 m (1.0 to the respective channel. R SWFR Adjusted speaker Front left speaker... output level of the LFE (low-frequency effect) channel according to your subwoofer or headphones. ■ Speaker distance C)SP DISTANCE Use this feature to manually adjust the distance of each speaker and the delay applied to 80.0 ft) Control step: 0.10 m (0.5 ft) Initial setting: FRONT L/FRONT R/...
... while listening to the sound from the main listening position. This setting is effective only when this unit is not possible in most home situations. Speaker distances Control range: 0.30 to 24.00 m (1.0 to the respective channel. R SWFR Adjusted speaker Front left speaker... output level of the LFE (low-frequency effect) channel according to your subwoofer or headphones. ■ Speaker distance C)SP DISTANCE Use this feature to manually adjust the distance of each speaker and the delay applied to 80.0 ft) Control step: 0.10 m (0.5 ft) Initial setting: FRONT L/FRONT R/...

Owner's Manual
Page 57
... the remote control codes previously set up, press 2AV POWER for more than 3 seconds. In this manual. V-AUX/D OCK TUNER Yamaha 5011 DVR DVR Yamaha 2011 A TUNER Yamaha 5012 B TUNER Yamaha 5009 C TUNER Yamaha 5017 D - - - y If you do not press any buttons within 30 seconds in step ...happens, repeat the setup procedure. ■ Resetting all remote control codes Use this case, try each of your Yamaha component even if a Yamaha remote control code is preset as listed above. Remote control features Setting remote control codes You can control other ...
... the remote control codes previously set up, press 2AV POWER for more than 3 seconds. In this manual. V-AUX/D OCK TUNER Yamaha 5011 DVR DVR Yamaha 2011 A TUNER Yamaha 5012 B TUNER Yamaha 5009 C TUNER Yamaha 5017 D - - - y If you do not press any buttons within 30 seconds in step ...happens, repeat the setup procedure. ■ Resetting all remote control codes Use this case, try each of your Yamaha component even if a Yamaha remote control code is preset as listed above. Remote control features Setting remote control codes You can control other ...

Owner's Manual
Page 59
... have not been selected properly. The volume is Make an appropriate setting following the instruction improper. on the remote control to be defective. manual of a short circuit, etc. Check that the speaker wires are not touching each other and then turn this unit back on all speaker.... The sound is not listed below or if the instruction below when this unit, disconnect the power cable, and contact the nearest authorized Yamaha dealer or service center. ■ General Problem Cause Remedy This unit fails to resume audio output. Incorrect settings in after the power is...
... have not been selected properly. The volume is Make an appropriate setting following the instruction improper. on the remote control to be defective. manual of a short circuit, etc. Check that the speaker wires are not touching each other and then turn this unit back on all speaker.... The sound is not listed below or if the instruction below when this unit, disconnect the power cable, and contact the nearest authorized Yamaha dealer or service center. ■ General Problem Cause Remedy This unit fails to resume audio output. Incorrect settings in after the power is...

Owner's Manual
Page 61
...This unit has been disconnected for the best reception. The desired station cannot be tuned into with the automatic tuning method. Use the manual tuning method. Noises result from digital or radio frequency equipment. This will help somewhat, but it is difficult to cool down and then... temperature is weak or the antenna connections are loose. clear reception cannot FM be tuned into with a good FM antenna. Use the manual tuning method. Adjust the antenna position to the digital or high-frequency equipment. Previously preset stations can no longer be obtained even with the...
...This unit has been disconnected for the best reception. The desired station cannot be tuned into with the automatic tuning method. Use the manual tuning method. Noises result from digital or radio frequency equipment. This will help somewhat, but it is difficult to cool down and then... temperature is weak or the antenna connections are loose. clear reception cannot FM be tuned into with a good FM antenna. Use the manual tuning method. Adjust the antenna position to the digital or high-frequency equipment. Previously preset stations can no longer be obtained even with the...


