
Owner's Manual
Page 1
U HTR-6130 AV Receiver OWNER'S MANUAL
U HTR-6130 AV Receiver OWNER'S MANUAL

Owner's Manual
Page 7
... the polarity markings (+ and -) on the rear panel of this unit and create a potential fire hazard. Notes • Change all of the batteries if you received all of the following condition: - When the memory is without batteries for your local voltage using a straight slot screwdriver. Avoid touching the leaked material or...
... the polarity markings (+ and -) on the rear panel of this unit and create a potential fire hazard. Notes • Change all of the batteries if you received all of the following condition: - When the memory is without batteries for your local voltage using a straight slot screwdriver. Avoid touching the leaked material or...

Owner's Manual
Page 9
... Center and surround speakers Press down Insert Release Cables are unplugged from the AC wall outlets. 2 Twist the exposed wires of your speaker. Subwoofer AV receiver Input jack Subwoofer cable SUBWOOFER OUTPUT jack English 5 En To the surround right speaker To the center speaker To the surround left speaker 1 2 3 4 1 Make sure...
... Center and surround speakers Press down Insert Release Cables are unplugged from the AC wall outlets. 2 Twist the exposed wires of your speaker. Subwoofer AV receiver Input jack Subwoofer cable SUBWOOFER OUTPUT jack English 5 En To the surround right speaker To the center speaker To the surround left speaker 1 2 3 4 1 Make sure...

Owner's Manual
Page 10
Quick start guide Step 2: Connect your DVD player and other kind of this unit. DVD player AV receiver Video input jack Video cable VIDEO MONITOR OUT jack 4 Connect the power plug of speaker combinations ☞ P. 10 • Connecting a video monitor and DVD .../CBL AUDIO DVR CD IN OUT L R R SUBWOOFER ANTENNA SPEAKERS SURROUND CENTER FRONT B R L R L AM GND FM 75 UNBAL. Video monitor AV receiver Make sure that this unit. DVD player AV receiver • Using the VIDEO AUX jacks on this unit and the DVD player are unplugged from the AC wall outlets. 1 Connect...
Quick start guide Step 2: Connect your DVD player and other kind of this unit. DVD player AV receiver Video input jack Video cable VIDEO MONITOR OUT jack 4 Connect the power plug of speaker combinations ☞ P. 10 • Connecting a video monitor and DVD .../CBL AUDIO DVR CD IN OUT L R R SUBWOOFER ANTENNA SPEAKERS SURROUND CENTER FRONT B R L R L AM GND FM 75 UNBAL. Video monitor AV receiver Make sure that this unit. DVD player AV receiver • Using the VIDEO AUX jacks on this unit and the DVD player are unplugged from the AC wall outlets. 1 Connect...

Owner's Manual
Page 12
... consumes a small amount of power in advance. Quick start guide Notes *1 You must connect a cable TV or a satellite tuner to this unit in order to receive infrared signals from the standby mode, press ASTANDBY/ON (or DPOWER) on the front panel to set to the standby mode. See pages 37 to...
... consumes a small amount of power in advance. Quick start guide Notes *1 You must connect a cable TV or a satellite tuner to this unit in order to receive infrared signals from the standby mode, press ASTANDBY/ON (or DPOWER) on the front panel to set to the standby mode. See pages 37 to...
Owner's Manual
Page 23
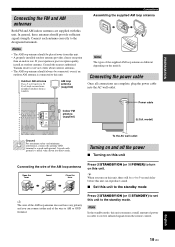
..., these antennas should be connected, even if an outdoor AM antenna is connected to receive infrared signals from this unit. If you can reproduce sound. ■ Set this unit to the designated terminals. Consult the nearest authorized Yamaha dealer or service center about outdoor antennas. • The AM loop antenna should always...
..., these antennas should be connected, even if an outdoor AM antenna is connected to receive infrared signals from this unit. If you can reproduce sound. ■ Set this unit to the designated terminals. Consult the nearest authorized Yamaha dealer or service center about outdoor antennas. • The AM loop antenna should always...

Owner's Manual
Page 41
If the signal received from the station you want to select is weak, tune into it manually. 1 Press NINPUT l / h repeatedly so that "TUNER" is displayed in the front panel ... AUTO A AM 1440 kHz Note Manually tuning into it manually. AUTO TUNED A AM 1530 kHz English 37 En Lights up and the frequency of the received station is no interference. Press BPRESET/TUNING to turn the colon (:) off . 4 Press EPRESET/TUNING l / h to begin automatic tuning. Automatic tuning Manual tuning Automatic tuning...
If the signal received from the station you want to select is weak, tune into it manually. 1 Press NINPUT l / h repeatedly so that "TUNER" is displayed in the front panel ... AUTO A AM 1440 kHz Note Manually tuning into it manually. AUTO TUNED A AM 1530 kHz English 37 En Lights up and the frequency of the received station is no interference. Press BPRESET/TUNING to turn the colon (:) off . 4 Press EPRESET/TUNING l / h to begin automatic tuning. Automatic tuning Manual tuning Automatic tuning...

Owner's Manual
Page 42
... appear in signal strength, tune into a station automatically or manually. You can select the preset station group and the preset station number where the first received station will be stored by automatic preset tuning. See page 37 for more than 3 seconds. Flashes C3:AM 630 TUNED MEMORY kHz Preset station group...
... appear in signal strength, tune into a station automatically or manually. You can select the preset station group and the preset station number where the first received station will be stored by automatic preset tuning. See page 37 for more than 3 seconds. Flashes C3:AM 630 TUNED MEMORY kHz Preset station group...


